Table of Contents
Advertisement
Advertisement
Table of Contents
Troubleshooting

Related Manuals for iData 70


Summary of Contents for iData 70
-
Page 2: Table Of Contents
4.3 GPS ..........................17 4.4 Connecting iData 70 to a Computer ................18 4.5 Synchronization ......................19 5. Introduction to iScan of the iData 70 ............ 20 5.1 Installing and Using iScan .................... 20 6 Managing iData 70 .................. 21 6.1 Installing Software ...................... -
Page 3: Introduction
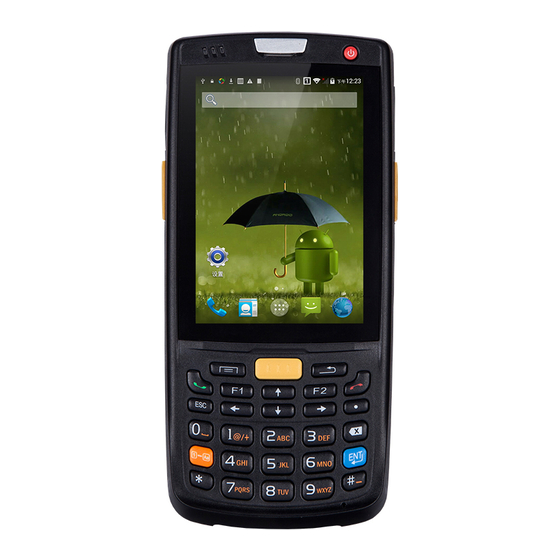
Power port Left scan key Right scan key Main scan key/read key Menu key Return key Input key Microphone Figure 1-1 Front view of iData 70 Scan lens Strap joint location Camera Flashlight RFID induction area Speaker Battery cover lock... -
Page 4: Installing An Sd Card
70 User Manual 1.2 Installing an SD Card To install an SD card, do as follows: 1. Push the card cover along the direction marked on the cover and open the cover. 2. Insert an SD card. 3. Press the SD card downward and lock the card along the IN direction marked on the cover. -
Page 5: Installing A Sim Card
70 User Manual 1.3 Installing a SIM Card To install a SIM card, do as follows: 1. Insert a SIM card along the direction, as shown in Figure 1-4. 2. Press the card cover downward. 3. Push the SIM card along the LOCK direction to lock the card cover. -
Page 6: Disassembling The Battery Cover
70 User Manual Figure 1-5 Installing a battery 1.5 Disassembling the Battery Cover To disassemble the battery cover, do as follows: 1. Insert your left forefinger into the upper left part of the battery cover and push the lock to the left by using the thumb. -
Page 7: Charging
Always connect the iData 70 to the AC power supply when you do not use it. In settings, set the time to sleep to a smaller value for the iData 70 by selecting Home > Applications > Settings > Display > Screen Delay. -
Page 8: Instructions On Idata 70
Android system. It takes some time to initialize the iData 70. Please wait patiently. 2. To power off the iData 70, press and hold the On/Off key for some time. After a dialog box for powering off the iData 70 is displayed, click Power Off. -
Page 9: Home
Menu key Scan key Return key 2.4 Home The iData 70 has five home pages. Slide to the left or right to switch among the pages. Click any application on the home page to start the application. Application tray ★ Tips ... -
Page 10: Basic Settings
Offline mode Charging ★ Note The applications of the iData 70 are often upgraded. Therefore, the status icons may be different from those on the iData 70. The actual status icons prevail. 2.6 Basic Settings 2.6.1 Date and Time Setting To change the date and time of the iData 70, do as follows: Select Settings >... - Page 11 70 User Manual 2.6.2 Display Settings To set display options, do as follows: Select Settings > Display and set display options such as Brightness, Auto-rotate screen, Animation, Screen timeout and Sensor Level Calibration. 2.6.3 Ringtone Setting Select Settings > Sound and click Profiles/Volume/Phone ringtone/Notification ringtone/Audible touch tone to set the ringtone in each option.
- Page 12 70 User Manual 2.6.4 Security Setting Select Settings > Location & security > Set up screen lock. 2.6.5 Language and Input Setting Select Settings > Language & keyboard > Select language. In the displayed list, select the desired language. Under Keyboard settings, set or switch the input.
- Page 13 70 User Manual 2.6.6 Shortcuts You can add or delete shortcut icons on the home page of the iData 70. On the home page, click the application tray icon, select and drag the icon to be added to the home page. On the home page, click and hold a shortcut icon until the icon of dustbin appears and drag the shortcut icon to the dustbin to delete the shortcut icon.
-
Page 14: Call Function
70 User Manual 3 Call Function 3.1 Making a Call To make a call, do as follows: 1. Enter a telephone number by pressing number keys. 2. Click to make a call. 3. Click to terminate the call. - 12 -... -
Page 15: Contacts
70 User Manual 3.2 Contacts 1. Click Contacts to open the contact list. 2. Press the menu key and click New contact to add a contact. 3. To import or export a contact, press the menu key and click Import/Export. -
Page 16: Email
You can send or receive emails. ★ Note To create an email account on the iData 70, you need to set the account on a PC. For example, to create a QQ email account, log in to the QQ mailbox, click Settings in the upper right corner of the mailbox to access the account options. - Page 17 70 User Manual To delete an account, do as follows: 1. On the Email page, press the menu key to open the menu. 2. Click Accounts. In the accounts displayed, select one account and press and hold the account. In the displayed menu, select Remove account to delete the email account.
-
Page 18: Network And Connection Synchronization
After a GPRS data connection is established, you can access the Internet. To establish a GPRS data connection, ensure that a SIM card is installed in the iData 70. Generally, the iData 70 has configured Internet access. If you delete the default configuration by mistake, set the network as follows (assume that China Mobile’s network is used):... -
Page 19: Wi-Fi Network Connection
4. Click Connect to complete the Wi-Fi connection. 4.3 GPS The iData 70 is equipped with a high-performance navigation chip and can obtain position information quickly and accurately. The manufacturer of the iData 70, Wuxi iData Technology Company Ltd., provides GPS Test, which is a GPS demonstration program. -
Page 20: Connecting Idata 70 To A Computer
70 User Manual 4.4 Connecting iData 70 to a Computer Connect the iData 70 to a computer by using a USB cable so that files in the memory card, for example, pictures, videos, and music, can be transferred to the computer and processed in the computer. -
Page 21: Synchronization
70 User Manual 4.5 Synchronization Find the following icon: 1. Select Settings > Accounts & sync. 2. Click Add account to set a new account. 3. Click Company or Email, enter the email address and password, and click Next. Wait until the connection is completed (for details about mailbox settings, see section 3.4... -
Page 22: Introduction To Iscan Of The Idata 70
Wuxi iData Technology Company Ltd. provides the scan demonstration software, iScan, to obtain and decode barcode information. First of all, install iScan on the iData 70 (for details on how to install iScan, see 6.1 Installing Software). After iScan is installed, the iScan icon is displayed on the application page. Click the icon to start the software (by default, Barcode Scan is selected). -
Page 23: Managing Idata 70
2. Download software installation packages, store them on the SD card, and install the software by using file manager. 3. Connect the iData 70 to a computer by using the USB cable and install software on the computer. First of all, install software such as APK installer, pea, or 91 mobile assistant on the computer so that software can be installed in batches. -
Page 24: Precautions And Troubleshooting
Do not try to disassemble the iData 70. Otherwise, the iData 70 may be damaged. Do not touch the screen surface of the iData 70 by using a pen, a pencil or other sharp articles in case the screen may be scratched. -
Page 25: Troubleshooting
Cause Solution The battery volume is too After the power key is low or the battery is not Charge the iData 70 or replace the battery. pressed, the iData 70 is charged. not powered on. The battery is incorrectly Correctly install the battery. - Page 26 Too many applications are Remove applications installed on the iData installed on the iData 70. The scan application is not Load iScan in the iData 70. loaded. The iData 70 does not Reading a barcode fails. Check that the barcode is defective.
- Page 27 70 User Manual Table 7-2 Cable troubleshooting Problem Cause Solution Charging fails. The cable is in poor Replace the cable. contact. Synchronization fails. The cable is in poor Replace the cable. contact. Table 7-3 Wi-Fi connection troubleshooting Problem Cause Solution “Authentication...
-
Page 28: Appendix
70 Standard battery Power adapter Used to charge the battery. Straps Hand strap Package Used to communicate with the host or charge the iData USB data cable Instructions Warranty card One-slot USB charging base Optional Four-slot battery charger Optional... - Page 29 70 User Manual Supported language Java, C Management tool iData Tools Operating temperature -10C to 50C Operating Environment Storage temperature -20C to 60C Relative humidity 0 to 95% (non-condensing) Drop specification 1.5-meter drop on concrete ground Tumble specification 500 0.5-meter tumbles (1000 hits)
- Page 30 70 User Manual RFID Frequency 13.56 MHz Reading distance Within 50 mm Communication protocol ISO14443A(B)/15693 - 28 -...
- Page 31 The content in this document is subject to update without notice. Without written approval of Wuxi iData Technology Company Ltd., no one shall copy, extract, back up, modify, spread, or translate any part of this document in any form or method or use the whole or part of this document for business purposes.
Need help?
Do you have a question about the 70 and is the answer not in the manual?
Questions and answers