Table of Contents
Advertisement
Quick Links
Advertisement
Table of Contents

Related Manuals for Konica Minolta e-mini M


Summary of Contents for Konica Minolta e-mini M
-
Page 2: Fcc Notice
FCC Notice This equipment has been tested and found to comply with the limits for a Class B digi- tal device, pursuant to part 15 of the FCC Rules. These limits are designed to provide reasonable protection against harmful interference in commerical installation. This equip- ment generates, uses and can radiate radio frequency energy and if not installed and used in accordance with the instructions, may cause harmful interference to radio communications. - Page 3 CAUTION Do not place this camera in a damp or dusty location. This may cause a fire or electric shock. Do not place this camera in a location affected by oil fumes or steam, such as near a cooking stove or humidifier. This may cause a fire or electric shock.
- Page 4 CAUTION When leaving the camera unused for long periods, such as during a vacation, always unplug the camera from the power source (batteries or AC power adapter ) for safety. (If you are not going to use the AC power adapter, unplug the adapter from the AC power outlet after you have disconnected the camera.) Failure to do so could result in a fire.
- Page 5 WARNING Do not use this camera when it is emitting smoke, is unusually Unplug from hot to the touch, is emitting any unusual odor or noise, or is in power socket. any other abnormal state. Use of the camera in any of these situations may cause a fire or electric shock.
- Page 6 WARNING Do not place the camera in unstable locations such as on a wobbly table or sloping surface where the camera may fall or tip over and cause injury. T ake care that the camera is not exposed to moisture and that water does not get into the camera.
- Page 7 WARNING Never use this camera, look through the viewfinder, or watch the LCD (liquid crystal display)while you are operating a moving car, motorcycle or bicycle. This may cause a traffic accident. Do not attempt to charge the alkaline battery. This may cause the battery to split or leak, causing fire or injury. Do not carry or store a battery with objects such as metal pens, necklaces, coins or hairpins.
-
Page 8: Table Of Contents
Attaching the Strap ........................11 Using a Compact Flash Card (Optional Accessory) ........12 Operating the Camera ......................12 Using e-mini M as a Digital Camera ....... 14 T aking Pictures ..........................14 Camera Funtion Controls ....................... 15 Viewing Pictures ..............16 Downloading Pictures into your PC ....... -
Page 9: Introduction
MP3 player, audio recorder, and PC camera in the same camera unit. The e-mini M is equipped with 2MB built-in memory. In addition, it provides a memory card slot which can be inserted with a (Type I) Compact Flash Card. T o download digital pictures and audio from the camera into your PC, a USB cable connection is all that is required. -
Page 10: Getting To Know Your Camera
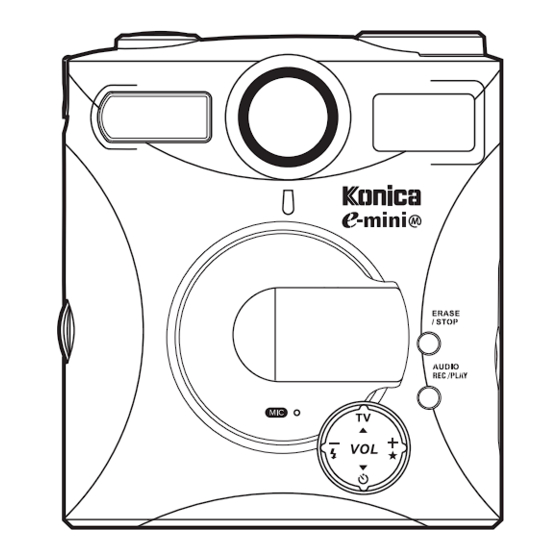
Getting to Know your Camera Before you start using camera, try to familiarize first with its various controls. This sec- tion shows the different parts of the camera in detail. A. Power Button B. Shutter Release C. Ready LED D. Mode Dial E. -
Page 11: Getting Started
Getting Started The e-mini M comes with standard accessories such as batteries, and strap. This sec- tion shows how you can use them with the camera. Basic camera operations are also described in this section. Inserting Batteries The battery compartment is located the bottom of the camera. You will need to use two AA-size batteries. -
Page 12: Using The Power Adapter (Optional Accessory)
Using the Power Adapter (Optional Accessory) If you prefer to operate the camera on AC power, a Power Adapter (5v/2.4a) is available. Simply connect the power adapter into the DC IN port on the camera, and then plug the power adapter into a wall socket. -
Page 13: Using A Compact Flash Card (Optional Accessory)
Attaching the Earphone You need to attach the earphone to the cam- era to listen to the MP3 songs or the recorded audio. To attach the earphone to the pouch and the camera: 1. Insert the end of earphone connector into the hole at the side of the pouch. -
Page 14: Changing Mode
Starting up the Camera Ready LED Power Button To switch the camera on, press the Power But- ton which is located at the side of the camera. The LED on the top of the camera then lights up, indicating that the camera is on. Auto Power Off Feature The camera automatically switches off after no operations has been performed for more than 2 minutes. -
Page 15: Using E-Mini M As A Digital Camera
Using e-mini M as a Digital Camera The camera allows you to easily take digital photo shots. This section shows you how to take pictures with the camera. T aking Pictures Set the camera to DSC mode when you want to take pictures. To take digital photo shots with the camera, make sure that there is enough battery power or that the op- tional power adapter is properly connected. -
Page 16: Camera Function Controls
TV mode TV mode TV mode. For more information, see page 25 . Camera Function Controls When you’re using e-mini M as a digital Press to set the Press to select the type camera, use the 4-Way Toggle Control lo-... -
Page 17: Viewing Pictures
Viewing Pictures Show off your pictures to an audience by connecting your camera to a TV. This section shows you how to properly connect the camera to a TV and display your pictures on Using the Camera in TV Mode Set the camera to TV Mode when you want to use a TV to view the pictures you have taken or when you want to erase pictures from the camera memory. -
Page 18: Viewing Your Pictures
TV mode Standard Standard 3. Use the 4-Way Toggle Control in front of the e-mini M to select the camera’s TV output. Press TV to select NTSC or PAL, depending Press to on the TV system you are using. enable Erase mode 4. -
Page 19: Downloading Pictures Into Your Pc
Downloading Pictures into your PC Once your camera’s memory or the inserted Compact Flash Card is full, you can erase the pictures and take more pictures. If you want to keep the pictures you have taken, you should save them first by transferring them to your computer. This section shows you how to download pictures into the computer. - Page 20 In order to transfer files between e-mini M and PC, you need to install the Multimedia Camera Manager which is included in the DSC Application Suite. It is provided with auto-setup program. Once you insert Disk 1 into the CD-ROM drive, the DSC Application Suite main menu will appear.
-
Page 21: Using E-Mini M As An Mp3 Player
Using e-mini M as an MP3 Player To use the e-mini M as an MP3 Player, you need to first transfer MP3 songs from your PC into the camera. This section tells you where you can get MP3 files as well as how to upload them into camera and then play them. -
Page 22: Mp3 Playback Controls
2. Make sure that the camera is securely con- nected to your PC using the USB cable provided. (See page 18 for a clear illustration on how to connect the USB cable.) 3. Set it to PC mode PC mode PC mode PC mode PC mode... -
Page 23: Using E-Mini M As An Audio Recorder
LCD Panel in MP3 Mode button located on the front panel. Using e-mini M as an Audio Recorder Another outstanding feature of the e-mini M is its built-in audio recorder, which allows you to record notes, interviews with other people, Press to increase lectures, or conferences. -
Page 24: Recording Audio
Note For details on erasing recorded audio, see page 25 . Recording Audio 1. Set the camera to Audio mode 2. Press the AUDIO REC/PLAY button to enter Audio Record Mode, the RECORD will ap- pear in the LCD panel 3. -
Page 25: Playing Recorded Audio
LCD Panel in Audio Playback Mode ton located on the front panel. T ransferring Recorded Audio into your PC e-mini M records audio in .WAV format. After recording, you can transfer the audio into your computer. To transfer recorded audio from the camera... -
Page 26: Erasing Contents From E-Mini M
PC. The camera receives power from the PC through the USB port. Erasing Contents from the e-mini M When both the camera’s internal memory and any additional Compact Flash Card are full, it’s is time to erase some or all of their contents to free up storage space. Before you erase anything, however, make sure that you first transfer the contents to your PC if you still want to use them. -
Page 27: Erasing All Pictures, Mp3 Songs Or Recorded Audio T Racks
Erasing a Picture (TV mode) Erasing an MP3 Song (MP3 mode) Erasing a Recorded Audio (AUDIO mode) Erasing All Pictures, MP3 Songs or Recorded Audio T racks To erase all pictures, MP3 songs or recorded audio tracks: 1. Set the camera to the appropriate operating mode: To erase all pictures, set to TV mode To erase all MP3 songs, set to MP3 mode. -
Page 28: Using E-Mini M As A Pc Camera
Using e-mini M as a PC Camera This camera features a USB device that complies with Windows 98 plug-and-play specifications. You don’t need to turn off your PC, before making the connection. Just plug camera’s USB cable connector into the USB port of your PC, then everything is ready to go. -
Page 29: Appendix 2 : Specifications
Appendix 2: Camera Specifications Image Sensor CMOS Image Sensor Image Size (HxV) 640x480 pixels Resolution Mode 640x480 pixels Internal Memory 2MB Flash Memory External Memory Compact Flash Card (Type 1) Image Storage 2MB Approximately up to 32 pictures (Normal) External Connectors AC adapter/ USB / Video Output (NTSC / PAL), Earphone Output Optical Viewfinder...
Need help?
Do you have a question about the e-mini M and is the answer not in the manual?
Questions and answers