
Subscribe to Our Youtube Channel
Related Manuals for Beltone CHG75 Open


Summary of Contents for Beltone CHG75 Open
- Page 1 Beltone Change Instructions for use Digital Behind-the-Ear hearing instrument CHG75 and CHG75D CHG75 Open and CHG75D Open CHG85 and CHG85D...
- Page 2 A new Beltone hearing instrument Congratulations on your choice of a Beltone hearing instrument! This is an important step towards clearer hearing and better under- standing. We have used all our experience with hearing instruments to help you communicate, lead an enjoyable social life and listen to the world around you.
-
Page 3: Table Of Contents
This booklet & your instrument In this booklet you will find instructions for inserting and controlling your new hearing instrument. You will find explanations on control- ling your instrument, on daily handling and on its use. Furthermore, you can read what to do if things do not live up to your expecta- tions. -
Page 4: Warning To Hearing Care Professional
Warning to hearing care professional A hearing care professional should advise a prospective user to consult promptly with a licensed physician (preferably an ear spe- cialist) before setting the instrument if the hearing care professional determines through inquiry, actual observation, or review of any other available information concerning the prospective user that the prospective user has any of the following conditions: visible congenital or traumatic deformity of the ear;... -
Page 5: Your Hearing Instrument
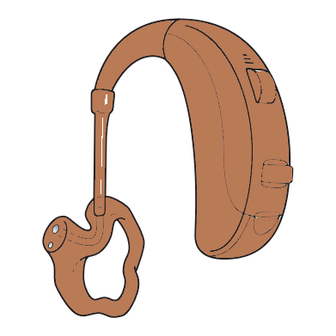
Your Hearing Instrument Microphone Tone tube Microphone behind cover Volume wheel Plastic tube Program button Battery door Earmold CHG75 / CHG75D / CHG85 / CHG85D Microphone Tone tube Microphone behind cover Volume wheel Plastic tube Program button Mini dome Battery door... -
Page 6: Switching On And Off
Switching on and off Switch your hearing instrument on by closing the battery door. Switch your instrument off by a small movement of the battery door till you feel a click. After switching on, your hearing instrument will always start in program 1. -
Page 7: Changing Batteries
Changing batteries When the hearing instrument generates a warning signal it’s advisable to change your battery as soon as possible. The signal will continue as long as the battery is not changed or unless it does not run out of power, and therefore it is advisable to keep an extra battery at hand. - Page 8 Warnings • Keep batteries away from children and mentally challenged persons. • Batteries can be harmful if swallowed. If you do, seek medical attention immediately. • Do not attempt to recharge batteries (Zinc Air) which are not specifically designated rechargeable as they may leak or explode. • Do not burn the batteries, as they could explode. • Replace spent batteries and do not leave them in the instrument for a prolonged period. • Used batteries are harmful to the environment. Please dispose of them according to local regulations or return them to your hearing care practitioner.
-
Page 9: Inserting And Removing The Instrument
Inserting and removing the instrument (standard earmould) Inserting the instrument • With the battery door opened in the off position take the earmould between thumb and index finger and position its ‘point’ in your ear canal. Now, slide the earmould all the way into your ear with a gentle, twisting movement. - Page 10 • You can as well insert the hearing instrument while in the on position. However you might experience some feedback (whistling) during the operation. This feedback can be prevented by enabling ”Delayed Activation”. Ask your hearing care practitioner about this feature. Removing your instrument • Switch off the instrument by pressing the battery door to the ‘off ’ position. • Lift the hearing instrument from behind the ear. For a moment, let it hang beside your ear.
- Page 11 Inserting and removing the instrument (ThinTube) Inserting the instrument • Hang the instrument over the top of the ear. • Grasp the sound tube where it bends. The dome should be placed far enough into the ear that the sound tube lies flush with your head. When the dome is placed appropriately, you should not see the sound tube sticking out when you look directly into a mirror.
-
Page 12: Recognising Left And Right Instrument
Recognising left and right instrument If you have two hearing instruments, they may be tuned differently. One for your left ear, the other for your right. Do not swap them. Please pay attention to this when cleaning, storing and inserting the instruments. -
Page 13: Setting The Volume
• You might want to ask your hearing care practitioner to mark your instruments with a coloured Left and Right indication: Left is blue and Right is red. CHG 75 / 75D / 75 Open / 75D Open / indication CHG 85 / 85D Setting the volume – BTE and Power BTE Your instrument has a volume control which allows you to set and control the volume manually. -
Page 14: Program Button
Program button Your hearing instrument has a push button allowing you to use up to three different listening programs, each of them suitable for certain situations. After pressing the program button, the instrument will switch program. If it was in program 1 it will switch to program 2, if it was in program 2 it will switch to program 3 etc. -
Page 15: Dual Microphone System
Let your hearing care practitioner fill out the following table: Program Intended for Type of program number listening situations Directional microphone BTE and Power BTE can have a directional microphone function. If you want to listen to a person in a noisy environment, the micro- phone in these hearing instruments can help you to concentrate on the speech. -
Page 16: T-Program
T-program Your hearing instrument has a built in function, the telecoil, enabling in many cases an improved use of the telephone and better hearing in those churches or halls where an induction loop system is installed. In order to activate this function, the telecoil program has to be selected (often available in program 2). -
Page 17: Hearing Through An Induction Loop
Hearing through an induction loop More and more public places, churches, theatres and cinemas, have induction loops systems. In these particular rooms, they transmit, wirelessly, the sound of the presenter or show. At home, radio or television can be connected to an induction loop system. Sound quality through induction loop is often better because noises from the environment are not transmitted. -
Page 18: Audio Input
Audio input Your hearing instrument is equipped with a direct audio input facility. Direct audio input allows direct connection of sound sour- ces, a radio, television or even school equipment, to your hearing instrument. Often, this will improve sound quality. • The sound source is connected to your instrument with a cable or a wireless FM system to an audio... -
Page 19: Maintenance And Cleaning
Maintenance and cleaning Earwax (cerumen) can accumulate in and on the earmould during use. Therefore, clean your earmould regularly. Failure to do so can lead to an accumulation of earwax, impairing sound quality. Keep your hearing instrument clean and dry. Wipe the case with a soft cloth or tissue after use to remove grease or moisture. You should avoid exposing your instrument directly to moisture such as rain or water from the shower. - Page 20 Cleaning the earmold • First, remove the tubing and ear- mold from the hearing instrument. Keep left and right instrument separated. • Remove earwax with the cleaning brush and a soft cloth. If needed, use a mild solution of soft soap and water or a special cleaning solution. Ask your hearing care practitioner for detailed instructions. • Rinse the earmold with water.
- Page 21 Cleaning the sound tube and dome The ThinTube The ThinTube feeds the amplified sound from the hearing instru- ment into the ear. It is important that the ThinTube and the dome fit correctly into your ear. If the ThinTube or the dome irritate your ear in any way and prevent you from wearing your hearing instrument, please contact your hearing care professional.
-
Page 22: General Warnings
General warnings • Do not leave your hearing instrument in the sun, near an open fire or in a hot, parked car. • Do not wear your instrument while showering, swimming, in heavy rain or in a moist atmosphere such as steam bath or sauna. • Should your instrument become moist, put it in a dessicator. Your hearing care practitioner will be happy to counsel on this. • Remove your instrument when applying cosmetics, e.g. -
Page 23: Eight Steps Towards Better Hearing
Eight steps towards better hearing You need to get used to your new hearing instrument. Sounds seem new and different. That is because you grew accustomed to your diminished hearing. Therefore, familiar sounds seem strange or unnatural at first. Every first-time user of a hearing instrument responds differently to this. - Page 24 3. Have a conversation with a single person Use your instrument in conversation with one person; a family member or a friend. Move to a quiet spot. Explain that you are now wearing a hearing instrument; ask the other person to talk normally. Look at your conversation partner. If your instrument is tuned to your requirements you will be able to communicate better than before.
- Page 25 Ask others to talk slowly and clearly. Talking louder does not help. If your instrument is equipped with a Dual Microphone System, select the directional listening program. Read more on this on page 6. Visit public buildings Visit public buildings. Try to sit near the speaker; try to be seated in the front rows in a show.
- Page 26 8. Use your instrument all day Using your hearing instrument and practising with it is the best way to learn to hear again. Even if you can hear without an instrument in some cases. Try to wear your instrument all day. In that way you will benefit the most.
-
Page 27: General Precautions
General precautions • Consult a physician if you find a foreign object in your ear canal, if you experience skin irritation or if excessive ear wax accumulates with the use of the hearing instrument. • Different types of radiation, e.g. from NMR or CT scanners, may damage the hearing instrument. Therefore, do not wear the hearing instrument during these or other corresponding scanning procedures. -
Page 28: Technical Specifications
Technical specifications Audio signal technology Digital Hearing instrument maximum output (IEC 118-0 OES) model CHG 85 141 dB SPL CHG 85D 141 dB SPL CHG 75 131 dB SPL CHG 75D 131 dB SPL CHG 75 Open 122 dB SPL CHG 75D Open 122 dB SPL... -
Page 30: Troubleshooting Guide
TROUBLESHOOTING GUIDE SYMPTOM CAUSE Is your earmould inserted correctly? Feedback, ’whistling’ Is the volume very loud? Is the plastic tube or the earmould clogged or broken? Are you holding your hand or an object (e.g. a hat) too close to an instrument? Is you ear full of wax? Is the instrument switched on? No sound... - Page 31 POSSIBLE REMEDY Put it in again Reduce it Visit your hearing care practitioner Move your hand away or create some more space between the instrument and the object Visit your physician Switch it on Switch it to the microphone program Insert a battery Replace it with a new one Visit your hearing care practitioner...
-
Page 32: International Warranty
Beltone hearing instrument requires service, please contact your hearing care professional for assistance. Abroad Before you leave, obtain from your hearing care practitioner an address list for Beltone services. In case you need support, contact the nearest Beltone Company during your stay abroad. -
Page 33: Your Selected Model
Your selected model Your hearing care professional place a check mark in the below table to identify the model you have received. Model received Type Hearing care professional CHG85 CHG85D CHG75 CHG75D CHG75 Open CHG75D Open Serial number Right: Serial number Left:... - Page 36 Any issues relating to the EU Medical Device Directive 93/42/EEC should be directed to Beltone A/S, Denmark Beltone A/S Lautrupbjerg 9 DK-2750 Ballerup Denmark Tel.: +45 45 75 11 11 17002600 GB-09.01 Rev. A Fax: +45 45 75 11 19 Printed in Denmark www.beltone-hearing.com...
Need help?
Do you have a question about the CHG75 Open and is the answer not in the manual?
Questions and answers