
Related Manuals for Gmate Gmate Mini


Summary of Contents for Gmate Gmate Mini
- Page 1 User's Guide Thank you for purchasing the Gmate™ System. Please read this User's Guide carefully before using to ensure correct use. Please keep this User's Guide for your future reference.
- Page 2 Gmate™ System is very easy to carry around and able to be used for measuring the glucose level in whole blood anytime. It is also very simple, easy and foolproof. You don't have to worry about coding your meter because the Gmate™ meter does it automatically.
-
Page 3: Table Of Contents
Table of Contents About Gmate™ System Before Starting Name and Function of the Parts Cautions Obtaining Blood Drop About Alternate Site Testing Testing Your Blood Glucose Control Solution Testing Reviewing Results Setting the Meter Replacing the Battery Error Messages Troubleshooting Performance Characteristics Caring for System Specifications... -
Page 4: About Gmate System
About Gmate System Gmate™ System includes:... -
Page 5: Before Starting
Before Starting Symbols Caution, see instructions for use Single use only Expiration date Serial number Lot number In Vitro Diagnostic medical device Manufacturer Authorised representative Symbol for temperature limitation Consult instructions for use Biological risks Contains sufficient for <n> tests Direct current Separate disposal from other household waste... -
Page 6: Test Principle
Before Starting Intended Use Gmate™ system is intended for self-testing to monitor glucose concentrations in fresh whole blood. Gmate™ system is for use outside body(in vitro diagnostic use) in fingertips, forearm, upper arm, hand, thigh and calf testing. Test principle The Gmate™... -
Page 7: Name And Function Of The Parts
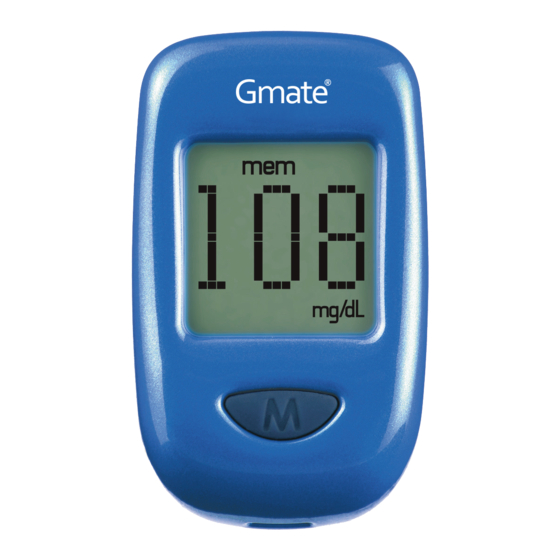
Names and Functions of the Parts Display Screen This is where you read your test results and other informations. M-button The 'M' button is used to recall the stored results and adjust the parameters in set-up mode. You can turn the meter off by pressing and holding the 'M' button for 2 seconds. - Page 8 Names and Functions of the Parts Strap Hole It is for hand-strap or neck-strap. Side View Battery Cover Slide cover off to replace batteries. SET Button Used to enter the set- up mode for changing the date and time and unit of measure.
- Page 9 Names and Functions of the Parts Displays the mode of meter. Warns when the battery is low or must be replaced. Display test results, measuring status, error messages and other informations. Results are displayed along with the Display units of measure. Clear AST cap *Clear AST cap is an optional accessory.
-
Page 10: Cautions
Cautions Cautions for The Gmate™ System is intended for use System outside the body(in vitro diagnostic use) only. The Gmate™ System is used only for measuring fresh capillary whole blood. The Gmate™ meter should only be used with Gmate™ Test Strip and Gmate™ Control Solution. - Page 11 Cautions Cautions for Keep the meter out of reach of young Meter children. If a young child swallows battery, battery cover, immediately consult with a doctor. Do not swing the meter by holding the neckstrap. You may injure yourself or other people.
- Page 12 Cautions Cautions for Store the test strip in a cool, dry place Test Strip between 2° and 32°C(36° and 90°F). Keep away from direct sunlight and heat. After removing test strip from the vial, immediately close the vial cap tightly. You may get the inaccurate result if vial cap opened long period of time.
-
Page 13: Obtaining Blood Drop
Obtaining Blood Drop STEP 1 Wash your hands carefully with warm water to increase the circulation of the blood into the fingers. Dry hands thoroughly until the finger to be pricked is completely dry. STEP 2 Unscrew the cap of the lancing device by turning it counter-clockwise while holding the base firmly. - Page 14 Obtaining Blood Drop STEP 3 While holding the lancet carrier, insert a new sterile lancet into the bottom of lancet carrier. STEP 4 Twist the cap of the lancet off. STEP 5 Put the cap of the lancing device back on and turn it clockwise.
- Page 15 Obtaining Blood Drop STEP 7 Set the proper depth of penetration by rotating the cap of lancing device. 1-2 for soft or thin skin, 3 for average skin, 4-5 for thick or calloused skin. STEP 8 Place the lancing device in place. Hold the lancing device firmly against the side of the finger, with the cap resting on the finger.
-
Page 16: About Alternate Site Testing
About Alternate Site Testing The Gmate™ Meter lets you obtain a blood sample from your Upper arm, Forearm, Hand, Thigh or Calf. Obtaining a drop of blood from these “alternate site testing” may be less painful than a fingertip sample. Following figure shows the areas where you can test with the Gmate™... - Page 17 About Alternate Site Testing Caution : Do not test on alternate sites : when you think your blood glucose level is changing rapidly, such as within two hours of exercise, a rapid-acting insulin injection or insulin pump bolus or within two hours after a meal. if you are testing for hypoglycemia (low blood glucose) or if you suffer from hypoglycemia unawareness.
-
Page 18: Testing Your Blood Glucose
Testing Your Blood Glucose STEP 1 Hold the test strip with the electrode end facing up. Insert the electrode end into the test strip port on the meter. Insert a new test strip into the meter until it stops. The meter will turn on. - Page 19 Testing Your Blood Glucose STEP 4 Bring tip of the test strip to lightly touch the drop of blood. Hold until the Meter beeps. Blood is automatically pulled into the test strip. Important : The volume of blood sample must be at least 0.5 microliter(real size" "). STEP 5 The Meter will now show counting progress during 5 seconds.
- Page 20 Testing Your Blood Glucose Caution : If your test is above 600 mg/dL (33.3 mmol/L), "HIGH" will appear on the display screen. If your test result is lower than 10 mg/dL (0.6 mmol/L), "LOW" will appear on the display screen. STEP 7 To turn your Meter off, simply remove the used test strip.
- Page 21 Testing Your Blood Glucose Unexpected results If your test result is below 50mg/dL(2.8mmol/L), above 250mg/dL(13.9mmol/L), or you see “LOW” or “HIGH” on the meter display, call your physician or healthcare professional immediately. If you continue to get unexpected results, check your system with control solution.
-
Page 22: Control Solution Testing
Control Solution Testing Gmate™ control solution contains a known amount of glucose and is used to check that the meter and the test strips are working properly. Control solution is available separately. Do a control solution test: to practice the test process instead of using blood, whenever you open a new vial of test strips, if you suspect the meter or the test strips are not working properly, if you have had repeated unexpected blood glucose results, or... - Page 23 Control Solution Testing STEP 3 Make sure the code number showed on the screen is same as the code number printed on the test strip vial. If the code number on the screen is different from the code number printed on the strip vial, try to insert new strip. STEP 4 Shake the control solution vial and remove the cap.
- Page 24 Control Solution Testing STEP 6 The test result is complete when you hear beeps. Your control solution test result is shown on the display screen. STEP 7 Compare the result displayed on the meter to the control solution range printed on the test strip vial.
-
Page 25: Reviewing Results
Reviewing Results STEP 1(To review average) With the meter is off, press and release the 'M' button on the meter. Time will be displayed for a moment. Then the average of your glucose result during fixed period will be displayed. If you set the date of average result 0 day, the meter will show most recent test result instead of average. - Page 26 Reviewing Results Important : If there is no result, the meter will display "- - -". The meter will display time, date and the result alternatively after no pressing 'M' button for 3 seconds. STEP 3 Press and hold the 'M' button. The number of next glucose result will be displayed.
-
Page 27: Setting The Meter
Setting the Meter STEP 1 When the meter is off, remove battery cover. STEP 2 Then press the 'SET' button located in the battery compartment. The meter is now in the setting mode. You can start setting up the meter. STEP 3 The year will appear first, with the year flashing. - Page 28 Setting the Meter STEP 5 With the month flashing, press the 'M' button until the correct month appears. Press the 'SET' button to move to the day setting. STEP 6 With the day flashing, press the 'M' button until the correct day appears. Press the 'SET' button to move to the hour setting.
- Page 29 Setting the Meter STEP 9 With the unit flashing, press the 'M' button to select "mg/dL" or "mmol/L". Press the 'SET' button to move to the average day setting. STEP 10 For the average day setting, press “M” button, then the period of date will change 0,7,14 and 30.
-
Page 30: Replacing The Battery
Replacing the Battery STEP 1 Prepare the 3V Lithium battery(CR2032) for replacement. Press firmly on the battery cover and slide in the direction of the arrow. STEP 2 Remove the old battery and place the new one in the tray with the "+" side facing up. Caution : Dispose of battery according to your local environmental regulations. -
Page 31: Error Messages
Error Messages Appears when environmental temperature is BELOW system operation range. System operation range is 10~40°C (50~104°F). Repeat the test after the meter and test strip have reached the above temperature range. Appears when environmental temperature is ABOVE system operation range. System operation range is 10~40°C (50~104°F). - Page 32 Error Messages This error message indicates the test strip may be inserted incorrectly or have a problem. Repeat to remove and re-insert the test strip or repeat the test with a new test strip. This error message indicates the meter has problem.
-
Page 33: Troubleshooting
Troubleshooting Meter does not enter the test mode after inserting a test strip. Probable cause What to do The battery is dead. Replace the battery. The battery is installed Check that the battery is installed correctly with incorrectly or there is no battery the positive(+) sign facing upward. -
Page 34: Performance Characteristics
Performance Characteristics Clinical accuracy The accuracy of the Gmate™ System was assessed by comparing blood glucose results obtained by patients with those obtained using a YSI 2300 Glucose Analyzer. System accuracy result for glucose concentrations < 75 mg/dL(4.2 mmol/L) Gmate mini System 87%(26/30) within 5 mg/dL(0.28 mmol/L) - Page 35 Performance Characteristics Within run precision(100 venous blood tests per glucose level) Gmate mini System Standard Coefficient of Mean glucose deviation(mg/dL) variation(%) 41 mg/dL(2.3 mmol/L) 102 mg/dL(5.7 mmol/L) 147 mg/dL(8.2 mmol/L) 237 mg/dL(13.2 mmol/L) 394 mg/dL(21.9 mmol/L) Total precision(100 control solution tests per glucose level) Gmate mini System Standard...
-
Page 36: Caring For System
Caring for System Your Gmate™ System does not need any special maintenance. Storing your system Store your meter, strips and control solution in your carrying case after each use. Store each item in a cool, dry place below 32°C(90°F), but do not refrigerate. Keep all items away from direct sunlight and heat. - Page 37 Caring for System Cleaning your meter To clean your meter, wipe the outside with a soft cloth dampened with water and mild detergent. Do not use alcohol or another solvent to clean your meter. Do not get any liquids, dirt, dust, blood, or control solution inside the meter through the test port.
-
Page 38: Specifications
Specifications Model PG-200 (Gmate™ mini Blood Glucose Monitoring System) Test Method Electrochemical sensor Calibration Method Plasma Sample Whole blood, capillary Sample Size 0.5 L Test Time 5 seconds Memory 500 Blood glucose tests Result Range 10 ~ 600 mg/dL(0.6~33.3 mmol/L) Hematocrit 20 - 60% Operating Temperature... - Page 39 IEC 61326. Warranty Philosys warrants that your Gmate™ meter will be free of defects in materials and workmanship for 5 years, valid from the date of purchase. The warranty extends only to the original purchaser and is...
- Page 40 Obelis SA philosys Co., Ltd. Av. de Tervueren 34 827-3, Sangpyeong-ri, BTE 44, B-1040 Okgu-eup, Gunsan-si, Brussels, Belgium Jeollabuk-do, Korea Tel +32 2 732-59-54 Tel +82-63-453-1421 Fax +32 2 732-60-03 Fax 82-63-453-1423 Email help@gmate.biz 0102R0 Rev. Date 2011-03 Printed in Korea...
Need help?
Do you have a question about the Gmate Mini and is the answer not in the manual?
Questions and answers