Codonics Virtua Reference Manual
Hide thumbs
Also See for Virtua:
- User manual (210 pages) ,
- Reference manual (30 pages) ,
- Manual (28 pages)
Table of Contents
Advertisement
Quick Links
Advertisement
Table of Contents

Related Manuals for Codonics Virtua


Summary of Contents for Codonics Virtua
- Page 1 Virtua Reference Guide...
-
Page 3: Table Of Contents
Table of Contents Components............................1 Assembly............................... 6 Startup ..............................14 Shutdown ............................16 Media Loading............................. 17 Configuration ............................20 DICOM Host Setup..........................31 Software Installation .......................... 32 Troubleshooting ..........................34... -
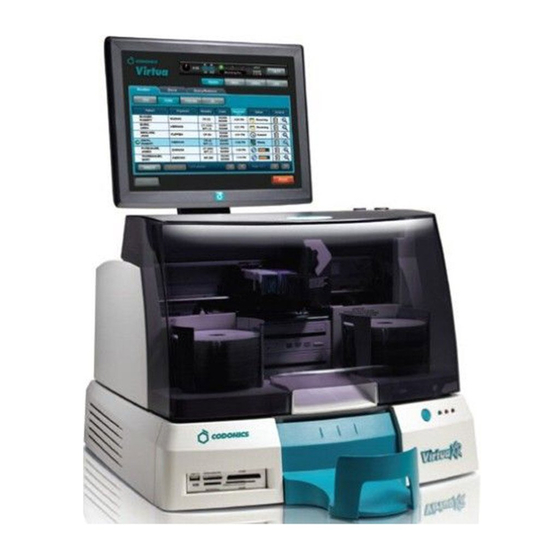
Page 5: Components
Components 1. Display 4. Recorder 2. Display arm 5. Controller 3. Front cover 6. Output bin... - Page 6 7. Ink carriages 11. Robotic disc transporter 8. CD/DVD recorders 12. Printer tray 9. Eject Ramp 13. Input bins 10. Ink Cartridge Load button Virtua Reference Guide...
- Page 7 14. Controller Soft Power button 17. SmartDrive USB port 15. Flash card reader/USB-2 port 18. SmartDrive 16. Status indicators 19. Display/exit on-screen menus 21. Contrast and Brightness settings 20. Select adjustment item 22. Power switch...
- Page 8 CEpartner4U BV, Esdoornlaan 13 ETL CLASSIFIED 3951 DB Maarn, The Netherlands Phone: +31.6.516.536.26 CONFORMS TO UL STD 60601-1 Codonics Inc.,17991 Englewood Dr. 3125782 Middleburg Heights OH, 44130 USA CERTIFIED TO CAN/CSA STD C22.2 NO. 601.1 Windows® XP Embedded MODEL / MODLE...
- Page 9 CEpartner4U BV, Esdoornlaan 13 3951 DB Maarn, The Netherlands ETL CLASSIFIED Phone: +31.6.516.536.26 CONFORMS TO UL STD 60601-1 Codonics Inc.,17991 Englewood Dr. 3125782 Middleburg Heights OH, 44130 USA CERTIFIED TO CAN/CSA STD C22.2 NO. 601.1 Windows® XP Embedded MODEL / MODLE...
-
Page 10: Assembly
Assembly 1. Place the Controller on a solid level surface. 2. Remove the cardboard insert (remove the foam piece if present). Virtua Reference Guide... - Page 11 CEpartner4U BV, Esdoornlaan 13 3951 DB Maarn, The Netherlands ETL CLASSIFIED CONFORMS TO Phone: +31.6.516.536.26 UL STD 60601-1 Codonics Inc.,17991 Englewood Dr. 3125782 CERTIFIED TO Middleburg Heights OH, 44130 USA CAN/CSA STD C22.2 NO. 601.1 MODEL / MODLE Windows® XP Embedded...
- Page 12 5. Assemble the Display by attaching the Display Arm to the Display using the 4 thumbscrews. 6. Attach the Display Arm with the thumbscrews to the Controller. Virtua Reference Guide...
- Page 13 CEpartner4U BV, Esdoornlaan 13 3951 DB Maarn, The Netherlands ETL CLASSIFIED Phone: +31.6.516.536.26 CONFORMS TO UL STD 60601-1 Codonics Inc.,17991 Englewood Dr. 3125782 Middleburg Heights OH, 44130 USA CERTIFIED TO CAN/CSA STD C22.2 NO. 601.1 Windows® XP Embedded MODEL / MODLE...
- Page 14 CEpartner4U BV, Esdoornlaan 13 ETL CLASSIFIED 3951 DB Maarn, The Netherlands CONFORMS TO Phone: +31.6.516.536.26 UL STD 60601-1 Codonics Inc.,17991 Englewood Dr. 3125782 Middleburg Heights OH, 44130 USA CERTIFIED TO CAN/CSA STD C22.2 NO. 601.1 Windows® XP Embedded MODEL / MODLE...
-
Page 15: Numerique De La Classe B Est Conform A La Norme Nmb-003 Du Canada This Product Is In Conformity With The Requirements Of Ec Council Directive 93/42/Eec On The Approximation Of The Laws Of The Member States Relating To Medical Devices. This Product Satisfi
CEpartner4U BV, Esdoornlaan 13 3951 DB Maarn, The Netherlands ETL CLASSIFIED Phone: +31.6.516.536.26 CONFORMS TO UL STD 60601-1 Codonics Inc.,17991 Englewood Dr. 3125782 CERTIFIED TO Middleburg Heights OH, 44130 USA CAN/CSA STD C22.2 NO. 601.1 Windows® XP Embedded MODEL / MODLE... - Page 16 CEpartner4U BV, Esdoornlaan 13 3951 DB Maarn, The Netherlands ETL CLASSIFIED CONFORMS TO Phone: +31.6.516.536.26 UL STD 60601-1 Codonics Inc.,17991 Englewood Dr. 3125782 CERTIFIED TO Middleburg Heights OH, 44130 USA CAN/CSA STD C22.2 NO. 601.1 Windows® XP Embedded MODEL / MODLE...
- Page 17 14. Install the output bin. 15. Install the input bins.
-
Page 18: Startup
CEpartner4U BV, Esdoornlaan 13 3951 DB Maarn, The Netherlands ETL CLASSIFIED Phone: +31.6.516.536.26 CONFORMS TO UL STD 60601-1 Codonics Inc.,17991 Englewood Dr. 3125782 Middleburg Heights OH, 44130 USA CERTIFIED TO CAN/CSA STD C22.2 NO. 601.1 Windows® XP Embedded MODEL / MODLE... - Page 19 2. Press the Controller soft power button. 3. Wait 3 minutes for startup to complete.
-
Page 20: Shutdown
Shutdown 1. Touch the Log Out button. 2. Touch the Shutdown button. 3. Touch the Shutdown button. 4. Wait 1 minute for shutdown to complete. Virtua Reference Guide... -
Page 21: Media Loading
Media Loading 1. Press the Ink Cartridge Load button. 2. Open the ink carriage. - Page 22 3. Remove the ink cartridge tape. Black Color 4. Install the ink cartridges. Virtua Reference Guide...
- Page 23 5. Close the ink carriage. 6. Load the discs (white side up).
-
Page 24: Configuration
Configuration On Screen Keyboard On Screen Keyboard allows character input from Display. 1. Touch characters. 2. Displays typed characters. 3. Press OK when done. Virtua Reference Guide... - Page 25 Log In 1. Touch the Username field. Type “admin”. 2. Touch the Password field. Type “codonics”. 3. Touch the Log In button.
- Page 26 Set Network 1. Touch the Setup button. 5. Enter the Subnet Mask. 2. Touch the Network tab. 6. Enter the Gateway. 3. Touch the Static button. 7. Touch the Save button. 4. Enter the IP Address. Virtua Reference Guide...
- Page 27 Set Date and Time 1. Touch the Setup button. 2. Touch the Date & Time tab. 3. Enter the Date. 4. Enter the Time. 5. Touch the Save button.
- Page 28 View Site Information 1. Touch the Setup button. 2. Touch the Site tab. Virtua Reference Guide...
- Page 29 4. Edit the file: \profiles\site\site.default.txt. 5. Insert the SmartDrive in the Controller. 6. Power-on the Controller. Sample file: site.default.txt [ SiteProfile ] address0 = Codonics Imaging Center address1 = 17991 Englewood Drive address2 = Suite D address3 = Middleburg Heights, OH 44130 customLabelFileLocation =...
- Page 30 Set User Password 1. Touch the Setup button. 2. Touch the User tab. 3. Select the User Name. 4. Enter the Password. 5. Confirm the Password. 6. Set the Administrator mode (optional). 7. Touch the Save button. Virtua Reference Guide...
- Page 31 Record Studies 1. Touch the Studies button. 2. Touch the Studies tab. 3. Select the Filter. 4. Select the Studies. 5. Touch the Record button.
- Page 32 6. Touch the Edit Options button. Virtua Reference Guide...
- Page 33 7. Select Label. 8. Select Viewer. 9. Set Make Auto-Run (optional). 10. Select the number of copies. 11. Touch the OK button.
- Page 34 12. Touch the OK button to record the disc. Virtua Reference Guide...
-
Page 35: Dicom Host Setup
DICOM Host Setup Host Settings for Storing DICOM Studies to Virtua AE Title TCP Port Description AUTO Automatically record studies. MANUAL Place studies in Study List for manual recording. -
Page 36: Software Installation
Software Installation 1. Power-off the Controller. 2. Open the bottom drive tray. Virtua Reference Guide... - Page 37 3. Place the “Operating Software” disc in the bottom drive tray. 4. Close the bottom drive tray. 5. Power-on the Controller. 6. Wait 45 minutes for the software to install. 7. Remove the “Operating Software” disc from bottom drive tray. 8.
-
Page 38: Troubleshooting
Multiple remote web connections are active. All registered and unregistered trademarks are the property of their respective owners. Specifications subject to change without notice. Patents Pending Copyright © 2007 by Codonics, Inc. Printed in U.S.A. Part Number 900-367-001. Rev. C. Virtua Reference Guide...
Need help?
Do you have a question about the Virtua and is the answer not in the manual?
Questions and answers