Texecom Premier 412 Installation Manual
Security control panels with integrated communicator
Hide thumbs
Also See for Premier 412:
- Installation manual (100 pages) ,
- User manual (24 pages) ,
- Programming manual (8 pages)

Related Manuals for Texecom Premier 412


Summary of Contents for Texecom Premier 412
- Page 1 THANK YOU FOR VOTING TEXECOM INSTALLATION MANUAL Security Control Panels with Integrated Communicator Issue 7...
-
Page 2: Table Of Contents
Contents Premier 412/816/832 Installation Manual Contents System Overview........4 Programming the Control Panel ....21 System Architecture............4 Introduction..............21 Control Panels..............4 Factory Defaults................21 Viewing Numeric Data (LED Keypads)........21 Remote Keypads .............. 4 Programming Text (LCD Only) ...........21 Zone Expansion Modules ..........5 Program Menus ..............22... - Page 3 Premier 412/816/832 Installation Manual Contents Programming Download Options ........56 System Overview Download Menu (' .......57 Download Options ('-" ......57 ('-! ......57 Download Call Back Number Download Passcode ('-# ......57 Installation Download Dial Attempts ('-$ ......57 Download Ring Count ('-% ......57 Programming Reporting Codes........58...
-
Page 4: System Overview
Premier RKP8 Programmable Aux. Input The Premier RKP8 remote keypad has 8 zone indicator lights Supervised Siren/Bell Output and is for use with the Premier 412, 816 and Premier 832 2 x 1A Supervised Outputs control panels. 6 x 100mA Outputs •... -
Page 5: Zone Expansion Modules
The Premier RKP16 remote keypad has 16 zone indicator The Premier LCD remote keypad has a standard 32 lights and is for use with the Premier 412, 816 and Premier character back-lit LCD display. It can be used with the 832 control panels when expanded. -
Page 6: Installation
Installation Premier 412/816/832 Installation Manual 2. Installation Installation Sequence Control Panel Before attempting to install the alarm system, read this Mounting section. Once you have an overall understanding of the Mount the control panel on a flat, plumb wall using at least installation sequence, carefully work through each step. -
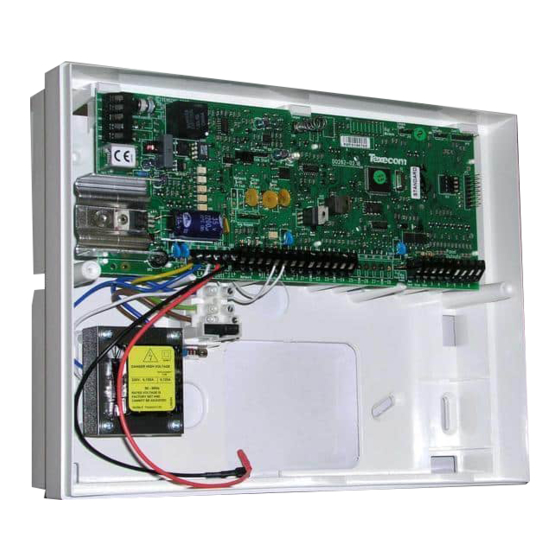
Page 7: Control Panel Pcb Layout
2: AC Input The Premier 816 and Premier 832 have 8 zone inputs, Connect to a 16.5V transformer. whereas the Premier 412 has only 4 zone inputs. There are "# Do NOT connect the mains supply to the AC several ways to wire a zone (see page 12). Each zone is fully input terminals. -
Page 8: Connecting Devices To The Data Bus
Installation Premier 412/816/832 Installation Manual 11: Communication Port 23: Fuse Blown Indicator LEDs The serial communication port is used for connecting to a Fuses F2-F4 have red indicator LEDs, which light up when printer or PC for local downloading. the relevant fuse has blown. -
Page 9: Overcoming Voltage Drop
Premier 412/816/832 Installation Manual Installation Installing a Power Supply The table below shows maximum cable runs when one keypad or expander is installed using standard 7/0.2 alarm When a power supply is installed, the 0V connections on the cable with various loads:... -
Page 10: Installing Remote Keypads
Installation Premier 412/816/832 Installation Manual Address DIL Switch Installing Remote Keypads Tamper Switch & Piezo Sounder Keypad Layouts Data Bus Connections Programmable Zones 1 and 2 Speaker Output (Premier LCDL/LCDLP Only) Programmable Output Remote Keypad Connections The remote keypad is connected to the data bus terminals located at the bottom left hand side of the PCB. -
Page 11: Keypad Speaker Output (Lcdl/Lcdlp Only)
Only one remote expander can be connected to the Premier 412 & 816 control panels (Address = 1). Remote Expander Layout Remote Expander Zones The Premier 8X Remote Expander has eight programmable zone inputs (see page 13 for wiring details). -
Page 12: Zone Expander Outputs
Installation Premier 412/816/832 Installation Manual Zone Expander Outputs The table below shows the zone allocation when the module The Zone Expander module has two programmable outputs, is installed: which can be used to drive auxiliary devices such as relays, Panel... -
Page 13: Zone Connections
Premier 412/816/832 Installation Manual Installation Normally Closed Zone Connections Use this wiring configuration when connecting normally closed detection devices to the zone. Ensure that the zone Each zone on the system is fully programmable to allow for is programmed for Normally Closed operation (see page maximum flexibility (see page 23 for Zone Programming 25). -
Page 14: Single Eol - N/C & N/O (Burglary)
Installation Premier 412/816/832 Installation Manual Single EOL - N/C & N/O (Burglary) Single EOL - N/O (Fire) Use this wiring configuration when connecting a mixture of Use this wiring configuration when connecting a 4-wire normally closed and normally open detection devices to the smoke detector to the zone. -
Page 15: Single Eol - N/C
Premier 412/816/832 Installation Manual Installation Single EOL - N/C Double EOL Use this wiring configuration when connecting just normally Use this wiring configuration when connecting detection closed detection devices to the zone. Ensure that the zone devices to a zone that requires alarm/tamper monitoring. -
Page 16: Double Pole
Installation Premier 412/816/832 Installation Manual The following table shows how each physical zone is 2-Wire Smoke Detector mapped when using the “Zone Doubled” configuration: Compatible 2-wire smoke detectors such as the ESL429AT Premier 412 or System Sensor 2100TS can be connected as shown:... -
Page 17: Siren/Bell Operation
Premier 412/816/832 Installation Manual Installation Siren/Bell Operation Panel Outputs 1 - 8 When configured as bell operation the output terminals provide up to 750mA of power for driving bells as shown: The control panel has eight programmable outputs, which can be used to drive auxiliary devices such as relays, LED’s, smoke detectors etc. -
Page 18: Commissioning & Troubleshooting
Commissioning & Troubleshooting Premier 412/816/832 Installation Manual 3. Commissioning & Troubleshooting Commissioning Troubleshooting Once ALL connections have been made to the control panel Power Faults and power is ready to be applied, you should read this section before continuing. No Power to Unit (mains only) •... -
Page 19: Remote Expander
Premier 412/816/832 Installation Manual Commissioning & Troubleshooting • Keypad Does Not Generate Alarm Tones etc. Panel outputs 1 and 2 are supervised outputs, if you • Each keypad can be configured so that the alarm, entry, have not connected a device to either of these outputs exit, chime tones etc. -
Page 20: Operation
Commissioning & Troubleshooting Premier 412/816/832 Installation Manual Operation The System Will Not Allow Arming • Check that there are no outstanding Service Faults, see page 71. • Check that there are no outstanding alarms that require resetting, see page 70. -
Page 21: Programming The Control Panel
Premier 412/816/832 Installation Manual Programming the Control Panel 4. Programming the Control Panel Viewing Numeric Data (LED Keypads) Introduction When programming numeric data, the value of the data may be viewed by pressing the key. The keypad will flash All engineers should read this section carefully so as to... -
Page 22: Program Menus
Programming the Control Panel Premier 412/816/832 Installation Manual Program Menus Menu Function Page Menu Function Page Programming Zones Programming System Outputs !"/ '" All Zone Options Panel Outputs Zone Type Fast Format Channels Zone Wiring Expander 1 Outputs Zone Attributes 1... -
Page 23: Programming Zones
Premier 412/816/832 Installation Manual Programming the Control Panel Programming Zones Enter Engineers code ???? Then press then Programming Menu Led Key Enter Code > Slow Flash Zones Fast Flash Alarm Armed Service Ready All Zone Options All Zone Options Zone Types Enter Zone Type Enter Zone No.?? -
Page 24: All Zone Options
Programming the Control Panel Premier 412/816/832 Installation Manual From Previous Page Zone Attributes 3 Zone 00 Att. 3 Zone 01 Att. 3 Zone Attributes 3 Enter Zone No.?? > 1******* < Change to Delay 1 on Stay Arm Enter Zone Number... -
Page 25: Zone Wiring
Premier 412/816/832 Installation Manual Programming the Control Panel !( Maintained Key Switch the panel will start the “Double Knock” timer then remove power to the smoke detector (Sensor Reset on Reset) for a This zone type can be used to arm/disarm and reset one or short period, then reapply the power (to reset the detector). -
Page 26: Zone Attributes 2
Programming the Control Panel Premier 412/816/832 Installation Manual & Enable Instant Strobe (/ Enable Swinger Shutdown On: The strobe output will trigger immediately the zone On: The zone will only rearm at the end of the bell duration causes an alarm. -
Page 27: Zone Attributes 3 (Key Switch)
Premier 412/816/832 Installation Manual Programming the Control Panel (/ Truncate Exit Delay #/ Partition 2 On: When the zone is activated during exit, the panel will On: The zone is assigned to Partition 2. truncate any remaining exit time to zero. This attribute Off: The zone is not assigned to Partition 2. -
Page 28: Programming Partitions
Programming the Control Panel Premier 412/816/832 Installation Manual Programming Partitions Enter Engineers code ???? Then press then Programming Menu Led Key Enter Code > Slow Flash Zones Fast Flash Alarm Armed Service Ready Exit Delay Exit Delay Exit Delay Note Partition No. -
Page 29: Partition Exit Delay
Premier 412/816/832 Installation Manual Programming the Control Panel From Previous Page Bell Duration Bell Duration Bell Duration Note Partition No. ? Enter Value: 015 If the system only has 1 partition, Enter Partition No. the option to enter the Partition No... -
Page 30: Partition Auto Arm/Disarm Options
Programming the Control Panel Premier 412/816/832 Installation Manual $/ Enable Remote Arming %/ Auto Arm Partition with Control Timer 4 On: The selected partition can be armed remotely via On: The selected partition is armed (2 minute exit) download software. -
Page 31: Programming Global Options
Premier 412/816/832 Installation Manual Programming the Control Panel Programming Global Options Enter Engineers code ???? Then press then Programming Menu Led Key Enter Code > Slow Flash Zones Fast Flash Alarm Armed Service Ready System Timers System Timers Line Fault Delay System Timers Enter Timer >... -
Page 32: Hardware Options
Programming the Control Panel Premier 412/816/832 Installation Manual From Previous Page System Options 1 System Options 1 System Options 1 > ****56*8 < System Clock = Crystal Use keys Battery Connection Supervision select/deselect Options. Zones Battery Dynamically Load Tested Then press... -
Page 33: System Timers
Premier 412/816/832 Installation Manual Programming the Control Panel System Timers $" !" Service Timer There are 14 global system timers that control the system This timer controls the period in which a Service Required timing and delay functions. The function of each timer is fault condition will occur. -
Page 34: System Control Timers
Programming the Control Panel Premier 412/816/832 Installation Manual System Control Timers System Options 2 The system has 4 independent Control Timers that may be The function of each option is described as follows: configured to switch on and off at different points of the day !/ Tamper Alarms Cause a Trouble While Disarmed and days of the week. -
Page 35: Hardware Options
Premier 412/816/832 Installation Manual Programming the Control Panel Hardware Options #/ Zone Test - Silence on No Violation On: The Zone Test sounder is silent when all zones are The hardware options allow you to control which hardware secure and will pulse sound when one or more zones monitoring features are enabled or disabled. -
Page 36: Miscellaneous Options 1 $)
Premier Bell Module pulses 3 times, armed. this invokes the Engineer Hold Off mode if a Texecom Odyssey bell box is connected %/ Disable Open/Close Reporting on STAY Arm On: Open and Close events are not reported to the Alarm Off: The Premier Bell Module and UK options are disabled. - Page 37 Premier 412/816/832 Installation Manual Programming the Control Panel &/ Enable DD 243:2002 Options Off: The operation of the auxiliary input is inverted and On: The Confirmation output is disabled once the Entry operates as shown in the table below: Timer is started, i.e. during the Entry Time, activation of...
-
Page 38: Programming Remote Keypads
Programming the Control Panel Premier 412/816/832 Installation Manual Programming Remote Keypads Enter Engineers code ???? Then press then Programming Menu Led Key Enter Code > Slow Flash Zones Fast Flash Alarm Armed Service Ready Keypad Options 1 Keypad Options 1... -
Page 39: Keypad Options 1
Premier 412/816/832 Installation Manual Programming the Control Panel Keypad Options 1 %" $/ Keypad Activation of Medical Alarm The operation of Keypad Options 1 is described as follows: On: The selected keypad will generate an emergency Medical alarm if keys ( and * are pressed at the !/ Partition 1 Operation same time. -
Page 40: Keypad Options 4
Programming the Control Panel Premier 412/816/832 Installation Manual &/ Error Tones from Keypad %/ Zone Shift by 8 On: The internal sounder for the selected keypad will On: The remote keypad zone status lights indicate from produce Error tones. Zone 9 onwards i.e., Zone 1 on the remote keypad Off: Error tones will not be produced. -
Page 41: Programming Remote Expanders
Premier 412/816/832 Installation Manual Programming the Control Panel Programming Remote Expanders Enter Engineers code ???? Then press then Programming Menu Led Key Enter Code > Slow Flash Zones Fast Flash Alarm Armed Service Ready Expander Partitions Expander Areas Expander Areas Expander Partitions Enter Exp No. -
Page 42: Expander Partitions
Programming the Control Panel Premier 412/816/832 Installation Manual Expander Partitions &" When the expander is assigned to one or more partitions the speaker output on the expander will generate tones only for the partition(s) it’s assigned to. E.g. if the expander is assigned to partition 3, the speaker will only be enabled when partition 3 is in alarm, entry, exit etc. -
Page 43: Programming System Outputs
Premier 412/816/832 Installation Manual Programming the Control Panel Programming System Outputs Enter Engineers code ???? Then press then Programming Menu Led Key Enter Code > Slow Flash Zones Fast Flash Alarm Armed Service Ready Panel Outputs Panel Outputs Panel Outputs... - Page 44 Programming the Control Panel Premier 412/816/832 Installation Manual From Previous Page Expander 3 Outputs Exp. 3 Outputs Enter Output No? Enter Output Number Follow procedure for Only available on the Premier 832 Panel Outputs (Menu 60) Zones Armed Alarm Service...
-
Page 45: Panel Outputs
Premier 412/816/832 Installation Manual Programming the Control Panel Panel Outputs '" "& Timed Arming Countdown This menu option allows you to program the eight control This output type activates when the system initiates a timed panel outputs. arm. "' Zone Soak Test Active... - Page 46 Programming the Control Panel Premier 412/816/832 Installation Manual ## Service Required/Test Fail "% 24Hr - Water Alarm This output type activates when a Service Required fault This output type activates when a 24hr Water alarm is exists or the system has failed zone soak test.
-
Page 47: Output Attributes
Premier 412/816/832 Installation Manual Programming the Control Panel !( Stay Armed $$ Away Armed/Exit This output type activates when the selected Partition is stay This output type activates when the partition is in exit mode armed. (Away arming) and when the partition is “Away Armed”. -
Page 48: Programming The Communicator
Programming the Control Panel Premier 412/816/832 Installation Manual Programming the Communicator Note Enter Engineers code ???? Only Engineer codes that have the “Allow NVM Locking/Communicator Programming” option are Then press then allowed to access menus 70 - 79. Programming Menu Led Key Enter Code >... - Page 49 Premier 412/816/832 Installation Manual Programming the Control Panel From Previous Page Protocol Type Protocol Types Disabled Protocol Pulse Format Contact ID Enter Protocol type Express Format LCD: to scroll type Fast Format (UK) Zones then press Contact ID Armed Alarm...
-
Page 50: Communicator Options
Programming the Control Panel Premier 412/816/832 Installation Manual From Previous Page Fast Format Restore Channels Restore Channels Fast Format Restore Channels 1 Report Restore on Channel 1 > 12345678 < Use keys Report Restore on Channel 2 select/deselect Channels. Zones... -
Page 51: Telephone Numbers
Premier 412/816/832 Installation Manual Programming the Control Panel Telephone Numbers (!-" in the accompanying “Installation Records and Defaults” Alarm Receiving Centre 1 has a primary and secondary booklet. telephone number. The primary number is the number that & SIA Level II... -
Page 52: Partition Options
Programming the Control Panel Premier 412/816/832 Installation Manual Partition Options (!-% Pulse Format Options (!-' The Partition Options are described as follows: If ARC 1 protocol is programmed for “Pulse Format”, the pulse format protocol can be changed using this menu !/ Report for Partition 1 option. -
Page 53: Fast Format Reporting Channels
Premier 412/816/832 Installation Manual Programming the Control Panel Fast Format Reporting Channels (!-( Off: The panel will communicate as follows: This option defines which channels are reported to Alarm • If the event occurs in single partition, the panel will... -
Page 54: Fast Format Restore Channels
Programming the Control Panel Premier 412/816/832 Installation Manual Fast Format Restore Channels &/ Report Open/Close on Channel 5 If either ARC 1 or ARC 2 protocols are programmed as “Fast On: Open/Close reported on channel 5. Off: Open/Close not reported on channel 5. -
Page 55: Programming Check List
Premier 412/816/832 Installation Manual Programming the Control Panel Programming Check List The table below provides a checklist of what options require programming for each of the protocols supported: Protocol Notes 1. Program to type 1. Pulse Format 2. Use table on page 52. -
Page 56: Programming Download Options
Programming the Control Panel Premier 412/816/832 Installation Manual Programming Download Options Note Enter Engineers code ???? Only Engineer codes that have the “Allow NVM Locking/Communicator Programming” option are Then press then allowed to access menus 70 - 79. Programming Menu Led Key Enter Code >... -
Page 57: Download Menu
Premier 412/816/832 Installation Manual Programming the Control Panel Download Menu Download Passcode ('-# The Download Menu has the following options: When the remote downloading computer dials into the system, the control panel compares the Security code sent " Download Options by the computer with Security code stored in the control panel. -
Page 58: Programming Reporting Codes
Programming the Control Panel Premier 412/816/832 Installation Manual Programming Reporting Codes Note Enter Engineers code ???? Only Engineer codes that have the “Allow NVM Locking/Communicator Programming” option are Then press then allowed to access menus 70 - 79. Programming Menu Led Key Enter Code >... -
Page 59: Zone Alarm/Restore Codes
Premier 412/816/832 Installation Manual Programming the Control Panel Zone Alarm/Restore Codes Alarm Restore Event Type This menu option allows you to change the alarm/restore Event No Event No reporting event codes for each zone. These codes are used Code Tamper Alarm... -
Page 60: Programming Users
Programming the Control Panel Premier 412/816/832 Installation Manual Programming Users Enter Engineers code ???? Then press then Programming Menu Led Key Enter Code > Slow Flash Zones Fast Flash Alarm Armed Service Ready Program User Program User 00 Program User 03 Enter User No.?? -
Page 61: Program User
The number of users (including system. the engineer) that are available is as follows: • User Options 1 • Premier 412 - 32 Users See User Options 1 on page 62 for details. • • Premier 816 - 32 Users User Options 2 See User Options 2 on page 62 for details. - Page 62 Programming the Control Panel Premier 412/816/832 Installation Manual User Options 1 #/ Time Lock Code with Control Timer 1 On: When Control Timer 1 is on, the Access code will not User Options 1 can be enabled or disabled for a selected be accepted by the system.
-
Page 63: User Text (Lcd Only) )
Premier 412/816/832 Installation Manual Programming the Control Panel Program Standard Users )& $/ Allow Engineer Programming On: The Access code access Engineer This menu option allows you to add “Standard” users to the programming menus. system. The user will automatically be assigned the... -
Page 64: System Tests & Utilities
Programming the Control Panel Premier 412/816/832 Installation Manual System Tests & Utilities Enter Engineers code ???? Then press then Programming Menu Led Key Enter Code > Slow Flash Zones Fast Flash Alarm Armed Service Ready Walk Test Walk Test Zone 01 Active... -
Page 65: Walk Test
Premier 412/816/832 Installation Manual Programming the Control Panel From Previous Page Banner Text (LCD Only) Premier 816 Premier 816 Text Editing Keys Press to edit text. Banner Text ^anner Text . , ? ! 1 @ ” - & a b c 2 A B C d e f 3 D E F Use keys to enter/edit text. -
Page 66: Operating The Alarm System
Operating the Alarm System Premier 412/816/832 Installation Manual 5. Operating the Alarm System " To Away arm the alarm system proceed as follows: Introduction Enter Access code ???? Before attempting to operate the alarm system ensure you YES to Arm? -
Page 67: Cancelling The Arming Process
Premier 412/816/832 Installation Manual Operating the Alarm System Cancelling the Arming Process Disarming after an Alarm " To cancel the arming process during the exit delay: " To disarm the alarm system after an alarm, proceed as follows: Enter Access code ???? -
Page 68: Arming And Disarming Partitions
Operating the Alarm System Premier 412/816/832 Installation Manual Stay Arming Partitions " To change from Instant Stay to Delayed Stay, proceed as follows: This option allows you to Stay arm one or more partitions. Ensure that the system is Instant Stay armed. -
Page 69: Changing To Another Partition
Premier 412/816/832 Installation Manual Operating the Alarm System Changing to another Partition " To manually bypass zones, proceed as follows: Normally the remote keypad that you use will be assigned to Enter Access code ???? a particular partition and therefore the zone and status lights will indicate information relevant to the assigned partition. -
Page 70: Quick Bypass And Arm
Operating the Alarm System Premier 412/816/832 Installation Manual " To Bypass a group of zones, proceed as follows: " To Quick Bypass a group of zones and Stay arm, proceed as follows: Enter Access code ???? Enter bypass group 1 4... -
Page 71: Service Faults
Premier 412/816/832 Installation Manual Operating the Alarm System Service Faults Service Faults Displayed on LED Keypads Light Fault Condition The response to a Service Fault condition is programmed by AC Fail the installer but is normally limited to the keypad buzzer. To silence the Service Fault alarm, enter your Access code. -
Page 72: Toggle Chime On And Off
Operating the Alarm System Premier 412/816/832 Installation Manual Enter Access code ???? Anti-code Reset YES to Arm? Zones Armed Alarm MENU for Options This feature is normally used in the UK where users are not Service Ready Enter N5 permitted to reset the panel following a communicated alarm. -
Page 73: Specifications
Premier 412/816/832 Installation Manual Specifications 6. Specifications Control Panel Remote Keypads Power Supply Electrical Maximum Current Rating Operating Voltage: 9 - 13.7VDC 16.5V , 25VA transformer: Current Consumption 16.5V , 40VA transformer: 1.5A Nominal: 35mA <5% Ripple: When fully back lit:... -
Page 74: Local Zone Expander
The press-seal bag must not be stored inside the panel. Warranty European Standards All Texecom products are designed for reliable, trouble free The Premier 412/816/832 conforms to the European Union operation. Quality is carefully monitored by extensive (EU) Low Voltage Directive (LVD) 73/23/EEC (amended by computerised testing. -
Page 75: Quick Reference Guide
Premier 412/816/832 Installation Manual Quick Reference Guide 7. Quick Reference Guide Menu Function Page Menu Function Page Programming Zones Programming Partitions !"/ #" All Zone Options Partition Exit Time Zone Type Partition Entry Delay 1 Time "" Null !" 24-Hour Tamper Partition Entry Delay 2 Time "! Delay 1... - Page 76 Quick Reference Guide Premier 412/816/832 Installation Manual Menu Function Page Menu Function Page System Options 2 Programming Remote Keypads ! Tamper Alarms Cause a Trouble While Disarmed %" Keypad Options 1 # Tamper Alarms Cause a Trouble While Stay Armed...
- Page 77 Premier 412/816/832 Installation Manual Quick Reference Guide Menu Function Page Menu Function Page Programming System Outputs Programming The Communicator '"/ Panel Outputs (" Communicator Options Fast Format Channels ! Enable On-Board Communicator # Enable DTMF Dialling Expander 1 Outputs $ Switch to Pulse Dialling after 3...
- Page 78 Quick Reference Guide Premier 412/816/832 Installation Manual Menu Function Page Menu Function Page Fast Format Restore Channels User Options 3 ! Report Restore on Channel 1 ! Allow Engineer Code Programming # Report Restore on Channel 2 # Allow NVM Locking...
- Page 79 Premier 412/816/832 Installation Manual Quick Reference Guide Service Faults Displayed on LED Keypads User Functions Light Fault Condition Enter User Code 2222 followed by AC Fail ," Reset Alarm/Troubles Telephone Line Fault View Last Alarm 2-Wire Smoke Alarm View/Acknowledge Service Faults Box Tamper &...
- Page 80 Programming Global Options Programming Remote Keypads Programming Remote Expanders Programming System Outputs Programming the Communicator Programming Download Options Texecom Limited, Bradwood Court, St. Crispin Programming Reporting Codes Way, Haslingden, Lancashire BB4 4PW, England. Programming Users Technical Support: Tel: +44 (0)1706 234833...
Need help?
Do you have a question about the Premier 412 and is the answer not in the manual?
Questions and answers