Texecom Premier 412 Installation Manual
Smoke detection system
Hide thumbs
Also See for Premier 412:
- Installation manual (80 pages) ,
- User manual (24 pages) ,
- Programming manual (8 pages)
Table of Contents
Advertisement
Quick Links
Advertisement
Chapters
Table of Contents

Related Manuals for Texecom Premier 412


Summary of Contents for Texecom Premier 412
- Page 1 Installation Manual Premier 412/816/832 INS159-13...
-
Page 2: Table Of Contents
Contents Premier 412/816/832 Installation Manual Contents Troubleshooting .............20 System Overview ......... 5 Power Faults ................20 System Architecture ............5 Remote Keypads ................20 Remote Expander ...............20 Control Panels ..............5 Zones ..................21 Remote Keypads .............. 5 Service Faults................21 Zone Expansion Modules ..........6 Communicator ................21... - Page 3 Premier 412/816/832 Installation Manual Contents Account Numbers - ..........53 Acknowledging a New Service Fault ......... 75 Protocol Type - ..........53 View Service Faults ..............76 Dial Attempts - ..........53 Anti-code Reset.............. 77 Partition Options - ..........53 Toggle Chime On and Off ..........
- Page 4 Index Premier 412/816/832 Installation manual System Overview Installation Control Panel PCB Layout Installing Remote Keypads & Expanders Zone Connections Siren/Bell, Telephone and Panel Outputs Commissioning & Troubleshooting Programming Menus Programming Zones Programming Partitions Programming Global Options Programming Remote Keypads Programming Remote Expanders...
-
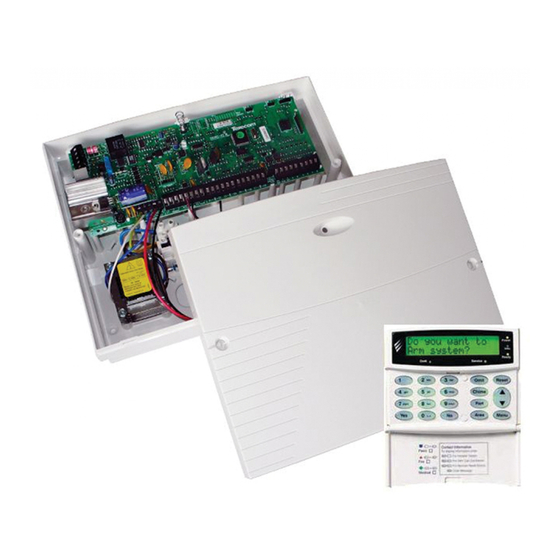
Page 5: System Overview
7 8 9 Control Panels Remote Keypads The Premier 412, 816, 816 Plus and Premier 832 are highly The control panels will accept up to a maximum of 6 remote sophisticated security control panels with Integrated Multi-protocol keypads. All remote keypads require a 4-wire connection to the data Digital Communicator/Modem. -
Page 6: Zone Expansion Modules
PC-Com Module off, changing to bright whenever a keypad is used and during the entry mode This module plugs on to the Premier 412, 816 and Premier 832 Dedicated status lights for “Alarm”, “Service”, “Armed”, control panel to provide an RS232 interface, which can be used for: “Ready”, “Fire”, “Bypass”, “Instant”... -
Page 7: Installation
Premier 412/816/832 Installation Manual Installation 2. Installation Installation Sequence Control Panel Mounting Before attempting to install the alarm system, read this section. Once you have an overall understanding of the installation Mount the control panel on a flat, plumb wall using at least three sequence, carefully work through each step. -
Page 8: Control Panel Pcb Layout
Premier 816 and Premier 832 have 8 zone inputs, whereas the 2: AC Input Premier 412 has only 4 zone inputs. There are several ways to wire Connect to a 16.5V transformer. a zone (see page 14). Each zone is fully programmable, see page Do NOT connect the mains supply to the AC 25 for information on programming zones. -
Page 9: Power Supply Ratings
Premier 412/816/832 Installation Manual Installation 12: Load Defaults 23: Electronic Fuse Fault Indicator LEDs Short between the centre and either of the outer pins during power Electronic fuses F2-F4 have red indicator LEDs, which light up when up to restore the control panel default program parameters. These the relevant fuse is open circuit (fault). -
Page 10: Connecting Ac Mains
Receive Data battery. Cable Type and Distances For improved immunity to electrical noise Texecom recommend the use of screened 4 core cable. The screen should be twisted together and wired into the (–) terminal at the control panel only. The maximum recommended distance for devices when using standard 7/0.2 alarm cable is:... -
Page 11: Overcoming Voltage Drop
Premier 412/816/832 Installation Manual Installation Double up on the power connections – this will require using a Overcoming Voltage Drop 6 or 8-core cable rather than a 4-core cable There are several ways to overcome voltage drop: Install a power supply to power the device locally, remember to ... -
Page 12: Installing Remote Keypads
Installation Premier 412/816/832 Installation Manual Address DIL Switch Installing Remote Keypads Tamper Switch Piezo Sounder Keypad Layouts Data Bus Connections Programmable Zones 1 and 2 Speaker Output (Premier LCDL/LCDLP Only) Programmable Output Remote Keypad Connections The remote keypad is connected to the data bus terminals located at the bottom left hand side of the PCB. -
Page 13: Keypad Speaker Output (Lcdl/Lcdlp Fmk/Smk)
Premier 412/816/832 Installation Manual Installation Keypad Speaker Output (LCDL/LCDLP Data Bus Connections FMK/SMK) Programmable Zone Inputs The Premier LCDL and LCDLP keypads has an output that can be Auxiliary 12V used for driving up to one 8 or two 16 loudspeakers (see page Programmable Outputs 1 and 2 ... -
Page 14: Zone Expander Outputs
Installation Premier 412/816/832 Installation Manual Zone Expander Outputs Local Expander Zones The Zone Expander module has two programmable outputs, which The Premier 8XE Local Zone Expander has eight programmable can be used to drive auxiliary devices such as relays, LED’s, smoke zone inputs (see page 15 for wiring details). -
Page 15: Zone Connections
Premier 412/816/832 Installation Manual Installation Normally Closed Zone Connections Use this wiring configuration when connecting normally closed detection devices to the zone. Ensure that the zone is programmed Each zone on the system is fully programmable to allow for for Normally Closed operation (see page 27). The zone must be maximum flexibility (see page 25 for Zone Programming details). -
Page 16: Single Eol - N/C & N/O (Burglary)
Installation Premier 412/816/832 Installation Manual Single EOL - N/C & N/O (Burglary) Single EOL - N/C Use this wiring configuration when connecting just normally Use this wiring configuration when connecting a mixture of normally closed and normally open detection devices to the zone. Ensure closed detection devices to the zone. -
Page 17: Double Eol
Triple EOL the appropriate keypad, Premier RKP16 on the Premier 816 This wiring option is designed to be used with Texecom detectors and the Premier RKP8 on the Premier 412. that support Triple EOL (T-EOL) wiring. Ensure that the zone is When a zone is configured for “Zone Doubled”... -
Page 18: Double Pole
Installation Premier 412/816/832 Installation Manual 2-Wire Smoke Detector Compatible 2-wire smoke detectors such as the ESL429AT or System Sensor 2100TS can be connected as shown: Triple EOL wiring can only be used on remote keypads and Panel Output 1 must be enabled for 2-wire smoke detection remote expanders that are fitted with V7.1 software or... -
Page 19: Siren/Bell Operation
Premier 412/816/832 Installation Manual Installation Siren/Bell Operation Panel Outputs When configured as bell operation the output terminals provide up Supervised Max Current Type to 750mA of power for driving bells as shown: 1 Amp Switched –ve For EN50131 & INCERT Installations the bell Aux/Tamper 1 Amp Switched –ve... -
Page 20: Commissioning & Troubleshooting
Commissioning & Troubleshooting Premier 412/816/832 Installation Manual 3. Commissioning & Troubleshooting Check the mains block is connected correctly; live to live Commissioning (brown), neutral to neutral (blue). No Power to Unit (battery only) Once ALL connections have been made to the control panel and ... -
Page 21: Zones
Premier 412/816/832 Installation Manual Commissioning & Troubleshooting The Speaker Output Does Not Work Check that the primary telephone number is programmed The expander can be configured so that the alarm, entry, exit, correctly, see page 52. chime tones etc. can be enabled or disabled. Check that the ... -
Page 22: Programming The Control Panel
Programming the Control Panel Premier 412/816/832 Installation Manual 4. Programming the Control Panel information on complying with EN 50131-1 please refer to Introduction page 79. Viewing Numeric Data (LED Keypads) All engineers should read this section carefully so as to familiarise themselves with the programming of the control panel. -
Page 23: V16 Start Up Procedure
Premier 412/816/832 Installation Manual Programming the Control Panel V16 Start up Procedure V16 sees a new start-up procedure allowing selection of the control panel language, loading specific country defaults and confirming devices connected to the panel network at start-up. Premier RKP8 & 16 LED Keypads For LED keypads there is no change to the current operation. -
Page 24: Program Menus
Programming the Control Panel Premier 412/816/832 Installation Manual Program Menus Menu Function Page Menu Function Page Programming Zones Programming System Outputs All Zone Options Panel Outputs Zone Type Fast Format Channels Zone Wiring Expander 1 Outputs ... -
Page 25: Programming Zones
Premier 412/816/832 Installation Manual Programming the Control Panel Programming Zones ???? Programming Menu Enter Code > A Zone Otion Enter Zone o.?? Zone 00 e Zone 01 e... -
Page 26: All Zone Options
Programming the Control Panel Premier 412/816/832 Installation Manual Zone 00 Att. 3 Zone 01 Att. 3 Enter Zone o.?? > 1******* < Zone 00 Area Zone 01 Areaa Enter Zone o.?? > 1******* < ... -
Page 27: Zone Wiring
Premier 412/816/832 Installation Manual Programming the Control Panel violated when the system/partition is armed or disarmed. In alarm condition resets the assigned partition(s). The operation of addition, the bell output will be pulsed rather than sounding this zone type can be further changed, see “Zone Attributes 3” on continuously as with a normal alarm. -
Page 28: Zone Attributes 2
Programming the Control Panel Premier 412/816/832 Installation Manual Enable Instant Strobe Enable Double Knock The strobe output will trigger immediately the zone causes an When a zone is enabled for Double Knock it will only cause alarm. an alarm when: Off: The strobe output will trigger after the bell delay timer. -
Page 29: Zone Attributes 3 (Key Switch)
Premier 412/816/832 Installation Manual Programming the Control Panel Zone Attributes 3 (Key Switch) Off: The zone is not assigned to Partition 2. When a zone is programmed as a Key Switch type Zone Attributes 3 Partition 3 (Premier 816/832 Only) options 3, 4 and 6 are used to change the operation of the Key The zone is assigned to Partition 3. -
Page 30: Programming Partitions
Programming the Control Panel Premier 412/816/832 Installation Manual Programming Partitions ???? Programming Menu Enter Code > Eit ea Eit ea Partition o. ? Enter aue: 005 Entr ea 1 Entr ea 1 Partition o. ? Enter aue: 030... -
Page 31: Partition Exit Delay
Premier 412/816/832 Installation Manual Programming the Control Panel Be uration Be uration Partition o. ? Enter aue: 015 Otion Otion Partition o. ? > **34**** < ... -
Page 32: Partition Auto Arm/Disarm Options
Programming the Control Panel Premier 412/816/832 Installation Manual Enable Remote Disarming The selected partition can be disarmed remotely via the When the control timer switches on, the panel will start a 2 downloading computer. minute exit timer. During the first 90 seconds of the exit timer Off: The selected partition cannot be disarmed remotely. -
Page 33: Programming Global Options
Premier 412/816/832 Installation Manual Programming the Control Panel Programming Global Options ???? Programming Menu Enter Code > tem imer ine Faut ea Enter imer > ?? Enter aue: 001 ... - Page 34 Programming the Control Panel Premier 412/816/832 Installation Manual tem Otion 1 > ****56*8 < tem Otion 2 > 123**6** < ...
-
Page 35: System Timers
Premier 412/816/832 Installation Manual Programming the Control Panel Mieaneou 1 > ***4**** < Mieaneou 2 > ******** < ... -
Page 36: System Counter/Levels
Programming the Control Panel Premier 412/816/832 Installation Manual Courtesy Delay clock will be speeded up, e.g., a value of 52 will speed the clock up This timer controls the duration of courtesy output. The courtesy by 2 seconds per day. -
Page 37: System Options 2
Premier 412/816/832 Installation Manual Programming the Control Panel Panel NVM is Locked Use Delay Timer to Defer Zone Restorals The NVM is locked and the “Load Defaults” jumper pins on If System Option 2.7 (see above) is enabled, then enabling... -
Page 38: Hardware Options
Programming the Control Panel Premier 412/816/832 Installation Manual Off: The siren output is normal. Auxiliary Tamper When activated the panel will generate a tamper alarm for the Hardware Options assigned partitions (see page 32). The hardware options allow you to control which hardware monitoring features are enabled or disabled. -
Page 39: Miscellaneous Options 2
After entering the engineers passcode, the Strobe output on the Premier Bell Module pulses 3 times, this invokes Silent PA Normally Closed the Engineer Hold Off mode if a Texecom Odyssey bell Latched Keyswitch Apply 0V to Disarm box is connected... -
Page 40: Miscellaneous Options 3
Programming the Control Panel Premier 412/816/832 Installation Manual Miscellaneous Options 3 - Entry Stray Notification Delay Entry stray notification is delayed after the alarm. Allow User Tamper Reset Off: Entry stray notification occurs at the time of the alarm. -
Page 41: Programming Remote Keypads
Premier 412/816/832 Installation Manual Programming the Control Panel Programming Remote Keypads ???? Programming Menu Enter Code > ead Otion 1 ead Otion 1 Enter P o. ? > 1***5*78 < ... -
Page 42: Keypad Options 1
Programming the Control Panel Premier 412/816/832 Installation Manual Keypad Options 1 Keypad Activation of PA Alarm The selected keypad will generate a Panic Alarm (Police) if The operation of Keypad Options 1 is described as follows: keys and are pressed at the same time. -
Page 43: Keypad Options
Premier 412/816/832 Installation Manual Programming the Control Panel Entry Tones from Keypad Zone Shift by 16 The internal sounder for the selected keypad will produce The remote keypad zone status lights indicate from Zone 17 Entry tones. onwards i.e., Zone 1 on the remote keypad follows the status... -
Page 44: Programming Remote Expanders
Programming the Control Panel Premier 412/816/832 Installation Manual Programming Remote Expanders ???? Programming Menu Enter Code > Eander Area Eander Area Enter E o. ? > 1***..< Eander one Eander one... -
Page 45: Programming System Outputs
Premier 412/816/832 Installation Manual Programming the Control Panel Programming System Outputs ???? Programming Menu Enter Code > Pane Outut Pane Outut Enter Outut o? tem e Pane Outut Courte... - Page 46 Programming the Control Panel Premier 412/816/832 Installation Manual E. 3 Outut Enter Outut o? ead Outut Enter Outut o? ...
-
Page 47: Panel Outputs
Premier 412/816/832 Installation Manual Programming the Control Panel Panel Outputs Telephone Line Fault This output type activates when the communicator detects a This menu option allows you to program the eight control panel telephone line fault. outputs. Smoke Alarm Fast Format/Speech Channels ... - Page 48 Programming the Control Panel Premier 412/816/832 Installation Manual Walk Test 24Hr - High Temp Alarm This output type activates when the user selects the Zone Test This output type activates when a 24hr High Temperature alarm is option (menu 90).
-
Page 49: Output Attributes
Premier 412/816/832 Installation Manual Programming the Control Panel Double Pulse on Arming Arm Failed This output type activates twice (2 seconds on) when the selected This output type activates when the selected partition fails to arm. Partition is armed. -
Page 50: Programming The Communicator
Programming the Control Panel Premier 412/816/832 Installation Manual Programming the Communicator ???? Programming Menu Enter Code > igi Otion > *2*****8 < AC o.1 Menu AC o.2 Menu... - Page 51 Premier 412/816/832 Installation Manual Programming the Control Panel Protoo Contat I ia Attemt Enter aue: 003 Partition > 1234..< ...
-
Page 52: Communicator Options
Programming the Control Panel Premier 412/816/832 Installation Manual etore Canne > 12345678 < Oen/Coe Can. > ***4**** < ... -
Page 53: Account Numbers
Premier 412/816/832 Installation Manual Programming the Control Panel Each telephone number can be up to 24 digits. When entering the Pager telephone number the following keys can be used: The panel will communicate to a pager. When using the pager... -
Page 54: Reporting Options
Programming the Control Panel Premier 412/816/832 Installation Manual Report for Partition 3 (Premier 816/832 Only) Use 2300Hz Kiss-Off Frequency The system will report events for Partition 3 to Alarm Pulse Format uses 2300Hz kiss-off. Receiving Centre 1. Off: Pulse Format uses 1400Hz kiss-off. -
Page 55: Protocol Options
Premier 412/816/832 Installation Manual Programming the Control Panel Report Fast Format/Speech Channel 2 partitions 1 and 3, the panel will report the event for Channel 2 is reported. partition 1 using the account number for partition 1, then Off: Channel 2 is not reported. -
Page 56: Fast Format Open/Close Channels
Programming the Control Panel Premier 412/816/832 Installation Manual Report Restore on Channel 3 Restore reported on channel 3. The channel must also be programmed to report an event, Off: Restore not reported on channel 3. see Program Outputs on page 45. -
Page 57: Programming Check List
Premier 412/816/832 Installation Manual Programming the Control Panel Programming Check List The table below provides a checklist of what options require programming for each of the protocols supported: Protocol Notes 1. Program to type 1. Pulse Format 2 ... -
Page 58: Programming Download Options
Programming the Control Panel Premier 412/816/832 Installation Manual Programming Download Options ???? Programming Menu Enter Code > ownoad Menu Enter Otion 0-8 ownoad Otion > ******** < ... - Page 59 Premier 412/816/832 Installation Manual Programming the Control Panel Com1 eie e Enter aue 003 ComIP-1 19216800 001000980 ComIP-2 19216800 0001 ComIP-3 Enter aue: 008 ...
-
Page 60: Download Menu
Programming the Control Panel Premier 412/816/832 Installation Manual Download Menu only switched in when the panel is required to transmit an alarm or The Download Menu has the following options: to test the status of the telephone line. If this option is used then it is NOT possible to use the upload/download feature unless the user ... -
Page 61: Ip Address & Port
Premier 412/816/832 Installation Manual Programming the Control Panel IP Address & Port Chiron Iris Data Setup - - This option allows you to assign a local IP address and port number This menu option has three submenus to allow programming of the to a module connected to a Com Port (e.g. -
Page 62: Programming Reporting Codes
Programming the Control Panel Premier 412/816/832 Installation Manual Programming Reporting Codes ???? Programming Menu Enter Code > Aarm/etore Aarm/etore Enter Eent > ?? > 03:07 ... -
Page 63: Zone Alarm/Restore Codes
Premier 412/816/832 Installation Manual Programming the Control Panel Zone Alarm/Restore Codes Alarm Restore Event Type This menu option allows you to change the alarm/restore reporting Event No Event No event codes for each zone. These codes are used with Pulse... -
Page 64: Programming Users
Programming the Control Panel Premier 412/816/832 Installation Manual Programming Users ???? Programming Menu Enter Code > Program Uer 00 Program Uer 03 Enter Uer o.?? Code : ****** ???? Program Uer 03 Code : **** ???? Uer 00 Otion1... - Page 65 Premier 412/816/832 Installation Manual Programming the Control Panel Engineer Engineer Uer 00 et ^er 00 et Program Uer 00 Program Uer 03 Enter Uer o.?? Code : ****** ???? Program Uer 03 Code : **** ...
-
Page 66: Program User
The number of users (including the engineer) Off: The user cannot disarm any partitions. that are available is as follows: Premier 412 - 32 Users The Engineer code (User 0) can only disarm the system, if Premier 816 - 32 Users the system was armed with the Engineer code. -
Page 67: User Options 3
Premier 412/816/832 Installation Manual Programming the Control Panel the partition that is in alarm. The user cannot disarm or reset Allow User Code Programming the partition if they are not assigned to it. The Access code can access users 01 to 31 in the User... -
Page 68: System Tests & Utilities
Programming the Control Panel Premier 412/816/832 Installation Manual System Tests & Utilities ???? Programming Menu Enter Code > Wak et Zone 01 Atie o Zone eted Zone 01 eted et tem et tem Enter 1 to 5 Be... -
Page 69: Walk Test
Premier 412/816/832 Installation Manual Programming the Control Panel Premier 816 Premier 816 Banner et ^anner et Walk Test The Walk Test feature can only be performed when the partition is Start Call Back ... -
Page 70: Operating The Alarm System
Operating the Alarm System Premier 412/816/832 Installation Manual 5. Operating the Alarm System Away Arming Introduction The Away arming mode is normally used when leaving the premises. When the system is armed in this mode all detection Before attempting to operate the alarm system ensure you have zones assigned to your partition(s) will be armed. -
Page 71: Cancelling The Arming Process
Premier 412/816/832 Installation Manual Operating the Alarm System If the Quick Disarm feature is enabled (see page 42) and the system is Stay armed you can omit step 1 from the above Cancelling the Arming Process procedure. Disarming after an Alarm ... -
Page 72: Arming And Disarming Partitions
Operating the Alarm System Premier 412/816/832 Installation Manual If the system is fitted with a Premier RKP16 Plus the Instant If the Quick Arm feature is enabled (see page 42) you can light will also illuminate. omit step 1 from the above procedure. -
Page 73: Changing To Another Partition
Premier 412/816/832 Installation Manual Operating the Alarm System Changing to another Partition Normally the remote keypad that you use will be assigned to a To manually bypass zones, proceed as follows: particular partition and therefore the zone and status lights will indicate information relevant to the assigned partition. -
Page 74: Group Bypass
Operating the Alarm System Premier 412/816/832 Installation Manual Group Bypass Quick Bypass and Arm The Group Bypass feature allows you to bypass a predefined group The Quick Bypass and Arm feature allows you to Bypass a of zones. The alarm system has up to four groups, see page 29 on predefined group of zones and Away or Stay arm the system. -
Page 75: Reset Alarms
Premier 412/816/832 Installation Manual Operating the Alarm System on either of these faults but no Service Fault Alarm (transmission or Reset Alarms audible alarm) will occur unless the delay expires. This function is used to reset any standing alarms and service faults. -
Page 76: View Service Faults
Operating the Alarm System Premier 412/816/832 Installation Manual View Service Faults Standing faults can be viewed as follows: Press the key followed by the key. The keypad will display any Service Faults (see tables). On completion press the key. -
Page 77: Anti-Code Reset
Premier 412/816/832 Installation Manual Operating the Alarm System ???? Anti-code Reset E to Arm? This feature is normally used in the UK where users are not MEU or Otion permitted to reset the panel following a communicated alarm. However, the user can reset the panel after entering a unique remote reset number, which is supplied by their installer or ARC. -
Page 78: Specifications
Specifications Premier 412/816/832 Installation Manual 6. Specifications Control Panel Control Panel Rated Input: 220V - 240V @50/60Hz; 1A All Models Large & Small Polymer Rated Output Current@40°C: 2.5A MAX Rated Input: 100VV - 120V @50/60Hz; 1A Rated Output Current@40°C: 2.3A MAX... -
Page 79: Remote Keypads
Current Consumption Standards Nominal (model dependant): 10mA When fully back lit: 200mA Zone Indicators Texecom declares that this product complies with Premier RKP4/8/16: LED (4/8/16) Premier RKP8/16 Plus: LED (8/16) the requirements of the following directives: Premier LCD/LCDL/FMK/SMK: 32 Character (Standard/Large) Environmental ... -
Page 80: Warranty
Texecom cannot accept responsibility or liability for any damages whatsoever based on a claim that the control panel failed to function correctly. Due to our policy of continuous improvements Texecom reserve the right to change specification without prior notice. INS159-13... -
Page 81: Quick Reference Guide
Premier 412/816/832 Installation Manual Quick Reference Guide 7. Quick Reference Guide Menu Function Page Menu Function Page Programming Zones Programming Partitions All Zone Options Partition Exit Time Zone Type Partition Entry Delay 1 Time Null ... - Page 82 Quick Reference Guide Premier 412/816/832 Installation Manual Menu Function Page Menu Function Page Use Delay Timer to Defer Non-Zone Restorals Expander Lost Inhibit Keyswitch Operation Upon EOL Tamper User Code Entry Away Arm Overrides Alarm Transmission Delay ...
- Page 83 Premier 412/816/832 Installation Manual Quick Reference Guide Menu Function Page Menu Function Page Programming System Outputs Programming The Communicator Panel Outputs Communicator Options Fast Format Channels Enable On-Board Communicator Enable DTMF Dialling Expander 1 Outputs ...
- Page 84 Quick Reference Guide Premier 412/816/832 Installation Manual Menu Function Page Menu Function Page Time Lock Code with Control Timer 1 ARC 2 Communicator Menu Enable Open Reporting Fast Format/Speech Restore Enable Close Reporting Channels Enable User as Duress Code ...
- Page 85 Premier 412/816/832 Installation Manual Quick Reference Guide Service Faults Displayed on LED Keypads Service Faults Displayed on LCD Keypads Light Fault Condition Fault Condition General Warnings AC Fail AC Fai Press to view type, lights 1 - 5 indicate: Telephone Line Fault ine Faut...
-
Page 86: Standard Defaults & Programming Records
Programming Worksheets & Defaults Premier 412/816/832 Installation Manual 8. Standard Defaults & Programming Records Installation Details Customer: _____________________________________________________ Address: _____________________________________________________ _____________________________________________________ _____________________________________________________ Telephone: _________________________________ Fax: _______________ Email: _____________________________________________________ Alarm Receiving Centre 1: Alarm Receiving Centre 2: Installation Date: Zone Details... -
Page 87: Programming Worksheets & Defaults
These worksheets and defaults apply to the following control panels where standard factory defaults are loaded, if you load country defaults as per page 36 the defaults shown may differ. Premier 412/816 - Software Version 12.x > Premier 832 - Software Version 12.x >... - Page 88 Programming Worksheets & Defaults Premier 412/816/832 Installation Manual Menu: Zone Attributes 1 Page 27 ] ] ] ] ] ] ] ] ] ] ] ] ] ...
- Page 89 Premier 412/816/832 Installation Manual Programming Worksheets & Defaults Menu: Zone Attributes 3 Page 28 Change to Change to * Auto Disable * Zone * Disable Truncate Exit Forced Walk Delay 1 on Follower on Reinstate if Keyswitch if Warning...
- Page 90 Programming Worksheets & Defaults Premier 412/816/832 Installation Manual Menu: Zone Partitions & Bypass Groups Page 29 ] ] ] ] ] ] ] ] ] ] ] ] ...
- Page 91 Premier 412/816/832 Installation Manual Programming Worksheets & Defaults Partition Programming ] ] ] ] ] ] ] ] Menu: Equipment Areas Page 30 Partitions Options 0: Auxiliary Input Areas ] ...
- Page 92 Programming Worksheets & Defaults Premier 412/816/832 Installation Manual Global Programming 0: Not Used; 1: Auxiliary Tamper; 2: Remote Reset; 3: Line Fault; 4: Panic Alarm; 5: Silent PA; 6: Latched Key Switch; 7: Momentary Key Switch Menu: Miscellaneous Options 1...
- Page 93 Premier 412/816/832 Installation Manual Programming Worksheets & Defaults Remote Keypad Programming Menu: Remote Keypad Options 4 Page 43 Enable Disable Zone Shift by Zone Shift by Zone Shift by Keypa Keypad Keypad Lid Reserved Reserved Reserved Zones Tamper ] ...
- Page 94 Programming Worksheets & Defaults Premier 412/816/832 Installation Manual Menu: Expander Outputs Page 47 Part. 1 Part. 2 Part. 3 Part. 4 Test Invert Latch Pulsed Output Group & Type Default ] : [ 0:00 ] ] ] ...
- Page 95 Premier 412/816/832 Installation Manual Programming Worksheets & Defaults Menu: ARC 1 Communicator Options Page 52 Telephone Primary: None Numbers Secondary: None Account Partition 1: [ ] None Partition 3: [ ] None Numbers Partition 2: [ ] None...
- Page 96 Programming Worksheets & Defaults Premier 412/816/832 Installation Manual ] ] ] ] ] ] ] ] Menu: Fast Format/Speech Restore Channels Page 55 Channel 1 Channel 2 Channel 3 Channel 4...
- Page 97 Premier 412/816/832 Installation Manual Programming Worksheets & Defaults Reporting Codes Programming ] 00 ] 00 ] 00 ] 00 ] 00 ] 00 ] 00 ] 00 ] 00 ] 00 ] 00 ] 00 ] 00 ] 00 ] 00...
- Page 98 Programming Worksheets & Defaults Premier 412/816/832 Installation Manual Menu: Non Zone Alarm/Restore Codes Page 63 Event No Event Type Event Reporting Group Pulse/Express Contact ID Soak Test Alarm Test ] 00 Restore Fire Zone Trouble Alarm Tamper ] 00...
-
Page 99: Notes
Premier 412/816/832 Installation Manual Notes Notes INS159-13... - Page 100 Programming Remote Keypads Programming Remote Expanders Programming System Outputs Programming the Communicator Programming Download Options Texecom Limited, Bradwood Court, St. Crispin Way, Haslingden, Lancashire BB4 4PW, England. Programming Reporting Codes Technical Support: UK Customers Tel: 08456 300 600 (Calls charged at 3.36 pence per minute from a BT landline. Calls from other networks may vary.)
Need help?
Do you have a question about the Premier 412 and is the answer not in the manual?
Questions and answers