Table of Contents
Advertisement
Advertisement
Table of Contents

Related Manuals for IFB ZEPHYR SX


Summary of Contents for IFB ZEPHYR SX
- Page 1 ZEPHYR SX USER MANUAL...
-
Page 2: Table Of Contents
CONTENTS Getting familiar with your machine ………………………………………………………. Technical specifications ……………………………………………………………… • Conformity with the standards and Test data ………………………………………... • Safety information and Recommendations………………………........ Recycling ..………………………................• Safety information ………………………………………………………………………. • Recommendations …...…………………………………………………………………. • Items not suitable for dishwashing ……………………………………………………. •... - Page 3 Loading your dishwasher .…………………………………………………………………….. Dish rack …………………………………………………………………………………… • Alternative basket loads …………………………………………………......• Standard loading and Test data …………………………………………………………... • Programme descriptions .……………………………………………………………………... Programme items …………………………………………………………………………... • Switching on the machine and selecting a programme……………....... Switching on the machine………………………………………………………………….. • Programme follow-up………………………………………………………………………..
- Page 4 Worktop Rating plate Upper basket with racks Control Panel Upper spray arm Detergent and rinse-aid dispenser Lower basket Cutlery basket Lower spray arm Salt dispenser Filters Upper basket track latch...
-
Page 5: Getting Familiar With Your Machine
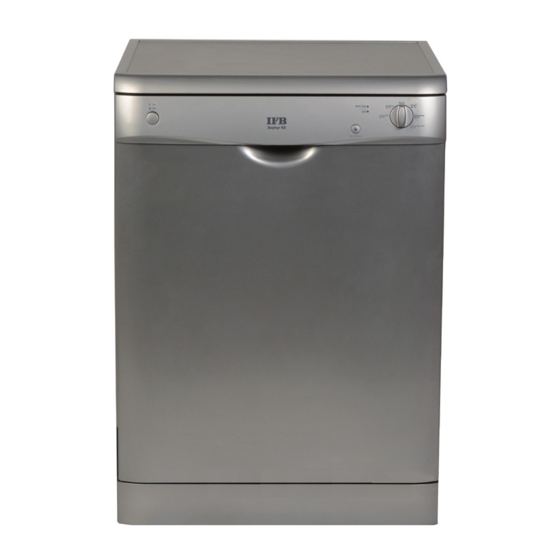
GETTING FAMILIAR WITH YOUR MACHINE 1.) Power On/Off Button In the stop condition while wash led is On, Start/Pause led will blink. When the Power On/Off button is pressed, the lamp on the Start/Pause button starts lighting. 4.) Programme selector knob With the programme selector knob, you can select a suitable programme 2.) Door Handle for your dishes. -
Page 6: Technical Specifications
Technical specifications Capacity ………………………… 12 place settings Height …………………… ……… 845 mm Height (without worktop) ………. 815 mm Width …………………………….. 596 mm Depth ……………………………. 598 mm Net Weight ……………………... 46 kg Electricity input ……………..220-240 V, 50 Hz Total Power …………………….. 2200 W Heat ing Power ………………….. -
Page 7: Installing The Machine
Only original spare parts should be used with the machine. • Before installing, be sure that the machine is unplugged. • Check whether the indoor electrical fuse system is connected according to the regulations. • All electrical connections must match the values indicated on the rating plate. •... -
Page 8: Recommendations
Recommendations For energy and water saving, remove coarse residues on your dishes before placing the dishes • into the machine. Start your machine after having fully loaded it Use the pre-wash programme only whenever necessary. • Place such hollow items as bowls, glasses and pots into the machine in such a way that they will •... -
Page 9: Water Inlet Hose
Water connection Be sure that the indoor plumbing is suitable for installing a dishwasher. Also, we recommend that you fit a filter at the entrance of your place or apartment so as to avoid any damage to your machine because of any contamination (sand, clay, rust etc.) that might be occasionally carried in through the mains water supply or the indoor plumbing, and to forestall such complaints as yellowing and formation of deposits after washing. -
Page 10: Electrical Connection
Electrical connection The earthed plug of your machine should be connected to an earthed outlet supplied by suitable voltage and current. If there is no earthing installation, have a competent electrician carry out an earthing installation. In case of usage without earthing installed, our company will not be responsible for any loss of usage that might occur. - Page 11 To remove the worktop, remove the screws that hold the worktop which are located at the rear of the machine; then push the front panel 1 cm from the front side towards the rear and lift it. Adjust the machine feet according to the slope of the floor.3 Fit your machine by pushing it undercounter without letting the hoses get crushed or...
-
Page 12: Prior To Using The Machine
Prior to using the machine for the first time Check whether the electricity and supply water specifications match the values indicated by the • installation instructions for the machine. Remove all packaging materials inside the machine. • Set the water softener. •... -
Page 13: Testing Strip
In order to understand whether or not the amount of softener salt in your machine is sufficient, check the transparent section on the salt compartment cap. There is sufficient salt if the transparent section is green. Salt has to be added if the transparent section is not green. Testing strip The washing effectiveness of your machine depends on the softness of the tap water. - Page 14 Adjusting salt consumption Adjust the water softener according to how hard your tap water is. Move the programme selector knob to the 0 (Reset) position while your machine is not in operation. After resetting your machine, press the Start/Pause button and keep it pressed down.
-
Page 15: Detergent Usage
Detergent usage Use a detergent specifically designed for use in domestic dishwashers. You can find powder,gel,and tablet detergents in the market that have been designed for household dishwashers. Detergent should be put into the compartment prior to starting the machine. Keep your detergents in cool, dry places out of reach of your children. -
Page 16: Filling With Rinse Aid And Making The Setting
If such detergents are in the form of tablets, never put them into the interior section or the • cutlery basket of the dishwasher. Always put the tablets into the detergent compartment in the detergent dispenser. They produce good results for certain types of usage only. If you are using this type of •... -
Page 17: Loading Your Dishwasher
The rinse aid level adjuster can be set to a position between 1 and 6. Factory setting for rinse aid is the position 3. You need to increase the degree of the adjuster if water stains form on your dishes after a wash, whereas you need to decrease the degree if a blue stain is left when wiped by hand.3 Warning: Use only those rinse aid materials which are allowed for use in the machine. -
Page 18: Alternative Basket Loads
Alternative basket loads Lower Basket Top basket Faulty loads... -
Page 19: Standard Loading And Test Data
Standard loading and test data Capacity: Upper and lower baskets: 12 place settings. The upper basket should be adjusted to high position. Cups should be placed on to the dish rack pins. Detergent / Rinse aid 5+25 cm , in accordance with EN50242-DIN 44990 IEC 436 (international norms) / Rinse aid dosage adjustment: 4 Programme test Economic 50°... -
Page 20: Programme Descriptions
PROGRAMME DESCRIPTIONS Programme items Programme items Reference Programme No Programme names Quick 30 min. Super 50 min. Intensive Hygiene Economic Temperatures 65°C 70°C 65°C 40°C 50°C soups, sauces, soups, sauces, coffee, milk, coffee, milk, tea, Dishes with dense pasta, pasta, dirt waiting for a tea, cold meats, cold meats,... -
Page 21: Switching On The Machine And Selecting A Programme
SWITCHING ON THE MACHINE AND SELECTING A PROGRAMME Switching on the machine Press the Power On/Off key. Select the program suiting your dishes via the Program Selection button. Start the program pressing the Power Start/Pause key. Once the Power On/Off key is pressed, the lamp Power Start/Pause is highlighted. -
Page 22: Changing A Programme With Resetting
Changing a programme with resetting If you would like to cancel a program while a washing program is resumed Press once the Power Turn the Program Start/Pause key. Selection Button to Reset The program will have been The machine will discharge the cancelled once the drying lamp water in it for nearly 30 sec. -
Page 23: Maintenance And Cleaning
MAINTENANCE AND CLEANING Cleaning the machine in regular intervals prolongs the machine’s service life. Oil and lime may accumulate in the machine’s washing section. In case of such accumulation; -Fill the detergent compartment without loading any dishes into the machine, select a programme that runs at high temperature, and start the machine. -
Page 24: Spray Arms
Spray arms Check whether or not the holes for the upper and lower spray arms are clogged. If there is any clogging, remove the spray arms and clean them under water. You can remove the lower spray arm by pulling it upwards, while the upper spray arm nut can be removed by turning the nut to the left. -
Page 25: Failure Codes And What To Do In Case Of Failure
FAILURE CODES AND WHAT TO DO IN CASE OF FAILURE ERROR CODE ERROR CONTROL DESCRIPTION Wash /Dry Start/Pause • Make sure the water input tap is totally open and that Inadequate water there is no water cut. supply • Close the water input tap, separate the water input hose from the tap and clean the filter at the connection end of the hose. - Page 26 If water is left inside the machine at the end of the programme The water drain hose is clogged or twisted. • The filters are clogged. • The programme is not finished yet. • If the machine stops during a wash operation Power failure.
-
Page 27: Practical And Useful Information
PRACTICAL AND USEFUL INFORMATION Whenever you will not be operating your machine Unplug the machine and then turn the water off. • Leave the door slightly ajar in order to prevent the formation of unpleasant smells. • Keep the machine interior clean. •... - Page 30 Products Owned by the customer:(Please tick in the appropriate box.) Washing Machine Refrigerator Color TV 100% Clothes Dryer Dishwasher Music System Oven Toaster Grill 2 Wheeler Air Conditioner IFB Industries Limited Regd. Off : 14 Taratolla Road, Kolkata - 700088...
- Page 31 52059166...
Need help?
Do you have a question about the ZEPHYR SX and is the answer not in the manual?
Questions and answers