Table of Contents
Advertisement
Advertisement
Table of Contents

Subscribe to Our Youtube Channel
Related Manuals for Dazon Raider Classic 250


Summary of Contents for Dazon Raider Classic 250
-
Page 2: Limited Warranty
Raider Classic 250 (double-seat): Owner’s Manual EEC Version:2.0 Feb. 2007 Limited Warranty The warranty policy applies to those cases where the new seller vehicle unloaded from its shipping container, set up and delivered by authorized dealer and under normal use and service is found to have defects in parts or workmanship under the following terms and conditions. - Page 3 Your selling dealership must register your vehicle by sending your warranty registration form upon purchase of the vehicle. You must properly use, maintain and care for the vehicle as outlined in the DAZON owner’s manual. You must maintain a record of the vehicles service history. Periodic service and inspection are considered regular maintenance and are not considered as warranty.
- Page 4 The warranty does not cover any losses of the seller vehicle use, any losses of time, any inconveniences, or any other consequential damages which include, but are not limited to the losses or damages to any persons, property or expenses of returning damaged units to the vehicle distributor or any DAZON authorized dealers.
- Page 5 Raider Classic 250 (double-seat): Owner’s Manual EEC Version:2.0 Feb. 2007 • Any damage resulting from negligence of periodic maintenance. • Any damage which results from repairs, adjustments, or maintenance operations that do not follow those specified by DAZON. • Any damages caused by collision or improper use.
- Page 6 Raider Classic 250 (double-seat): Owner’s Manual EEC Version:2.0 Feb. 2007 Contents [Attached wiring diagram] 1. Foreword------------------------------------------------------------------------------------------------------------------7 2. A Few Words about Safety---------------------------------------------------------------------------------------------8 3. Important Safety Information-----------------------------------------------------------------------------------------10 4. Safety Labels------------------------------------------------------------------------------------------------------------15 5. Are You Ready to Drive? ---------------------------------------------------------------------------------------------16 6. Is Your Vehicle Ready to Drive? ------------------------------------------------------------------------------------20 7.
- Page 7 Raider Classic 250 (double-seat): Owner’s Manual EEC Version:2.0 Feb. 2007 FOREWORD Thanks for choosing our double seat BUGGY. Prior to operating your Buggy, please read through this Owner's Manual carefully as it contains important safety and maintenance information. Failure to follow the warnings contained in this manual could lead to personal injuries or damages to the unit.
-
Page 8: A Few Words About Safety
Raider Classic 250 (double-seat): Owner’s Manual EEC Version:2.0 Feb. 2007 A FEW WORDS ABOUT SAFETY In order to keep everyone safe, you must take responsibility for the safe operation of your Buggy. To help you make informed decisions about safety, we have provided the operating procedures and other information on the labels and in this manual. - Page 9 Raider Classic 250 (double-seat): Owner’s Manual EEC Version:2.0 Feb. 2007 The meaning of these signal words: ------ Physical harm may result from the failure to follow the instructions described within the WARNING labels; ------Damages to your Buggy and possible subsequent personal injuries or death could result from the failure to take proper precautions described within the CAUTION labels;...
- Page 10 Raider Classic 250 (double-seat): Owner’s Manual EEC Version:2.0 Feb. 2007 IMPORTANT SAFETY INFORMATION Your Buggy will provide you with many years of service and pleasure providing you take responsibility for your own safety and understand the challenges you’ll meet while driving.
- Page 11 Raider Classic 250 (double-seat): Owner’s Manual EEC Version:2.0 Feb. 2007 Always Wear Wrist Straps Attach your wrist straps to the steering wheel to insure that you won’t try to reach out to one side during a rollover. This will prevent injuries to your wrists, arms, fingers, etc. Follow the photos below when using the...
- Page 12 Raider Classic 250 (double-seat): Owner’s Manual EEC Version:2.0 Feb. 2007 Take Time to Learn & Practice Even if you have driven other buggies, you still should take time to become familiar with how this Buggy works. Practice in a safe area until you have built your skills and gotten accustomed to its size and weight.
- Page 13 Raider Classic 250 (double-seat): Owner’s Manual EEC Version:2.0 Feb. 2007 Don't Drink and Drive Alcohol and drive never mix. Even one drink can reduce your ability of responding to changing conditions, and every additional drink can lengthen and worsen your reaction time.
- Page 14 Raider Classic 250 (double-seat): Owner’s Manual EEC Version:2.0 Feb. 2007 Avoid Skidding or Sliding The terrain surface can be a major factor affecting turns. Skidding or sliding a turn is more likely to occur on slippery surfaces such as snow, ice, mud and loose gravel. If you skid or slide on ice, you may lose all directional controls.
-
Page 15: Safety Labels
Raider Classic 250 (double-seat): Owner’s Manual EEC Version:2.0 Feb. 2007 SAFETY LABELS The labels should be considered permanent parts of your Buggy. If a label comes off or becomes difficult to read, please contact your dealer for warning label replacements. -
Page 16: Are You Ready To Drive
Raider Classic 250 (double-seat): Owner’s Manual EEC Version:2.0 Feb. 2007 ARE YOU READY TO DRIVE? Before each drive, you need to make sure that you and your Buggy are both ready to drive. To help you be prepared, this section discusses how to evaluate your driving readiness, what items you should check on your vehicle, and how to adjust your vehicle for your comfort, conveniences and safety. - Page 17 Raider Classic 250 (double-seat): Owner’s Manual EEC Version:2.0 Feb. 2007 Protective Apparel For your safety, we strongly recommend that you always wear an E-Mark approved motorcycle helmet, approved goggles sturdy boots, durable gloves, long pants and long-sleeved shirt or jacket whenever you drive.
- Page 18 Raider Classic 250 (double-seat): Owner’s Manual EEC Version:2.0 Feb. 2007 2. Additional Driving Gear In addition to a helmet and eye protection gear, we also recommend: • Sturdy motorcycle boots to help protect your feet, ankles and lower legs; • Durable motorcycle gloves to help protect your hands;...
- Page 19 Raider Classic 250 (double-seat): Owner’s Manual EEC Version:2.0 Feb. 2007 Operating this BUGGY without proper instructions could increase your risks of accidents that could lead to serious injuries, or even death. No Alcohol or Drugs Alcohol, drugs and Buggies never mix. Even a small amount of alcohol can impair your ability to operate your Buggy safely.
- Page 20 Raider Classic 250 (double-seat): Owner’s Manual EEC Version:2.0 Feb. 2007 IS YOUR VEHICLE READY TO RUN ? Before each of your drive, it is important to inspect your Buggy and make sure that any problems you’ve found have been corrected. A pre-drive inspection is a must, not only for safety, but also because a breakdo- wn, or even a flat tire, can be a major inconvenience.
- Page 21 Raider Classic 250 (double-seat): Owner’s Manual EEC Version:2.0 Feb. 2007 SAFE DRIVING PRECAUTIONS Off-Road Use Only Your BUGGY and its tires are designed and manufactured for off-road use only, not for pavements. Driving on pavements can affect your handling and controlling. Don’t drive your BUGGY on pavements.
- Page 22 Raider Classic 250 (double-seat): Owner’s Manual EEC Version:2.0 Feb. 2007 While we want to shift the gear from forward to reverse or vice visa, the gear shifter should go back to neutral position first and do not accelerate the engine to high speed ( i.e. Do not change gear when...
- Page 23 Raider Classic 250 (double-seat): Owner’s Manual EEC Version:2.0 Feb. 2007 Control Speed Driving at excessively high speed increases the chances of accidents. When choosing a proper speed, you need to consider the capability of your BUGGY, terrain, visibility and other operating conditions, plus your own skills and experiences.
- Page 24 Raider Classic 250 (double-seat): Owner’s Manual EEC Version:2.0 Feb. 2007 When driving your BUGGY on unfamiliar terrain, failure to be especially careful could cause your BUGGY to go out of control or overturn. When operating your BUGGY on unfamiliar terrain, always drive slowly, always be especially careful, and always be alert to changing terrain conditions.
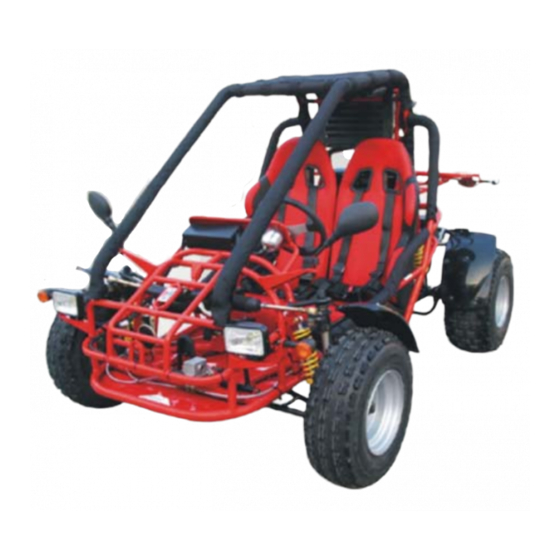
- Page 25 Raider Classic 250 (double-seat): Owner’s Manual EEC Version:2.0 Feb. 2007 IDENTIFY COMPONENTS Brush Guard Bar Seat Control Panel Steering Wheel Headlight Seat Belt Turning Light Rear Wheel Front Wheel Front Wheel Front Shock Absorber...
- Page 26 Raider Classic 250 (double-seat): Owner’s Manual EEC Version:2.0 Feb. 2007 Water Tank Sub Water Tank Rear Rack Taillight Rear Shock Absorber Air Cleaner Rear Mudguard Rear Reflector Rear Wheel Trailer Hook Engine Support...
- Page 27 Raider Classic 250 (double-seat): Owner’s Manual EEC Version:2.0 Feb. 2007 CONTROL PANEL Don’t attempt to start or operate the engine until you’ve been completely familiar with the location and use of each control that is necessary to operate your Buggy. You must know how to stop your vehicle before starting and driving.
- Page 28 Raider Classic 250 (double-seat): Owner’s Manual EEC Version:2.0 Feb. 2007 On the control panel, there are altogether three instruments and eight switches. Three Instruments: Coolant Temperature Indicator------ Indicates the level of engine coolant temperature. Tachometer------ Indicates the vehicle running speed.
- Page 29 Raider Classic 250 (double-seat): Owner’s Manual EEC Version:2.0 Feb. 2007 Master Lamp Switch------It controls all the lamp switches. Warning: Don't crank the starter more than 5 seconds at one time. THROTTLE The right foot pedal is the throttle that controls your vehicle speed.
- Page 30 Raider Classic 250 (double-seat): Owner’s Manual EEC Version:2.0 Feb. 2007 Step the left foot on the brake pedal with proper force each time starting the engine and turn the key switch at the same time. Always check the throttle subassembly before starting the engine and make sure that the throttle subassembly can rotate smoothly when stepped on and rebound to the idle speed position when released.
- Page 31 Raider Classic 250 (double-seat): Owner’s Manual EEC Version:2.0 Feb. 2007 REAR VIEW MIRRORS Adjust both left and right rear view mirrors to the desired angle before start driving the vehicle. If the rear view mirror is defective, it must be replaced immediately.
- Page 32 Raider Classic 250 (double-seat): Owner’s Manual EEC Version:2.0 Feb. 2007 TAIL LAMP [BRAKE LAMP] Tail lamps are installed at the rear of vehicle. There are two bulbs inside, one is for brake light, the other is normal light. Make sure both lights are in working condition before you drive the vehicle in the night.
- Page 33 Raider Classic 250 (double-seat): Owner’s Manual EEC Version:2.0 Feb. 2007 SEAT ADJUSTMENT The seat must always be securely adjusted to the positions which affords the best control of the foot, pedals, steering wheel for the operator.. 1) Pull the seat adjustment handle upward to disengage the seat slide;...
- Page 34 Raider Classic 250 (double-seat): Owner’s Manual EEC Version:2.0 Feb. 2007 Each single bucket seat comes with a safety belt. For safety reason, both driver and passenger MUST put on safety belt provided on each seat. Inspect and test the safety belt before you drive the BUGGY.
- Page 35 Raider Classic 250 (double-seat): Owner’s Manual EEC Version:2.0 Feb. 2007 the strap sideward; 4) Release the safety belt by pressing the red button on the buckle with the left hand and pull out the hook from the buckle with the right hand.
- Page 36 Raider Classic 250 (double-seat): Owner’s Manual EEC Version:2.0 Feb. 2007 at the end of the seat belt, otherwise the dangling portion will hit the ground and obstruct the moving of the vehicle. MAINTENANCE OF SAFETY BELT 1) Make sure the buckle is free of dust all the time.
- Page 37 Raider Classic 250 (double-seat): Owner’s Manual EEC Version:2.0 Feb. 2007 to accelerate /decelerate. The operator can’t completely control the speed of acceleration/ deceleration. The engine performance can also affect the speed. The electric enrichment device controls the starting. At the beginning of starting, the idle speed bore opens automatically, to let in large quantities of fuel for starting.
- Page 38 Raider Classic 250 (double-seat): Owner’s Manual EEC Version:2.0 Feb. 2007 2) Open the fuel tank cap in anti-clockwise direction. 3) After fuelling, close the fuel tank cap in clockwise direction. Type of petrol Only high quality unleaded petrol is allowed. The quality of petrol will affect the functioning and life of engine.
- Page 39 Raider Classic 250 (double-seat): Owner’s Manual EEC Version:2.0 Feb. 2007 Use Off-road tires for off-road vehicle [Picture A]. Use On-road tires for on-road vehicle [Picture B]. Tubeless tires are used for both On-road & Off-road tires. Both front and rear wheels are having different sizes:...
- Page 40 Raider Classic 250 (double-seat): Owner’s Manual EEC Version:2.0 Feb. 2007 Radiator Cooling fan b. The engine cooling system is using closed cooling forced circulation system which mainly consists of radiator, sub water tank, water pump, heat-sensor switch, water holes, fan blade and fan motor.
- Page 41 Raider Classic 250 (double-seat): Owner’s Manual EEC Version:2.0 Feb. 2007 d. Way of adding anticorrosive antifreeze into radiator : Cap valve Remove radiator cap; ii. Pinch the rubber pipe to expel air bubble, meanwhile fill in antifreeze up to the top of the rubber pipe;...
- Page 42 Raider Classic 250 (double-seat): Owner’s Manual EEC Version:2.0 Feb. 2007 COOLANT The coolant container must be filled with coolant up to the level of upper marking . The coolant is prepared with fixed ratio of Glycol and water as follow :...
- Page 43 Raider Classic 250 (double-seat): Owner’s Manual EEC Version:2.0 Feb. 2007 NOTE : 1. The boiling coolant and water will spill and hurt your hands and eyes, do not open the cap of coolant bottle if the engine and water tank is very hot.
- Page 44 Raider Classic 250 (double-seat): Owner’s Manual EEC Version:2.0 Feb. 2007 BRAKE OIL PUMP The brake oil pump is installed behind the brake pedal. If the brake oil level is below the required minimum level, or the two pistons connecting to the brake oil pump are defective, the brake system will be affected.
- Page 45 Raider Classic 250 (double-seat): Owner’s Manual EEC Version:2.0 Feb. 2007 ADD OIL BEFORE DRIVING Before starting to operate the engine, add appropriate amount of specified grade of oil into the brake, engine, transmission box, coolant. BRAKE OIL Brake oil is highly water-absorptive. The brake effect will be affected when too much water goes into the brake oil.
- Page 46 Raider Classic 250 (double-seat): Owner’s Manual EEC Version:2.0 Feb. 2007 Transmission/Gearbox gear oil The gear box is situated at the side of the engine. Inspect gear oil only when the gear box is cold down and the vehicle is turned off on a flat ground. Open the oil drive back cap of the oil inlet and check the oil level inside the gear box.
- Page 47 Raider Classic 250 (double-seat): Owner’s Manual EEC Version:2.0 Feb. 2007 ENGINE OIL Grade of engine oil : SAE15/40SF [Winter] SAE10/30SF [Summer] Amount of oil : 1.3 L or 0.34 gallon Steps for checking engine oil level : 1. Place the buggy in a level position..
- Page 48 Raider Classic 250 (double-seat): Owner’s Manual EEC Version:2.0 Feb. 2007 Engine Oil Capacity: The engine's rated capacity of engine oil is 3.5 qts,. Although all the engine oil is supposed to be drained out at the factory before export packaging, small amount of oil may still remain in the engine.
- Page 49 Raider Classic 250 (double-seat): Owner’s Manual EEC Version:2.0 Feb. 2007 PRE-DRIVE INSTRUCTION Overall Inspection Perform this pre-drive inspection every time before driving your Buggy. If not, serious damages to your Buggy or personal injuries to yourself may be caused. a. Engine Oil &Transmission Oil: Check for the engine oil level, and add oil if required; check for oil leaks;...
- Page 50 Raider Classic 250 (double-seat): Owner’s Manual EEC Version:2.0 Feb. 2007 i. Roll Cage Bar: Ensure that all the protective roll cage bars are fastened. j. Brake Light: Check for the proper operation of brake light. k. Wheels: Check the wheels to see if all the axle nuts have been tightened properly and been secured by cotter pins.
- Page 51 Raider Classic 250 (double-seat): Owner’s Manual EEC Version:2.0 Feb. 2007 OPERATION INSTRUCTION [A] BEFORE YOU START THE ENGINE Ensure no obstacle in front and behind the vehicle。 Conduct the following routine check: 1、 Check the engine oil level, add oil if required; check for oil leaks。...
- Page 52 Raider Classic 250 (double-seat): Owner’s Manual EEC Version:2.0 Feb. 2007 [B] STARTING THE ENGINE Step on the brake pedal fully, insert ignition key and turn the ignition switch clockwise. Once the engine is ignited, step on the throttle pedal slightly to warm up the engine for a few minutes.
- Page 53 Raider Classic 250 (double-seat): Owner’s Manual EEC Version:2.0 Feb. 2007 [C] STARTING TO DRIVE Test the controls to learn how to start, turn and stop. Operate your Buggy slowly until you have been familiar with it. After starting the engine, shift the gearshift lever from neutral to forward position and ready to move the vehicle。If you want to reverse the vehicle, shift the gearshift lever from neutral to reverse position.
- Page 54 Raider Classic 250 (double-seat): Owner’s Manual EEC Version:2.0 Feb. 2007 When you are starting the buggy on a slope, do not release the brake until you have already shifted the gearshift lever to forward position and ready to move the vehicle.
- Page 55 Raider Classic 250 (double-seat): Owner’s Manual EEC Version:2.0 Feb. 2007 [E] RUNNING-IN OF NEW ENGINE The running-in distance is 1000km. During this period, please follow the instructions below: (1) Run the engine according to the requirements specified; Do not overwork the engine. Avoid keeping the throttle full open.
- Page 56 Raider Classic 250 (double-seat): Owner’s Manual EEC Version:2.0 Feb. 2007 [F] BRAKE OPERATING SYSTEM When the brake is applied, the rear wheels will be locked。 When the brake lever is pulled upward/ toward direction, the brake is applied and the rear wheels are locked;...
- Page 57 Raider Classic 250 (double-seat): Owner’s Manual EEC Version:2.0 Feb. 2007 [G] STOP THE BUGGY 1、 Depress brake pedal, pull the brake lever. 2、 When the Buggy is to be parked on a flat ground, shift the gear to neutral position。...
- Page 58 Raider Classic 250 (double-seat): Owner’s Manual EEC Version:2.0 Feb. 2007 BATTERY Free-maintenance battery with 12V 12AH is installed at the rear of the vehicle [behind the seat cushion]. No charging of battery is required if the vehicle is received within 6 weeks after the ex-factory date, what you need to do is to pour electrolyte into the battery.
- Page 59 Raider Classic 250 (double-seat): Owner’s Manual EEC Version:2.0 Feb. 2007 The following procedure is very dangerous and should be performed with utmost care and attention. Wear protective eyewear, rubber gloves, and have water available should electrolyte come in contact with skin or eyes. KEEP ALL CHILDREN AWAY FROM THE AREA WHILE THIS PROCEDURE IS BEING PERFORMED.
- Page 60 Raider Classic 250 (double-seat): Owner’s Manual EEC Version:2.0 Feb. 2007 2) Battery Installation Note: The following page is for vehicles with battery’s containing separate electrolyte pack. Most battery’s will come with the electrolyte already sealed into the battery. 2.1) Place battery on level surface;...
- Page 61 Raider Classic 250 (double-seat): Owner’s Manual EEC Version:2.0 Feb. 2007 2.4) Push the container down strongly enough to break the silver seals; 2.5) As electrolyte starts flowing into battery, air bubbles will come up from the mouths of the plastic electrolyte bottles;...
- Page 62 Raider Classic 250 (double-seat): Owner’s Manual EEC Version:2.0 Feb. 2007 2.10) After filling, let battery stand for at least 30 minutes before charging (This allows the electrolyte to penetrate plates for optimum performance and ensures longer battery life); 2.11) After 30 minutes the battery is ready for its initial charge, place cap strip loosely over the filling holes as shown in the picture.
- Page 63 Raider Classic 250 (double-seat): Owner’s Manual EEC Version:2.0 Feb. 2007 3.2) Connect the black negative (-) cable to the black negative (-) pole of the battery; Note: The red positive (+) cable has a larger diameter than the black negative y cable.
- Page 64 Raider Classic 250 (double-seat): Owner’s Manual EEC Version:2.0 Feb. 2007 3.5) Install battery into battery tray making sure that the rubber mat is in place; Note: The warning label on the battery should be facing the warning label on the gray tray.
- Page 65 Raider Classic 250 (double-seat): Owner’s Manual EEC Version:2.0 Feb. 2007 3.6) Once battery is firmly seated in gray tray with rubber mat under it, attach the red positive wire to the red positive terminal on the battery. 3.7) Then attach the black negative wire to the black negative...
- Page 66 Raider Classic 250 (double-seat): Owner’s Manual EEC Version:2.0 Feb. 2007 3.8) Place grey plastic battery cover on top of the battery and thread wires through the cover cuts – outs. Finally, secure the battery with the wide black rubber strap using the hooks on both ends.
- Page 67 Raider Classic 250 (double-seat): Owner’s Manual EEC Version:2.0 Feb. 2007 Charge the battery in a well ventilated area. At the beginning or end of charging, turn off the charger first, in order to prevent electric spark and explosion. 4. Battery Replacement Battery failure could be caused by the following possibilities : i) Low voltage --- Test the voltage by using multi-meter, 9V or below means the battery is weak.
- Page 68 Raider Classic 250 (double-seat): Owner’s Manual EEC Version:2.0 Feb. 2007 Note: Positive (+) cable is red and larger in diameter; Negative y cable is black and smaller of the two in diameter. CONNECT NEGATIVE CABLE LAST. 4.5) Torque terminal bolts to 40 in. / lbs;...
- Page 69 Raider Classic 250 (double-seat): Owner’s Manual EEC Version:2.0 Feb. 2007 MAINTENANCE & SERVICE INSTRUCTIONS Following safety precaution must be observed while conducting regular maintenance and services : 1. Make sure the engine and entire vehicle is in OFF position. 2. Make sure the engine and exhaust pipes are cooled down.
- Page 70 Raider Classic 250 (double-seat): Owner’s Manual EEC Version:2.0 Feb. 2007 A. AIR CLEANER [FILTER] The air filter is installed above the engine cylinder head. Maintain regular service as follow : Regular maintenance Period Cleaning Every 20 hours or 500 km[311m]...
- Page 71 Raider Classic 250 (double-seat): Owner’s Manual EEC Version:2.0 Feb. 2007 Seam, Dirt, Carbon Verify B. SPARK PLUG a. Remove the spark plug and inspect it with a spark plug 0.6~0.8mm wrench each time you change the oil; Note: The electrodes should be kept clean and free of carbon.
- Page 72 Raider Classic 250 (double-seat): Owner’s Manual EEC Version:2.0 Feb. 2007 C. CARBURETOR ADJUSTMENT Never make unnecessary adjustments. The manufacturer recommended settings are correct for most applications. It's not necessary to disassemble the screw unless the carburetor needs to be replaced. Prepare a 50r/w tachometer before the adjustment.
- Page 73 Raider Classic 250 (double-seat): Owner’s Manual EEC Version:2.0 Feb. 2007 D. CLEANING INSTRUCTION Keep your vehicle clean. Use a clean rag to wipe off the dirt and oil from around the controls, and wipe off any spilled fuel and oil. Keep the engine clean of foreign objects and be sure that the water tank fan is free of debris for proper cooling.
- Page 74 Raider Classic 250 (double-seat): Owner’s Manual EEC Version:2.0 Feb. 2007 G. CHAIN ADJUSTMENT Check the chain adjustment after the first two hours of use, and readjust the chain if it has over 1/2" flex. a. Loosen Nut # 1; b. Turn Nut # 2 clockwise in 1/2-turn increments, then turn nut # 1 until it is tightened;...
- Page 75 Raider Classic 250 (double-seat): Owner’s Manual EEC Version:2.0 Feb. 2007 H. FRONT SHOCK ABSOBER ADJUSTMENT There are five adjustable positions on each shock. The default position is in the middle set by the manufacturer. Use a round nut wrench as you adjust the shock.
- Page 76 Raider Classic 250 (double-seat): Owner’s Manual EEC Version:2.0 Feb. 2007 L. WHEEL REPLACEMENT 1. Front Wheel Replacement Don’t disassemble the castle nuts when replacing the front wheels. It is only necessary to loosen the nuts so that the wheels turn freely on the axle with minimum endplay.
- Page 77 Raider Classic 250 (double-seat): Owner’s Manual EEC Version:2.0 Feb. 2007 3. Tires inflation Maintaining the following specified tire pressure will be necessary to ensure driving comfort, safety of the driver and durability of tires. Spare Tire Front tire Rear Tire...
- Page 78 Raider Classic 250 (double-seat): Owner’s Manual EEC Version:2.0 Feb. 2007 ENGINE A. Type of engine CH250CC single cylinder, 4-stroke, water-cooled engine is used in the buggy. Any change in the engine must be approved by the manufacturer because its dimension and technical specification must match the technical specification of carburetor, muffler, air filter and gear transmission, otherwise, engine vibration, oil leaking, engine under-powered, strange noise, disturbance with other portion of the frame body will happen.
- Page 79 Raider Classic 250 (double-seat): Owner’s Manual EEC Version:2.0 Feb. 2007 C. Engine components 1. Aeration pipe of gear case 2. Cylinder head 3. Spark plug (D8RTC) 4. Cylinder head cover 5. Carburetor 6. Cylinder body 7. Left case cover 8. Special bolt subassembly...
- Page 80 Raider Classic 250 (double-seat): Owner’s Manual EEC Version:2.0 Feb. 2007 9. Secondary wire 10. Right case body 11. Air-input hole of carburetor 12. Temperature sensor 13. Water-inflow rubber pipe (Water hose B) 14. Starting motor 15. Magneto winding Figure II Outline of the engine (front view)
- Page 81 Raider Classic 250 (double-seat): Owner’s Manual EEC Version:2.0 Feb. 2007 16. Linking hole of vent-pipe 17. Chain regulator 18. Left case body 19. Output axle 20. Dipstick 21. Oil-filter gauge cover 22. Right case cover 23. Water pump cover 24. Fuel pipe Figure III Engine outline (right view) 25.
- Page 82 Raider Classic 250 (double-seat): Owner’s Manual EEC Version:2.0 Feb. 2007 D. ENGINE OVERHEATING You should stop and check the buggy when the water temperature gauge indicates high temperature. Run the engine at idle speed for a few minutes then check whether the fan blade is running. If it is running and there is no heating gas coming out from the engine, let the engine continue to run at idle speed until the engine is cooled.
- Page 83 Raider Classic 250 (double-seat): Owner’s Manual EEC Version:2.0 Feb. 2007 B. ENGINE LUBRICATION After the new engine has operated for the first 5 hours and for every 10 hours thereafter, change the oil in the crankcase to insure the proper lubrication of internal parts and to prevent costly repairs due to the excessive wear.
- Page 84 Raider Classic 250 (double-seat): Owner’s Manual EEC Version:2.0 Feb. 2007 C. ENGINE MAINTENANCE (1) Daily Maintenance: a) Remove the dust and dirt on the surface; b) Check all the exterior fasteners at the joints, and fasten or replace them if necessary;...
- Page 85 Raider Classic 250 (double-seat): Owner’s Manual EEC Version:2.0 Feb. 2007 (2) 50–Hour Maintenance: a) Finish the daily maintenance; b) Remove the dust in the air cleaner element; replace the element if there is too much dust or any damp; Note: Don’t dip the element in water or oil. Don’t apply any lubrication oil or any other oil on the element.
- Page 86 Raider Classic 250 (double-seat): Owner’s Manual EEC Version:2.0 Feb. 2007 Draining of oil should be done at room Note: temperature to achieve quick and complete draining. Check the cooling devices. Check for leakage on the water tank and water pipe;...
- Page 87 Raider Classic 250 (double-seat): Owner’s Manual EEC Version:2.0 Feb. 2007 (3) 100-Hour Maintenance: a) Finish the 50-hour maintenance; b) Remove the cylinder cover and cylinder body, and clean out the carbon on the cylinder cover, cylinder body, piston top and in/ex valve, etc.;...
- Page 88 Raider Classic 250 (double-seat): Owner’s Manual EEC Version:2.0 Feb. 2007 (6) 500-Hour Maintenance: a) Finish 300-hour maintenance; b) Disassemble the engine (except the crankshaft connecting rod); check the parts for wear, and repair or replace the parts if necessary; c) Replace the cooling fluid.
- Page 89 Raider Classic 250 (double-seat): Owner’s Manual EEC Version:2.0 Feb. 2007 Note : NEVER MIX VARIOUS GRADES OF OIL TOGETHER Oil filter must be replaced whenever engine oil is replaced. Check the oil level before driving the vehicle, add oil up to the required level.
- Page 90 Raider Classic 250 (double-seat): Owner’s Manual EEC Version:2.0 Feb. 2007 STORAGE INSTRUCTION In the event your vehicle is not to be operated for periods in excess of 30 days or at the end of each driving season, prepare for storage...
- Page 91 Raider Classic 250 (double-seat): Owner’s Manual EEC Version:2.0 Feb. 2007 PERIODICAL CHECKS AND SERVICES The maintenance intervals in the following table are based on average riding conditions. Riding in unusually dusty areas requires more frequent services. Items First week Monthly...
- Page 92 Raider Classic 250 (double-seat): Owner’s Manual EEC Version:2.0 Feb. 2007 SPECIFICATIONS DIMENSIONS DOUBLE-SEAT Overall Length 2250 mm/7.38 ft [On-road]; 2270mm/7.45ft [Off-road] Overall Width 1430 mm/4.69 ft [On-road]; 1450 mm/4.76ft [Off-road] Overall Height 1630 mm/5.35 ft [On-road]; 1475mm/4.84ft [Off-road] Wheelbase 1560 mm/5.12 ft Ground Clearance 250 mm/0.82 ft...
- Page 93 Raider Classic 250 (double-seat): Owner’s Manual EEC Version:2.0 Feb. 2007 Max. Power 12.5kw/7000 rpm or 17 hp/7000 rom Max. Torque 17.6 N.m /6500 rpm Idle Speed 1500 ±100 rpm CO Emission ≤3.8% HC Emission ≤800 ppm Fuel Type SAE 90# or above (unleaded) Min.
- Page 94 Raider Classic 250 (double-seat): Owner’s Manual EEC Version:2.0 Feb. 2007 Transmission OHC Chain Drive Transmission Ratio F 1:1, B 1:1.758 Primary Transmission Ratio 2.2-0.9 Compression Ratio 10 : 1 Reduction Ratio Clutch Automatic, centrifugal, dry, shoe -type Generator Outer rotor, flywheel...
- Page 95 Raider Classic 250 (double-seat): Owner’s Manual EEC Version:2.0 Feb. 2007 Climbing >18 Top speed 63kph Tachometer 33-40kph Turning Radius 3 m or 9.85 ft Acceleration < 16 Sec Horn 12V 3A 105dB, 93<db (A) <112 Headlight 12V /35W Headlight High Beam Intensity...
- Page 96 Raider Classic 250 (double-seat): Owner’s Manual EEC Version:2.0 Feb. 2007 CHASSIS Front/Rear Brake Hydraulic disc, foot control Front Wheel Brake Force 923N Rear Wheel Brake Force 1288N Braking Distance ≤7 m@30kmph Parking Brake Hydraulic disc, hand control Front Tire 20.5x8-10 [On-road] ; 21 X 7-10 [Off-road] Rear Tire 20.5-10-10 [On-road] ;...
- Page 97 Raider Classic 250 (double-seat): Owner’s Manual EEC Version:2.0 Feb. 2007 STANDARD TORQUE OF FASTENING PARTS Below table indicates the standard torque for fixing fastening parts such as bolts onto the BUGGY. Over or under use of torque strength will cause falling off of bolts or easy cracking of components.
- Page 98 Raider Classic 250 (double-seat): Owner’s Manual EEC Version:2.0 Feb. 2007 BUGGY IDENTIFICATION 1. VIN -----You may identify your buggy by the Vehicle Identification Number [VIN] which is embossed on the frame behind the passenger seat. This VIN number will be used in communication with the dealer, import custom office , service centre, forwarder or manufacturer.
Need help?
Do you have a question about the Raider Classic 250 and is the answer not in the manual?
Questions and answers
Chemas electric