Table of Contents
Advertisement
Advertisement
Table of Contents
Troubleshooting

Subscribe to Our Youtube Channel
Related Manuals for Dazon Raider mini 90S


Summary of Contents for Dazon Raider mini 90S
- Page 2 Raider Mini 90 (single/double-seat): Service Manual Version:2.0 Feb. 2006 FOREWORD This service manual has been specially prepared to provide all the necessary information for the proper maintenance and repair of the Raider Mini 90. The Raider Mini 90 fits the needs of a wide variety of users. Those who will be servicing this Raider Mini 90 should carefully review this manual before performing any repair or service.
-
Page 3: Table Of Contents
Raider Mini 90 (single/double-seat): Service Manual Version:2.0 Feb. 2006 CONTENTS 1. GENERAL INFORMATION ---------------------------------------------4 2. MAINTENANCE --------------------- -------------------------------------10 3. ENGINE ----------------------------------------------------------------------21 3.1 ENGINE COMBUSTION SYSTEM-----------------------------------21 3.2 CLUTCH --------------------------------------------------------------------25 3.3 TRANSMISSION /CRANKCASE -------------------------------------27 3.4 FUEL SYSTEM -----------------------------------------------------------29 3.5 ENGINE LUBRICATION & COOLING SYSTEM----------------33 3.6 STARTING FAILURE----------------------------------------------------34 4. -
Page 4: General Information
Raider Mini 90 (single/double-seat): Service Manual Version:2.0 Feb. 2006 1. INFORMATION SAFETY Gasoline is extremely flammable and is explosive under certain conditions. Do not smoke or allow sparks of flames in your work area. Never run the engine in a closed area. The exhaust contains poisonous carbon monoxide gas that may cause loss of consciousness and lead to death. -
Page 5: Engine Serial Number
Raider Mini 90 (single/double-seat): Service Manual Version:2.0 Feb. 2006 Vehicle Identification Number (VIN) The VIN is stamped on the nameplate that is stuck on the left front of the vehicle frame. Engine Serial Number The engine serial number is stamped on the lower front left side of the engine crankcase. -
Page 6: Specifications
Raider Mini 90 (single/double-seat): Service Manual Version:2.0 Feb. 2006 1.4 SPECIFICATIONS DIMENSIONS SINGLE-SEAT / DOUBLE-SEAT Overall Length 1550mm / 1550mm Overall Width 1000mm / 1100mm Overall Height 1200mm / 1200mm Wheelbase 1100mm / 1100mm Ground Clearance 100mm / 100mm Accord with GMVR A01-01 Statutory Plate &... - Page 7 Raider Mini 90 (single/double-seat): Service Manual Version:2.0 Feb. 2006 CAPACITIES Fuel Tank 4.5L Engine Oil 0.7~0.9L Acceleration ≤15s Climbing >18 Top Speed 25km/h Turning Radius 1.7m Noise Level ≤80dB Battery 12V 8Ah CHASSIS Brake System Rear disk, foot control Front Suspension Single A-arm 30 Travel Rear Suspension Swing arm 30 Travel...
-
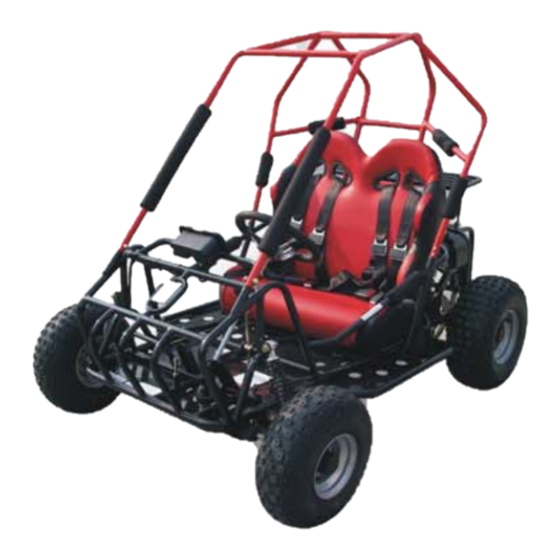
Page 8: Parts Location
Raider Mini 90 (single/double-seat): Service Manual Version:2.0 Feb. 2006 1.6 PARTS LOCATION Double-seat Single-seat Seat Safety Belt Roll Bar Rear Rack Steering Wheel Control Panel Rear Wheel Throttle Pedal Front Shock Absorber Brake Pedal Front Wheel... - Page 9 Raider Mini 90 (single/double-seat): Service Manual Version:2.0 Feb. 2006 Rear View Rear Rack Fuel Tank Cap Fuel Tank Air Cleaner Engine Muffler Chain Reverse lever...
-
Page 10: Maintenance
Raider Mini 90 (single/double-seat): Service Manual Version:2.0 Feb. 2006 2. MAINTENANCE 2.1 MAINTENANCE SCHEDULE The maintenance interval in the follow table is based upon average riding conditions. Riding in unusually dusty areas requires more frequent servicing. Interval Service in Daily Monthly Quarterly Yearly... - Page 11 Raider Mini 90 (single/double-seat): Service Manual Version:2.0 Feb. 2006 c) Clear up the filth and carbon accumulation on the spark plug with a steel brush or a blade; d) Inspect the spark plug gap (in general, it should be about 0.6 - 0.7 mm.); e) When the carbon accumulation and wear of the spark plug are too serious, replace the spark plug with a new one of the same specification.
-
Page 12: Air Cleaner
Raider Mini 90 (single/double-seat): Service Manual Version:2.0 Feb. 2006 2.2.4 Air Cleaner Air Cleaner Clean the air cleaner quarterly, or more often when driving in dusty conditions. If the air cleaner is clogged with dust, its performance will be severely decreased, even the engine damages will probably be caused. -
Page 13: Engine Oil
Raider Mini 90 (single/double-seat): Service Manual Version:2.0 Feb. 2006 2.2.6 Tightening Torque Table Bolt Conventional marked bolt 8.8 marked bolt Diameter N•m Kg•m lb-ft N•m Kg•m lb-ft (mm) 0.1-0.2 0.7-1.5 1.5-3 0.15-0.3 1.0-2.0 0.2-0.4 1.5-3.0 0.3-0.6 2.0-4.5 0.4-0.7 3.0-5.0 8-12 0.8-1.2 6.0-8.5 10-16... - Page 14 Raider Mini 90 (single/double-seat): Service Manual Version:2.0 Feb. 2006 b) Remove the large cap on the left bottom of the engine ,and remove the screen; c) Wash the screen with some cleaning solvent and reassemble it; make sure that the O-ring is still in good conditions;...
- Page 15 Raider Mini 90 (single/double-seat): Service Manual Version:2.0 Feb. 2006 b) If the chain is too loose, adjust the left and right rear wheel bearing holders counterclockwise at the same time; If the chain is too tight, adjust the left and right rear wheel bearing holders clockwise at the same time;...
-
Page 16: Idle Speed Adjustment
Raider Mini 90 (single/double-seat): Service Manual Version:2.0 Feb. 2006 Castle Nut d) Remove the cotter pin, castle nut, left rear tire, right rear tire and rear wheel hub in order; Rear Wheel Hub Cotter Pin Bolt Rear Wheel Axle Holder e) Loosen the 4 bolts on the left/right holder of the rear wheel axle;... - Page 17 Raider Mini 90 (single/double-seat): Service Manual Version:2.0 Feb. 2006 2.2.14 Rear Brake Swing Arm Solution & Replacement Problem: Rear brake swing arm becomes loose, and is hard to fix when vehicle brakes in suddenly. Rear Brake Swing Arm Rear Brake Caliper Assy. Adjust Bolt Fastening Nut Solution:...
- Page 18 Raider Mini 90 (single/double-seat): Service Manual Version:2.0 Feb. 2006 2. Replacement a) Remove the adjust nut of brake cable; Adjust Nut of Brake Cable b) Remove the fastening nut of rear brake swing arm ; Rear Brake Swing Arm Fastening Nut c) Remove the rear brake swing arm;...
- Page 19 Raider Mini 90 (single/double-seat): Service Manual Version:2.0 Feb. 2006 e) Reassemble the adjust nut of brake cable. Adjust Nut of Brake Cable Adjust Nut of Brake Cable Return Spring Notice: The return spring of brake should be assembled in the exact direction as shown in the picture.
- Page 20 Raider Mini 90 (single/double-seat): Service Manual Version:2.0 Feb. 2006 Notice: In storage and during service, please put your buggy with its four wheels on the ground. Correct All the other ways are wrong, and should be forbidden. Wrong Wrong Wrong way to set your buggy during storage and service may cause the problems below: a) Carburetor gas flows into the engine, which makes starting very difficult;...
-
Page 21: Engine
Raider Mini 90 (single/double-seat): Service Manual Version:2.0 Feb. 2006 ENGINE ENGINE COMBUSTION SYSTEM 3.1.1 Troubleshooting CYLINDER HEAD COMPRESSION LEAKAGE OR DAMAGE OF HEAD GASKET WARPED OR CRACKED CYLINDER HEAD WORN-OUT CYLINDER OR PISTON RINGS HIGH EXCESSIVE CARBON ACCUMULATION ON PISTON HEAD OR COMPRESSION IN COMBUSTION CHAMBER EXCESSIVE... - Page 22 Raider Mini 90 (single/double-seat): Service Manual Version:2.0 Feb. 2006 b) Remove the cylinder head; Remove the cylinder carefully to see the whole piston; Remove one piston pin clip, and remove the piston and piston pin; Spread and remove each piston ring. Locating pin Bush NOTE: Don’t let the clip drop into the engine...
- Page 23 Raider Mini 90 (single/double-seat): Service Manual Version:2.0 Feb. 2006 d) Measure the clearance between the ring and groove; Service limit: 0.12 mm Piston Ring Piston e) Measure the piston outer diameter at 10 mm high from the skirts bottom; Service limit: 49.90 mm Piston Outer Diameter Measurement Measure the piston pin bore, and the piston pin outer diameter;...
- Page 24 Raider Mini 90 (single/double-seat): Service Manual Version:2.0 Feb. 2006 3.1.4 Installation a) Install the piston rings with the marks facing up; NOTE: Do not damage the piston rings by Piston spreading the ends too far. Ring The piston ring gap must align with the ring pin in the ring groove of piston.
-
Page 25: Clutch
Raider Mini 90 (single/double-seat): Service Manual Version:2.0 Feb. 2006 3.2 CLUTCH Plank Cover, Limited 3.2.1 Dismantle a) Dismantle the following parts: ---Lever Comp., Clutch ---Plate Comp. , Clutch Lifter Cam ---Plank Comp., Limited ---Spring, Plate Side ---Through, Oil ---Spring, Oil Through Lever Comp., Clutch b) Remove the four screws, cover and gasket;... - Page 26 Raider Mini 90 (single/double-seat): Service Manual Version:2.0 Feb. 2006 e) Dismantle the following parts: ---Circlip, External ---Gear, Primary Drive Circlip Gear Troubleshooting 3.2.2 When the engine works at the idle speed, the vehicle moves slowly. The clutch has not been adjusted properly; The clutch disc is warped;...
-
Page 27: Transmission /Crankcase
Raider Mini 90 (single/double-seat): Service Manual Version:2.0 Feb. 2006 3.3 TRANSMISSION /CRANKCASE Trouble Shooting 3.3.1 Difficulty in gearshift: The clutch was not adjusted properly; The gear shifter is bent; The guide pin is broken; The gear guard is worn out. Transmission dislocation: The guide pin is worn out;... - Page 28 Raider Mini 90 (single/double-seat): Service Manual Version:2.0 Feb. 2006 Engine vibration: The crankshaft radial run-out is too great. 3.3.2 Transmission Device Assembly Assemble the transmission device by reversing the disassembly procedure. NOTE: Align the head of the snap ring with the center of the key slot as shown in the picture.
-
Page 29: Fuel System
Raider Mini 90 (single/double-seat): Service Manual Version:2.0 Feb. 2006 3.4 FUEL SYSTEM 3.4.1 Trouble Shooting ENGINE NO FUEL IN TANK STARTING NO FUEL TO CYLINDER DIFFICULTY TOO MUCH FUEL IN CYLINDER NO SPARK AT SPARK PLUG CLOGGED AIR CLEANER FILTER UNSTEADY, IMPROPER ADJUSTMENT OF IDLE SPEED SCREW AT STALLING... - Page 30 Raider Mini 90 (single/double-seat): Service Manual Version:2.0 Feb. 2006 b) Clean the carburetor and readjust the idle speed according to the steps below: Open the connecting tube between the air cleaner and carburetor. Air Cleaner c) Spray a little carburetor cleanser into the carburetor.
- Page 31 Raider Mini 90 (single/double-seat): Service Manual Version:2.0 Feb. 2006 Throttle Valve Spring b) Remove the carburetor cap; Throttle Cable Remove the throttle cable from the throttle valve while depressing the throttle valve spring; c) Remove the needle clip retainer, the jet needle and needle clip;...
- Page 32 Raider Mini 90 (single/double-seat): Service Manual Version:2.0 Feb. 2006 c) Inspect all the jets and screws for wear or damage; Clean the passages and jets with compressed air. Carburetor Assembly Clean all parts in solvent and blow it dry with compressed air. Assembly is essentially the reverse order of disassembly.
-
Page 33: Engine Lubrication & Cooling System
Raider Mini 90 (single/double-seat): Service Manual Version:2.0 Feb. 2006 3.5. ENGINE LUBRICATION & COOLING SYSTEM 3.5.1 Troubleshooting TOO LOW OIL LEVEL IN OIL TANK IMPROPER FIXED OIL TUBES INSUFFICIENT OIL SUPPLY OIL LEAKAGE FROM TUBE ENDS TO ENGINE DAMAGED OIL TUBES CLOGGED OIL TUBES BROKEN-DOWN OIL PUMP EXTERNAL OIL LEAKAGE... -
Page 34: Starting Failure
Raider Mini 90 (single/double-seat): Service Manual Version:2.0 Feb. 2006 3.6 Starting Failure... - Page 35 Raider Mini 90 (single/double-seat): Service Manual Version:2.0 Feb. 2006...
-
Page 36: Electric System
Raider Mini 90 (single/double-seat): Service Manual Version:2.0 Feb. 2006 4. ELECTRIC SYSTEM Troubleshooting ENGINE STOPPING IMPROPER IGNITION TIMING AFTER STARTING FAULTY SPARK PLUG NO SPARK AT PLUG ENGINE STOP SWITCH AT “OFF” FAULTY IGNITION COIL FAULTY GENERATOR FAULTY CDI UNIT POOR CONNECTION: Between CDI and Ignition Coil Between Alternator and CDI Unit... -
Page 37: Ignition Coil
Raider Mini 90 (single/double-seat): Service Manual Version:2.0 Feb. 2006 (When Starter Motor And Engine Can FAULTY IGNITION SYSTEM Turn) ENGINE STARTING FAILURE ENGINE PROBLEMS SLOW MOVEMENT OF STARTER FAULTY ENGINE STOP SWITCH OVERLOW ELECTROLYTE SPECIFIC GRAVITY IN BATTERY or USED UP BATTERY POOR CONTACT BETWEEN CONNECTING TERMINALS OF BATTERY WIRES BROKEN STARTING RELAY... -
Page 38: Ignition Timing
Raider Mini 90 (single/double-seat): Service Manual Version:2.0 Feb. 2006 c) Measure the secondary coil resistance with the spark plug cap in place. Standard: 7-9 KΩ 4.3 Ignition Timing The ignition advance is 15º± 1º B.T.D.C /1700rpm. The Capacitive Discharge Ignition (CDI) system is factory pre-set and does not require adjustment. - Page 39 Raider Mini 90 (single/double-seat): Service Manual Version:2.0 Feb. 2006 KEEP ALL CHILDREN AWAY FROM THE AREA WHILE THIS PROCEDURE IS BEING PERFORMED. POISON – CAUSES SEVERE BURNS Contains sulfuric acid. Avoid contact with skin, eyes, or clothing TO prevent accidents, rinse empty container with water. ANTIDOTE: External –...
- Page 40 Raider Mini 90 (single/double-seat): Service Manual Version:2.0 Feb. 2006 d) Push the container down strongly enough to break the silver seals; e) As electrolyte starts flowing into battery, air bubbles will come up from the mouths of the plastic electrolyte bottles; f) Leave bottles upside down in battery holes until electrolyte is completely drained;...
- Page 41 Raider Mini 90 (single/double-seat): Service Manual Version:2.0 Feb. 2006 b) Connect the black negative (-) cable to the black negative (-) pole of the battery; NOTE: The red positive (+) cable has a larger diameter than the black negative y cable. c) Charging rate: Charge battery @ 0.7 Amps for 5 ~ 10 hours;...
- Page 42 Raider Mini 90 (single/double-seat): Service Manual Version:2.0 Feb. 2006 f) Once battery is firmly seated in gray tray with rubber mat under it, attach the red positive wire to the red positive terminal on the battery; g) Then attach the black negative wire to the black negative terminal on the battery;...
- Page 43 Raider Mini 90 (single/double-seat): Service Manual Version:2.0 Feb. 2006 Charge in a well ventilated area. DO NOT smoke around batteries and keep away from open flame. Battery Replacement: a) Remove old battery; Mark which cable is connected to the positive terminal (+) and which cable is connected to the negative (-) terminal;...
- Page 44 Raider Mini 90 (single/double-seat): Service Manual Version:2.0 Feb. 2006 Trouble Shooting Battery Short Circuit Solution Problem: battery short circuit Purpose: to prevent battery electrodes touch battery box cover and cause battery short circuit Solution: Battery Band 1. Inspect Battery a) Remove the battery band; Steel Battery Box Cover b) Remove the steel battery box cover;...
- Page 45 Raider Mini 90 (single/double-seat): Service Manual Version:2.0 Feb. 2006 2. Replace Battery Box Cover - + Electrode Electrode a) Assemble the battery + /- electrode; Battery b) Put the battery into the battery box; Tel.: (8 Battery Box Plastic Battery Box Cover c) Put on the plastic battery box cover (part no.
- Page 46 Raider Mini 90 (single/double-seat): Service Manual Version:2.0 Feb. 2006 Replaced Battery Box Cover e) The replacement is finished. 4.6 Starter Motor / Starting Clutch 4.6.1 Starter Motor Maintenance Warning Turn off the ignition switch before maintaining the electric starter. The sudden starting of the electric starter could cause severe injuries or death.
- Page 47 Raider Mini 90 (single/double-seat): Service Manual Version:2.0 Feb. 2006 Spec. Unit: mm (in) Item Standard value Limit value Length of electric starter carbon brush 12.0mm 4.0mm Trouble Shooting NOTE: Check the following items before looking for the system failure: If the main fuse has been burned (10A); If the wire of the battery or electric starter got loose;...
- Page 48 Raider Mini 90 (single/double-seat): Service Manual Version:2.0 Feb. 2006 b) Align the rear shell groove with the carbon brush pin; Install the rear shell; c) Check if the O-ring is in good condition; replace it if it is defective. Lubricate the O-ring; Install the electric starter and fasten the bolt;...
- Page 49 Raider Mini 90 (single/double-seat): Service Manual Version:2.0 Feb. 2006 b) Check the abrasion and damage of the Main/follower sprocket and chain: Measure the outer diameter of the main Sprocket. Assembly a) Install the starting clutch shell; Apply the locking agent to the screw threads of the starting clutch shell;...
- Page 50 Raider Mini 90 (single/double-seat): Service Manual Version:2.0 Feb. 2006 4.6.3 Starting Relay System Check a) Turn on the ignition switch; Press the starting switch; It is normal if the starting relay makes “Kata” Sounds. b) Pull out the connector from the starting relay;...
- Page 51 Raider Mini 90 (single/double-seat): Service Manual Version:2.0 Feb. 2006 Troubleshooting Turn on the ignition switch Connect the electric starter terminal and press the starting “Kata” with the positive terminal of the switch; check if there is a sounds battery (a thin wire can’t be used “Kata”...
-
Page 52: Chassis
Raider Mini 90 (single/double-seat): Service Manual Version:2.0 Feb. 2006 5. CHASSIS 5.1 Rear Axle Removal a) Disassemble the rear Wheel. b) Remove the cotter pins on the rear wheel axle nut. c) Remove the axle nut. d) Block up the rear end of the machine. e) Remove the rear wheel and hub assembly by sliding off splines of the axle. -
Page 53: Front Wheel Replacement
Raider Mini 90 (single/double-seat): Service Manual Version:2.0 Feb. 2006 Rear Swing Arm Shock Absorber Electric Box Chain Guard Cover Battery 5.3 Front & Rear Shocks The front and rear shocks are oil dampened units. They are non-re-build able. If any oil seepage is noticed, the shock should be replaced. 5.4 Front Wheel Replacement Don’t disassemble the castle nuts when you replace the front wheels. - Page 54 Raider Mini 90 (single/double-seat): Service Manual Version:2.0 Feb. 2006 5.5Front Hubs a) Check the seals for rips or tears, and replace them if any exist. b) Remove the bearings with a punch from the opposite side. c) Inspect the bearings for easy movements; If any dirt or mud has gotten into them, wash them in the cleaning solvent and spin with your finger.
- Page 55 Raider Mini 90 (single/double-seat): Service Manual Version:2.0 Feb. 2006 Steering Comp. Steering Shaft Steering Ball Joint, Right Steering Ball Joint, Left Dust Cover Steering Gear 5.8 Steering Gear Box and Ball Head a) Remove the four bolts of the LH&RH clamp nuts on the steering gear box. b) Remove and check the ball head dust cover on the steering gear box for wear.
- Page 56 Raider Mini 90 (single/double-seat): Service Manual Version:2.0 Feb. 2006 5.10 Steering Knuckle Support a) Remove the rubber dust cover of the knuckle support. b) Check the grease of the ball joint; Clean it if it’s dirty and fill with grease. c) Replace the steering knuckle support if the ball joint is loose or the steering isn't flexible 5.11 Tie Rod...
-
Page 57: Ignition System Check
Raider Mini 90 (single/double-seat): Service Manual Version:2.0 Feb. 2006 b) Dry the filter after cleaning, dip it into the engine oil specified by the manufacturer and wring the excess oil out of the filter. 5.13 Spark Plug a) Remove the spark plug and inspect it with a spark plug wrench each time you change the oil;... -
Page 58: Front Wheel Alignment
Raider Mini 90 (single/double-seat): Service Manual Version:2.0 Feb. 2006 2.Push the electric button “START” ( Yellow button). Apply the rear brake lever to make sure the rear wheels are locked. If the ignition system is operating properly, a blue mark should jump across the spark plug gap. If there is no spark, take your machine to your service center. - Page 59 Raider Mini 90 (single/double-seat): Service Manual Version:2.0 Feb. 2006 To make Dimension B shorter, screw the rod left; if Dimension B needs to be longer, screw the rod right; Tighten the jam nut tightly against the rod end, recheck the distance and repeat the above steps until the Dimensions are the same as the required.
-
Page 60: Wiring Diagram
Raider Mini 90 (single/double-seat): Service Manual Version:2.0 Feb. 2006 Wiring diagram:...
Need help?
Do you have a question about the Raider mini 90S and is the answer not in the manual?
Questions and answers