Table of Contents
Advertisement
Quick Links
Advertisement
Chapters
Table of Contents

Related Manuals for JVC HR-J595EK


Summary of Contents for JVC HR-J595EK
- Page 1 VIDEO CASSETTE RECORDER HR-J595EK INSTRUCTIONS LPT0669-001A...
-
Page 2: Safety Precautions
In the unlikely event of the plug fuse failing be sure to replace the fuse only with an identical approved type, as originally fitted, and to replace the fuse cover. If the fuse fails again consult your nearest JVC dealer. If nonetheless the mains plug is cut off remove the fuse and dispose of the plug immediately, to avoid a possible shock hazard by inadvertent connection to the mains supply. - Page 3 o button does not completely shut off mains power from the unit, but switches STANDBY/ON operating current on and off. “y ” shows electrical power standby and “ z” shows Video tapes recorded with this video recorder in the LP (Long Play) mode cannot be played back on a single-speed video recorder.
-
Page 4: Some Do's And Don'ts On The Safe Use Of Equipment
safety first Some Do’s And Don’ts On The Safe Use Of Equipment This equipment has been designed and manufactured to meet international safety standards but, like any electrical equipment, care must be taken if you are to obtain the best results and safety is to be assured. -
Page 5: Table Of Contents
Contents Diagrams of Equipment ... 6 Equipment Key ... 7 Welcome to JVC ...8 Plug&Play Setup ... 10 Initial Settings ... 13 Basic Features ... 23 Advanced Features ... 37 Subsidiary Information ... 48 List of Terms ... 52... -
Page 6: Diagrams Of Equipment
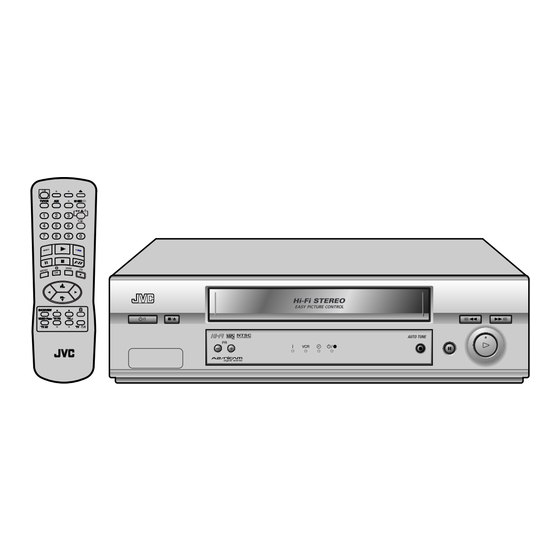
diagrams of equipment front panel rear panel display remote control &... -
Page 7: Equipment Key
ATTENTION: To mobile phone users: Using a mobile phone in the vicinity of the VCR may cause picture vibration on the TV screen or change the screen to a blue back display. On placing the VCR: Some TVs or other appliances generates strong magnetic fields. Do not place such appliance on top of the VCR as it may cause picture disturbance. -
Page 8: Welcome To Jvc
We hope that you will get many hours of enjoy- ment from your new unit. Getting Everything Ready check the contents Unpack the box and place the VCR on a flat, stable surface. before you start Check that you have the items shown below. - Page 9 You are now ready to start the Plug&Play Setup which begins on the next page. connect the RF cable. Do not turn on the VCR. When the main power cord is first plugged into a main outlet, the VCR performs Plug&Play Setup. (...
-
Page 10: Plug&Play Setup
Plug the mains power cord into a mains outlet. before you start Check that the note Do not turn on the VCR or do not press any buttons on the VCR or connection is completed Remote Control. what will happen? The Plug&Play screen Tune the TV to your appears on the TV screen. - Page 11 • manual station setting If any of the above problems occur, refer to page 19 to input station names ( station preset positions ( pg. 20, IF YOU HAVE ANY DIFFICULTY WITH THE ABOVE PROCEDURES CALL THE JVC CUSTOMER SERVICE HOT LINE ON 0870 330 5000 plug&play setup Delete A Channel ).
- Page 12 plug&play setup...
-
Page 13: Initial Settings
Initial Settings Video Channel Set ... 14 Language Set ... 15 Clock Set ... 16 Tuner Set ...17... -
Page 14: Video Channel Set
Video Channel Set The VCR can send picture signals to the TV set in one of two ways; RF before you start (ordinary cable included with this VCR) and AV (via a 21-pin SCART cable available from TV and Hi-Fi dealers). Depending upon which method you... -
Page 15: Setting The Language
Language Set You can change the language setting manually as required. before you start The Remote Control must have batteries inserted The TV set must be get to the main menu Press MENU. Select the icon get to the main menu get to the main menu get to the main menu get to the main menu... -
Page 16: Setting The Clock
initial settings Clock Set before you start The Remote Control must have batteries inserted get to the main menu Press MENU. Select the icon The TV set must be press OK. turned on Tune the TV to your Video Channel or to its AV mode Setting the Clock using the * and Tbuttons and... -
Page 17: Auto Channel Setup
Tuner Set The VCR needs to find, identify and memorise all available stations in your area in order to record programmes correctly. Once done, pressing the ^ or & buttons enables you to jump to the available channels without going via any vacant channels. This channel search can be done either automatically or manually. -
Page 18: Manual Channel Setup
initial settings Manual Channel Setup get to the main menu Press MENU. Select the icon the * and Tbuttons and press OK. The Manual Channel Set screen of the channel position currently received appears. get to the confirmation screen Press MENU. WDR3 - - - - - - - - - -... -
Page 19: Change Station Name
Change Station Name get to the main menu Press MENU. Select the icon the * and Tbuttons and press OK. The Manual Channel Set screen of the channel position currently received appears. get to the confirmation screen Press MENU. select position Press the ^ and &... -
Page 20: Change Station Preset Position
initial settings Change Station Preset Position get to the main menu Press MENU. Select the icon the * and Tbuttons and press OK. The Manual Channel Set screen of the channel position currently received appears. get to the confirmation screen Press MENU. select item Press the ^ and &... -
Page 21: Fine-Tuning Stored Channels
Fine-Tuning Stored Channels get to the main menu Press MENU. Select the icon the * and Tbuttons and press OK. The Manual Channel Set screen of the channel position currently received appears. get to the confirmation screen Press MENU. select item Press the ^ and & buttons on the Remote Control to select the channel that you wish to fine-tune then press OK. -
Page 22: Tv Station Channel Number Guide
initial settings TV Station Channel Number Guide Region London & South-East South-West South West East Midlands North North-West North-East Scotland Wales Northern Ireland Transmitter BBC1 Bluebell Hill Crystal Palace Dover Heathfield Oxford Beacon Hill Caradon Hill Huntshaw Cross Redruth Stockland Hill Channel Islands Fremont Point Hannington... -
Page 23: Basic Features
Basic Features Playback... 24 Playback Features ... 26 Recording ... 28 ® VIDEO Plus+ Timer Programming ... 31 Timer Programming... 33... -
Page 24: Playback
VCR. Insert the cassette as shown in the diagram below; Turn the TV on don’t use too much force. If the VCR was turned off before you inserted the cassette, the power will come on automatically. -
Page 25: Video Heads Cleaning
Video Heads Cleaning Use a dry cleaning cassette — JVC TCL-2 — in the following cases: • Rough, poor picture appears while a tape is played back. • The picture is unclear or no picture appears. -
Page 26: Pause During Playback
Pause During Playback Press the | button on the VCR or the Remote Control. • The VCR enters Pause mode after moving two or three frames. • If the paused picture on the TV screen jumps vertically, press the PR+ and –... -
Page 27: Variable Speed Search
During playback, press 3 up to 6 times. Each press of the 3 button will cause the VCR to go into fast-motion playback for a period of 30 seconds. When the specified portion of the tape is skipped, normal playback resumes automatically. -
Page 28: Recording
On either the VCR or the Remote Control, press | to temporarily stop recording and press | to resume. You cannot change the preset position on the VCR while it is recording but you can while it is paused (see of this page). -
Page 29: Resetting The Counter
While the display is shown, press the ‘0:00:00’ before starting playback or recording. Record a Programme While Watching Another If your VCR is connected to the TV with both the RF cable and 21-pin SCART cable, press TV/VCR Once you have started recording all you need to do is use the controls on your TV set to tune to a different programme. -
Page 30: Instant Timer Recording
Instant Timer Recording This method allows you to quickly set the VCR to record in 30 minute incre- ments. start recording Press T (ITR) once. If left in this state, the VCR will keep recording until the tape runs out. -
Page 31: Video Plus+ Timer Programming
TV listings guide. These are a kind of Make sure that the shorthand for video recorders and using them automatically sets your VCR VCR’s clock is set to record the correct programme, channel and time. Up to 7 timer recording correctly programmes within a month can be made. - Page 32 The timer indicator and standby/record indicator light on the display panel. To disengage the Timer Mode, press o again. • If a cassette has not loaded when the VCR enters the Timer Mode, the timer Check the Results change preset position Press * Tto select the preset number.
-
Page 33: Timer Programming
Timer Programming If you do not know the PlusCode number for the programme that you wish to record, follow the instructions below to manually set your VCR to record. before you start Make sure that the VCR’s clock is set... -
Page 34: Intelligent Lp Recording
The timer indicator and standby/record indicator light on the display panel. To disengage the Timer Mode, press o again. • If a cassette has not loaded when the VCR enters the Timer Mode, the timer When you set the tape speed to to allow complete recording if there is not enough tape to record the entire programme while timer-recording in SP mode. -
Page 35: Check, Cancel & Change Programmes
• After timer recording is completed, the VCR enters the standby mode automatically. • If the tape reaches its end during timer recordings, the VCR stops recording, rewinds the tape and ejects the cassette, then enters the standby mode automatically. - Page 36 basic features...
-
Page 37: Advanced Features
Advanced Features Picture Quality ... 38 Sound Modes ... 39 Editing ... 41 Other Functions ... 43 Connection to a Stereo System ... 47... -
Page 38: Manual Tracking
During playback, use the manually. NOTE: When a new tape is inserted, the VCR returns to automatic tracking. Picture Control This feature allows you to select the most appropriate picture quality according to the type of tape or use of this VCR. The default setting is get to the main menu Press MENU. -
Page 39: Nicam Stereo And Bilingual Broadcasts
AUDIO MONO Soundtrack Selection This VCR is capable of recording four soundtracks and will play back the one that you select. Set AUDIO to the appropriate mode. get to the main menu Press MENU. Select the icon press OK. - Page 40 If the NICAM stereo signal is poor or unavailable, the VCR will automatically record normal audio onto both the Hi-Fi and normal audio tracks. This will eliminate possible...
-
Page 41: Editing Using Another Vcr
The recording VCR mode must be set to AUX. If this VCR is the recorder, press AV and /or PR to select AV1 (if you’ve used the EURO AV1 AUDIO/VIDEO connecter) or AV2 (if you’ve used the EURO AV2 DECODER connecter). -
Page 42: Editing From A Camcorder
Editing From a Camcorder connect up Connect the Camcorder’s AUDIO/VIDEO OUT connector to the VCR’s rear panel EURO AV1 AUDIO/VIDEO or EURO AV2 DECODER connector, via an optional cable adapter. set input mode Press AV or PR so that AV1 (for EURO AV1 AUDIO/VIDEO connector) or AV2 (for EURO AV2 DECODER connector) appears in the place of a preset position number. -
Page 43: On-Screen Display (Osd)
RECORD: appears during recording. RECP: appears in the record pause mode. SAFE: appears when the VCR enters in child lock mode, or any buttons on the VCR are pressed during child lock mode. advanced features (OK) on the Remote Control... -
Page 44: Ez (Easy) Repeat Playback
TV screen. The VCR enters the standby mode automatically after rewinding the tape. Ez (Easy) Power Off During playback, press 10y. The VCR stops playback, rewinds the tape and ejects the cassette, then enters the standby mode automatically. Ez (Easy) Repeat Playback During playback, press and hold . -
Page 45: Memory Stop Facility
You can play back PAL, NTSC and MESECAM tapes, or record PAL and SECAM* signals on this VCR. Select the appropriate colour system. * SECAM signals will be recorded as MESECAM on this VCR; MESECAM is the designation for tapes with SECAM signals that have been recorded on a MESECAM-compatible PAL video cassette recorder. -
Page 46: Child Lock
TV screen and the power indicator blinks on the display panel. notes: • When the child lock function is in use, the VCR’s operations are possible only with the Remote Control. Keep the Remote Control out of the children’s reach. -
Page 47: Connection To A Stereo System
Make sure that you connect the L and R speakers in the right order. nicam tv If you can receive NICAM TV broadcasts in your area, this VCR can record them indepen- dently of the TV set and play them back through the stereo. -
Page 48: Subsidiary Information
PLAYBACK What happens if the end of the tape is reached during playback or search? A: The VCR stops playback, rewinds the tape and ejects the cassette, then enters the standby mode automatically. Can the VCR indefinitely remain in the still mode? No. -
Page 49: Troubleshooting
If you are using both the RF cable and 21-pin SCART cable for connection, set the TV to its AV mode. Try manual tracking. ( pg. 38) Use a dry cleaning cassette JVC TCL-2 or consult your JVC dealer. Try manual tracking. ( pg. 38) - Page 50 2. The timer indicator blinks on the display panel. 3. Timer programming is not possible. 4. The VCR stops timer recording, rewinds the tape and ejects the cassette, then enters the standby mode automatically. 5. The VIDEO Plus+ system does not timer record properly.
- Page 51 Press | to pause the recording, change presets, then press | to resume recording. Perform manual setting again. Turn off the VCR once and connect the TV aerial cable to the VCR properly, plug the main power cord into a main outlet again.
-
Page 52: List Of Terms
Delete a Channel ... 19 Display Tape Position/Time Counter ... 29 E E E E E Editing From a Camcorder ... 42 Editing Using Another VCR ... 41 Ez (Easy) Power Off... 44 Ez (Easy) Repeat Playback ... 44 F F F F F Fine-Tuning Stored Channels ... - Page 53 MEMO...
- Page 54 MEMO...
- Page 55 MEMO...
- Page 56 Power consumption : Power on : Approx. 12 W : Standby mode:3.0 W Video Head system : DA4 (Double Azimuth) head helical scan system Tape format : Tape width 1/2" (12.7 mm high density VHS tape) Dimensions (W x H x D) : 360 mm x 94.5 mm x 270 mm Signal system: PAL-type colour signal and CCIR monochrome signal, 625 lines 50 fields Input level : VIDEO IN (SCART type) 1.0 Vp-p, 75 ohm, unbalanced Output level : VIDEO OUT (SCART type) 1.0 Vp-p, 75 ohm, unbalanced...
Need help?
Do you have a question about the HR-J595EK and is the answer not in the manual?
Questions and answers