Table of Contents
Advertisement
Advertisement
Table of Contents

Related Manuals for Ier 512C


Summary of Contents for Ier 512C
- Page 1 IER 512C PRINTER N06102A Revision Level 1 August 10, 1995...
- Page 2 The warranty shall be null and void in case of use of any spare part, special tool or consumable part not expressly approved in writing by IER and in the event of attempted repair or servicing of the machines by...
-
Page 3: Table Of Contents
ABLE OF CONTENTS TABLE DES MATIERES A ) INTRODUCTION ........B ) DESCRIPTION . - Page 4 1) List of IER 5122C Consumable Supplies ....31 2) IER 512C Related Documentation ..... . 31...
-
Page 5: A Introduction
The IER 512C Printer is specially designed for printing self-adhesive labels or paper strips. In color and design, the IER 512C Printer matches the existing ATB line of IER products. The printer is easy to use, with an alphanumeric display unit for direct dialogue with the operator. -
Page 6: B Description
ESCRIPTION 1) Physical Characteristics • Dimensions: • a: Max height = 230 mm (9.06 in) • b: Max depth = 460 mm (18.11 in) • c: Width = 204 mm (8.03 in) • Weight: • 8 kg (17.6 lbs) excluding packaging •... -
Page 8: Inside View
4) Inside View To open the right-hand cover (6): a) Push the latch (1) upwards. b) Lift the right-hand cover (6) up onto the top of the printer. Opening the cover gives access to the following parts: • thermal printhead on a retractable mounting (2) •... -
Page 9: C Installation
Connect the data transmission cable and the power supply cord to the corresponding connectors on the printer. c) Connect the power supply cord to the line power. The IER 512C power supply adapts automatically to the line voltage supplied. -
Page 10: Adjusting The Paper Path
3) Adjusting the Paper Path Before switching on for the first time, or when changing document widths, the paper path must be adjusted. IMPORTANT Loosen the paper path locking wheel before adjusting the paper path. a) Open the right-hand cover (see Page 8). b) Locate the locking wheel underneath the paper guides. - Page 11 d) Carefully set the width of the paper path for accurate paper feed while leaving sufficient play (“J”, see Figure below) : e) Tighten (lock) the paper path locking wheel. Close the right-hand cover. IMPORTANT To avoid an immediate paper jam, check that the document runs freely along the full length of the paper path.
-
Page 12: Switching On The Printer
4) Switching on the Printer a) Switch power switch to “I” to switch on the IER 512C Printer: b) The display shows one of the two following messages: IER 512 OFF LINE IER 512 ON LINE è If the display shows an error message, see Page 28 for a solution to the problem. -
Page 14: Loading Document Rolls
6) Loading Document Rolls The IER 512C Printer may be fitted with an optional document roll dispenser. a) Take the removable flange (1) off the spindle (2). b) Position the new roll of blank documents (3) so that the first label is inserted heat-sensitive face uppermost. -
Page 16: D Operation
PERATION 1) Printing a Document a) Switch on the IER 512C Printer (see Page 12). • If the display reads: IER 512C OFF LINE press the “on/off Line” key to switch to On Line mode. IER 512C ON LINE •... -
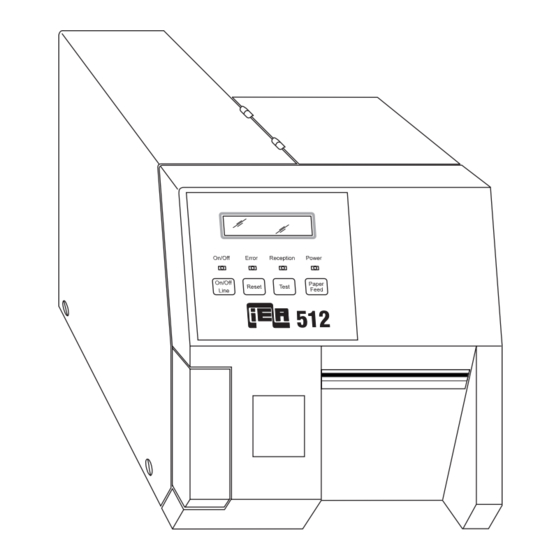
Page 17: Key And Indicator Functions
2) Key and Indicator Functions The IER 512C Printer control panel consists of: • an alphanumeric display • four indicator lights • four touch-sensitive keys On/Off Error Reception Power On/Off Paper Reset Test Feed Line... -
Page 18: Control Panel Key Functions
Active in Off Line mode only, this key ejects a blank Paper document, thus setting the position of the next document to Feed be printed. This key can be inhibited from the configuration menu (see IER 512 Printer Technical Manual). -
Page 19: Control Panel Indicator Functions
4) Control Panel Indicator Functions On/Off On/Off When on, shows that the printer is On Line, and therefore able to receive from the host computer system the information needed to print a document. When off, shows that the printer is in Off Line mode and the Self Test menus can be accessed. -
Page 20: Self Test Mode
5) Self Test Mode Selecting Self Test mode a) Switch power switch to “I” to switch on the IER 512C Printer. b) Press “on/off Line” to switch to Off Line mode. c) Check that the “On/Off” indicator is off and the display reads:... -
Page 21: Printing Other Test Documents
The number and contents of other test d oc um e n ts de pe nd on t h e c ust o mer application. For further information on these and on the Configuration Menu, see the IER 512 Printer Technical Manual. •... -
Page 22: E Periodic Maintenance
Cleaning the platen • Final checking The Cleaning Kit (ref. IER PL21709) and the Thermal Printhead Cleaning Pens (ref. IER T106080) are ideally suited for carrying out these maintenance operations. 1) Dust Removal CAUTION Before any dust removal or head cleaning operations, ensure that the power supply cord is disconnected from the printer. -
Page 23: Cleaning The Printing Module
d) Use the dust remover can to remove dust from the interior of the printer (see Figure below: paper path, mechanical subassembly, sensors). 2) Cleaning the Printing Module a) To set printhead to “cleaning” position, perform the following steps: IMPORTANT To place the printhead in the “cleaning”... - Page 24 • Unlock the printhead mounting by sliding as shown in the diagram (black arrow) : • Rotate the printhead mounting to the “cleaning ” position as shown in the diagram (black arrow). b) Cleaning the printhead and the platen: • Rub the printhead Cleaning Pen across the line of heating elements.
-
Page 25: Final Check
• Spray cleaning product (supplied in the Cleaning Kit) onto a soft cloth and carefully wipe the platen. Turn the paper jam knob to get access to the entire surface. • Dry the platen using air from the dust remover can. c) Returning the printhead to “operating”... -
Page 26: F Operating Faults
PERATING FAULTS Operating faults may lead to document jams inside the printer and/or to the display of an error message. NOTE The alarm buzzer warns the operator of an error condition. Note the error message displayed, then key “Reset” before correcting the problem. 1) Clearing Document Jams When the printer displays: MECHANICAL ERROR... -
Page 27: Clearing The Cutter Blade
d) If using self-adhesive labels, put the printhead (1) into the “cleaning” position and check that the printing mechanism has not been soiled with glue from the jammed label. If necessary, carry out the printer maintenance procedure (see Page 22) and return the printhead (1) to the “operating”... -
Page 28: List Of Error Messages
3) List of Error Messages IMPORTANT If the recommended solution fails to solve the problem, call the help desk. a) Messages for operator’s attention: Document jam in the cutting zone MECHANICAL ERROR Remove the jammed document(s) (see Page ). cutter blocked Printhead lever up MECHANICAL ERROR When the printhead is up, all printing stages are... - Page 29 Messages for Help Desk Attention: Error messages not listed above are reserved for the help desk. For further details, see the “IER 512 Printer Technical Manual - NT01234 and the host computer system documentation.
-
Page 30: Other Operating Problems
4) Other Operating Problems The printer does not work: • Switch off the printer (power switch on “0”). • Check the AC power supply by plugging in another electrical appliance. • Check that the power cord is correctly plugged into the line power outlet and the printer. -
Page 31: G Consumable Supplies And Documentation
2) IER 512C Related Documentation • IER 512 Standard Printer Technical Manual: NT01234 • IER 512C Printer Operation and Adjustment Manual: N06122A • IER 512C Printer Illustrated Parts Catalog: N06133A • User Guide - N06102A - Rev. Level 1 - August 10, 1995... - Page 32 8420 W. Bryn Mawr - Suite 280 Chicago - IIlinois 60631 - USA Tel. (312) 380 9600 Fax (312) 380 9606 Toll Free 1-800 624-8538 IER Asia Pacific Unit no.72/72A Neil Road 088838 SINGAPORE Tel. (65) 324 08 89 Fax (65) 324 08 87...
Need help?
Do you have a question about the 512C and is the answer not in the manual?
Questions and answers