
Related Manuals for Ier 567


Summary of Contents for Ier 567
- Page 1 IER 567 PRINTER Print User Guid N00202A Revision Level 5 Jan. 22, 2009...
- Page 2 NOTICE THIS IER PRODUCT COMES WITH A LITHIUM BATTERY. BATTERY REPLACEMENT MUST IMPERATIVELY BE PERFORMED BYQUALIFIED MAINTENANCE PERSONNEL. MOREOVER, ONLY APPROVED Warning DANGER MODELS MAY BE USED. DANGER OF EXPLOSION IF BATTERY IS INCORRECTLY REPLACED. REPLACE ONLY WITH THE SAME OR EQUIVALENT TYPE RECOMMENDED BY THE MANUFACTURER.
- Page 3 The warranty shall be null and void in case of use of any spare part, special tool or consumable not expressly approved in writing by IER and in the event of attempted repair or servicing of the machines by persons lacking the requisite technical qualifications.
- Page 4 • Consulting with the manufacturer for appropriate product waste management according to the terms of the manufacturer. Translated from French - IER Documentation Department...
-
Page 5: Table Of Contents
G OPERATING FAULTS ................. 35 1) List of Error Messages ..................35 2) Clearing a Paper Jam ..................37 3) Other Operating Faults ..................40 H CLEANING PRODUCTS AND TECHNICAL DOCUMENTATION....41 1) List of Cleaning Products ..................41 2) IER 567 Printer Technical Documentation ............41... -
Page 6: Aintroduction
Another optional feature, the stock control number (SCN) reading function, is available to prevent fraudulent use of blank stock. The IER 567 Printer can be installed on top of a cabinet containing two or three media stocks, which are accessed by opening a door or drawer. - Page 7 Fig. 1 Fig. 2...
-
Page 8: Bcontents Of The Shipping Container
Test coupons (3), one of which containing the IER 567 Printer configuration • AC line power cord (4). Visit our website to download the PDF version of the IER 567 NOTE: Printer User Guide (www.ier.fr). Blank coupons and cleaning products are not supplied with the printer (see Page 39). -
Page 9: Cdescription
DESCRIPTION 1) Physical Characteristics Printer clearance with the covers open: • Depth (A): 440 mm (17.32 in) • Height (B): 434 mm (17.1 in) • Width with operator access door open (C): 357 mm (14 in) • Total width (D): 496 mm (19.53 in) Fig. - Page 10 Overall printer dimensions with covers closed: • Depth (A) 436.9 mm (17.21 in) • Height (B) 201 mm (7.87 in) including feet • Width (C) 200 mm. (7.87 in) Weight: • Without options: 10 Kg (22.05 lbs.) • With thermal transfer option: 11 kg (24.26 lbs.). Operating temperature: •...
-
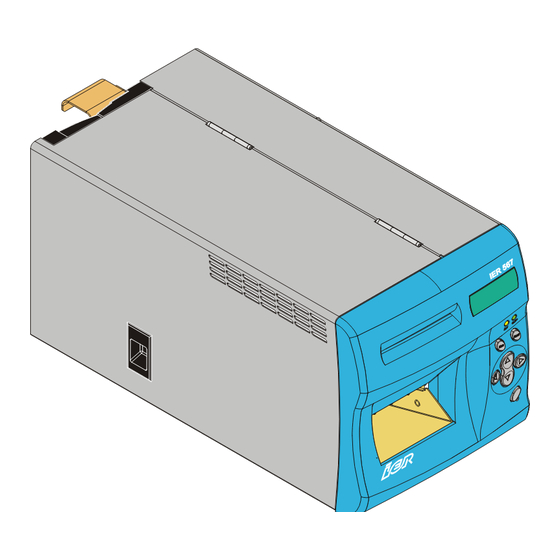
Page 11: Front Left View
2) Front Left View a) Front panel (1) (cf. § E) where the following items are visible: • Four-line, 20-character alphanumeric LCD display (2) • Two indicators (3) • Seven keys (4) • Front feed slot (5) • Output stacker (6) for printed coupons (7) b) Hinged operator access door (8) fitted with a catch (9). -
Page 12: Rear Right View
♦ 25-pin female connector (3) for RS232 serial link to computer system. ♦ A mini-DIN connector (4) for a connection to a keyboard or other optional peripherals compatible with the IER 567 printer (secure stacker or cabinet). ♦ Free slot (5) for an optional USB connector, network connector or RS232 serial connector. -
Page 13: Interior View - Paper Path
4) Interior View – Paper Path Opening the operator access door allows the user to perform simple operations (described in this manual) on accessible parts of the paper path, which include: a) Rear feeder assembly flange (1) providing access to the triple rear feeder b) Magnetic module (2) c) Cutter module (3) and hinged paper guide (4), which is opened... -
Page 14: Interior View - Paper Path (Thermal Transfer Option)
5) Interior View – Paper Path (Thermal Transfer Option) Printers with the optional thermal transfer system have a number of additional components, as shown on the diagram below: a) Two spindles (1) that hold the black multi-pass ribbon cartridge b) Two pins (2) to facilitate cartridge positioning and centering on the two spindles (1) c) A stepper motor (3) (unwinding motor) d) A freewheeling geared motor (4) (winding motor) -
Page 15: Dinstallation
INSTALLATION 1) Unpacking the Printer a) Remove the printer from the box. b) Install the printer on an even and stable work surface allowing sufficient clearance for fully opening the covers. c) Remove the transport packing (1) from between the area behind the printhead mount (2) and the printhead assembly (3). -
Page 16: Connecting The Printer To The Host
2) Connecting the Printer to the Host IMPORTANT: To connect the printer to the host, it is essential to use a shielded cable fitted with metal plated connector hoods. The cable shield must be attached to the connector hoods. a) Ensure that the AC power switch located on the right of the printer is switched off by pressing O (off- position). - Page 17 Fig. 15 Fig. 16 NOTE: The IER 567 Printer power supply unit is autoranging and adapts itself automatically to the current AC line power voltage. d) The LCD comes on and displays automatically the following messages in the order specified below:...
-
Page 18: Loading Blank Stock
NOTE: Other printer initialization messages may be displayed during printer initialization, depending on the protocol configuration (refer to the IER 567 Printer Technical Manual, IER P/N N00211A). NOTE: If the LCD displays an error message instead, refer to page 33 to solve the problem encountered. - Page 19 Check that the printer is ready (the display should show 567 READY, Bins 1 2 3 empty). Stock1 Stock3 Stock2 Fig. 17...
- Page 20 c) Insert the leading coupon of the fanfold stock(s) into the corresponding rear feeder(s) (note that the uppermost feed slot corresponds to stock 1). When inserted, the coupon is immediately and automatically drawn in. NOTE: If several stocks need to be loaded at the same time, we recommend you start with the lowest feeder.
-
Page 21: Installing The Multipass Ribbon Cartridge (Thermal Transfer Option)
5) Installing the Multipass Ribbon Cartridge (Thermal Transfer Option) a) Bring the cartridge (1) up to the two spindles (2) and the two centering pins (3). b) Engage the cartridge onto the two spindles (2) and the two centering pins (3), pressing on the area shown in the Figure as (4) until the cartridge (1) clicks into place. -
Page 22: E Using The User Interface
Using the User Interface 1) Physical Layout of the User Interface IER 567 Line 1 Line 4 Alphanumeric display Navigation keys On/Off line Menu Fig. 24... -
Page 23: User Interface Key Functions
2) User Interface Key Functions a) On-Line Mode In this mode the following keys are active: Function Description Pressing this key switches the printer to the On/Off Line Switching to the Menu Navigation (Off-Line) mode and Menu Menu Navigation allows you to scroll through the various mode menus. - Page 24 Function Description Pressing this key moves the cursor up one level in the menu tree. If the current menu is Moves the cursor the main menu, pressing this key has no Esc key up one level in the effect. menu tree The Esc key does not change the mode of operation, the printer stays in the Menu Navigation mode.
-
Page 25: User Interface Indicator And Sound Alarm Function
d) Parameter Modification Mode (Digit-by-Digit Method) In this mode the following keys are active: Function Description Moves the cursor Up-Arrow up through the possible These two keys allow you to scroll through parameters the possible digits you may choose from Moves the cursor when in the digit by digit modification mode. -
Page 26: Coupon Printing
4) Coupon Printing a) Switch on the printer (see Page 16). The following message is displayed: 5 6 7 R E A D Y R e v i s i o n X . X X Where the x’es stand for the program version number. b) If an error message is displayed instead, refer to Page 35 to solve the problem. -
Page 27: Inserting A Coupon Through The Front Feed Slot (Option)
6) Inserting a Coupon through the Front Feed Slot (Option) a) Insert the coupon through the feed slot (1) as shown in the Figure below. b) If the coupon size is not acceptable, the coupon is rejected through the feed slot. c) Request coupon printing by sending the corresponding message from the host to the printer. -
Page 28: Fperiodic Maintenance
Before starting any cleaning operation make sure you have disconnected the AC power cable and the data I/O cable from the printer. We recommend the use of the IER cleaning kit (IER P/N S32132A) to carry out these maintenance operations. 1) General Printer Cleaning Refer to the figure on page 27. - Page 29 Fig. 26...
-
Page 30: Cleaning The Printhead And The Platen
2) Cleaning the Printhead and the Platen a) Open the hinged operator access door and push the printhead towards the rear of the printer (direction of arrow A) to the stop (arrow B). Fig. 27 Fig. 28... - Page 31 Rotate the printhead up and towards the rear of the printer (direction of arrow C). Fig. 29 c) Clean the printhead using an alcohol-filled foam swab from the cleaning bag, IER P/N T106140. Fig. 30...
- Page 32 d) Clean the entire platen (5) surface using a soft cloth slightly dampened with cleaning solution from the cleaning kit. Fig. 31 e) Tip the thermal head module forward in its mounting and push forward in the direction of the two arrows, until it locks into position with two audible clicks.
-
Page 33: Cleaning The Optional Magnetic Head
3) Cleaning the Optional Magnetic Head a) Using a swab from the cleaning kit slightly dampened with cleaning solution contained in the kit, clean the entire surface of the magnetic head. Fig. 33 b) Clean the entire surface of the magnetic head pad using the same swab and cleaning solution Fig. -
Page 34: Final Checks
4) Final Checks Having completed above periodic maintenance operations, carry out the following: • Make sure the magnetic head (1) is firmly locked in its seat. • Check that the hinged paper guide (2) is locked in its closed position. •... -
Page 35: G Operating Faults
Operating Faults Operating faults usually generate an error message on the display and/or may cause a paper jam inside the printer. IMPORTANT: If the recommended action does not solve the problem encountered, call the Help Desk. Having solved the problem, imperatively press the Enter key or the Esc key to confirm. - Page 36 O U T R I B B O N Means that the printer is out of ribbon. P l e a s e c h a n g e Insert a new cartridge without r i b b o n c a r t r i d g e powering down the printer and a n d...
-
Page 37: Clearing A Paper Jam
S T A C K E R F U L L Means that the stacker is full. Empty the stacker without powering down the printer and P l e a s e e m p t y s t a c k e r press the Esc key. - Page 38 If the following message is displayed, proceed as described below: C O U P O N J A M [ X ] P l e a s e c o r r e c t a n d t h e n p r e s s "...
- Page 39 Area D Area B Area E Area C Area A Fig. 36...
-
Page 40: Other Operating Faults
3) Other Operating Faults Printer Does not Start up: a) Switch the printer off by setting the AC power switch to the O- position. Fig. 37 b) Check for the presence of AC power at the outlet. c) Make sure the power cord is correctly plugged in at the printer (see Page 16) and at the AC power outlet. -
Page 41: H Cleaning Products And Technical Documentation
Cleaning Products and Technical Documentation All the technical documentation and cleaning products required in order to operate and service the printer can be obtained from the IER subsidiary covering your geographical area. 1) List of Cleaning Products • Standard IER cleaning kit, IER P/N S32129A •... - Page 44 Phone: +86 (21) 6473 6792 Fax: +86 (21) 6473 6806 SINGAPORE SPAIN IER PTE LTd IER Impresoras Especializadas, S.L. 120 Lower Delta Road C/ Torre de Don Miguel, 23 # 14-13/16 Cendex Centre E-28031 MADRID SINGAPORE 169208 Phone: +34 91 535 89 75...
Need help?
Do you have a question about the 567 and is the answer not in the manual?
Questions and answers