
Subscribe to Our Youtube Channel
Related Manuals for Icy Box IB-RD3252


Summary of Contents for Icy Box IB-RD3252
- Page 1 IB-RD3252 External 2bay 3.5" SATA RAID Enclosure Benutzerhandbuch / Manual Version 1.4...
- Page 3 IB-RD3252 Externes 2x 3,5” SATA Festplatten RAID Gehäuse EINLEITUNG Systemanforderungen 1.1.1 PC Anforderungen • Minimum Intel Pentium III CPU 500MHz, 128MB RAM • PC mit eSATA Anschluss: Windows XP/Vista/7/8 • PC mit FireWire 400/800 Anschluss: Windows XP/Vista/7/8 • PC mit USB 2.0 Anschluss: Windows XP/Vista/7/8 •...
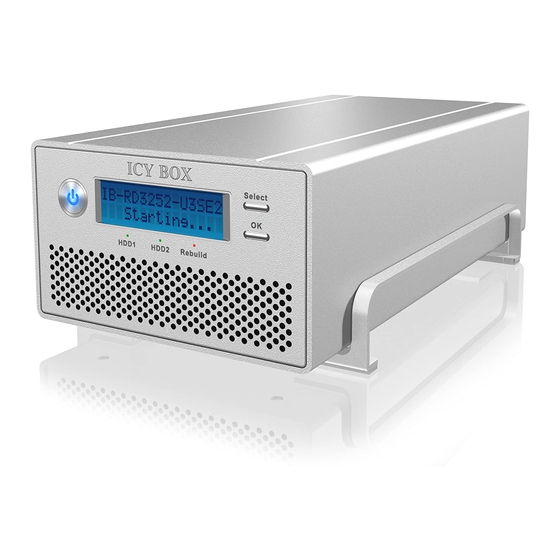
- Page 4 IB-RD3252 Externes 2x 3,5” SATA Festplatten RAID Gehäuse Übersicht IB-RD3252 1.5.1 Frontansicht IB-RD3252 LED/Taste Status • Ein-/Ausschalttaste; blau = Stromzufuhr an HDD1/2 • Rot = Fehler oder leerer Festplattensteckplatz • Aus = Festplattenstatus normal Rebuild • Orange = Datenwiederherstellung Select •...
- Page 5 IB-RD3252 Externes 2x 3,5” SATA Festplatten RAID Gehäuse 1.5.2 Rückansicht IB-RD3252 = 1x Netzteilanschluss eSATA = 1x Externer SATA Anschluss FW800 = 2x FireWire 800 Anschluss FW400 = 1x FireWire 400 Anschluss USB 3.0 = 1x USB 3.0 High Speed Anschluss...
- Page 6 IB-RD3252 Externes 2x 3,5” SATA Festplatten RAID Gehäuse RAID Modi Bevorzugt sollten Festplatten der gleichen Kapazität verwendet werden. Sollten die Kapazitäten unter- schiedlich sein, wird die Summe der zur Verfügung stehenden Gesamtkapazität immer nur der kleineren Festplatte entsprechen. Einen Geschwindigkeitsunterschied wird immer nur über schnelle Datenschnitt- stellen wie z.B.
- Page 7 IB-RD3252 Externes 2x 3,5” SATA Festplatten RAID Gehäuse Anmerkung Das Wechseln des RAID Modus erfordert ein Neuformatieren der Festplatten. Durch diesen Vorgang werden alle Daten auf den Festplatten gelöscht. Stellen Sie sicher, das vorher alle vorhanden Daten auf einen anderen Datenträger gesichert werden.
- Page 8 Schieben Sie das Innere des Gehäuses zurück in die Gehäusehülle und montieren die Füße mittels der Schrauben wieder. Verbinden Sie das Gerät mit der Stromversorgung, schalten es ein und verbinden die IB-RD3252 mittels Datenkabel mit Ihrem Computer. Haben Sie die Funktion zur Einstellung der RAID Modi über das Display gewählt, stellen Sie zuerst, unter Verwendung des LCD Displays, Ihren bevorzugten RAID Modus ein.
- Page 9 Vor der ersten Verbindung mit dem Computer setzen Sie bitte die entsprechenden Festplatten ein und wählen den bevorzugten RAID Modus. • Zum sicheren Entfernen der IB-RD3252 vom Computer unter der Vermeidung von Datenverlust, folgen Sie der korrekten Trennung Ihrer Hardware entsprechend Ihres Betriebssystems. •...
-
Page 10: Lcd Display
Um Ihre Daten zu sichern und Datenverlust zu vermeiden, sollten Sie immer mindestens zwei Kopien chenden Speichermedien wie CD, DVD, Blu-Ray o.ä. Jeglicher Datenverlust oder -schaden durch die Benutzung der IB-RD3252 liegt in der Verantwortung des Benutzers und es kann unter keinen Umständen der Hersteller für die Wiederherstellung der Daten oder deren Kosten zur Verantwortung gezogen werden. - Page 11 Startanzeige des System-Informationsmenüs. Die Seriennummer ist eine Kombination der 1394 Hersteller ID, der Chip ID Hi und der Chip Zeigt die aktuelle Firmwareversion der IB-RD3252 an. Der I/O Status zeigt die aktuell verwendete Datenschnittstelle zum Computer an. Zeigt den aktuellen Status der >2 TB- und Alarmfunktion an.
- Page 12 Einstellung zum aktivieren oder deaktivieren der Alarmfunktion. Einstellung zum aktivieren oder deaktivieren des Alarmtons. Verlassen des Einstellungsmenüs und Rückkehr zu Startmenü. IB-RD3252 Anzeige: 3.4.1 > 2TB Volume Modus Damit ein Computer auf Datenträger größer 2 TB zugreifen kann, muss die Hardware, sowie das Be- triebssystem diese Funktion unterstützen (z.B.
- Page 13 IB-RD3252 Externes 2x 3,5” SATA Festplatten RAID Gehäuse IB-RD3252 Anzeige: 3.4.2 Einstellung des RAID Modus Um Einstellungen des RAID Modus über das Display vornehmen zu können, stellen Sie sicher, dass die DIP Switch Position wie folgt eingestellt ist: 1 oben, 2 unten.
- Page 14 • Um die Einstellungen zu ändern drücken Sie bitte die [Select] Taste um die bevorzugte Einstellung auszuwählen, dann die [OK] Taste um die Auswahl zu bestätigen IB-RD3252 Anzeige: 3.4.4 Temperatur Alarm Einstellung Der dieser Alarmton ist ein Piepen, das Sie hören, wenn die Temperatur am Messfühler einen kritischen Bereich (>60°...
- Page 15 Um das Menü zu verlassen ohne Änderungen vorzunehmen, drücken Sie bitte die [Select] Taste bis die EXIT Anzeige erscheint und drücken dann die [OK] Taste. Um die Einstellungen zu ändern drücken Sie bitte die [Select] Taste um die bevorzugte Einstellung auszuwählen, dann die [OK] Taste um die Auswahl zu bestätigen. IB-RD3252 Anzeige:...
- Page 16 IB-RD3252 Externes 2x 3,5” SATA Festplatten RAID Gehäuse Display Informationen Zusätzlich zu den Details zur Hardware- und Geräteinformation, zeigt das LCD Display bestimmte Informationen zu verschiedenen Vorkommnissen an. Eine Liste der Meldungen und ihrer Bedeutungen lauten wie folgt: [HDD Error / Remaining 1xHDD] Wenn im RAID 0 Modus eine Festplatte ausfällt, ertönt zunächst der Alarm und das Display zeigt...
- Page 17 IB-RD3252 Externes 2x 3,5” SATA Festplatten RAID Gehäuse © Copyright 2013 RaidSonic Technology GmbH. Alle Rechte vorbehalten. tung darf ohne die schriftliche Genehmigung des Herstellers reproduziert werden. Die in dieser Anleitung dargestellten Anzeigebeispiele und Beschreibungen können von den tatsächlichen Anzeigen des aktuellen Produkts oder dem Inhalt etwas abweichen.
- Page 18 IB-RD3252 Dual-Bay RAID Storage Enclosure for two 3.5-inch Serial ATA Hard Drives INTRODUCTION System Requirements 1.1.1 PC Requirements • Minimum Intel Pentium III CPU 500 MHz, 128 MB RAM • eSATA equipped PC; Windows XP/Vista/7/8 • FireWire 400/800 equipped PC; Windows XP/Vista/7/8 •...
- Page 19 IB-RD3252 Dual-Bay RAID Storage Enclosure for two 3.5-inch Serial ATA Hard Drives Detailed View IB-RD3252 1.5.1 Front View IB-RD3252 LED/Button Status • Power button; blue = power on • Green = Data access (read/write) HDD1/2 • Red = Error or empty drive bay •...
- Page 20 IB-RD3252 Dual-Bay RAID Storage Enclosure for two 3.5-inch Serial ATA Hard Drives 1.5.2 Rear View IB-RD3252 = Security lock slot = 1x Power receptacle eSATA = 1x External SATA port FW800 = 2x FireWire 800 port FW400 = 1x FireWire 400 port...
- Page 21 IB-RD3252 Dual-Bay RAID Storage Enclosure for two 3.5-inch Serial ATA Hard Drives RAID Modes mance is only visible for fast interfaces like eSATA. 1.6.1 RAID 0 - Disk Striping The drives are shown as one large single volume but the total size will depend on the drive with the striping) is not redundant.
-
Page 22: System Setup
(e.g.: Windows Vista 32bit/64bit or Mac OS 10.4 and above). SYSTEM SETUP IB-RD3252 Hard Drive Assembly Your unit may come with pre-installed hard drives. Before opening such an enclosure, please read the warranty from your vendor carefully, as this could void your warranty. - Page 23 IB-RD3252 Dual-Bay RAID Storage Enclosure for two 3.5-inch Serial ATA Hard Drives Install the second hard drive and mount it with two screws on each side. Connect the SATA and power cables to your hard drives. Be careful not to damage any...
- Page 24 Only one interface can be used at any given time. About Data Backup copies of your data, one copy on your IB-RD3252 and a second copy either on your internal drive or another storage media such as CD, DVD, Tape or an additional external drive.
- Page 25 Press the [Select] button until the system information menu is selected and then press the [OK] button the main screen. To fast forward, press the [Select] button. IB-RD3252 Display: The main screen of the system information menu. The I/O status shows the interface that is currently used for the connection to the computer.
- Page 26 Settings Press the [Select] button until the settings menu is selected and then press the [OK] button to enter the IB-RD3252 Display: Option to enable or disable the support for large volumes in excess of 2TB. Setup menu for the RAID settings.
- Page 27 To exit the menu without changing any of the settings, press the [Select] button until you see the Exit screen and then press the [OK] button. • To change the setting, press the [Select] button to choose your preferred mode, press the [OK] IB-RD3252 Display:...
- Page 28 IB-RD3252 Dual-Bay RAID Storage Enclosure for two 3.5-inch Serial ATA Hard Drives 3.4.2 RAID Mode Setup • [RAID 0->1] Change the mode from RAID 0 striping to RAID 1 mirroring. • [RAID 1->0] Change the mode from RAID 1 mirroring to RAID 0 striping.
- Page 29 Exit screen and then press the [OK] button. • To change the setting, press the [Select] button to choose your preferred mode and then press the IB-RD3252 Display: 3.4.4 TEMP Alarm Setup This is the alarm sound you hear when the temperature that is measured by the thermal probe reaches a •...
- Page 30 To exit the menu without changing any of the settings, press the [Select] button until you see the Exit screen and then press the [OK] button. To change the setting, press the [Select] button to choose your preferred mode and then press the [OK] button to the change. IB-RD3252 Display:...
- Page 31 IB-RD3252 Dual-Bay RAID Storage Enclosure for two 3.5-inch Serial ATA Hard Drives Display Information In addition to the details about the hardware and device the LCD display will also show certain event information. Following is a list of possible messages and their meanings.
- Page 32 © Copyright 2013 by RaidSonic Technology GmbH. All Rights Reserved The information contained in this manual is believed to be accurate and reliable. RaidSonic Technology GmbH assumes no responsibility for any errors contained in this manual. RaidSonic Technology GmbH reserves the right to make changes in the specifications and/or design of the above mentioned product without prior notice.
Need help?
Do you have a question about the IB-RD3252 and is the answer not in the manual?
Questions and answers