
Related Manuals for Icy Box IB-RP406


Summary of Contents for Icy Box IB-RP406
- Page 1 Quick installation guide IB-RP406 Protective case for Raspberry Pi 2 and 3 ® Schnellinstallationsanleitung IB-RP406 Schutzgehäuse für Raspberry Pi 2 und 3 ®...
-
Page 2: Safety Information
Safety information Please read carefully the following information to prevent injuries, damage to material and device as well as data loss: Warning levels Signal words and safety codes indicate the warning level and provide immediate information in terms of the probability of occurrence as well as the type and severity of the consequences if the measures to prevent hazards are not complied with. - Page 3 Safety information 4. Hazards caused by very small parts and packaging Risk of suffocation WARNING Risk of death by suffocation or swallowing • Keep small parts and accessories away from children • Store/dispose of plastic bags and packaging in an area that is inaccessible to children •...
- Page 4 Sicherheitshinweise Zur Vermeidung körperlicher Schäden, sowie von Sach-, Geräteschäden und Datenverlust beachten Sie bitte folgende Hinweise: Warnstufen Signalwort und Sicherheitszeichen kennzeichnen die Warnstufe und geben einen sofortigen Hinweis auf aWahrscheinlichkeit, Art und Schwere der Folgen, wenn die Maßnahmen zur Vermeidung der Gefahr nicht befolgt werden. warnt vor einer unmittelbar gefährlichen Situation, die zum GEFAHR Tod oder zu schweren Verletzungen führen wird.
- Page 5 Sicherheitshinweise • keine Gegenstände auf dem Gerät/Netzteil abstellen 4. Gefahren durch Kleinstteile und Verpackung Erstickungsgefahr WARNUNG Lebensgefahr durch Ersticken oder Verschlucken • Kleinteile, Zubehör für Kinder unzugänglich verwahren • Plastiktüten und Verpackung für Kinder unzugänglich verwahren/entsorgen • Kleinteile und Verpackungen nicht in Kinderhände geben 5.
- Page 6 Quick installation guide IB-RP406 Important product information Dear customer, please note the following information about the main boards which are supported by this device! The device has been developed for: • Compatible with: Raspberry Pi 1 Model B+, Pi 2 Model B, Pi 3 Model ®...
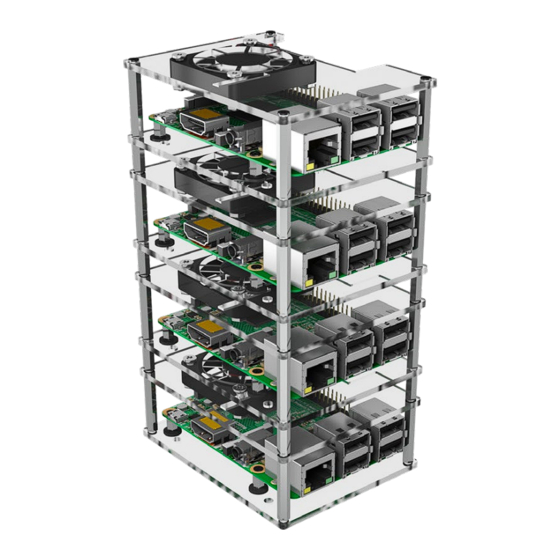
- Page 7 Quick installation guide IB-RP406 Assembly • Please follow the drawing to assemble the appropriated board(s) to the IB-RP406. • The heat sinks can be placed to the main chip sets on the board accor- dingly to their sizes. Please remove the foil before stick them to the PCB.
- Page 8 Quick installation guide IB-RP406 2. Stick the two heatsinks on the CPU and IC of your Raspberry Pi ® 3. Fasten the spacers-A to the corresponding Raspberry Pi screw holes ® position on the bottom acrylic with black screws-B. Fasten your Raspberry Pi to the bottom acrylic with silver screws-C.
- Page 9 Quick installation guide IB-RP406 5. Repeat step 4 to step 5 four times for all four layers 5. Fasten the standoffs-F to the bottom acrylic with black screws-B. 6. lnstall top acrylic by putting the standoffs-F into the top acrylic screw holes and fixingwith standoffs-G.
- Page 10 Quick installation guide IB-RP406 8. To build the second layer, install the bottom acrylic of the second layer on standoffs-G of the first layer and fasten it with standoffs-F. 9. lnstall top acrylic by putting the standoffs-F into the top acrylic screw holes and fixing it with standoffs-G.
- Page 11 Quick installation guide IB-RP406 1 1. To build the forth (or last) layer, install the bottom acrylic of the last layer on the standoffs-G of the third layer and fasten it with standoffs-H. 12. Put the top acrylic on standoffs-H and fasten with black screws-B.
- Page 12 ® • Raspberry Pi Board nicht im Lieferumfang enthalten ® Verpackungsinhalt: 1x IB-RP406, 4x 40 mm Lüfter, 4x Satz Kühlkörper, 4x Satz Schrauben, Abstandshalter und Muttern, 4x Gummifußaufkleber, 1x Schraubendreher 1x Schnellinstallationsanleitung, (Raspberry Pi nicht im Lieferumfang enthalten) ® Stapelbares 4-fach Gehäuse für Raspberry Pi 2 und 3 ®...
- Page 13 SchnellinstallationsanleitungIB-RP406 Zusammenbau • Um die entsprechenden Boards einzubauen, folgen Sie bitte der Darstellung. • Die Kühlkörper können bei Bedarf auf die entsprechend dimensionierten PCB Bauteile gesetzt werden. Bitte entfernen Sie die Folie, bevor Sie die Kühlkörper anbringen. • Alternativ oder zusätzlich können Sie auch die 40 mm Lüfter (enthalten) im Oberteil eines jeden Layers verbauen.
- Page 14 SchnellinstallationsanleitungIB-RP406 2. Entfernen Sie die Folie von den entsprechenden Kühlkörpern und kleben Sie sie auf den CPU- und IC-Chipsatz. 3. An den Positionen der entsprechenden Raspberry-Pi Schraubenlöcher ® befestigen Sie 4x die Distanzstücke-A mittels 4x der Schrauben-B auf der unteren Acrylscheibe wie gezeigt. Befestigen Sie Ihren Raspberry Pi ®...
- Page 15 SchnellinstallationsanleitungIB-RP406 5. Für jede Ebene wiederholen Sie Schritt 3 bis 5 (bis zu vier Mal insgesamt). 6. Befestigen Sie 4x die Abstandshalter-F mit 4x den Schrauben-B an der unteren Acrylscheibe. 6. Montieren Sie die obere Acrylscheibe, indem Sie die Gewinde der Abstandshalter-F in die Schraublöcher der oberen Acrylscheibe stecken und mit 4x Abstandshaltern-G befestigen.
- Page 16 SchnellinstallationsanleitungIB-RP406 8. Um die zweite Ebene aufzubauen, montieren Sie die untere Acrylscheibe der zweiten Ebene, indem Sie die Gewinde der Abstandshalter-G in die Schraublöcher der unteren Acrylscheibe stecken und mit 4x Abstandshal- tern-F befestigen 9. Montieren Sie die obere Acrylscheibe, indem Sie die Gewinde der Abstandshalter-F in die Schraublöcher der oberen Acrylscheibe stecken und mit 4x Abstandshaltern-G befestigen.
- Page 17 SchnellinstallationsanleitungIB-RP406 1 1. Um die vierte (bzw. letzte) Ebene aufzubauen, montieren Sie die untere Acrylscheibe der letzten Ebene auf die Abstandshalter-G der vorherigen Ebene und befestigenSie sie 4x mit Abstandshalter-H. 12 Montieren Sie die obere Acrylscheibe, indem Sie die Schraublöcher auf den Abstandshaltern-H ausrichten und 4x mit den schwarzen Schrauben-B befestigen.
- Page 18 © Copyright 2019 by RaidSonic Technology GmbH. All Rights Reserved The information contained in this manual is believed to be accurate and reliable. RaidSonic Technology GmbH assumes no responsibility for any errors contained in this manual. RaidSonic Technology GmbH reserves the right to make changes in the specifications and/or design of the above mentioned product without prior notice.
Need help?
Do you have a question about the IB-RP406 and is the answer not in the manual?
Questions and answers