Mobotix M12 Manual
Ip camera
Hide thumbs
Also See for M12:
- User manual (96 pages) ,
- Software manual (292 pages) ,
- Quick installation (2 pages)
Table of Contents
Advertisement
Megapixel
1280 x 960
software zoom
30 Frames/s
VGA (640 x 480)
10 fps Mega
-22°F to +140°F
Weatherproof
-30°C to +60°C, IP65
no heating necessary
IEEE 802.3af
PoE
network power
even in winter
microphone & speaker
Audio
bi-directional via IP
variable framerates
Video SIP Client
IP-Telephony
alarm notify,
cam remote control
Video motion
multiple windows
precision pixel-based
lip-syncronized audio
Recording
event-ringbuffer
30 cams each 30 fps
Live viewing
30 cams at 30 fps
all on one screen
Backlight
safe using CMOS
without mechanical iris
Wall bracket
with cable cover
for RJ45 wall outlet
Robust
no moving parts
fiber glass housing
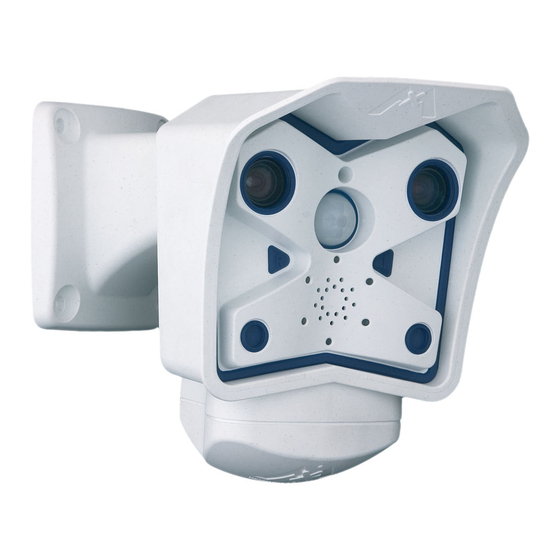
M12
Camera Manual
VGA
30 fps
480 lines
CIF
CIF
30 fps
288 lines
Complete integration for web and security
MOBOTIX AG • Security-Vision-Systems • Made in Germany
www.mobotix.com • sales@mobotix.com • 19.10.2006
Part 1
Mega
10 fps
960 lines
Image
detail
Current PDF File:
www.mobotix.com > Services > Manuals
Security-Vision-Systems
X
MOBOTIX
AG
Advertisement
Table of Contents

Subscribe to Our Youtube Channel
Related Manuals for Mobotix M12


Summary of Contents for Mobotix M12
-
Page 1: Live Viewing
CMOS www.mobotix.com > Services > Manuals without mechanical iris Wall bracket with cable cover for RJ45 wall outlet MOBOTIX AG • Security-Vision-Systems • Made in Germany Robust no moving parts www.mobotix.com • sales@mobotix.com • 19.10.2006 fiber glass housing... -
Page 2: M12 Camera Manual Part
Admin User Name: Admin Password: ISDN Dial-In Number: ISDN User Name: ISDN Password: Notes: Note: MOBOTIX offers inexpensive seminars that include a workshop and practical excercises: Basic Seminar 2 days, Advanced Seminar 2 days. For more information, see www.mobotix.com © MOBOTIX AG • Security-Vision-Systems • Made in Germany... -
Page 3: Table Of Contents
INTRODUCTION The Concept Behind the MOBOTIX M12 Product Advantages of the MOBOTIX M12 Feature List Hard- and Software Differences of the MOBOTIX M10/M12 Important Notes 1.5.1 MOBOTIX M12—Weatherproof to IP65 1.5.2 Password for the Administration Menu 1.5.3 Password for ISDN Dial-In 1.5.4 Irreversibly Deactivating the Microphone... - Page 4 2.10.1 Dimensions—Ceiling Mount 2.10.2 Dimensions—Wall Mount 2.10.3 Dimensions of the SecureFlex Mount's Foot 2.11 Mounting the MOBOTIX M12 to a Wall or Ceiling 2.11.1 Mounting to a Wall 2.11.2 Mounting to a Ceiling 2.11.3 Converting the Wall Mount to Ceiling Mount 2.12 Preparing the Installation...
-
Page 5: Connecting External Devices And Sensors: Mx Interface Connector
The MultiView Screen in the Browser PDA Screen Guest Screen Browser Settings 4.10 Configuring the Softbuttons 4.11 Fast Video Streaming 4.12 Operating Multiple Cameras BASIC CAMERA CONFIGURATION © MOBOTIX AG • Security-Vision-Systems • Made in Germany www.mobotix.com • sales@mobotix.com • 19.10.2006... - Page 6 Working with Profiles Time Tasks RECORDING Overview Recording Modes Recording Types TELEPHONY FEATURES Overview VoIP Settings for IP Telephony Camera Phone (Listen, Speak and Intercom Modes) © MOBOTIX AG • Security-Vision-Systems • Made in Germany www.mobotix.com • sales@mobotix.com • 19.10.2006...
- Page 7 Technical information subject to change without notice! No part of this manual may be reproduced by any means without our written approval! Copyright © MOBOTIX AG, Kaiserslautern, Germany © MOBOTIX AG • Security-Vision-Systems • Made in Germany www.mobotix.com • sales@mobotix.com • 19.10.2006...
-
Page 8: Introduction
Similar to previous MOBOTIX cameras, M12 cameras are available as SECURE, IT, BASIC models with differing software features. The WEB and BASIC mo- dels do not have a microphone. The M12 can be fitted with three M14 high-perfor- mance lenses; additional lenses will be available in the future. Everything integrated! Like all other MOBOTIX cameras, M12 models are more than "just a camera";... -
Page 9: The Concept Behind The Mobotix M12
Low Bandwidth Requirements MOBOTIX' patent pending MxPEG streaming format allows fast live video with au- dio at extremely low network load (1 to 2 Mbps). Since the MOBOTIX camera itself detects movements in the image, video is only transmitted if movements occur, and when the video and audio data are stored. - Page 10 SD card can easily bridge longer network outages. 30 Live Cameras Using MxViewer The free MxViewer Windows client for viewing up to 30 MOBOTIX cameras with audio now features an integrated layout editor for quick assembly of building plans-using full drag&drop support for positioning the live camera images.
- Page 11 PoE can be used for supplying power—unlike in other cameras. Weatherproof MOBOTIX M12 cameras are certified according to IP65 and are designed for out- door as well as indoor usage. As the cameras do not have any moving parts, they are extremely robust and resistant against heat or cold (-30°C to +60°C;...
- Page 12 Logos, Animated or Freestyle Logo generator integrated The Logo generator of MOBOTIX cameras allows integrating different banners and graphics (including files loaded from any URL) into the current camera images—with optional scheduler control. MOBOTIX cameras are the only network IP cameras supporting animated and transparent graphics.
-
Page 13: Product Advantages Of The Mobotix M12
• Optional Wireless or UMTS/3G functionality thanks to CF cards (only instal- led by MOBOTIX; available in future versions). • High image quality with max. 1.3 M pixels resolution. The proven MOBOTIX software scaling delivers crisp images even for the smaller formats (PDA, CIF, VGA). - Page 14 (PoE). • Free MxViewer for Windows to display and manage MOBOTIX cameras and includes alarm management, background images, etc. • Layout editor in free-of-charge MOBOTIX MxViewer for quickly creating building layout plans with cameras.
-
Page 15: Feature List
M12 Camera Manual Part 1 Feature List The MOBOTIX M12 includes the following main features (some features are model- dependent): • Live images of up to 1280 x 960 pixels resolution via network, ISDN, GSM, 1280 x 960 pixels GPRS, UMTS, wireless up to 30 fps (at 640 x 480 resolution), also adapted for PDAs. - Page 16 • Multiple possibilities for connecting external devices, sensors and signal lines using the D Sub 15 HD socket of the camera or the MOBOTIX Cam-IO in- stallation box. • Speaker phone with talk, listen and intercom modes via Internet telephony Speaker phone (SIP) and ISDN using the integrated microphone and speaker.
-
Page 17: Hard- And Software Differences Of The Mobotix
M12 Camera Manual Part 1 1.4 Hard- and Software Differences of the MOBOTIX M10/M12 To cut a long story short – nothing changes with the basic functionality or the looks of the camera. Users, who have worked with M10 models before will not have any problems adjusting to a MOBOTIX M12. -
Page 18: Important Notes
M12 Camera Manual Part 1 Important Notes 1.5.1 MOBOTIX M12-Weatherproof to IP65 The MOBOTIX M12 is IP65 weatherproof (absolutely dustproof, resistant against water jets). 1.5.2 Password for the Administration Menu The administration area of the camera (Admin Menu button) is protected by a user... -
Page 19: Starting The Camera Using The Factory Ip Address
MOBOTIX camera only displays the text WWW.MOBOTIX.COM, to your liking the time stamp and the MOBOTIX logo at the top of the image. Once the camera arming has been activated, the text at the bottom of the live image (event, action and messaging symbols) will also appear. -
Page 20: Isdn Compatibility Note
1.5.14 Maximum Cable Lengths According to UL regulations, the length of the cable to a MOBOTIX camera must be limited to 140 feet or less running outside of buildings. The installation must comply with articles 725 and 800 of the National Electric Code. -
Page 21: Additional Information
Camera Status the camera's browser interface. Another source of information on all dialogs and parameters of the MOBOTIX ca- mera is the Reference Manual that you can download from www.mobotix.com. The Reference Manual consists of the MOBOTIX camera's online help in one PDF file. -
Page 22: Mounting The Camera
M12 Camera Manual Part 1 MOUNTING THE CAMERA Delivered Parts, Camera Components and Dimensions The MOBOTIX M12 is delivered with the SecureFlex wall and ceiling mount and is ready for use out-of-the-box. 2.1.1 Standard Delivery Cover Ø 27 mm for... -
Page 23: Camera Housing And Connectors
M12 Camera Manual Part 1 2.2 Camera Housing and Connectors The MOBOTIX M12 camera housing is made of fiber-reinforced plastic (PBT-30GF, Ultraviolet resistant: No Polybutyleneterephtalate with 30% fiberglass). This material is used heavily in yellowing of housing even the automotive industry and is sturdy, resistant against high temperatures, environ- after years of outdoor mental influences, chemicals, etc. -
Page 24: Optional Accessories
IEEE 802.3af! Network Power Adapter (MX-NPA-3-RJ) The Network Power Adapter allows injecting the power supply for the MOBOTIX camera into the network cable. It thus allows using a single cable for connecting to the camera and for remotely supplying power (up to Power supply for smaller 100 m/300 ft). - Page 25 For additional information on the MOBOTIX Cam-IO, see section 3.7.2, MOBOTIX Cam-IO : Expansion Mo- dule for Easy Installation . The MOBOTIX Cam-IO will be available from November 2006. Split cable for ISDN-only power supply Power injection into one If only ISDN is available for the camera and only one cable should be used for con-...
-
Page 26: Wiring, Fire Prevention, Lightning And Surge Protection
MOBOTIX recommends having MOBOTIX cameras installed only by specialists accustomed to installing network devices and having proper respect for the perti- nent regulations regarding lightning protection and... -
Page 27: Providing The Connections (Network/Isdn)
SIP telephony reduces costs ISDN connection of MOBOTIX cameras is not required if the network permits SIP Internet telephony connections for Internet phone connections. Thanks to the... -
Page 28: Power Supply Of The Mobotix M12
Caution In contrast to the MOBOTIX M10, it is not possible to use an ISDN NT and the S0 bus to supply power to the M12. Using the ISDN split cable and MOBOTIX PoE products (see section 2.3, Optional Accessories), the power can be injected into the ISDN data cable (8-wire cable required). -
Page 29: Using Uninterruptible Power Supplies (Ups)
When using more powerful 19" rack-mounted USPs, you can also protect all other network components (e.g. switches, routers, PoE switches, etc.). Since MOBOTIX cameras do not require any heating even in the wintertime, the power consumption of 3 W is quite low. This in turn means that you can centrali- ze the USP-protected power supply by injecting power into the network cables (max. -
Page 30: Determining Where To Mount The Camera
The camera can be turned/tilted within the following ranges (see section 2.11, Mounting the MOBOTIX M12 to a Wall or Ceiling ): • horizontally: approx. 180° • vertically: approx. 70°... -
Page 31: Mobotix M12 Lens Options
L22 Super Wide-Angle 90° has very litt- le distortion, even when using the 4x digital zoom of the M12. Mounting a camera with the Super Wide Angle lens in the corner of a room will allow you to see the complete room (see figure right). - Page 32 M12 Camera Manual Part 1 Note The focal lengths of MOBOTIX lenses do not reflect the actual focal Focal lengths of MOBO- length of the lenses, but the focal length ( Lxx mm) converted to 35 mm TIX lenses are always camera format.
-
Page 33: The Mobotix Secureflex Mount
On top, the SecureFlex wall mount covers RJ45 wall outlets (without the frame) and the concealed cabling improves the se- curity of the camera. The SecureFlex mount is pre-installed on all MOBOTIX M12 models. -
Page 34: Dimensions (Ceiling Mount/Wall Mount)
2.10 Dimensions (Ceiling Mount/Wall Mount) 2.10.1 Dimensions—Ceiling Mount Mounting to a ceiling Mounting to a ceiling 2.10.2 Dimensions—Wall Mount All measurements in mm! Mounting to a wall © MOBOTIX AG • Security-Vision-Systems • Made in Germany www.mobotix.com • sales@mobotix.com • 19.10.2006... -
Page 35: Dimensions Of The Secureflex Mount's Foot
Check the appendix for the drilling template, which will be helpful when drilling the holes. For more detailed information on planning, please download MOBOTIX Planning from www.mobotix.com. © MOBOTIX AG • Security-Vision-Systems • Made in Germany www.mobotix.com • sales@mobotix.com • 19.10.2006... -
Page 36: Mounting The Mobotix M12 To A Wall Or Ceiling
M12 Camera Manual Part 1 2.11 Mounting the MOBOTIX M12 to a Wall or Ceiling Caution Never use screws with countersunk heads to fasten the mount, as these screws will destroy the mount. The mount covers RJ45 The foot of the SecureFlex mount is large enough to completely cover a wall wall outlets and complete- outlet (see section 2.12, Preparing the Installation ). -
Page 37: Converting The Wall Mount To Ceiling Mount
Pull out! Mount Mounting to a wall Cover Max. torque for all Allen screws: 4 Nm (2.95 lbf ft) Push in until reaching stop! Mounting to a ceiling © MOBOTIX AG • Security-Vision-Systems • Made in Germany www.mobotix.com • sales@mobotix.com • 19.10.2006... -
Page 38: Preparing The Installation
2.14, Mounting the Camera to Different Surfaces . 2.12.1 Insect Protection of the Camera MOBOTIX cameras feature a pre-installed insect protection (item 8), which effec- tively prevents small animals from entering the camera. Make sure that the... -
Page 39: Connecting Another Cable (Isdn/Rs232)
2.12.4 Inserting an SD Card (Optional) The MOBOTIX M12 can use an SD card for storing events (from end 2006, after up- dating the software). • Remove the bottom cover of the SecureFlex mount. SD cards will be suppor- •... -
Page 40: Mounting The Camera
All measurements in mm! Caution Never use screws with countersunk heads to fasten the mount, as these screws will destroy the mount. © MOBOTIX AG • Security-Vision-Systems • Made in Germany www.mobotix.com • sales@mobotix.com • 19.10.2006... -
Page 41: Mounting The Camera To Different Surfaces
Make sure not to seal off this opening. Wall thickness: Make sure that the wall is at least five centimeters (2") thick if you intend to use the supplied dowels and screws. © MOBOTIX AG • Security-Vision-Systems • Made in Germany www.mobotix.com • sales@mobotix.com • 19.10.2006... -
Page 42: Mounting To A Wooden Wall Or Surface
SecureFlex mount. • Tighten the screws using the wrench or ratchet. • Check the screws for proper tightness and push the caps onto the hex heads. © MOBOTIX AG • Security-Vision-Systems • Made in Germany www.mobotix.com • sales@mobotix.com • 19.10.2006... -
Page 43: Mounting To A Drywall
SecureFlex mount and into the dowels. • Tighten the screws using the wrench or ratchet. • Check the screws for proper tightness and push the caps onto the hex heads. © MOBOTIX AG • Security-Vision-Systems • Made in Germany www.mobotix.com • sales@mobotix.com • 19.10.2006... -
Page 44: Mounting To A Concrete Or Brick Wall
SecureFlex mount and into the dowels. • Tighten the screws using the wrench or ratchet. • Check the screws for proper tightness and push the caps onto the hex heads. © MOBOTIX AG • Security-Vision-Systems • Made in Germany www.mobotix.com • sales@mobotix.com • 19.10.2006... -
Page 45: After Mounting The Camera
• Check the image focus (tele lens L135 only) and the camera position on the computer monitor. Please also see section 2.16, Adjusting the Tele Lens Focus . © MOBOTIX AG • Security-Vision-Systems • Made in Germany www.mobotix.com • sales@mobotix.com • 19.10.2006... -
Page 46: Installing The Mobotix Secureflex Pole Mount
Part Name Stainless steel screws M6x40 mm Stainless steel washers Ø 6.4 mm Stainless steel screws M6x25 mm Stainless steel hex nuts M6 Stainless steel straps © MOBOTIX AG • Security-Vision-Systems • Made in Germany www.mobotix.com • sales@mobotix.com • 19.10.2006... -
Page 47: Mounting The Pole Mount And The Camera
Allen screw, washer and hex nut from the mount and pull out the turn/tilt unit out of the mount's foot. Remove the Allen screw of the bottom cover and take off the cover. © MOBOTIX AG • Security-Vision-Systems • Made in Germany www.mobotix.com • sales@mobotix.com • 19.10.2006... - Page 48 (2.95 lbf ft) ten all screws of the turn/tilt unit (max. 4 Nm/2.95 lbf ft) to make sure that the camera keeps position. © MOBOTIX AG • Security-Vision-Systems • Made in Germany www.mobotix.com • sales@mobotix.com • 19.10.2006...
-
Page 49: Adjusting The Tele Lens Focus (Cameras With L135 Tele Lens Only)
• Cautiously turn the lens in clockwise or counter-clock- wise direction until the image is properly focused. The 135 mm tele lens is focused using the supplied adjustment ring © MOBOTIX AG • Security-Vision-Systems • Made in Germany www.mobotix.com • sales@mobotix.com • 19.10.2006... -
Page 50: Operating The Camera
OPERATING THE CAMERA 3.1 General Procedure The MOBOTIX camera does not require any software installation; all you need is your preferred browser with JavaScript support to operate the camera. Thus, the MOBOTIX camera is supported by all common operating systems (such as Windows, Macintosh and Linux, ...). - Page 51 M12 Camera Manual Part 1 Note After first booting the new MOBOTIX camera or after resetting to facto- ry defaults, accessing the Administration menu (Admin Menu button) will automatically start the Quick Installation wizard. This is where you Always use Quick Instal-...
-
Page 52: Overview Of The Configuration Settings
Some of these settings can be changed using the corresponding pull-down menus above the image on the Live screen. • The image settings are already optimized The factory image settings of MOBOTIX cameras deliver excellent images for Recommendation: Always use factory image most application scenarios and should not be changed. - Page 53 If all options are displayed, the Less button appears. Clicking this button will hide the advanced options. Click on the More/Less buttons to show/hide the advanced options © MOBOTIX AG • Security-Vision-Systems • Made in Germany www.mobotix.com • sales@mobotix.com • 19.10.2006...
-
Page 54: Connecting The Camera
In order to inject the power supply into the network cabling, MOBOTIX PoE products have proven reliable and Use the 19" MOBOTIX Netpower rack-mount easy to install for one camera (MX-NPA-3-RJ), for up to four... -
Page 55: Ethernet: Power Supply Using A Network Power Rack (Mx Poe)
PoE can be used (lower risk of failure). • Easy installation on DIN rails ( MX-NPR-4 ) or in 19" racks ( MX- NPR-8/20 ). © MOBOTIX AG • Security-Vision-Systems • Made in Germany www.mobotix.com • sales@mobotix.com • 19.10.2006... -
Page 56: Ethernet: Power Supply Using Poe Products (Power Over Ethernet)
IEEE 802.3af Power over Ethernet network compo- PoE components without nents for supplying power to MOBOTIX cameras, make sure that these fans increase overall reli- components do not have a fan. Since the power consumption of MO- ability of the entire sys-... -
Page 57: Isdn: Power Supply Using A Network Power Adapter
Caution Missing termination resistors and wrong cable lengths are the most common installation errors! Always observe the instructions regarding maximum cable lengths and proper ISDN termination! © MOBOTIX AG • Security-Vision-Systems • Made in Germany www.mobotix.com • sales@mobotix.com • 19.10.2006... -
Page 58: Isdn: Directly Supplying Power Using The External Power Supply
Power is supplied only via the Ethernet cable and the 10BaseT/NET connector of the camera (using MOBOTIX PoE products or Power over Ethernet according to IEEE 802.af). ISDN Ethernet/power supply © MOBOTIX AG • Security-Vision-Systems • Made in Germany... -
Page 59: Camera Startup Sequence
During the startup sequence, the LEDs will always light up, even if they have been deactivated in Admin Menu > LED Setup. Signals of the camera LEDs: Camera Ethernet Serial interface VoIP/ISDN Camera © MOBOTIX AG • Security-Vision-Systems • Made in Germany www.mobotix.com • sales@mobotix.com • 19.10.2006... -
Page 60: The First Image From The Camera
UNIX/OS X computers, search for the inet address parameter of the eth0 device (the first network interface). If your computer does not use an IP address in the © MOBOTIX AG • Security-Vision-Systems • Made in Germany www.mobotix.com • sales@mobotix.com • 19.10.2006... - Page 61 If you receive an answer from another network device although the camera is not connected, you will have to remove that device until you have reset the MOBOTIX camera to a free IP address. We recommend using the Quick Installation wizard for this task.
-
Page 62: Preparing The Isdn Connection
Password: 3.4.3 Simultaneously Using ISDN and Ethernet Connections (Gateway) In most cases, MOBOTIX cameras will be used either on an Ethernet LAN or on ISDN, not both. The gateway (for accessing computers outside of the local network) needs to be set manually for Ethernet; it is usually obtained automatically for ISDN. -
Page 63: The First Image In The Browser
After entering the camera's IP address in the browser address bar (e.g. http:// Make sure that you use 10.1.0.99), you will see the Live screen of the MOBOTIX camera with its user the IP address of your interface controls, such as softbuttons, buttons for the different camera screens,... -
Page 64: Additional Information
In order to obtain more information on the camera and its current configuration, Camera status open the Camera Status dialog by clicking on the yellow icon in the top right corner of the camera's browser interface. Another source of information on all dialogs and parameters of the MOBOTIX camera Reference Manual that... -
Page 65: The Playback Screen In The Browser
M12 Camera Manual Part 1 3.4.6 Camera Screens in the Browser Per factory default, the MOBOTIX camera first shows the Live screen. You can set a different start page in order to prevent others from changing the settings. In additi-... -
Page 66: Fast Video Streaming
M12 Camera Manual Part 1 3.4.7 The First Image in MxControlCenter Download MxControlCen- The MOBOTIX MxControlCenter is a free Windows application that allows display- ter free of charge from ing multiple MOBOTIX cameras on one computer and provides alarm manage- www.mobotix.com... - Page 67 Defining Video Sources sources If you start MxControlCenter for the first time on a computer without having defined any video sources (MOBOTIX cameras) before, the MxControlCenter Video Sour- ces dialog will appear. Depending on the task at hand, select the appropriate option in the Select video sources group: •...
- Page 68 In the first pass, MxControlCenter searches the selected subnet for MOBOTIX ca- meras and in the second pass, MxControlCenter verifies if it can access the cameras. MxControlCenter then highlights all cameras in the list, which have a status of OK...
- Page 69 MOBOTIX cameras. • Add: Add the IP address or DNS name of the MOBOTIX camera you entered to the list. If possible, MxControlCenter shows the image of the last camera you added in the preview window.
- Page 70 DHCP server. If this is not the case, the camera uses its last IP address camera cannot obtain a valid IP address and will fall back to its last known IP address. © MOBOTIX AG • Security-Vision-Systems • Made in Germany www.mobotix.com • sales@mobotix.com • 19.10.2006...
- Page 71 (see section 1.4.5), the users and passwords defined in the camera will not be reset if the camera is being booted using the factory IP address. © MOBOTIX AG • Security-Vision-Systems • Made in Germany www.mobotix.com • sales@mobotix.com • 19.10.2006...
- Page 72 MOBOTIX Cam-IO 3.7.1 MX Interface Connector for Direct Connections The MOBOTIX camera's MX Interface Connector (D Sub 15 HD) features one signal input pin and one signal output pin for switching loads. In addi- tion, the interface also provides two signal inputs and two signal outputs of the RS232 interface.
- Page 73 M12 Camera Manual Part 1 camera (e.g. when using a MOBOTIX camera as a video conferencing system and in access control scenarios). 3.7.2 MOBOTIX Cam-IO: Expansion Module for Easy Installation This expansion module has the following main tasks: • It represents a unified installation platform with power supply for the MOBOTIX M12 and M22 models with SecureFlex mount.
- Page 74 3.8 Signal Input/Output, RS232 Interface The signal lines of the se- The MOBOTIX camera provides a signal input/output as well as two additional sig- rial interface can also be nal input pins and two signal output pins on its RS232 interface (not available on programmed as additional WEB and BASIC models).
- Page 75 M12 Camera Manual Part 1 3.8.2 Signal Output Pins When an event is detected, the MOBOTIX camera can switch the signal output (pin 1). Use the corresponding options in Setup Menu > Actions to set how long the camera should close the signal output.
- Page 76 When printing the PDF file, you should print two pages onto one to obtain an unscaled printout of the drilling templates. © MOBOTIX AG • Security-Vision-Systems • Made in Germany www.mobotix.com • sales@mobotix.com • 19.10.2006...
- Page 77 M12 Camera Manual Part 1 SecureFlex wall mount (centered wall outlet) Wall outlet centered © MOBOTIX AG • Security-Vision-Systems • Made in Germany www.mobotix.com • sales@mobotix.com • 19.10.2006...
- Page 78 4.000 4000 VGA images approx. 1250 1250 2.500 2.500 2500 Mega images approx. External audio (Line-In/Out) Switch/signal input pins Switch/signal output pins Concealed cabling In stock © MOBOTIX AG • Security-Vision-Systems • Made in Germany www.mobotix.com • sales@mobotix.com • 19.10.2006...
- Page 79 Model Limitations Image size Mega Mega Image sensor (color / BW) Color Color Color & BW Color & BW Standard lens for software version Audio support (Microphone/Speaker) © MOBOTIX AG • Security-Vision-Systems • Made in Germany www.mobotix.com • sales@mobotix.com • 19.10.2006...
- Page 80 M12 Camera Manual Part 1 IP65 Certificate © MOBOTIX AG • Security-Vision-Systems • Made in Germany www.mobotix.com • sales@mobotix.com • 19.10.2006...
- Page 81 M12 Camera Manual Part 1 Declaration of Conformity © MOBOTIX AG • Security-Vision-Systems • Made in Germany www.mobotix.com • sales@mobotix.com • 19.10.2006...
- Page 82 M12 Camera Manual Part 1 Notes: © MOBOTIX AG • Security-Vision-Systems • Made in Germany www.mobotix.com • sales@mobotix.com • 19.10.2006...
- Page 83 M12 Camera Manual Part 1 MOBOTIX ... the new face of IP video All pictures in this manual are genuine MOBOTIX camera images. Enjoy the image quality! Manufacturer: CEO: MOBOTIX AG Dr. Ralf Hinkel Luxemburger Str. 6 67657 Kaiserslautern Court of Registration:...
- Page 84 CMOS www.mobotix.com > Services > Manuals without mechanical iris Wall bracket with cable cover for RJ45 wall outlet MOBOTIX AG • Security-Vision-Systems • Made in Germany Robust no moving parts www.mobotix.com • sales@mobotix.com • 19.10.2006 fiber glass housing...
Need help?
Do you have a question about the M12 and is the answer not in the manual?
Questions and answers