Table of Contents
Advertisement
Advertisement
Table of Contents

Related Manuals for Clever Choice Auto-Code Blood Glucose MonitoringSystem


Summary of Contents for Clever Choice Auto-Code Blood Glucose MonitoringSystem
- Page 1 Ver 2.0 2008 07...
- Page 2 Dear CLEVER CHOICE Auto-Code System Owner: Thanks for choosing CLEVER CHOICE Auto-Code Blood Glucose Moni- toring System to manage your diabetes effectively. The greatest feature of this system is its one code function which means you do not need to cali- brate your meter, and makes you easily monitor blood glucose at home.
-
Page 3: Important Safety Instructions
IMPORTANT SAFETY INSTRUCTIONS READ THIS BEFORE USING The following basic safety precautions should always be taken. 1. Close supervision is necessary when the device is used by, on, or near children, handicapped persons or invalids. 2. Use the device only for the intended use described in this manual. 3. -
Page 4: Table Of Contents
TABLE OF CONTENTS IMPORTANT SAFETY INSTRUCTIONS IMPORTANT INFORMATION ABOUT ATERNATIVE SITE TESTING (AST) INTRODUCTION OF THE SYSTEM Intended Use Principle of Measurement Contents of the System Appearance and Key Function of the Meter Meter Display Segments Appearance of the Test Strip PREPARATION BEFORE USE Battery Replacement Setting the Meter and Deleting the Memory... - Page 5 Cleaning Storage Strip storage Control solution storage PROBLEM-SOLVING GUIDE Error Message Problem in Operation SPECIFICATIONS SUMMARY OF OPERATION...
-
Page 6: Important Information
IMPORTANT INFORMATION Severe dehydration and excessive water loss may cause false low re- sults. If you believe you are suffering from severe dehydration, consult a healthcare professional immediately. Test results below 60 mg/dL* mean low blood glucose (hypoglycemia). Test results greater than 240 mg/dL* mean high blood glucose (hyper- glycemia). -
Page 7: About Aternative Site Testing (Ast)
ABOUT ALTERNATIVE SITE TESTING (AST) Important: There are limitations for doing AST. Please consult your healthcare professional before you do AST. What is AST? Alternative site testing (AST) means that people use parts of the body oth- er than fingertips to check their blood glucose levels. - Page 8 Do NOT use AST if: You think your blood glucose is low. You are unawareness of hypoglycemia. Your AST results do not match the way you feel. You are testing for hyperglycemia. Your routine glucose results are often fluctuating. You are pregnant. How to increase the accuracy? Stimulating blood perfusion by rubbing the puncture site prior to blood ex- traction has a significant influence on the glucose value obtained.
-
Page 9: Introduction Of The System
INTRODUCTION OF THE SYSTEM Intended Use The system is intended for use outside the body (in vitro diagnostic use). It should be used only for testing glucose (sugar) and only with fresh capil- lary whole blood samples taken from the finger and the alternative sites including the palm, the forearm, the upper arm, the calf and the thigh. -
Page 10: Contents Of The System
Contents of the System The system consists of three main products: the blood glucose meter, test strips, and a vial of control solution. These products have been designed, tested, and proven to work together as a system to produce accurate blood glucose test results. -
Page 11: Appearance And Key Function Of The Meter
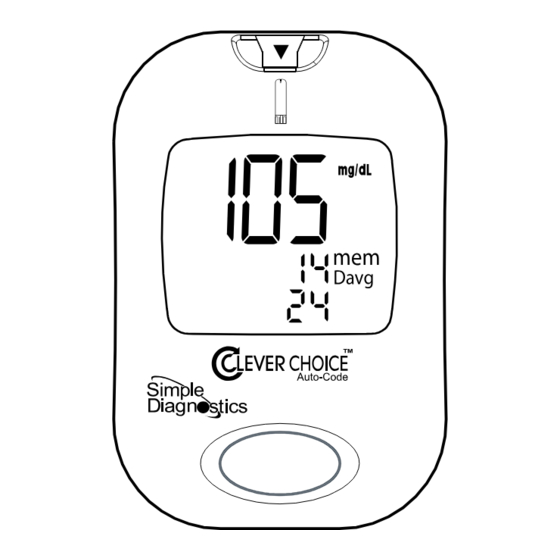
Appearance and Key Function of the Meter TEST PORT The test port is where you insert the test strip for testing. The meter will turn on automatically when you insert a test strip. DISPLAY Your test results are displayed here. The large, easy-to-read display guides you through the test using symbols and simple messages. -
Page 12: Meter Display Segments
Meter Display Segments TEST RESULT AREA MEASUREMENT UNIT Test results are displayed here. BLOOD DROP SYMBOL This symbol tells you when CTL SYMBOL to apply the sample. Appears when in control solution test. Its result won't be stored in the memory. CODE Appears with the code number... -
Page 13: Appearance Of The Test Strip
Appearance of the Test Strip Your system measures the amount of sugar (glucose) in whole blood. Blood is applied to the absorbent hole of the test strip and is automatically drawn into the reaction cell where the reaction takes place. The test strip consists of the following parts: Contact Bars Insert this end of the test strip into the meter. -
Page 14: Preparation Before Use
PREPARATION BEFORE USE Battery Replacement Your meter comes with one 3.0 V (CR2032) lithium battery that is already installed. The meter will alert you when the power is getting low by displaying two different messages: 1. The symbol appears with “CHK” and test strip symbol: the meter is func- tional and the result remains accurate, but it is time to change the battery. - Page 15 To replace the battery, make sure that the meter is turned off. 1. Press the buckle on battery cover and lift up to remove cover. 2. Remove the old battery and replace with one new 3.0 V (CR2032) lithi- um battery. Make sure that the positive “+” side is facing up. 3.
-
Page 16: Setting The Meter And Deleting The Memory
Setting the Meter and Deleting the Memory Your meter comes with the time, date and unit of temperature preset. But if you replace the battery, you may need to reset the meter. Start with the meter off. Then press the set button located in the battery com- partment. - Page 17 STEP 4 Set the Hour Press and release the Main button to ad- vance one hour. To move faster, hold the Main button down. With the correct hour on the display, press the Set button and then the minute segment flashes. STEP 5 Set the Minutes Press and release the Main button to ad- vance one minute.
- Page 18 STEP 7 Delete Memory and Exit the Setting Mode With “dEL” and flashing “mem” symbol on the dis- play: Press the Main button again to delete all of the memory, following the meter will display “---“ and “OK” to show that the memory is deleted. Then press the Set button to turn off the meter.
- Page 19 PLEASE NOTE The time, date and unit of temperature can ONLY be changed in the setting mode. Therefore, when you perform a glucose testing, those parameters are not possible to be changed. Your meter displays 7-, 14-, 21-, 28-, 60- and 90-day averages which you can access from the meter memory.
-
Page 20: Before Testing
“9F” before you proceed. Please note that CLEVER CHOICE Auto-Code system only works with “9F” code number. If the code number on the test strip vial is not “9F”, please stop testing and contact your local agent for help. -
Page 21: Checking The System With Taidoc Control Solution
Checking the System with TaiDoc Control Solutions TaiDoc control solutions contain a known amount of glucose that reacts with test strips. By comparing your control solution test results with the expected range printed on the test strip vial label, it is able to check that the meter and the test strips are working together as a system and that you are performing the test correctly. -
Page 22: Important Control Solution Information
Important Control Solution Information Use only TaiDoc control solutions. Check the expiration date on the control solution vial. Do not use if ex- pired. Control solution, meter, and test strips should come to room temperature (68~77ºF/20~25ºC) before testing. Shake the vial, discard the first drop of control solution, and wipe off the dispenser tip to ensure a good sample and an accurate result. -
Page 23: Doing A Control Solution Test
Doing a Control Solution Test STEP 1 Insert the Test Strip Insert a test strip with contact bars end first and facing up, into the test slot. The meter turns on automatically and displays the fol- lowings in sequence: “ CHK ” and “ ” ambient temperature Code “... - Page 24 STEP 3 Obtain Control Solution Shake the control solution vial well. Re- move the cap. Squeeze the vial, discard the first drop, and wipe off the dispenser tip to prevent contamination. Squeeze the vial again to get another drop and place the drop on your fingertip first.
- Page 25 STEP 5 Read and Compare the Result After counting to 0, the test result of control solution is shown on the screen. Compare this result with the range printed on the test strip vial. It should fall within this range. Normal 109-165 Out-of-range results...
-
Page 26: Testing Your Blood
TESTING YOUR BLOOD Be sure to read this section and the test strip package insert found in the test strip box carefully before testing. Make sure you have all items needed to test: A.Blood Glucose Meter B.Test Strip C.Lancing Device D.Pharmacist Choice Brand Lancets E.Clear Cap (For AST use) WARNING... -
Page 27: Testing Procedure
Testing Procedure WASH AND DRY YOUR HANDS FIRST BEFORE START- ING. STEP 1 Set the Lancing Device Screw off the cap of lancing device. Insert a lancet into the lancet holder and push down firmly until it is fully seated. Twist the protective disk until it separates from the lancet. - Page 28 Slide the ejection/cocking control back until it clicks. If it does not click the device may have been cocked when the lancet was inserted. Blood from sites other than the fingertip A clear cap, together with the kit, makes it easier to get a drop of blood for AST.
- Page 29 STEP 2 Insert Test Strip Insert a test strip with contact bars end first and facing up into the test slot. The meter turns on automatically and displays the followings in se- quence: “ CHK ” and “ ” ambient temperature Code and 9F ”...
- Page 30 STEP 3 Get a drop of blood Select the puncture site either in finger or in other parts (AST). Clean the puncture site with 70% alcohol cotton and let it air-dry. Fingertip Hold the lancing device firmly against the side of your finger. Press the release but- ton.
- Page 31 STEP 4 Apply blood into the test strip When “ “ is flashing on the screen, apply your blood to the absorbent hole of the test strip until the confirmation window is fully covered with blood. The meter then begins to count down automatically.
- Page 32 STEP 6 Remove the Lancet Always use caution when removing the lancet. Take the lancet out carefully. Place the disk on a hard surface and push the exposed tip into the pro- tective disk. WARNING The used lancet and the used test strip may be potentially biohazard.
-
Page 33: Expected Test Results
60%* . The results you get with the CLEVER CHOICE Auto-Code system can help you and your healthcare professional monitor and adjust your treatment plan to gain better control of your diabetes. -
Page 34: Special Messages
Special Messages The CLEVER CHOICE Auto-Code meter displays results between 20 to 600 mg/dL . If your test result is lower than 20 mg/dL , “Lo” will appear on the meter display. This indicates severe hypoglycemia (low blood glucose). You should immediately treat hypoglycemia as recommended by your healthcare professional. -
Page 35: Comparing Meter And Laboratory Results
COMPARING METER AND LABORATORY RE- SULTS The result you obtain from your meter may differ somewhat from your labo- ratory result due to normal variation. Meter results can be affected by fac- tors and conditions that do not affect laboratory results in the same way. (See test strip package insert for typical accuracy and precision data, and for important information on Limitations.) To make an accurate comparison between meter and laboratory results, follow the guide-lines below. - Page 36 References *5: Surwit, R.S., and Feinglos, M.N.: Diabetes Forecast (1988), April, 49-51. *6: Sacks, D.B.: “Carbohydrates. “ Burtis, C.A., and Ashwood, E.R.( ed.), Tietz Text book of Clinical Chemistry. Philadelphia: W.B. Saunders Company (1994), 959.
-
Page 37: Using The Meter Memory
USING THE METER MEMORY Your meter stores the 450 most recent blood glucose test results with date and time in its memory. It also provides you with 7-, 14-, 21-, 28-, 60-, and 90-day averages of your blood glucose test results. You can review the test results in memory with these easy steps. - Page 38 STEP 2 Recall Test Results After 90-day average, the most recent test result with date and time ap- pears. Press the Main button to review your last 450 test results in or- der. When the memory is full, the oldest result is dropped as the latest is added.
-
Page 39: Caring For Your Meter And Strip
CARING FOR YOUR METER AND STRIP To avoid the meter and test strips getting dirt, dust or other contami- nants, please wash and dry your hands thoroughly before use. Cleaning Your meter does not require special maintenance. As no blood or control solution comes in contact with the meter, there is no special cleaning re- quired. -
Page 40: Strip Storage
Strip Storage Storage condition: 39.2°F~104°F (4°C~ 40°C), below 85% relative humidity. Store your test strips in their origi nal vial only. Do not transfer to other container. Store test strip packages in a cool and dry place. Keep away from direct sunlight and heat. -
Page 41: Control Solution Storage
Control solution storage Storage condition: Store the control solution tightly closed at temperatures below 86°F(30°C). Do NOT refriger- ate. Record the discard date (date opened plus 90 days) on the control solution vial. Discard after 90 days. -
Page 42: Problem-Solving Guide
PROBLEM-SOLVING GUIDE Following is a summary of some display messages and symbols. These messages help to identify certain problems but do not appear in all cases when a problem has occurred. Improper use may cause an inaccurate result without producing an error message or a symbol. In the event of a problem, refer to the information under action. -
Page 43: Error Message
Error Message Replace the battery at once. symbol appears with this message on the display by itself. This means that the battery will not provide enough power for a test. Error message could be caused Repeat the test with a new test by a used test strip, or a temporary strip. -
Page 44: Problem In Operation
Problem in Operation 1. If the meter does not display a message after inserting a test strip: PROBABLE CAUSE WHAT TO DO a.Battery exhausted. Replace the Battery. b.Battery incorrectly Check that the battery is correctly installed or absent. . installed with the positive “+” side up. Insert the test strip correctly with the c.Test strip inserted upside down or incompletely. - Page 45 3. If the control solution test result is out of range. POSSIBLE CAUSE WHAT TO DO Error in performing the test. Read the instruction thoroughly and repeat the test again. Improper code number. Check if the code number on the display matches the code number on the test strip vial.
-
Page 46: Specifications
SPECIFICATIONS Model No.: TD-4226 Dimension: 88mm*62mm*22mm Weigh: 56.5g Power source: one CR2032 3V lithium coin battery Display: LCD Memory: 450 measurement results with date and time Auto electrode inserting detection Auto sample loading detection Auto reaction time count-down Auto turn-off after 3 minutes without action Temperature warning Operating condition: 50°F~104°F(10°C~40°C), below 85%R.H. -
Page 47: Summary Of Operation
SUMMARY OF OPERATION This summary is intended only for quick reference and can not be taken as the substitute for the Owner’s Manual. Please read the entire manual before you begin doing test. STEP 1 Insert Test Strip The meter is automatically turned on. The ambient temperature and next the code number “... - Page 48 STEP 3 Obtain a Result The meter starts to count down. Never try to add any blood into the absorbent hole even if you find that the confirmation win- dow is not fulfilled. Discard the strip and retest with a new strip. STEP 4 Discard the used strip and the lancet according to your local regulations.
- Page 49 NOTE...
- Page 50 NOTE...
- Page 51 NOTE...
- Page 52 NOTE...
Need help?
Do you have a question about the Auto-Code Blood Glucose MonitoringSystem and is the answer not in the manual?
Questions and answers