Table of Contents
Advertisement
Available languages
Available languages
Advertisement
Table of Contents

Related Manuals for ARIETE Evolution 2.0


Summary of Contents for ARIETE Evolution 2.0
- Page 1 2712...
- Page 3 Gentile cliente, desideriamo ringraziarLa per aver acquistato il nuovo Robot aspirapolvere intelligente che effettua le pulizie dei pavimenti in modo autonomo ed accurato. Il Robot è infatti in grado di aspirare lo sporco dai pavimenti mediante un motore aspirante e spazzole rotanti laterali che consentono di raggiungere anche gli angoli della casa, intorno e al di sotto dei mobili e lungo i muri.
- Page 4 AVVERTENZE IMPORTANTI LEGGERE QUESTE ISTRUZIONI PRIMA DELL’USO. CONSERVARE SEMPRE QUESTE ISTRUZIONI. Questo apparecchio è conforme alla direttiva 2006/95/EC e EMC 2004/108/EC. Per il corretto smaltimento del prodotto ai sensi della Direttiva Europea 2009/96/CE si prega leggere l’apposito foglietto allegato al prodotto. PERICOLO PER I bAMbINI 1. Questo apparecchio può essere usato da bambini con età superiore agli 8 anni e da persone con ridotte capacità...
- Page 5 PERICOLO DOVUTO A CORRENTE ELETTRICA E bATTERIE 6. Assicurarsi che il voltaggio elettrico dell’apparecchio corrisponda a quello della vostra rete elettrica. 7. Per caricare il Robot utilizzare solo la base di ricarica e il caricabatterie forniti. 8. Assicurarsi di avere sempre le mani ben asciutte prima di utilizzare o di regolare gli interruttori posti sull’apparecchio o prima di toccare la spina e i collegamenti di alimentazione.
- Page 6 18. In caso di fuoriuscita di liquido dalle batterie, l’apparecchio non deve essere utilizzato ma portato al più vicino Centro Assistenza per la sosti- tuzione delle stesse. 19. L’apparecchio funziona con batterie ricaricabili, pertanto alla fine della sua vita non deve esser smaltito insieme ai rifiuti urbani. Può essere conse- gnato presso gli appositi centri di raccolta differenziata predisposti dalle amministrazioni locali, oppure presso i rivenditori che forniscono questo servizio.
- Page 7 28. Il Robot non deve essere usato senza filtri, oppure qualora i filtri siano rotti o danneggiati. 29. Non aspirare mai su superfici bagnate. 30. Non aspirare mai liquidi o residui di candeggina, vernice o altri prodotti chimici o sostanze umide. 31.
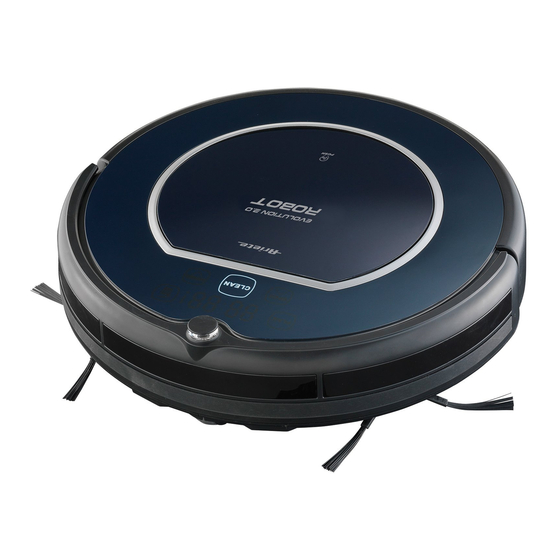
- Page 8 DEsCRIZIONE DEL RObOT E DEI COMPONENTI Coperchio contenitore dello sporco Presa per cavo di alimentazione Display e pannello comandi (touch screen) Corpo dell’apparecchio Pennello per pulizia Spazzole rotanti Ricevitore segnale a infrarossi Fessura di aspirazione sporco Fascia sensori anti urto per ostacoli alti Interruttore accensione/spegnimento (ON/OFF) Caricabatterie Coperchio batteria...
- Page 9 Contenitore dello sporco Presa per cavo di alimentazione W Supporto filtro Hepa Filtro Hepa Filtro primario Display orario e informazioni Icona segnalazione contenitore dello sporco pieno Pulsante touch screen rientro alla base di ricarica Pulsante touch screen “CLEAN” di accensione con illuminazione Pulsante touch screen “SPOT clea- ning”...
- Page 10 IsTRUZIONI PER L’UsO - POSIZIONARE LA BASE DI RICARICA (I) su una superficie rigida e contro un muro libero da ostacoli per 1 metro per ciascun lato e per circa 2 metri frontal- mente. Inserire la spina del cavo di alimentazione (F) nella relativa presa (M) posta sulla base di ricarica e quindi collegare il cari- cabatteria alla rete elettrica.
- Page 11 b) Mediante base di ricarica (I) Dopo aver correttamente installato la “Home Base”, posizionare il Robot sulla base di ricarica assicurando che i poli di ricarica (S) combacino con i contatti di ricarica (G) della base. I contatti di ricarica della “Home Base” hanno un basso voltaggio e non costitu- iscono alcun pericolo.
- Page 12 NOTE SULLA RICARICA E L’AUTONOMIA Attenzione! Prima del primo utilizzo, è necessario ricaricare l’apparecchio per almeno 12 ore. Una ricarica di durata inferiore potrebbe compromettere la vita delle batterie. Nelle successive ricariche il tempo di ricarica è di 3,5 h per assicurare un completo ciclo di pulizia di 1,5 h. Tempo prima ricarica 12 h Tempo successive ricariche 3,5 h Autonomia di funzionamento 90 min. (compreso il rientro alla base) Stato del display (1) Stato del Robot Durante la carica...
- Page 13 MODALITA’ DI FUNZIONAMENTO CON AVVIAMENTO Una volta terminato il ciclo di ricarica, sul display dell’apparecchio comparirà la scritta “FULL” e sarà possibile attivare il Robot e iniziare il ciclo di pulizia. Per avviare il Robot occorre verificare il suo stato Spie Stato del Robot “Pausa” Tasto “CLEAN” acceso e è...
- Page 14 Tramite touch screen è possibile selezionare varie modalità di pulizia: 1) Pulizia AUTOMATICA: Premendo il tasto “CLEAN”, il Robot pulirà la stanza autonomamente, adattando automa- ticamente il proprio percorso in ragione degli ostacoli presenti sul pavimento, applicando in maniera alternata: - movimenti a spirale Home Base...
- Page 15 Attenzione! Qualora il Robot si trovi in una stanza diversa dalla base di ricarica, non sarà in grado di ricevere il segnale di richiamo. Attenzione! Durante il rientro alla base di ricarica la funzione di aspirazione è sospesa, pertanto anche il livello di rumorosità sarà attutito. DURANTE IL CICLO DI PULIZIA Il tempo di copertura di una stanza può variare a seconda della tipologia di pavimento, della quantità di ingombri che il Robot può incontrare nel suo percorso e dei possibili dislivelli presenti sul pavimento. Grazie ai sensori anticollisione frontali, il Robot riesce ad intercettare le superfici (pareti, mobili..) evitan- do di collidere con essi.
- Page 16 IMPOsTAZIONE DEL PROGRAMMA DI PULIZIA - Premere il pulsante “CLEAN” per portare il Robot in “pausa”. - Premere il pulsante “PLAN” per entrare nella programmazione. - Premere i pulsanti “SPOT” e “HOME” per impostare il giorno, dal numero “1” che rappresenta il lunedì...
- Page 17 PULIZIA DEL CONTENITORE DELLA POLVERE PREFERIBILMENTE DOPO OGNI UTILIZZO Non appena l’icona (2) sul pannello comandi (B) si accenderà il Robot interromperà le operazioni di pulizia per tornare alla base di ricarica e sarà necessario procedere con la pulizia del contenitore della polvere e della fessura di aspirazione sporco (P). Solo una volta svuotato il contenitore, il Robot riprenderà...
- Page 18 - Rimuovere il filtro HEPA mediante l’ap- posita linguetta e pulirlo con l’apposito pennello Attenzione! Lavare il filtro HEPA ogni 15-30 giorni di utilizzo e sostituirlo ogni 6 mesi. - Svuotare il contenitore e pulirlo con l’aiuto del pennello e/o lavarlo. - Asciugati perfettamente tutti i componenti, procedere al montaggio prestando particolare attenzione all’inserimento del filtro Hepa nell’apposito alloggio.
- Page 19 RICERCA GUAsTI Codice sul Causa Soluzione display (1) La ruota sinistra non fun- Controllare la ruota sinistra. ziona. La ruota destra non funziona. Controllare la ruota destra. Il corpo dell’apparecchio è Riposizionare il Robot sul pavimento. sollevato. Difetto dei sensori per ostacoli Pulire i sensori, se il problema persiste, richiedere bassi (T).
- Page 20 CARATTERIsTICHE Tipologia Caratteristica Detail Diametro 340 mm Specifiche meccaniche Altezza 90 mm Peso 3,0 Kg Tensione 14,4 V Specifiche elettriche Tipo batterie Ni-MH 2000 mAH Capacità contenitore polvere 0,5 l Tipo ricarica Ricarica Automatica / Manuale Specifiche di pulizia Modalità pulizia Automatica, Turbo, Perimetrale, Pianificata giornalmente Tempo di carica Circa 3,5 h...
- Page 21 Dear Customer, Thank you for choosing to purchase the Robot the new intelligent robot floor cleaner that works independ- ently to clean your floors. The Robot is able to vacuum the dirt from floors with its suction motor and rotating side brushes that mean it can get into the corners as well as around and under furniture and along skirting.
- Page 22 IMPORTANT sAFEGUARDs READ THESE INSTRUCTIONS BEFORE USE. DO NOT THROW AWAY THESE INSTRUCTIONS. This appliance conforms to the 2006/95/EC and EMC 2004/108/EC directives. To dispose of product correctly according to European Directive 2009/96/ CE, please refer to and read the provided leaflet enclosed with the product. CHILD HAZARD 1. This appliance can be used by children over the age of 8 and by people with reduced physical, sensory or mental capabilities, or lack of experience and knowledge, if they are supervised while using it or have been shown how to use it in a safe way and understand the hazards involved.
- Page 23 8. Always make sure that your hands are thoroughly dry before using or adjusting the switches on the appliance, or before touching the power plug or power connections. 9. Should acid leak from the batteries, avoid all contact with skin, eyes and mucous.
- Page 24 recover the materials from which it is made and this helps to save energy and resources. To point out the requirement to dispose of electrical appli- ances properly and separately, this product is marked with the crossed out wheelie bin symbol. Never throw batteries into fire. 20.
- Page 25 34. In case of using extension leads, these must be suitable for the appliance power to avoid danger to the operator and for the safety of the environment in which the appliance is being used. Extension leads, if not suitable, can cause operating anomalies.
- Page 26 DEsCRIPTION OF RObOT AND PARTs Dust container lid Socket for power cord Display and control panel (touch screen) Appliance body Cleaning brush Rotary brushes Infrared signal receiver Suction opening Crashproof sensor beam for tall obstacles ON/OFF switch Charger Battery cover Contact points for charging Contact points for charging station IR signal transmitters...
- Page 27 Dirt container Socket for power cord Hepa filter support W Hepa filter Main filter Time and information display Icon to signal that the dirt container is full Touch screen HOME button to return to the charging station “CLEAN” touch screen on button with light “SPOT cleaning”...
- Page 28 INsTRUCTIONs FOR UsE - PLACE THE CHARGING STATION (I) on a hard surface and against a wall with no obstacles within one metre on each side and for about two metres to the front. Plug the power cord (F) into the socket (M) in the charging station and then connect the battery charger to the main power.
- Page 29 b) Via charging station (I) After installing the “Home Base” correctly, place the Robot on this charging station, making sure that the charge poles (S) meet with the charge contacts (G) in the base. The “Home Base” charge contacts are low voltage and do not constitute any type of hazard.
- Page 30 NOTES ABOUT CHARGING AND AUTONOMY Important! Before using for the first time, you need to charge the appliance for at least 12 hours. Anything less than this could affect the life of the batteries. Subsequent charges need a maximum time of 3.5 hours to guarantee a full 1.5 hour cleaning cycle. First charge time 12 h Subsequent charge times 3,5 h Autonomous operating time 90 min (including return to charging station) Robot status Display status (1) While charging...
- Page 31 OPERATION IN START MODE Once the charge cycle has been completed, the appliance display will read “FULL” and it will be possible to start the Robot and the cleaning cycle. To start the Robot, first check its status Lights Robot status “Pause” “CLEAN” button on and 2-3-5-6 In pause mode, waiting for com- icons flashing mands.
- Page 32 The different cleaning modes can be set from the touch screen: 1) AUTOMATIC cleaning: Pressing the “CLEAN” button will start the Robot cleaning the room automatically and changing its route according to the obstructions on the floor, applying alternately: - spiral movements - linear perimeter movements Home Base...
- Page 33 Important! The Robot cannot return to the charging station if the station is not connected to the mains power; in this case, the suction function will be reduced until it runs out and the Robot will switch off. Important! During the return to the charging station, the suction function is suspended and therefo- re, the noise level will be lower. DURING THE CLEANING CYCLE The coverage time for a room may vary according to floor type and to the number of obstructions the Robot encounters as well as the possible differences in height on the floor. Thanks to its front anti-collision sensors, the Robot is able to intercept surfaces (walls, furniture…) avoid- ing collisions with them.
- Page 34 sETTING THE CLEANING PROGRAMME - Press the “CLEAN” button to set the Robot to “pause”. - Press the “PLAN” button to enter the programming mode. - Press the “SPOT” and “HOME” buttons together to set the day, from the number “1” which represents Monday, through to “7”, which is Sunday.
- Page 35 CLEAN THE DUST CONTAINER AFTER EACH USE: As soon as the icon (2) on the control panel (B) switches on, the Robot will stop cleaning to return to the charging station and it will be necessary to proceed with cleaning the dust container and the dirt suction opening (P).
- Page 36 - Remove the HEPA filter using the special tab and clean it with the brush. Important! Wash the HEPA filter every 15-30 days and replace it every 6 months. - Empty the container and clean it with the brush and/or wash it. - Dry all the parts and then re-fit them, taking care to insert the Hepa filter in its special housing. Important! Always make sure that items or dirt build-up has not blocked the suction openings and remove gently, if necessary, using a soft, dry cloth to prevent the SPOT function from...
- Page 37 TROUbLEsHOOTING Code on the Cause Solution display (1) Left wheel not working. Check the left wheel. Right wheel not working. Check the right wheel. The appliance body is raised. Reposition the Robot on the floor. Defect in sensor beam for low Clean the sensors and if the problem persists, obstacles (T).
- Page 38 CHARACTERIsTICs Classification Item Detail Diameter 340 mm Mechanical specifications Height 90 mm Weight 3,0 Kg Power voltage 14,4 V Electrical specifications Battery specifications Ni-MH 2000 mAH Dust container capacity 0,5 l Charge type Automatic / Manual charge Cleaning specifications Cleaning mode Automatic, Turbo, Perimeter, Daily schedule Charge time About 3,5 hours...
- Page 39 Cher Client, nous désirons vous remercier d’avoir choisi le nouveau Robot aspirateur intelligent qui nettoie les sols de façon autonome et minutieuse. En effet, le Robot est en mesure d’aspirer la saleté sur le sol au moyen d’un moteur aspirant et de brosses rotatives latérales qui permettent d’atteindre tous les coins de la maison, autour et sous les meubles et le long des murs.
- Page 40 AVERTIssEMENTs IMPORTANTEs LIRE CES INSTRUCTIONS AVANT L’EMPLOI. CONSERVEZ SOIGNEUSEMENT CES INSTRUCTIONS. Cet appareil est conforme à la directive 2006/95/EC et EMC 2004/108/EC. Pour l’élimination correcte du produit aux termes de la Directive Européenne 2009/96/CE, nous vous prions de lire le feuillet qui accompagne le produit. DANGER POUR LEs ENFANTs 1.
- Page 41 DANGER DERIVANT DE LA PREsENCE DE COURANT ELECTRIQUE ET DEs PILEs 6. Vérifiez que le voltage électrique de l’appareil corresponde à celui de votre réseau électrique. 7. Pour recharger le Robot, utilisez seulement la base de recharge et le chargeur de batteries fournis avec l’appareil. 8.
- Page 42 17. En cas de substitution et/ou d’entretien de l’alimentateur ou du cordon élec- trique d’alimentation, adressez-vous à un centre de service après-vente ou à un revendeur autorisé. 18. En cas de fuite du liquide des batteries, l’appareil ne doit pas être utilisé mais apporté...
- Page 43 vêtements, les papiers, les rideaux, et évitez les franges des tapis car elles peuvent rester encastrées dans l’appareil et faire tomber les objets des tables ou des étagères). 28. Le Robot ne doit pas être utilisé sans filtre ou si les filtres sont cassés ou endommagés.
- Page 44 DEsCRIPTION DU RObOT ET DE sEs COMPOsANTs Couvercle récipient pour la saleté Voyant lumineux d’alimentation Afficheur et panneau de commande Prise pour cordon d’alimentation (touch screen) Corps de l’appareil Pinceau de nettoyage Brosses rotatives Récepteur signaux à infrarouges Fissure d’aspiration saleté Bande capteurs antichocs pour obstacles Interrupteur marche/arrêt (ON/OFF) hauts...
- Page 45 Récipient pour la saleté Prise pour cordon d’alimentation W Support filtre Hepa Filtre Hepa Filtre primaire Afficheur heure et informations Icône signalisation récipient de la saleté plein Poussoir touch screen retour à la base de recharge Poussoir touch screen “CLEAN” de démarrage avec éclairage Poussoir touch screen “SPOT cleaning”...
- Page 46 INsTRUCTIONs D’UsAGE - POSITIONNEZ BASE RECHARGE (I) sur une surface rigide et contre un mur libre de tout obstacle sur 1 mètre de chaque côté et sur environ 2 mètres frontalement. Branchez la fiche du cordon d’alimen- tation (F) dans la prise (M) située sur la base de recharge puis branchez le char- geur de batteries au réseau électrique.
- Page 47 b) A travers la base de recharge (I) Après avoir installé correctement la “Home Base”, positionnez le Robot sur sa base de recharge en vérifiant que les pôles de recharge (S) coïncident avec les contacts de recharge (G) de la base. Les contacts de recharge de la “Home Base”...
- Page 48 NOTES SUR LA RECHARGE ET SUR L’AUTONOMIE Attention! Avant la première utilisation de l’appareil, il est nécessaire de le recharger pendant au moins 12 heures. Une recharge d’une durée inférieure pourrait compromettre la vie des batteries. Pour les recharges successives, le temps de recharge est de 3h30 pour garantir un cycle complet de nettoyage de 1h30. Temps première recharge 12 h Temps recharges successives 3h30 Autonomie de fonctionnement 90 min. (y compris le retour à la base) Etat de l’afficheur (1) Etat du Robot Pendant la recharge...
- Page 49 MODALITE DE FONCTIONNEMENT AVEC DEMARRAGE A la fin du cycle de recharge, l’afficheur de l’appareil visualise le message “FULL” et il est possible d’allumer le Robot et de commencer le cycle de nettoyage. Pour faire démarrer le Robot, il est néces- saire de vérifier son état. Témoins lumineux Etat du Robot “Pause”...
- Page 50 Il est possible, grâce au touch screen de sélectionner plusieurs modalités de nettoyage: 1) Nettoyage automatique En appuyant sur la touche “CLEAN”, le Robot nettoie la pièce de façon autonome, en adap- tant automatiquement son parcours selon les obstacles présents au sol, et en appliquant de façon alternée: Home Base...
- Page 51 Attention! Le Robot ne pourra pas revenir à la base de recharge si cette dernière n’est pas branchée au réseau électrique; dans ce cas, la fonction d’aspiration décroît jusqu’à épuisement total et le Robot s’éteint. Attention! Si le Robot se trouve dans une pièce différente de la base de recharge, il ne sera pas en mesure de recevoir le signal de rappel. Attention! Pendant le retour à la base de recharge, la fonction d’aspiration est interrompue et par conséquent le niveau de bruit est lui aussi amorti. DURANT LE CYCLE DE NETTOYAGE Le temps de couverture d’une pièce peut varier selon la typologie du sol, la quantité d’encombrements que le Robot peut rencontrer dans son parcours et les dénivellations éventuelles du sol. Grâce à ses capteurs anti- collision frontaux, le Robot arrive à...
- Page 52 PROGRAMMATION DU PROGRAMME DE NETTOYAGE - Appuyez sur la touche “CLEAN” pour ramener le Robot sur “pause”. - Appuyez sur la touche “PLAN” pour accéder à la programmation. - Appuyez sur les touches “SPOT” et “HOME” pour programmer le jour, du numéro “1” qui représente le lundi jusqu’au “7”...
- Page 53 NETTOYAGE DU RECIPIENT A POUSSIERE DE PREFERENCE APRES CHAQUE UTILISATION Dès que l’icône (2) sur le panneau de commande (B) s’allume, le Robot interrompt les opératiosn de nettoyage pour revenir à sa base de recharge et il sera nécessaire de procéder au nettoyage du récipient à poussière et de la fissure d’aspiration de la saleté (P). Le Robot reprend les opérations de nettoyage seulement après avoir vidé...
- Page 54 - Retirez le filtre HEPA au moyen de la languette et lavez-le à l’aide du pinceau. Attention! Laver le filtre HEPA tous les 15-30 jours d’utilisation et le remplacer tous les 6 mois. - Videz le récipient à poussière et nettoyez-le à l’aide du pinceau et/ou lavez-le. - Essuyez parfaitement tous les composants, procédez au montage en prêtant une attention particu- lière à...
- Page 55 RECHERCHE DEs PANNEs DE FONCTIONNEMENT Code sur Cause Solution l’afficheur La roulette de gauche ne Contrôler la roulette de gauche. fonctionne pas. La roulette de droite ne fonc- Contrôler la roulette de droite. tionne pas. Le corps de l’appareil est Repositionner le Robot sur le sol. soulevé.
- Page 56 CARACTERIsTIQUEs Typologie Caractéristique Détail Diamètre 340 mm Spécifications Hauteur 90 mm mécaniques Poids 3,0 Kg Voltage 14,4 V Spécifications électriques Type batteries Ni-MH 2000 mAH Capacité récipient poussière 0,5 l Type de recharge Recharge Automatique / Manuelle Spécifications Modalité de nettoyage Automatique, Turbo, Périmétrale, Planifiée quoti- de nettoyage...
- Page 57 Verehrter Kunde, wir danken Ihnen für den Kauf des neuen, intelligenten Staubsauger-Roboters der Ihren Boden selb- ständig und sorgfältig reinigt. Der Roboter ist in der Lage, den Schmutz vom Boden durch einen Saugmotor und seitliche, rotie- rende Bürsten aufzusaugen, die es ihm gestatten, auch in Ecken, um und unter Möbeln und entlang den Wänden zu saugen.
- Page 58 WICHTIGE HINWEIsE VOR GEBRAUCH BITTE DIESE ANLEITUNG LESEN. ANLEITUNG AUFBEWAHREN. Dieses Gerät ist konform mit den Richtlinien 2006/95/EC und EMC 2004/108/EC. Zur korrekten Entsorgung des Produkts gemäß Europa-Richtlinie 2009/96/EG bitte das beiliegende Informationsblatt lesen. GEFAHR FÜR KINDER 1. Dieses Gerät kann von Kindern ab 8 Jahren sowie von Personen mit reduzierten physischen, sensorischen oder mentalen Fähigkeiten oder Mangel an Erfahrung und/oder Wissen benutzt werden, wenn sie beauf- sichtigt oder bezüglich des sicheren Gebrauchs des Gerätes unterwiesen...
- Page 59 GEFAHR DURCH ELEKTRIsCHEN sTROM UND bATTERIEN 6. Sicherstellen, dass die Spannung des Geräts dem Ihres Stromnetzes entspricht. 7. Zum Aufladen des Roboters die Aufladestation und das mitgelieferte Batterieladegerät benutzen. 8. Bevor das Gerät benutzt bzw. die Schalter des Geräts eingestellt oder der Stecker oder das Anschlusskabel angefasst wird, immer sicherstellen, dass Ihre Hände trocken sind.
- Page 60 17. Der Austausch und/oder die Wartung des Netzteils oder des Stromkabels darf ausschließlich von einer Vertrags- Kundendienststelle oder einem Vertragshändler vorgenommen werden. 18. Sollte Batterieflüssigkeit austreten, darf das Gerät nicht benutzt wer- den, sondern muss zwecks Austausch der Batterien zur nächsten Kundendienststelle gebracht werden.
- Page 61 26. Keine Gegenstände auf dem Roboter, abstellen, nicht daraufsetzen. 27. Vor dem Gebrauch, den Fußboden frei räumen (zerbrechliche Gegenstände und Kabel, Kleidungsstücke, Papiere, Gardinen usw. besei- tigen. Auch auf Teppichfransen muss geachtet werden, da diese sich im Gerät verfangen können und zum Herunterfallen von Gegenständen von Tischen oder Regalen führen können).
- Page 62 bEsCHREIbUNG DEs RObOTERs UND sEINER bAUTEILE Deckel des Schmutzbehälters Steckbuchse für Versorgungskabel Display und Bedienfeld (Touchscreen) Gehäuse Rotierende Bürsten Reinigungspinsel Infrarot-Signalempfänger Schmutzansaugschlitz Anstoß-Sensorleiste für hohe Hindernisse Ein-/Ausschalter (ON/OFF) Batterieladegerät Batteriedeckel Nachlade- Kontaktpunkte Kontaktpunkte zum Ladegerät Infrarot-Signalsender Anstoß-Sensoren für niedrige Hindernisse Ladegerät (“HOME BASE”) bzw.
- Page 63 Schmutzbehälter Steckbuchse für Versorgungskabel W Halterung Hepa-Filter Hepa-Filter Primärfilter Display Uhrzeit und Informationen Anzeige- Leuchten bei vollem Schmutzbehälter Touchscreen-Taste Rücklauf zur Aufladestation Touchscreen-Einschalttaste “CLEAN” mit Beleuchtung Touchscreen-Taste “SPOT cleaning” Touchscreen-Taste “PLAN” - 61 -...
- Page 64 GEbRAUCHsANLEITUNG - DAS LADEGERÄT (I) auf eine feste Fläche an einer Wand stellen, die im Abstand von 1 m auf beiden Seiten und frontal 2 m frei von Hindernissen ist. Den Stecker des Versorgungskabels (F) in die entsprechende Buchse (M) des Ladegeräts stecken und das Ladegerät an das Stromnetz anschließen.
- Page 65 b) Mittels Ladegerät (I) Nachdem die “Home Base” korrekt ins- talliert wurde, den Roboter am Ladegerät so anbringen, dass die Nachladepole (S) an den Ladekontakten (G) des Ladegeräts anliegen. Die Ladekontakte der “Home Base” führen Niederspannung und stellen keine Gefahr dar.
- Page 66 HINWEIS ZUM NACHLADEN UND ZUR LAUFDAUER Achtung! Vor dem ersten Gebrauch muss das Gerät mindestens 12 Stunden geladen werden, andernfalls besteht die Gefahr, dass die Standzeit der Batterien beeinträchtigt wird. Bei späteren Ladevorgängen beträgt die Nachladezeit 3,5 h. Die Batterieladung reicht aus für einen kompletten Reinigungszyklus von 1,5 Std. Dauer. Dauer erstes Aufladen 12 h Dauer Nachladen 3,5 h Laufdauer...
- Page 67 BETRIEBSMODALITÄTEN MIT START Nach Beendigung des Nachladezyklus erscheint auf dem Display des Geräts die Anzeige “FULL”. Der Roboter kann nun aktiviert und der Reinigungszyklus gestartet werden. Zum Starten des Roboters muss sein Zustand kontrolliert werden. Kontrolllampen Status des Roboters “Pause” Taste “CLEAN” eingeschaltet Das Gerät ist im Pausenzustand und Leuchten 2-3-5-6 blinken und wartet auf Steuerbefehle.
- Page 68 Über den Touchscreen können verschiedene Reinigungsmodalitäten gewählt werden: 1) AUTOMATISCHE Reinigung: Durch Drücken der Taste “CLEAN” reinigt der Roboter den Raum selbsttätig, wobei er seine Bewegungsbahnen den auf dem Fußboden vorhandenen Hindernissen anpasst und abwechselnd folgende Bewegungen ausführt: Home Base - spiralförmige Bewegungen, - umlaufende Bewegungen, - diagonale Bewegungen,...
- Page 69 Achtung! Der Roboter kann die Home Base nicht finden, wenn diese nicht am Stromnetz angeschlos- sen ist. In diesem Fall nimmt die Saugleistung ab, bis der Roboter bei vollständig verbrauch- ter Batterie stehenbleibt. Achtung! Wenn der Roboter sich in einem anderen Raum befindet, als die Home Base, kann das Gerät das Infrarot-Rufsignal nicht empfangen. Achtung! Während des Rücklaufs zur Home Base wird die Saugfunktion unterbrochen, so dass auch der Geräuschpegel niedriger ist. VERHALTEN WÄHREND DEs bETRIEbs Die notwendige Zeit zur Bearbeitung eines Raums ändert sich je nach Art des Bodenbelags, der Anzahl der Hindernisse, auf die das Gerät während der Bewegung trifft, sowie nach Vorhandensein von Stufen.
- Page 70 EINsTELLUNG VON UHRZEIT UND WOCHENTAG - Zum Aufruf der Einstellfunktion der Uhrzeit, 3 Sekunden die Taste “PLAN” drücken - Zum Einstellen der Stunden, die Tasten “SPOT” und “HOME” betätigen. Dann zur Bestätigung und zum Weiterschalten auf Minuten die Taste “PLAN” drücken. - Zum Einstellen der Minuten, die Tasten “SPOT”...
- Page 71 REINIGUNG UND INsTANDHALTUNG Zur korrekten Instandhaltung des Roboters müssen die folgenden Regeln eingehalten werden: REGELMÄSSIGE REINIGUNG DER SEITLICHEN BÜRSTEN UND DEREN AUSTAUSCH IM FALL DER BESCHÄDI- GUNG. - Die Schraube Mitte Bürstenhalterungen entfernen. - Die Bürsten entfernen und eventuell austauschen, falls sie abgenutzt sind. Dabei muss darauf geachtet werden, dass die Markierungen “L”...
- Page 72 - Den Behälter durch Drücken der seitli- chen Lasche öffnen und den Hauptfilter (J) herausnehmen. Den Filter mit dem mitgelieferten Pinsel (C) reinigen bzw. bei starker Verschmutzung waschen. - Den HEPA- Filter an der entsprechen- den Lasche herausnehmen und mit dem zugehörigen Pinsel reinigen Achtung! Den HEPA-Filter alle 15-30 Tage Gebrauch reinigen und alle 6 Monate austauschen.
- Page 73 sTÖRUNGssUCHE Fehlercode Ursache Abhilfe am Display Das linke Rad funktioniert Das linke Rad kontrollieren. nicht. Das rechte Rad funktioniert Das rechte Rad kontrollieren. nicht. Das Gehäuse des Geräts ist Den Roboter wieder richtig auf den Boden stellen. vom Boden abgehoben. Defekt der Sensoren für nied- Die Sensoren reinigen;...
- Page 74 MERKMALE Merkmal Wert Durchmesser 340 mm Höhe 90 mm Mechanische Daten Gewicht 3,0 Kg Spannung 14,4 V Elektrische Daten Batterie-Typ Ni-MH 2000 mAH Fassungsvermögen 0,5 l Staubbehälter Nachladung Automatisch/von Hand Reinigung Automatisch, Turbo, Umlauf, Angaben zur Reinigung Tagesprogramm Nachladedauer circa 3,5 h Laufdauer maximal 90 Minuten Touchscreen Tastentyp Hauptgehäuse - 72 -...
- Page 76 De’ Longhi Appliances Srl Divisione Commerciale Ariete Via San Quirico, 300 50013 Campi Bisenzio FI - Italy E-Mail: info@ariete.net Internet: www.ariete.net 637111...
Need help?
Do you have a question about the Evolution 2.0 and is the answer not in the manual?
Questions and answers