Table of Contents
Advertisement
Quick Links
Advertisement
Table of Contents
Troubleshooting

Related Manuals for Xerox DocuMate 4760


Summary of Contents for Xerox DocuMate 4760
-
Page 1: Xerox Documate
OneTouch 4.6 January 2014 05-0838-200 Xerox DocuMate 4760 ® ® User’s Guide... - Page 2 Design © 2014 Xerox Corporation. All rights reserved. Xerox , Xerox and Design and DocuMate are registered trademarks of Xerox Corporation in the United States and/or other countries. BR373 ® Content © 2014 Visioneer, Inc. All rights reserved. The Visioneer brand name and OneTouch logo are registered trademarks of Visioneer, Inc.
-
Page 3: Table Of Contents
The Xerox DocuMate 4760 Scanner ........ - Page 4 Image Editors ................100 ® ® Xerox DocuMate 4760...
- Page 5 Image Enhancements ..............161 ® ® Xerox DocuMate 4760...
- Page 6 Xerox DocuMate 4760 Specifications ........
-
Page 7: Safety
Electrical Information on page 10 • Emergency Power Off on page 11 • Maintenance Information on page 12 • Product Safety Certification on page 13 • Environmental Health and Safety Contacts on page 14 ® ® Xerox DocuMate 4760 User’s Guide... -
Page 8: Safety Introduction
Please read the following instructions carefully before operating the machine and refer to them as needed to ensure the continued safe operation of your machine. Your Xerox product and supplies have been designed and tested to meet strict safety requirements. These include safety agency evaluation and certification, and compliance with electromagnetic regulations and established environmental standards. -
Page 9: Operational Safety Information
• Always unplug this equipment from the electrical outlet before cleaning. Note: Your Xerox machine is equipped with an energy saving device to conserve power when the machine is not in use. The machine may be left on continuously. Do Not Do These •... -
Page 10: Electrical Information
Plug the power cable directly into a correctly grounded electrical outlet. If you are not sure whether or not an outlet is correctly grounded, consult an electrician. Do not use an adapter to connect any Xerox equipment to an electrical outlet that lacks a ground connection terminal. -
Page 11: Emergency Power Off
A wall panel circuit breaker, fuse, or other safety device has been tripped. • Liquid is spilled into the machine. • The machine is exposed to water. • Any part of the machine is damaged. ® ® Xerox DocuMate 4760 User’s Guide... -
Page 12: Maintenance Information
Do not perform any maintenance procedures unless you have been trained to do them by an authorized local dealer or unless a procedure is specifically described in the user manuals. ® ® Xerox DocuMate 4760 User’s Guide... -
Page 13: Product Safety Certification
Product Safety Certification This product is certified by the following Agency using the Safety standards listed: Standard UL60950-1 (USA) CSA 22.2 No. 60950-1 (Canada) IEC 60950-1 ® ® Xerox DocuMate 4760 User’s Guide... -
Page 14: Environmental Health And Safety Contacts
Environmental Health and Safety Contacts Contact Information For more information on Environment, Health, and Safety in relation to this Xerox product and supplies, please contact the following customer help lines: USA & Canada: 1-800-828-6571 Europe: +44 1707 353 434 ®... -
Page 15: Welcome
• Documentation on page 18 • The Xerox DocuMate 4760 Scanner on page 19 Your new Xerox scanner can quickly scan stacks of single-sided or double-sided pages and place their electronic images on your computer. ® ® Xerox DocuMate 4760... -
Page 16: What's In The Box
What’s in the Box Before proceeding, check the contents of the box. If items are missing or damaged, contact the dealer where you purchased the scanner. Xerox DocuMate 4760 Input Tray Output Tray USB Cable Scanner Power Supply Power Cord Technical Support Card Windows™... -
Page 17: System Requirements
Color quality of 16-bit or 32-bit • Resolution set to at least 800 x 600 pixels Refer to your Windows documentation for instructions on setting the color quality and resolution for the monitor. ® ® Xerox DocuMate 4760 User’s Guide... -
Page 18: Documentation
• Kofax Virtual ReScan (VRS™) user’s guide—contains detailed feature and configuration instructions for the software, including using the advanced image enhancement options to improve the clarity of scanned images created from imperfect originals. ® ® Xerox DocuMate 4760 User’s Guide... -
Page 19: The Xerox Documate 4760 Scanner
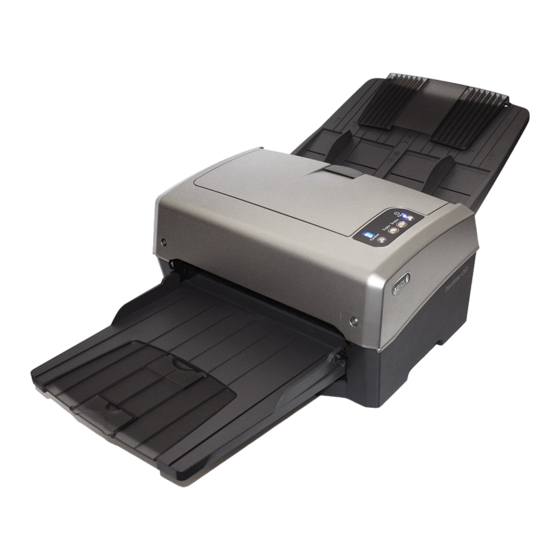
The Xerox DocuMate 4760 Scanner Input Tray Paper Guides Automatic Control Panel Document Feeder Output Tray USB Port Power Jack Input Tray—holds the documents in the Automatic Document Feeder for scanning. Paper Guides—guides adjust to support various document widths. Automatic Document Feeder—feeds documents through the scanner during scanning. Pull to open the Automatic Document Feeder. -
Page 20: Xerox Documate User's Guide
Output Tray—holds documents after being scanned. Unfolds to support various document lengths. Universal Serial Bus (USB) port—connects the scanner to the computer. Power jack—connects the power cord to the scanner. ® ® Xerox DocuMate 4760 User’s Guide... -
Page 21: Scanner Setup
Scanner Setup This chapter includes: • Unpack and Assemble the Scanner on page 22 • Connect the Scanner Power Cord on page 24 ® ® Xerox DocuMate 4760 User’s Guide... -
Page 22: Unpack And Assemble The Scanner
Remove any shipping tape from the scanner, input tray and output tray. Pull the scanner cover release to open the scanner. Remove the foam strip from the inside of the scanner. Leave the cover open so you can attach the input tray. ® ® Xerox DocuMate 4760 User’s Guide... - Page 23 Insert the short pins on each side of the input tray into the holes on the scanner. Close the cover when you are done. Insert the short pins on each side of the output tray into the holes on the scanner. ® ® Xerox DocuMate 4760 User’s Guide...
-
Page 24: Connect The Scanner Power Cord
Connecting any other type of power supply may damage your scanner, and will void its warranty. Plug the power supply into the power port on the scanner. Plug the power cord into the power supply and into a wall outlet. ® ® Xerox DocuMate 4760 User’s Guide... -
Page 25: Installation
• Install the Software and Connect the Scanner on page 27 • Installing Additional Applications on page 33 • View the User Guides on page 35 • Register Your Scanner on page 36 ® ® Xerox DocuMate 4760 User’s Guide... -
Page 26: Before You Begin
If you already have a scanner connected to your computer, it is recommended that you remove that scanner’s driver program prior to installing your Xerox scanner. You can remove these programs from the Windows Control Panel. Please refer to the user manual provided with your other scanner hardware for instructions about removing the driver and software for that unit. -
Page 27: Install The Software And Connect The Scanner
Double-click the icon for your DVD-ROM drive. • The Installation menu for the disc should now open. If the menu does not open: • From the list of files on the disc, double-click the file named setup.exe. ® ® Xerox DocuMate 4760 User’s Guide... - Page 28 Make sure the boxes for Scanner Driver and Visioneer OneTouch are selected, as well as any other applications you want to install. Note: The software provided with your scanner may differ slightly from the list shown in the window. Click Install now. ® ® Xerox DocuMate 4760 User’s Guide...
-
Page 29: Installing The Scanner Driver
The scanner driver installation will start first. The Welcome screen for the scanner driver Setup Wizard opens. Click Next. On the Xerox License Agreement window, read the license agreement. If you accept the terms, select I Agree then click Next. -
Page 30: Connect The Usb Cable And Turn On The Power
The status light comes on and flashes indicating that the scanner is receiving power. Your computer recognizes that a scanner has been plugged into the USB port and automatically loads the appropriate software to run the scanner. ® ® Xerox DocuMate 4760 User’s Guide... - Page 31 When you’re certain that the software has completely loaded, return to the “Complete the installation by connecting your hardware” window. Click OK to complete the installation process. Click Close on the Installation Complete window to close and exit the driver installer. ® ® Xerox DocuMate 4760 User’s Guide...
-
Page 32: Installing Visioneer Onetouch
Note: If you selected other software to install from the DVD the installation for that software will automatically start after you click Close on the Installation Complete window. Follow the instructions on-screen to install each application you selected. ® ® Xerox DocuMate 4760 User’s Guide... -
Page 33: Installing Additional Applications
Combining unparalleled functionality, built-in intelligence and ease of use, PDF Converter Professional 7 enables users to create, convert, edit, assemble and securely share PDF files like never before for enhanced professionalism, productivity and collaboration. ® ® Xerox DocuMate 4760 User’s Guide... - Page 34 This is not an error, Kofax does not install your scanner’s ISIS driver. Please disregard ® this message in the VRS installation and click OK. The Kofax VRS Certified ISIS driver is installed correctly when you install the scanner driver. ® ® Xerox DocuMate 4760 User’s Guide...
-
Page 35: View The User Guides
When you’re finished, click Main menu to return to the Main menu window and click Exit. Remove the installation disc and store it in a safe place. That’s it! Installation is finished and your Xerox scanner is ready to scan. ®... -
Page 36: Register Your Scanner
Press Enter on your computer’s keyboard or click the option on screen to go to the web address. When the Xerox scanners web page loads click on Register Your Product. Fill in the registration form, all required fields have an asterisk (*). -
Page 37: Loading Documents To Scan
Also remove any labels, stickers, or Post-It™ notes that may come off during the scanning process and get stuck in the scanner. Misuse as described here will void your scanner’s warranty. ® ® Xerox DocuMate 4760 User’s Guide... -
Page 38: Supported Document Types
We recommend scanning one page at a time when the documents you are scanning are longer than 17 inches (432 mm). • Paper thickness between 7–110 lb paper (28–413 g/m • Embossed plastic cards up to 1.25 mm thick • Non-embossed plastic cards up to 1 mm thick ® ® Xerox DocuMate 4760 User’s Guide... -
Page 39: Documents To Avoid Scanning
• Partially transparent paper such as tracing paper as any images from the opposite side of the page or black background will appear in the scanned images. ® ® Xerox DocuMate 4760 User’s Guide... -
Page 40: Unsupported Document Types
Thermal or photosensitive paper. • Overhead projector sheets, plastic film, camera film, and any other type of transparent or partially transparent plastic item. • Documents that have been glued together. • Cloth or metallic sheets. ® ® Xerox DocuMate 4760 User’s Guide... -
Page 41: Scanning From The Automatic Document Feeder (Adf)
Pinch the ends to align the leading edges slantwise to help prevent multiple pages from being fed through at a single time. Scanning Extend the input and output trays for the length of the pages being scanned. ® ® Xerox DocuMate 4760 User’s Guide... - Page 42 Load the documents face down with the top of the pages inserted into the Automatic Document Feeder. You can now scan the documents using the scanner buttons, OneTouch, or one of the other scanning interfaces. ® ® Xerox DocuMate 4760 User’s Guide...
-
Page 43: Scanning Interfaces
Scanning Interfaces If you selected the recommended installation, then you have several different options to scan with your Xerox DocuMate 4760 scanner. Each method scans equally well, so use the one with appropriate options for the item you are scanning. - Page 44 ® ® Xerox DocuMate 4760 User’s Guide...
-
Page 45: Scanning And Configuring Onetouch
127 • Hardware Properties on page 131 Based on the recommended full installation of the scanner driver and the Visioneer OneTouch software, OneTouch is your main scanning interface for using the scanner. ® ® Xerox DocuMate 4760 User’s Guide... - Page 46 Email) and the icon of the destination (called the Destination Application) where the images will be sent when scanning is finished. The OneTouch button panel shows which application the button is configured to send images to. ® ® Xerox DocuMate 4760 User’s Guide...
-
Page 47: Default Onetouch Settings
8.5 x 11 inches. • If Metric is the selected measurement, the default page size in each profile is based on the ISO 216 standard and the majority of the profiles will default to A4. ® ® Xerox DocuMate 4760 User’s Guide... -
Page 48: Scan From The Onetouch Button Panel
• Right-click on a Destination Application icon to open the OneTouch Properties. • Left-click on the arrow buttons, on the right side of the panel, to view the rest of the OneTouch buttons. ® ® Xerox DocuMate 4760 User’s Guide... - Page 49 Single-click on the detailed information to open the OneTouch Properties. The Hardware View • Left-click on the scanner icon to return to the Button view. • Right-click on the scanner icon to open the scanner’s hardware properties. ® ® Xerox DocuMate 4760 User’s Guide...
-
Page 50: Changing The Button Settings
Select a file format in the Select format panel. The formats are based on the type of Destination Application you select. The icon names indicate their file types. See File Formats on page 63 for more information about the available formats. ® ® Xerox DocuMate 4760 User’s Guide... - Page 51 OK/Cancel/Apply buttons—OK accepts any changes and closes the window. Apply accepts any changes but leaves the window open so you can continue making additional changes. Cancel closes the window without accepting any changes. ® ® Xerox DocuMate 4760 User’s Guide...
-
Page 52: Selecting Options For Onetouch
Fax and Print is for sending your scanned documents directly to your printer or fax software. • STI event forwarding is for using another application’s interface for scanning. The OneTouch Event Forwarding dialog box opens so you can select which application to use to continue scanning. ® ® Xerox DocuMate 4760 User’s Guide... - Page 53 {MMMM}—inserts the full name of the month (August). • {YY}—inserts the two-digit year (97). • {YYYY}—inserts the four-digit year (1997). • {h}—inserts the 12-hour clock hour without a zero added to single-digit time values (2). ® ® Xerox DocuMate 4760 User’s Guide...
- Page 54 2 files. As each destination application link is different, there is no standard filename type you can create to use for all destinations. If you scan and the images are not grouped in the file(s) as needed, try deselecting Use custom file naming and then scan again. ® ® Xerox DocuMate 4760 User’s Guide...
-
Page 55: Scan Configurations
In the Scan Configuration Properties window, the Scan Settings, Page Settings, Advanced Settings, and Redaction Settings tabs are always available. When the Visioneer Acuity module is installed, the Acuity Settings tab will also be available for all destinations. ® ® Xerox DocuMate 4760 User’s Guide... -
Page 56: Scan Settings Tab
Key and Lock icon—if you want to lock the configuration, click the key icon to change it from a Key to a Lock. ® ® Xerox DocuMate 4760 User’s Guide... -
Page 57: Page Settings Tab
If you are scanning using an Automatic Document Feeder, and the page is fed through at too great of an angle, the image may not straighten correctly. In that case, re-scan the page using the paper guides to feed the paper in straight. ® ® Xerox DocuMate 4760 User’s Guide... - Page 58 6. When Skip Blank Originals is enabled, and 2 of the 3 pages in the stack are blank on one side, the total number of images counted is 4 not 6. ® ® Xerox DocuMate 4760 User’s Guide...
-
Page 59: Advanced Settings Tab
It is recommended that you keep the default Gamma value or adjust this setting before adjusting the other options. This option is available for both Color and Grayscale scanning. ® ® Xerox DocuMate 4760 User’s Guide... -
Page 60: Redaction Settings Tab
Back—this is the Duplex side of the page. The area(s) specified for the Back will only apply to the Duplex side of the page when scanning in Duplex. Therefore, if you scan 4 double-sided pages, the resulting image file(s) will have redacted areas on pages 2, 4, 6, and 8. ® ® Xerox DocuMate 4760 User’s Guide... - Page 61 To change the color, click the artist palette button to open the Windows color palette. Select the color you want then click on OK. The color you selected will now display in the Color field on the Redaction Settings tab. ® ® Xerox DocuMate 4760 User’s Guide...
- Page 62 For example, if you selected Red as the color dropout, but then specify red for the redaction region, the final image will have the redacted region filled with gray when scanning Grayscale, or black or white when scanning in Black&White. Click the name to toggle between inches and millimeters. ® ® Xerox DocuMate 4760 User’s Guide...
-
Page 63: File Formats
Select an image file format for photos, artwork or other documents that you want to save as images. BMP and TIFF are standard image file formats generally used if you want to do additional image processing, such as photo touch- up or color correction. ® ® Xerox DocuMate 4760 User’s Guide... - Page 64 To select a JPEG file size: Select JPG as the page format. Right-click on the JPG icon. A menu opens. ® ® Xerox DocuMate 4760 User’s Guide...
- Page 65 PDF selected as the file format are not affected, so you can set the PDF file size/image quality independently for each button. Click OK or Apply on the OneTouch Properties window. ® ® Xerox DocuMate 4760 User’s Guide...
-
Page 66: Text Formats
Word and the OneTouch OmniPage Storage and the OneTouch OmniPage Module is installed. Module is installed. Choose the file type that you want for the text format. Click OK or Apply on the OneTouch Properties window. ® ® Xerox DocuMate 4760 User’s Guide... -
Page 67: Configure Before Scan
The item is scanned. When finished, click the Done button and the image will be sent to the Destination Application specified in the OneTouch Properties window. Canceling a Configure Before Scan Click Cancel in the scanning progress window. ® ® Xerox DocuMate 4760 User’s Guide... - Page 68 Instead of having to re-scan the entire batch, you can stop the current scan, change the picture type from Black & White to Color, then restart the scanning without losing the pages already scanned. ® ® Xerox DocuMate 4760 User’s Guide...
-
Page 69: Open Scanned Document(S)
Windows documentation for instructions on associating file types. • When scanning to multiple destinations, the scanned file is still sent to the other selected destination application(s) in OneTouch. ® ® Xerox DocuMate 4760 User’s Guide... -
Page 70: Transfer To Storage
If you modify the storage options in an individual configuration, changing the options in this Link Properties window will no longer update to the configurations you modified. ® ® Xerox DocuMate 4760 User’s Guide... -
Page 71: Setting The Folder From Windows
When OneTouch was installed, a storage option was added to the right-click menu of your Windows folders. This menu option allows you to set the Transfer to Storage folder location without opening OneTouch first. Right-click on the folder you want set as the scan destination. ® ® Xerox DocuMate 4760 User’s Guide... -
Page 72: Scanning To Multiple Folders
Setting Up Multiple Folders for Transfer to Storage Using Microsoft Windows, create the folders that you want to use for storing scanned items. Open the OneTouch Properties window. Select Transfer to Storage as the Destination Application. ® ® Xerox DocuMate 4760 User’s Guide... - Page 73 To help you remember which folder it is, give the new configuration a name that indicates the folder name, such as “Business Receipts.” Click the Scan Settings, Page Settings, and Advanced Settings tabs, and select the settings you want. Click the Storage Options tab. Click the Browse button. ® ® Xerox DocuMate 4760 User’s Guide...
- Page 74 11. Click OK. The new configuration is now listed as a Transfer to Storage configuration. 12. Repeat the process to create additional new configurations, such as one named “Personal Receipts.” Note: Make sure to designate separate folders as the Storage Locations for each new configuration. ® ® Xerox DocuMate 4760 User’s Guide...
- Page 75 When scanning is complete, insert the next set of documents in the scanner, then press the second button you set to scan documents and transfer them to storage. When scanning is finished, the documents are stored in the two separate folders. ® ® Xerox DocuMate 4760 User’s Guide...
-
Page 76: Burn To Cd-Rom
The scanner will start scanning. When finished the file will be saved to the Windows temporary location for CD files. An information bubble will appear in the Windows notification area telling you that there are files waiting to be burned to CD. ® ® Xerox DocuMate 4760 User’s Guide... - Page 77 Click the Burn to CD button. The CD burner begins and your scanned documents are written to the CD. If other files are also waiting in this location, they will get written with the OneTouch files on the CD. ® ® Xerox DocuMate 4760 User’s Guide...
-
Page 78: Printer Or Fax
Select a printer or fax device, in the Select destination list, then open a Scan Configuration to modify the settings for the device you selected. Click on the Device Settings tab and use the options on this tab to select settings for the device. ® ® Xerox DocuMate 4760 User’s Guide... - Page 79 For example, if the device is your printer, the dialog box is your printer’s setup settings. Note: When scanning to multiple printers and/or faxes, select the specific device, you want to configure the Advanced features for, from the list before clicking on the Advanced... button. ® ® Xerox DocuMate 4760 User’s Guide...
-
Page 80: Paperport
When you create new configurations, the default settings will also match what you have selected here. If you modify the options in an individual configuration, changing the options in this Link Properties window will no longer update to the configurations you modified. ® ® Xerox DocuMate 4760 User’s Guide... - Page 81 The list of folders in this window are from the PaperPort Folder Manager. Use the PaperPort Folder Manager to add or delete folders, add other drives and network locations to this list. You cannot add new folders from the OneTouch PaperPort configuration windows. ® ® Xerox DocuMate 4760 User’s Guide...
- Page 82 The selected folder in this list is where the scanned file will be saved when PaperPort is open and the OneTouch option Scan to the current PaperPort folder is selected. ® ® Xerox DocuMate 4760 User’s Guide...
-
Page 83: Sharepoint
Select an existing configuration in which you have already specified your SharePoint site information, and then click on the Copy button to create a new configuration using the settings of the current configuration. ® ® Xerox DocuMate 4760 User’s Guide... - Page 84 72. Click on the Help button, in this configuration tab, to launch the SharePoint help file. The help file contains detailed information about the settings in this window and technical implementation notes. ® ® Xerox DocuMate 4760 User’s Guide...
-
Page 85: Sharepoint Link Log Viewer
Click on the Properties button to open the Log Viewer from the SharePoint OneTouch Link Properties window. There are no global configuration properties for the SharePoint destination application, all configuration is done using the Scan Configuration Properties window as described in the previous section. ® ® Xerox DocuMate 4760 User’s Guide... -
Page 86: Ftp Transfer
Select an existing configuration in which you have already specified your FTP server information, and then click on the Copy button to create a new configuration using the settings of the current configuration. ® ® Xerox DocuMate 4760 User’s Guide... -
Page 87: Ftp Link Log Viewer
After you address the failure indicated in this log file, you can click the Retry button to resend the document to the server. ® ® Xerox DocuMate 4760 User’s Guide... - Page 88 Click on the Properties button to open the Log Viewer from the FTP OneTouch Link Properties window. There are no global configuration properties for the FTP destination application, all configuration is done using the Scan Configuration Properties window as described in the previous section. ® ® Xerox DocuMate 4760 User’s Guide...
-
Page 89: Smtp
Select an existing configuration in which you have already specified your SMTP server information, and then click on the Copy button to create a new configuration using the settings of the current configuration. ® ® Xerox DocuMate 4760 User’s Guide... - Page 90 72. Click on the Help button, in this configuration tab, to launch the SMTP help file. The help file contains detailed information about the settings in this window and technical implementation notes. ® ® Xerox DocuMate 4760 User’s Guide...
-
Page 91: Smtp Link Log Viewer
Click on the Properties button to open the Log Viewer from the SMTP OneTouch Link Properties window. There are no global configuration properties for the SMTP destination application, all configuration is done using the Scan Configuration Properties window as described in the previous section. ® ® Xerox DocuMate 4760 User’s Guide... -
Page 92: Email Applications
The email application in the OneTouch destination list is the default email program selected in the Internet Options of Internet Explorer. Click on the email application that is in the list, then click on the Properties button to launch the Email OneTouch Link Properties window to change the email application. ® ® Xerox DocuMate 4760 User’s Guide... -
Page 93: Email Properties
If you changed the email application Internet Explorer, and it does not immediately appear in the Select destination list, click the Refresh button to update the destination list in OneTouch. ® ® Xerox DocuMate 4760 User’s Guide... -
Page 94: Text Editors
OneTouch should do when text is not detected or recognition fails, and add other applications to OneTouch. Note that if you recently installed an application, click the Refresh button to see if OneTouch will automatically configure the link before you try adding it manually. ® ® Xerox DocuMate 4760 User’s Guide... -
Page 95: Text Documents Properties
This could occur if you scanned a photograph with a scanner button set for text applications. • Show message if text recognition failed—a message will open on the screen if the OCR reader does not detect text in the image. ® ® Xerox DocuMate 4760 User’s Guide... -
Page 96: Adding Text Editor Applications To Onetouch
When you are done making changes in this window, click the Add button to accept the changes and close the window. Click OK on the Link Properties window. Click Refresh on the OneTouch Properties window and the new application should now be available. ® ® Xerox DocuMate 4760 User’s Guide... -
Page 97: Creating An Html Web Page From Your Scanned Documents
Microsoft Internet Explorer, or other web browser you scanned to, then opens showing your converted page. The application’s URL field shows the location where OneTouch saved the HTML files for you to locate and post to your website. ® ® Xerox DocuMate 4760 User’s Guide... -
Page 98: Still Image Client
A dialog box opens for you to select the application to use for scanning. Select the application you want in the box and click OK. Now the application you selected opens and you can continue scanning using that application’s interface. ® ® Xerox DocuMate 4760 User’s Guide... - Page 99 Click on OK when you are done making changes to this window. Now when you scan with Event Forwarding you will either be prompted to choose an application, or the default application you selected will open. ® ® Xerox DocuMate 4760 User’s Guide...
-
Page 100: Image Editors
From this window you can add an application and set additional document handling options. Note that if you recently installed an application, click the Refresh button to see if OneTouch will automatically configure the link before you try adding it manually. ® ® Xerox DocuMate 4760 User’s Guide... -
Page 101: Image Documents Properties
• Convert Bitmaps to JPEG—JPEG files can be compressed to produce smaller file sizes and, therefore, shorter transmission times. Use this option to provide that compression capability to image files. ® ® Xerox DocuMate 4760 User’s Guide... -
Page 102: Adding Image Editor Applications To Onetouch
When you are done making changes in this window, click the Add button to accept the changes and close the window. Click OK on the Link Properties window. Click Refresh on the OneTouch Properties window and the new application should now be available. ® ® Xerox DocuMate 4760 User’s Guide... -
Page 103: Pdf Applications
Please note that any PDF application you add manually to OneTouch will be classified as a “Text Based Link.” These applications will only show in the destination list when Text editing applications are enabled. ® ® Xerox DocuMate 4760 User’s Guide... - Page 104 The options you select at Step 4 determine the page format icons in the OneTouch Properties window for that group of applications. Refer to the documentation you received with the application to see which text formats the application accepts. ® ® Xerox DocuMate 4760 User’s Guide...
- Page 105 When you are done making changes in this window, click the Add button to accept the changes and close the window. 10. Click OK on the Link Properties window. 11. Click Refresh on the OneTouch Properties window and the new application should now be available. ® ® Xerox DocuMate 4760 User’s Guide...
-
Page 106: Send To Application
Application tab and use this window to set a configuration to scan to a different application than the one selected in the Link Properties window. Changing the options in this window only affects the configuration you are creating or modifying. All other configurations will retain their settings for this destination. ® ® Xerox DocuMate 4760 User’s Guide... - Page 107 The scanner starts scanning and, when finished, sends the scanned file to the application you selected. Technical note • After configuring this link, you may need to click Refresh in the OneTouch Properties window to show the correct application icon in the Select destination list. ® ® Xerox DocuMate 4760 User’s Guide...
- Page 108 This unique file is created at scan time and contains a list of every image in the scan job. Only select this option if you are sure that the application you are scanning to can use the job file to accept image transfer. ® ® Xerox DocuMate 4760 User’s Guide...
-
Page 109: Scanning To Multiple Destinations
Click each destination where you want to send the scanned image in the Selected destinations (#) list. Click again to deselect a destination. As you click on each destination, the Selected destinations number will count so you know how many applications are selected to receive the image. ® ® Xerox DocuMate 4760 User’s Guide... - Page 110 For example, if you scan to a printer and to email, only the BMP file format will be available as printers can only receive an uncompressed image format. All other image formats and all text formats will be disabled until you deselect the printer. ® ® Xerox DocuMate 4760 User’s Guide...
- Page 111 The scanner starts scanning and when finished, the image is sent to each destination you selected in the OneTouch Properties window. Technical Note • The Still Image Client destination cannot be used with multiple destination scanning. This destination will be disabled when the Enable scanning to multiple destinations is selected. ® ® Xerox DocuMate 4760 User’s Guide...
-
Page 112: Scanning With Job Separation
Click on the down arrow next to the Select Button list to select the button you want to modify. Note that the options in this window are specific to each OneTouch button. Click on the option Use job separator when scanning multiple pages. ® ® Xerox DocuMate 4760 User’s Guide... - Page 113 If you want a single file created with the blank page discarded, deselect the job separation feature on the Options tab or remove the blank page from your scanning batch. ® ® Xerox DocuMate 4760 User’s Guide...
- Page 114 For example, if you scan 12 pages and 3 are blank, the total number of images counted for the job separation will be 9 not 12. ® ® Xerox DocuMate 4760 User’s Guide...
-
Page 115: Scanning With Optical Character Recognition (Ocr)
You can then work with the text and numbers to edit, spell check, change font or type size, sort, calculate, and so forth. Note: Xerox recommends that all OCR processing use the original factory settings for OCR scanning that came with your scanner. When scanning with other settings, use at least 300 dpi for the resolution. If the original documents are of poor quality or have a small type font, 400 dpi can be used as the maximum resolution. -
Page 116: Text Formats
The specific file format is the file name extension on the text format icon. The specific text format; this example is for Rich Text Format (.rtf). To select a file type for the text format: Select the Destination Application. ® ® Xerox DocuMate 4760 User’s Guide... - Page 117 Comma Delimited—the .csv file format; used for database or spreadsheet data with fields, when the document is converted into editable text the fields are maintained. Excel Spreadsheet—the .xls file format used by Microsoft Excel. HTML Document—the .htm file format used to create web pages. ® ® Xerox DocuMate 4760 User’s Guide...
- Page 118 Select Use MRC for documents with harder-to-read text or lower-quality graphics to get the best possible scan output image. The Use MRC option is available for sPDF and PDF. ® ® Xerox DocuMate 4760 User’s Guide...
-
Page 119: Selecting Onetouch Omnipage Ocr Options
Select a Destination Application that has one of the text format file types as the page format, such as Microsoft Word or WordPad. Right-click on the page format icon to see the menu. Choose OCR Options from the menu. The OCR Properties window opens with the OCR tab selected. ® ® Xerox DocuMate 4760 User’s Guide... -
Page 120: The Ocr Tab
The OCR engine does not automatically correct misspelled words that were present in the original document. When dictionaries are selected, the terms in those dictionaries are used to check the spelling. If this is option is not selected, User Dictionaries and Professional Dictionaries cannot be selected. ® ® Xerox DocuMate 4760 User’s Guide... -
Page 121: Creating Your Own Dictionaries
Type each word you want in your new dictionary, followed by a carriage return. Make sure to spell the words correctly as they will be used for spellchecking. Here is an example of what the text file might look like: • Xerox • OneTouch •... - Page 122 Click the drop-down arrow for Files of type and choose Text Files (.txt). 10. Select the file you just created for your user dictionary and click Open. In the example above, the file is named USERDIC1. ® ® Xerox DocuMate 4760 User’s Guide...
-
Page 123: Editing User Dictionaries
To delete a word from the list, select it and click Delete. If a word in the list is misspelled, delete it, then re-type the word correctly in the User Word box and click Add. ® ® Xerox DocuMate 4760 User’s Guide... - Page 124 The Export User Dictionary window opens. Select the dictionary file to export and click Save. The file is exported as a formatted dictionary with the .ud filename extension so it can be opened by other programs. ® ® Xerox DocuMate 4760 User’s Guide...
-
Page 125: The Format Tab
If the document is being scanned as an Excel spreadsheet, each detected table or spreadsheet becomes a separate worksheet, while other content is placed on the last worksheet. ® ® Xerox DocuMate 4760 User’s Guide... - Page 126 The worksheets can then be opened in a spreadsheet application. The Spreadsheet output option is only available for documents scanned with the XLS format. These options will now apply to the OCR processing when you select any text format as the page format. ® ® Xerox DocuMate 4760 User’s Guide...
-
Page 127: Onetouch With Visioneer Acuity Technology
OneTouch with Visioneer Acuity Technology The OneTouch software you received with your Xerox scanner now includes the Visioneer Acuity technology. This application has a set of features for improving and enhancing the quality of scanned documents, especially documents that would usually produce poorer quality images. Scan configurations with Acuity options work with OneTouch scan settings to produce the best quality images. -
Page 128: The Acuity Settings
Default settings—automatically selects the options your scanner can use with any scan mode (Black&White, Grayscale, and Color). Select the options for scanning. • AutoCrop to original—Select this option to let the software automatically determine the size of the item being scanned. ® ® Xerox DocuMate 4760 User’s Guide... - Page 129 Dithering the image creates a black and white image that is recognizable. Dynamic threshold attempts to evaluate the scanned page and automatically adjust the brightness and contrast levels to produce the best quality image when scanning in black and white. ® ® Xerox DocuMate 4760 User’s Guide...
- Page 130 Click OK or Apply to add the Acuity options to your scan configuration. The Acuity icon on the top of the OneTouch Panel and on the scan configuration remind you that the scan will use the Acuity settings. The summary of the scan settings ® ® Xerox DocuMate 4760 User’s Guide...
-
Page 131: Hardware Properties
Hardware Properties Right-click on the OneTouch icon and choose Show Hardware from the pop-up menu. The Hardware Properties dialog box opens and shows information about your Xerox scanner. Click the Properties button. ® ® Xerox DocuMate 4760 User’s Guide... -
Page 132: Device Settings
Device Settings Please refer to Device Settings on page 175 Driver Settings Please refer to Driver Settings on page 177 ® ® Xerox DocuMate 4760 User’s Guide... -
Page 133: Scanning From Twain And Wia
147 • Presets on page 148 • Document Settings on page 152 • Image Enhancements on page 161 • Driver Configuration on page 173 • Hardware Properties and Interface Behavior on page 175 ® ® Xerox DocuMate 4760 User’s Guide... -
Page 134: Accessing The Scanner Interface
175 for more information. Please refer to your Windows documentation for WIA scanning instructions if you do not see the interface described below, or if you have any questions regarding Windows scanning applications. ® ® Xerox DocuMate 4760 User’s Guide... -
Page 135: Scanning
Presets list, and then click the Scan button to start scanning. You can also click on the Preview button to open the preview dialogue for you to scan a preview image and set custom scan regions. ® ® Xerox DocuMate 4760 User’s Guide... - Page 136 Driver Settings section of this guide. If you are unable to change this setting the option may have been set by your system administrator. Please contact your system administrator for more information. ® ® Xerox DocuMate 4760 User’s Guide...
-
Page 137: Using The Preview Window
Zoom level box to zoom in or out on the preview image in 5% steps. Click the zoom to fit button to fit the entire preview area within the preview window. ® ® Xerox DocuMate 4760 User’s Guide... - Page 138 Save in the main interface to save the settings to the current preset, or save them to a new preset using the Save as dialogue. If you select a different preset from the Presets list before scanning, the changes you made will be discarded. ® ® Xerox DocuMate 4760 User’s Guide...
-
Page 139: Scan Regions
Resize the region by clicking on one edge of the region outline and dragging the mouse. Move the region by clicking in the region then dragging the mouse. Please refer to Move, Resize, or Delete Regions for detailed instructions. ® ® Xerox DocuMate 4760 User’s Guide... - Page 140 When you select a paper size in the Page size list, or input the dimensions in the custom page size fields, you are setting a scan region. ® ® Xerox DocuMate 4760 User’s Guide...
-
Page 141: Move, Resize, Or Delete Regions
Note that you can only resize the scan regions to be within the scanner’s minimum and maximum supported paper sizes. Please refer to the scanner specification table, in the maintenance section of the user guide, for the supported paper sizes for your scanner. ® ® Xerox DocuMate 4760 User’s Guide... -
Page 142: Reordering Regions
The priority determines which region gets processed first while scanning. For example, region 1 will be processed first and appear in the scanning application as the first image. Right-click on the region and select an option from the menu. ® ® Xerox DocuMate 4760 User’s Guide... -
Page 143: Clear All Regions
Right-click anywhere in the preview window where there are no regions, and then click on Clear all regions to remove all of the regions in the preview area. This will leave only the region labeled as number 1. There must always be at least one region for scanning. ® ® Xerox DocuMate 4760 User’s Guide... -
Page 144: Document Source Configuration
• Duplex—select this option to scan both sides of the item in the scanner. Note that if you deselect the Back side options in the source configuration list, this option will automatically deselect. ® ® Xerox DocuMate 4760 User’s Guide... - Page 145 (for example, “Input tray (Front side) Color”). To set the scanner options individually for each side: Click the drop down menu and deselect Sides identical. Select the color mode you want for the first side. ® ® Xerox DocuMate 4760 User’s Guide...
- Page 146 Click the top of the menu to collapse the list. Select the options in the scanner interface that you want to use for the second side. Tip: Save the changes to a Preset when you are done selecting options for each source. Please refer to Presets more information. ® ® Xerox DocuMate 4760 User’s Guide...
-
Page 147: Summary
Summary The Summary area displays some of the basic scan options selected in the interface. Clicking on one of the links will open the area of the interface where the setting is located. ® ® Xerox DocuMate 4760 User’s Guide... -
Page 148: Presets
Adjust the options in the scanner interface as needed. Click Save. To rename a preset: Select the preset you want to rename in the preset list. Click the right pointing arrow button and select Rename..® ® Xerox DocuMate 4760 User’s Guide... -
Page 149: Exporting Presets
Click Yes when prompted to confirm that you want to delete the currently selected preset. Exporting Presets Click on the right pointing arrow and select Export... from the list. Click on the browse button next to the Destination folder field to open a file browsing window. ® ® Xerox DocuMate 4760 User’s Guide... - Page 150 Skip—select this option to skip the preset with the duplicate name. Select the option Do this for all conflicts to have the action you select in this dialogue be used for all conflicts found. ® ® Xerox DocuMate 4760 User’s Guide...
-
Page 151: Importing A Preset
Skip—select this option to skip the preset with the duplicate name. • Select the option Do this for all conflicts to have the action you select in this dialogue be used for all conflicts found. ® ® Xerox DocuMate 4760 User’s Guide... -
Page 152: Document Settings
Advanced panel—this panel contains advanced document handling options. If you select an option in this panel that also appears on the Main panel, when you return to the Main panel that option will be selected. ® ® Xerox DocuMate 4760 User’s Guide... -
Page 153: Disabled Options In This Section
• Skip blank originals • Cleanup edges Resolution The resolution determines the amount of detail you can see in the scanned image. Resolution is the clarity of the image measured in dots-per-inch (dpi). ® ® Xerox DocuMate 4760 User’s Guide... -
Page 154: Document Size
Click the drop down menu and select a pre-defined document size from the list. The available document sizes are within the scanner's range of minimum and maximum item size. Custom document sizes Select the measurement units you want to use from the Units list. ® ® Xerox DocuMate 4760 User’s Guide... -
Page 155: Manual Feed
The accuracy of this sensor depends on paper thickness and whether or not creasing is in the original document. This option is available in the interface only if the current scanner supports this feature. ® ® Xerox DocuMate 4760 User’s Guide... - Page 156 The options in the list allow you to select where you want the front side image to appear in relation to the back side image in the final file. ® ® Xerox DocuMate 4760 User’s Guide...
-
Page 157: Advanced Panel Options
The options in this panel may also appear in the Main panel, but with additional settings for you to fine-tune the feature you've selected. Select the Advanced source configuration mode to show this panel. ® ® Xerox DocuMate 4760 User’s Guide... -
Page 158: Automatic Image Cropping
TWAIN driver compressing the image before it sends the image to the scanning application. In the scanning interface the input compression option is Compress transfers and the output option is Compression. ® ® Xerox DocuMate 4760 User’s Guide... - Page 159 Please note that if you adjust this setting, and the application cannot actually accept the option you change, the scanning interface and the application may crash. It is highly recommended that you leave the default options and let the application set any image compression. ® ® Xerox DocuMate 4760 User’s Guide...
- Page 160 Change to the Advanced source configuration mode. In the Document settings section click on the Advanced tab. If your scanner and application supports compressed file transfers, the Compression option will now be available. ® ® Xerox DocuMate 4760 User’s Guide...
-
Page 161: Image Enhancements
• Color processing panel—this panel contains advanced options for processing colors in the final scans. • Advanced panel—this panel contains advanced image enhancement options for improving the clarity of the scanned image. ® ® Xerox DocuMate 4760 User’s Guide... -
Page 162: Disabled Options In This Section
Brightness is the overall lightness of the image. Move the slider left or right to darken or lighten the image. Adjusting the brightness level adjusts the tone of the pixels, without changing the true color of the pixels; such as when adjusting hue. ® ® Xerox DocuMate 4760 User’s Guide... - Page 163 18lb paper weight, the background may “bleed” through into the final image and make the image darker than it should be. In that case, try adjusting the brightness level between 60% and 80%. ® ® Xerox DocuMate 4760 User’s Guide...
- Page 164 Refer to the monitor's user guide for adjusting the contrast level and see if the manufacturer has any recommended settings. ® ® Xerox DocuMate 4760 User’s Guide...
- Page 165 Refer to the monitor's user guide for adjusting the gamma level and see if the manufacturer has any recommended settings. ® ® Xerox DocuMate 4760 User’s Guide...
-
Page 166: Invert Image
Newspaper microfilm reverses black and white so that when viewed on a monitor, the text is white and the paper is black. The following example shows the original grayscale image and the inverted image. The following example shows the original color image and the inverted image. ® ® Xerox DocuMate 4760 User’s Guide... -
Page 167: Mirror Image
(black and white) mode. For example, if you scan a color photo in black and white, the image file will have large blocks of black and white and the image barely recognizable. Dithering the image creates a black and white image that is recognizable. ® ® Xerox DocuMate 4760 User’s Guide... - Page 168 The size of the hole can be between approximately 4 mm and 12 mm • The maximum width of the margin is 25.4 mm from the edge of the paper • The size of the margin is 24.4 mm ® ® Xerox DocuMate 4760 User’s Guide...
-
Page 169: Color Processing Panel Options
RGB reds close to pure red and remove them from the image. • More approximate—this option removes a wider range of colors based on the pure color selected in the list or defined in the custom fields. ® ® Xerox DocuMate 4760 User’s Guide... -
Page 170: Advanced Panel Options
For example, if the radius is 3 and the number is 5, then the document is evaluated in sections of 3x3 pixels and if there are more than 5 stray dots within a 3x3 area, they are not considered a speckle. ® ® Xerox DocuMate 4760 User’s Guide... -
Page 171: White Level
If you set the custom value to 255, you are telling the scanner that only pure white is white and anything lower than 255 should remain unchanged in the final image. ® ® Xerox DocuMate 4760 User’s Guide... - Page 172 You can set a value for black from 0 to 127. If you set this value to 127, you are telling the scanner that all pixels that are grey level 127 or lower (darker) should appear as black in the final image. ® ® Xerox DocuMate 4760 User’s Guide...
-
Page 173: Driver Configuration
® ® Xerox DocuMate 4760 User’s Guide... -
Page 174: Scanner Configuration
Counters—click the reset button next to the counter you want to set back to 0. You can use this option to monitor the number of scans completed since the last time a part has been replaced. ® ® Xerox DocuMate 4760 User’s Guide... -
Page 175: Hardware Properties And Interface Behavior
Scanners and Cameras. Right-click on the scanner and then select Properties from the list. Device Settings Scanner Details • Firmware version—this is the scanner’s hardware processor version number. • Serial number—the scanner’s unique identification number. ® ® Xerox DocuMate 4760 User’s Guide... -
Page 176: Firmware Update
Counters—click the reset button next to the counter you want to set back to 0. • You can use this option to monitor the number of scans completed since the last time a part has been replaced. ® ® Xerox DocuMate 4760 User’s Guide... -
Page 177: Driver Settings
Force UI-less—select this option to prevent this scanner interface from opening when you initiate a scan in • the scanning application. This option will only work if your scanning application supports UI-less scanning. You may also need to select Auto close on transfer complete for this option to work. ® ® Xerox DocuMate 4760 User’s Guide... - Page 178 WIA 2.0 applications. Emulate WIA 1.0—select this option to display the TWAIN interface for WIA 1.0 compatible applications. • When this option is selected, WIA 2.0 applications will use the Microsoft WIA interface. ® ® Xerox DocuMate 4760 User’s Guide...
-
Page 179: Scanning From Isis
The ISIS drivers were installed correctly during the installation of your scanner. The Scanner Selection dialog box will then appear. ® ® Select Xerox DocuMate 4760 from the list of scanners and click OK. Your scanner is then ready to work with the ISIS driver. - Page 180 ® ® Xerox DocuMate 4760 User’s Guide...
-
Page 181: Maintenance
• Uninstalling Your Scanner on page 197 • Xerox DocuMate 4760 Specifications on page 198 • Xerox DocuMate 4760 Parts List on page 200 This section contains information about maintenance, troubleshooting, uninstalling, scanner specifications, and spare parts. ® ® Xerox... -
Page 182: Safety Precautions
Never use aerosol sprays or compressed air, or attempt to lubricate parts with an oil or silicon spray. • Never service the scanner in an area where there are open liquid containers. • Never pour or spill liquid on the scanner or any of its components. ® ® Xerox DocuMate 4760 User’s Guide... -
Page 183: Clearing Paper Jams
Remove the jammed paper and close the cover. To reduce the number of paper jams, smooth and straighten the paper before scanning, adjust the guides to the paper size, and insert the paper evenly into the ADF. ® ® Xerox DocuMate 4760 User’s Guide... -
Page 184: Cleaning The Scanner
Do NOT force the roller to rotate in the opposite direction. Forcing the roller to rotate will damage the scanner, and may cause the scanner to feed pages incorrectly. ® ® Xerox DocuMate 4760 User’s Guide... -
Page 185: Replacing The Rollers
Lift the ADF cover release, on the top of the scanner, to open the Automatic Document Feeder cover. The roller module and housing are located in the underside of the ADF cover. Grab the top of the roller housing, just beneath the ADF cover release. ® ® Xerox DocuMate 4760 User’s Guide... - Page 186 Before installing the new roller, clean any dust that may have gotten on it during shipping. Place the new roller module in the housing a press down, on the back of the roller module, until the arms on the roller module snap into place. ® ® Xerox DocuMate 4760 User’s Guide...
-
Page 187: Paper Feed Roller
12. Gently press down on the ADF cover to close the scanner. Do not let the scanner lid slam shut. Paper feed roller The feed roller module is located in the body of the scanner. You will need a flat head and a Phillips head screw driver to replace the feed roller. ® ® Xerox DocuMate 4760 User’s Guide... - Page 188 Using a Phillips head screw driver, remove the screws holding the roller cover in place. Set the screws aside, you will need them to reattach the roller cover. Warning: these parts are small and pose a choking hazard. Lift the input tray up. ® ® Xerox DocuMate 4760 User’s Guide...
- Page 189 Pop up the roller cover and pull it out from underneath the input tray. Lower the input tray. Lift the main roller up. ® ® Xerox DocuMate 4760 User’s Guide...
- Page 190 Carefully angle the roller up and out of the scanner. 10. Discard the roller, it cannot be repaired or reused. 11. Before installing the new roller, clean any dust that may have gotten on it during shipping. ® ® Xerox DocuMate 4760 User’s Guide...
- Page 191 Make sure the gears on the roller are sitting properly against the gears in the scanner before continuing. 14. Rotate the white tab down to lock the roller in place and then lower the roller into the scanner. 15. Lift the input tray up. ® ® Xerox DocuMate 4760 User’s Guide...
- Page 192 Press down on the roller cover to lock it in place. When you are sure the roller cover is fully seated in place, lower the input tray. 17. Replace the screws you removed in step 2 of these instructions. 18. Close the scanner when you are finished. ® ® Xerox DocuMate 4760 User’s Guide...
-
Page 193: Troubleshooting
OneTouch options, and you need to remove those other drivers and re-install your Xerox DocuMate 4760 scanner. Please see the documentation that you received with the other scanner for the steps to remove its driver programs. - Page 194 You do not need to close the Anti-SpyWare software. Problem: With AutoCrop to Original selected, sometimes I get blank pages, or pages with lines. ® ® Xerox DocuMate 4760 User’s Guide...
-
Page 195: Error Light Troubleshooting Codes
Try cleaning the double feed detection sensor. Dust on the sensor may prevent the sensor from working properly. Error Light Troubleshooting Codes The status light indicates the current state of the scanner. Descriptions of the most common patterns are listed below. Contact Xerox Technical Support if you experience a different blinking pattern. ® ®... -
Page 196: Normal Operation
An internal part in the Turn off the power to your scanner, then turn it back on. If the problem Other scanner may have persists, re-boot your computer. If the problem still persists, contact Xerox Codes malfunctioned. Technical Support. ®... -
Page 197: Uninstalling Your Scanner
Windows Vista and later: Open Programs and Features Uninstalling the scanner driver: ® ® In the list of installed programs click on Xerox DocuMate 4760 driver. Click the Change/Remove or Uninstall button. Click Yes when asked to confirm that you want to remove the driver. -
Page 198: Xerox Documate 4760 Specifications
Xerox DocuMate 4760 Specifications Optical resolution 600 dpi Bit depth 24-bit color, 8-bit grayscale, 1-bit bitonal (black & white) Scan method Duplex Automatic Document Feeder (ADF) ADF specifications Minimum item size 2" x 3" (51 mm x 76 mm) Maximum item size 11.7"... - Page 199 Bundled Software Visioneer OneTouch® Visioneer Acuity Module Nuance OmniPage® Nuance PDF Converter Kofax Virtual ReScan® (VRS™) ® ® Xerox DocuMate 4760 User’s Guide...
-
Page 200: Xerox Documate 4760 Parts List
Xerox DocuMate 4760 Parts List Please use the following part names and numbers when ordering replacements for your Xerox DocuMate 4760 scanner. Part Name Part Number Input Tray 57-0125-000 Output Tray 57-0126-000 USB Cable 35-0118-000 AC Power Cord 35-0103-000 (US) -
Page 201: Regulatory Information
Regulatory Information This chapter includes: • Basic Regulations on page 202 • Copy Regulations on page 204 ® ® Xerox DocuMate 4760 User’s Guide... -
Page 202: Basic Regulations
In order to allow this equipment to operate in close proximity to Industrial, Scientific and Medical (ISM) equipment, the external radiation from ISM equipment may have to be limited or special mitigation measures taken. Changes and modifications to this equipment not specifically approved by Xerox may void the user’s authority to operate this equipment. -
Page 203: Other Regulations
AL7 1HE England, Telephone +44 (0) 1707 353434 Other Regulations Turkey (RoHS Regulation) In compliance with Article 7 (d) We hereby certify “It is in compliance with the EEE Regulation”. (“EEE yönetmeliğine uygundur“) ® ® Xerox DocuMate 4760 User’s Guide... -
Page 204: Copy Regulations
Copyright Office, Library of Congress, Washington, D.C. 20559. Ask for Circular R21. Certificates of Citizenship or Naturalization. (Foreign Naturalization Certificates may be photographed.) Passports. (Foreign Passports may be photographed.) Immigration Papers. Draft Registration Cards. ® ® Xerox DocuMate 4760 User’s Guide... -
Page 205: Canada
Copying certain documents may be illegal in your country. Penalties of fine or imprisonment may be imposed on those found guilty of making such reproductions. • Currency notes • Bank notes and cheques • Bank and government bonds and securities • Passports and identification cards ® ® Xerox DocuMate 4760 User’s Guide... - Page 206 Copyright material or trademarks without the consent of the owner • Postage stamps and other negotiable instruments Note: this list is not inclusive and no liability is assumed for either its completeness or accuracy. In case of doubt, contact your legal counsel. ® ® Xerox DocuMate 4760 User’s Guide...
-
Page 207: Compliance Information
Compliance Information This chapter includes: • Product Recycling & Disposal on page 208 • Energy Star for the USA on page 209 ® ® Xerox DocuMate 4760 User’s Guide... -
Page 208: Product Recycling & Disposal
Special handling may apply, please see: http://www.dtsc.ca.gov/hazardouswaste/perchlorate/. If you are managing the disposal of your Xerox product, please note that the product may contain lead, mercury, Perchlorate, and other materials whose disposal may be regulated due to environmental considerations. The presence of these materials is fully consistent with global regulations applicable at the time that the product was placed on the market. -
Page 209: Energy Star For The Usa
Energy Star for the USA Energy Program Compliance ® ® The Xerox DocuMate 4760 is E qualified under the E Program Requirements for Imaging NERGY NERGY Equipment. The E and E are registered United States trademarks. The E Imaging NERGY... - Page 210 ® ® Xerox DocuMate 4760 User’s Guide...
- Page 211 Example, 163, 164, 165 Compression, 159 Excel Spreadsheet, 117 Compression Options, 158 computer specifications, 17 Configure Before Scan, 55 Fax and Print, 52 cancel, 67 File format, 47, 63, 67 Contrast, 56, 163, 164 ® ® Xerox DocuMate 4760 User’s Guide...
- Page 212 JPG file format, 63 OCR input format, 125 OCR Options, 119 OCR output format, 125 OCR tab, 120 Key icon, 55, 56 OmniPage, 33 One Touch Button panel, 49 icon, 48, 50 Languages in Document, 120 ® ® Xerox DocuMate 4760 User’s Guide...
- Page 213 117 Text Documents Properties, 95 Text Editors, 52 text file format, 116 Text file formats, 66 Saturation, 59 Threshold, 167 Scan configuration, 47, 72 TIFF file format, 63 Edit or Delete, 55 ® ® Xerox DocuMate 4760 User’s Guide...
- Page 214 USB cable, 30 Use languages and dictionaries to improve accuracy, 120 Use MRC, 118 user dictionary edit, 123 new, 121 User Guides, 35 White Level, 171 Word Document, 117 xls file format, 117 ® ® Xerox DocuMate 4760 User’s Guide...
Need help?
Do you have a question about the DocuMate 4760 and is the answer not in the manual?
Questions and answers