Table of Contents
Advertisement
Quick Links
Advertisement
Table of Contents

Related Manuals for RugGear RG930


Summary of Contents for RugGear RG930
-
Page 1: User Manual
RG930 User Manual Please read carefully before use. - Page 3 WELCOME: Thank you for choosing this Mobile Phone. After reading, you will be able to fully master the usage of the phone and handle all functions via simple operation approaches. DECLARATION: This mobile is compatible with GSM/GPRS/EDGE technology. Some functions referred here also require support from a network operator or a service provider.
-
Page 4: Table Of Contents
CONTENTS 1. GETTING TO KNOW YOUR PHONE..1 2. GETTING STARTED......8 Install the USIM/SIM card ......8 Insert the memory card......9 Charging the battery......10 Turn your phone on and off....10 Password..........11 PIN code........11 PIN2 code........11 PUK code........11 PUK2 code........11 3. QUICK START GUIDE......13 Standby and Unlock.......13 Standby Screen and Main Menu..13 Date and Time Setting ....13... - Page 5 Make an international call....15 Dial an extension number....15 Make an emergency call....15 Answer calls, Check missed calls ...16 Answer/Reject calls......16 When a call comes, a dialog box shows the incoming number or a contact, press [SEND] key to answer, or [END/POWER] key to reject the call........16 Answer two calls at the same time 16 Check missed calls......16...
- Page 6 Add a new contact......24 View contact information....25 Edit contact information....26 Delete contacts......27 Speed find........27 Message..........27 SMS/MMS........28 SMS/MMS settings ......30 Email..........32 Settings ..........35 Profiles .........35 Display settings......36 Ringtone settings......36 Phone settings.......36 Call settings........37 Networks settings......39 Connectivity settings.....39 Security settings......39 Reset default.........40 Camera..........40...
- Page 7 Preview..........41 Take a photo........42 Record a video.......42 Media player..........42 Play the music.......43 Play the video........44 File manager..........45 Browser ..........45 Java apps..........46 Bluetooth..........47 Transmitting document via Bluetooth ...............48 Use Bluetooth earphone....49 Clock............49 Alarm..........50 World Time........50 Stopwatch........50 Countdown........51 Calendar..........51 Notes.............52 FM radio..........53...
- Page 8 Recorder..........53 Calculator..........55 Converter..........55 5. INPUT METHOD .......56 6. TROUBLESHOOTING ......57 7. CARE AND MAINTENANCE....59 8. ENVIRONMENTAL INSTRUCTIONS ..61...
-
Page 9: Icon Description
SAFETY NOTICE: Please comply with these precautions to avoid putting yourself or other around you in a dangerous or illegal situation, and ensure peak performance of your device. Icon Description ROAD SAFETY Do not use your phone while driving. INTERFERENCE All wireless devices could affect your device performance. - Page 10 REFUELLING Switch off the device when refueling. Do not use the device at refueling point. BLASTING AREAS Switch off the device near blasting areas. USE SENSIBLY Use in normal condition, as explained in the User’s manual. Do not touch the antenna unnecessarily.
-
Page 11: Getting To Know Your Phone
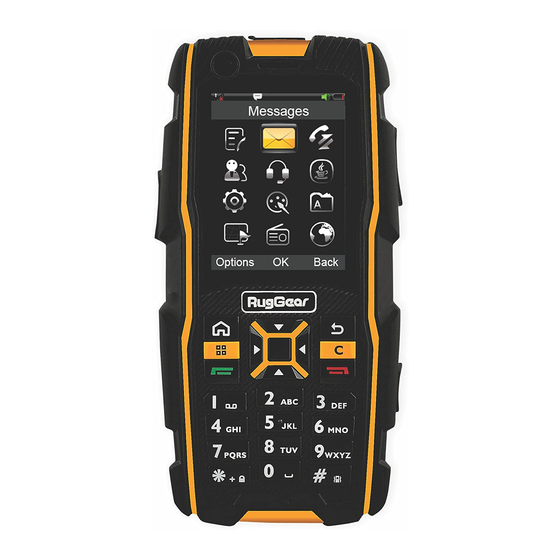
Getting to know your phone Front View POWER KEYI Phone Receiver Main Screen Navigation Key OK Key Right Soft Key (RSK) Left Soft Key (LSK) SEND Key Numeric Keys Microphone... -
Page 12: Side View
Side View Volume Keys Record Key SOS key... -
Page 13: Back View
Back View Camera Keys Description OK Key 1) Press to enter main menu screen. - Page 14 2) Confirm the selected item or function. Navigation 4-way navigation allows you to scroll between menu options. LSK/RSK Run the selected function. 1) Answer or make a phone call. SEND Key 2) Access the call history in standby mode. 1) Power on/off with a long press. 2) Reject an incoming call/End a END/POWER phone call.
-
Page 15: Status Icon
Switch Numeric keys to dial phone numbers; Long press to call contacts programmed into speed dial. 1) Press 0 for the space during text input; 2) Long press 0 for + during dialing; 1) Press * for symbols during text input;... - Page 16 Flight mode Battery GPRS EDGE UMTS Calling Missed call Unread SMS Unread MMS New voice mail Bluetooth Alarm clock Memory full...
- Page 17 Bluetooth is on Use as a U-disk Music played in background FM played in background Vibration only Silence profile Melody call alert Vibration and melody call alert...
-
Page 18: Getting Started
Getting Started Install the USIM/SIM card Turn off the phone before inserting the USIM/SIM card and battery. Battery performance depends on various factors, including network configuration, signal strength, the temperature of the environment during operation, the features and/or settings you select and use, items attached to connecting ports, as well as talk time, data transmission, and other software usage patterns. -
Page 19: Insert The Memory Card
Remove the battery cover and the battery: If the phone is on, long press [END/POWER] key to turn it off and remove the battery cover. Remove the battery; Insert the SIM card: Place the SIM card with the golden contacts facing down. -
Page 20: Charging The Battery
And then, close the card cover. Charging the battery Charging the battery: Connect the USB cable to USB port on the phone. Connect the charger to a standard wall outlet. When the battery is fully charged (the icon is no longer moving), unplug the travel charger from the power outlet. -
Page 21: Password
Password PIN code PIN code (Personal Identification Number) helps to avoid your (U)SIM card being used illegally. PIN code is provided with (U)SIM card. If the wrong PIN code is inputted three times, you should unlock it by PUK code. Default PIN code is 1234. - Page 22 network operator if it is unavailable.
-
Page 23: Quick Start Guide
Quick Start Guide Standby and Unlock Standby Screen and Main Menu Date and Time Setting < Main Menu > → <Settings> → <Phone settings> → <Time and date>. Choose <Time>, input to adjust the time, and then press [LSK] key to save. Choose <Date>, input to adjust the date,... -
Page 24: Make A Call
and then press [LSK] key to save. Set <Time zone>, <Use 24-hour format > and <Date format>. Make a call Make a call In standby screen press any numeric key to access dial board, input numbers to make a call. Press [RSK] key or [END/POWER] key to end the call. -
Page 25: Make An International Call
enter call log menu. Press [Up] key / [Down] key search for a call log. Press [SEND] key to make a call. Make an international call Long press numeric key [0] to input “+” in dial board. Input country code, area code and phone number Press [SEND] key to make a call. -
Page 26: Answer Calls, Check Missed Calls
Answer calls, Check missed calls Answer/Reject calls When a call comes, a dialog box shows the incoming number or a contact, press [SEND] key to answer, or [END/POWER] key to reject the call. Answer two calls at the same time During phone call, if call waiting feature is on (which requires service from the operator), you can follow as below when a second call comes:... -
Page 27: Send A Message
Send a Message Create and send SMS/MMS message. In SMS/MMS screen, choose <New SMS>/<New MMS>to create a new message. Input phone number or choose from <Contacts>. Input message text. Press [LSK] key and select<Send> to send it. In new SMS screen, press [LSK] key - <Insert>... - Page 28 message icon < > appears in status bar.
-
Page 29: Functions Description
Functions Description Call Log Call log records all calls, missed calls, dialed calls and answered calls. As long as the network supports these functions, the phone can record missed calls and answered calls. Check call logs In standby screen, press [SEND] key to access call logs. - Page 30 to the dialer and edit it before call Send SMS: send a SMS to this number Send MMS: send a MMS to this contact Save to contacts: add this number as a new contact; or choose recorded contact to add this number as a new contact number.
-
Page 31: Call Back Quickly
Send SMS: send a SMS to this number Send MMS: send a MMS to this contact Contact details: view the details of the contact Add to blacklist: press [OK] key to add into the blacklist. To manage the blacklist, <Settings>... -
Page 32: Contacts
[LSK] key, choose <Delete more> , select numbers to delete or < All>:press [LSK] key to delete selected numbers. Contacts You can manage your contact information in contacts menu. if the contacts are saved in USIM/SIM card:only the contact name and one number could be recorded. - Page 33 Send MMS: send a MMS to this contact Voice call: make a voice call to this contact Edit before call: copy the number to the dialer and edit it before call Send as vCard: send contact as ...
-
Page 34: Add A New Contact
move to, copy to, add to backlist or export to SD card. Export to SD card: export contacts from phone to SD card. Choose to export contacts directly, and then you can find the contact file in SD card. Import from SD card: import ... -
Page 35: View Contact Information
Choose image from photos to add as contact picture. To add more information, you can choose <Add detail>. View contact information In the contacts list, click the contact to view details. Press [LSK] key for option menu as below: Send SMS: send a SMS to this contact ... -
Page 36: Edit Contact Information
Move to: move the contact from phone to SIM Card or from SIM Card to phone. Then, the contact will be not saved in the previous location. Copy to: copy the contact from phone to SIM Card or from SIM Card to phone. -
Page 37: Delete Contacts
Delete contacts In the contact list, press [LSK] key, choose <Delete> , press [LSK] key to confirm; If you want to delete more, press [LSK] key, choose <Mark> , select contacts to delete or < All>:press [LSK] key, choose <Delete> , press [LSK] key to confirm; Speed find In the contact list, input letters to find the contact. -
Page 38: Sms/Mms
SMS/MMS Create a SMS In the SMS, choose the <New SMS> on top to edit a new message. Enter phone number in the receiver column, or choose <Contacts> to select numbers and press [LSK] key to add in the receiver list. Choose <Add from Contacts>... - Page 39 Input the message content in message column. - Choose <Insert picture/video/ sound/ other>to insert picture/video/sound etc. - Choose <Add subject/Cc/Bcc> to add subject/Cc/Bcc to the message. - Choose<MMS control> to preview the MMS: remove slide, select slide timing, add attachments or place text in the beginning/end.
-
Page 40: Sms/Mms Settings
Save/ view/ delete drafts. Outbox Save and view/delete messages on the way to be sent SMS/MMS settings In SMS, you can press [Options] - <Settings> to set SMS settings, Text template and Cell Broadcast. In MMS, you can press [Options] - <Settings> to set MMS settings and Text template. - Page 41 Edit /delete/add text template. Cell broadcast Select on/off to receive cell broadcast or not, as well as channel setting. MMS settings Validity period: Set the period that messages stay in the message center. Priority: Set MMS’s priority as low, ...
-
Page 42: Email
Save sent MMS: select on/off. Text template Edit /delete/add text template. Email You may receive and send messages via Email. You need to set up your own email, and then receive and send the emails. Receiving and sending emails requires Internet connection. - Page 43 Password, SMTP user ID and SMTP password. User ID, Password, SMTP user ID and SMTP password are those of your email account. Reply-to address is used to set the email account you want to be replied. Connection: to set outgoing and ...
- Page 44 Select your server type Edit Server name Edit Server port Msg preference: to set email’s download mode, maximum size, etc. Signature: to edit your signature After the settings, back to the Email, select to enter Inbox/Outbox/Sent/Drafts or write a new email.
-
Page 45: Settings
Receive email After setting the account, enter the Email, and select Inbox, then press [LSK]-<Retrieve E- Mail>to receive mails. Create a new email After setting the account, enter the Email, choose <New mail> to write and send a new mail. Enter the email address in the receiver column. -
Page 46: Display Settings
In main menu, select <Profiles> to set profiles. Profile setting In <Profiles> menu, select the profile you prefer to set <on>. Editing Profile In <Profile> menu, Press [LSK] key to select Settings Set the options. In Standby mode, the current profile settings and ring mode is displayed in the status bar on the top of screen. -
Page 47: Call Settings
You can set the time, the date and the format in the menu. If you remove the battery from the phone, then you may need to reset the time and the date when restarting the phone after reinstalling the battery. Language Select the language shown on the phone and press [OK] key. - Page 48 Reject message text: edit reject message text. Call connect tone: select to turn on/off Minute reminder: select to turn on/off Call end tone: select to turn on/off Answer mode: to select answer mode: Normal, Auto answer or Any key.
-
Page 49: Networks Settings
service and SIM card. Voice mail Voice mail service is a service to provide storage, forwarding, and voice information services for users. SMS will notify you new voice mails. Before using voice mail, please make sure your phone has service of SMS. Select to save after typing Voice mail number. -
Page 50: Reset Default
Data lock Data lock provides protections for contacts, SMS, MMS , call log and File manager. You need to input the phone code to activate data lock protection, or set functional protection. Change phone code You need to input the previous phone code before change. -
Page 51: Preview
Please use the appropriate software to view when uploading to PC. You need to delete some pictures or other files in “File manager” to release space if the memory is not enough for new pictures. Preview In the preview screen, press [LSK] key or [Up] key to view option menu: Switch Record/Snapshot... -
Page 52: Take A Photo
Settings: includes settings Resolution, Timer, White Balance, Effects, ISO, Image quality, Shutter sound and Storage. Album: view pictures in the album. Take a photo To a take photo, press [Ok] key or [Camera] key when there is no option menu in the interface. Delete, send, and rename the photo taken or set it as wallpaper or contact picture, slideshow, etc. -
Page 53: Play The Music
videos. In the media player screen, press [LSK] key and select <Update> to update the media files if you need. Play the music Select a category, press [Up/Down] key to select the music you like, and press [OK] key to play. Then you can see the playing music in the Now playing screen. -
Page 54: Play The Video
Bluetooth Set as: set the music as profile or contact ringtone Listen via Bluetooth: listen to the music via Bluetooth Details: view the music details Play the video In Media player screen, select Videos and press [Up/Down] key to select the video you like, and press [OK] key to play. -
Page 55: File Manager
File manager You may manage files including photos, videos, sounds, etc. In file manager, press [LSK] key for options as below: Delete: delete the selected file. Delete more: Delete multiple selected files. Send via: send via MMS or Bluetooth ... -
Page 56: Java Apps
make sure Internet service is available for SIM before using the function. The network service providers provide the fee information and other specific settings. You can access different Internet services such as news, weather reports, flight information, etc. These services are especially designed for mobile phones and maintained by WAP/WWW service providers. -
Page 57: Bluetooth
Bluetooth Select <Main menu> → <Extra> → <Bluetooth> to access the function. Activate the Bluetooth for more operations. Activate Bluetooth Select on/off. “on” accepts other devices to connect to your phone; ”off” rejects other devices to connect to your phone. Device list Show the compatible Bluetooth devices. -
Page 58: Transmitting Document Via Bluetooth
Bluetooth technology enables wireless connections between electronic devices within a range of 10 meters (33 feet). A Bluetooth connection can be used to send images, videos, texts, business cards, calendar notes, or to wirelessly connect to devices using Bluetooth technology. When Bluetooth technology starts, the distance between phone and Bluetooth device will greatly influence transfer speed... -
Page 59: Use Bluetooth Earphone
Select device you wanted; Press [OK] Use Bluetooth earphone Open the paired devices list and stay within 10 meters in the match statue. Activate Bluetooth and set the <My phone’s visibility> as <Visible to all>. Enter <Device list>: 1)Press [LSK] key to search device. If you have used Bluetooth before, a list of the previous search results is displayed;... -
Page 60: Alarm
enter the function. Alar You can set several alarm clocks at different times and you can set the alarm on or off and delete in this menu. World Time You can add a new region of time to the list of world time from the world time map. -
Page 61: Countdown
Start: to start. Stop: to record the time, continuous click to record several time points. Reset: to restart. Countdown The operations of this function are as follows, Press [LSK] key: Edit time: to edit the countdown time. Reset: to reset the countdown time. Calendar The function allows you to view calendar, remind you your schedules by alarm clock and... -
Page 62: Notes
In this item, you could choose weekly view /monthly view. Delete In this item, you could delete any schedules in the calendar. Go to date In this item, you could choose the date to view in the calendar. Settings Calendar alarm ring: choose the ... -
Page 63: Fm Radio
FM radio The phone supports FM radio. Select <Main menu> → <FM radio> to enter the function. The following operation in FM radio: My channels: list the channels you save All channels: list all the channels searched Manual tuning: enter the channel’s ... - Page 64 You can use the phone’s recorder to record sounds and adjust the recorder’s settings. The voice clips are taken in AMR format. Please use the appropriate software to use when you upload the voice clips to the computer. In the main screen of the recorder, press [OK] key to record, press [OK] key again to stop and this record clip will be saved automatically.
-
Page 65: Calculator
size, date and protected or not Settings Record mode: choose normal or Storage location: choose to save the voice clips in the phone or storage card You need to delete some pictures or other files in “file manager” to release some space in memory if the memory space is not enough for new Calculator... -
Page 66: Input Method
Input Method This mobile phone supports 14 kinds of input languages. You can set default input language and default input method in < Main Menu > → <Settings> → <Phone settings> → <Input settings>. -
Page 67: Troubleshooting
Troubleshooting Your phone displays “Call not allowed” or “No service.” • When you are in an area with weak signals or poor reception, you may lose reception. Move to another area and try again. • You cannot access some options without a subscription. - Page 68 Another caller cannot hear you speaking. • Ensure that you are not covering the built-in microphone. • Ensure that the microphone is close to your mouth. • If using a headset, ensure that it is properly connected. The phone beeps and the battery icon flashes.
-
Page 69: Care And Maintenance
• The battery terminals may be dirty. Wipe both gold-colored contacts with a clean, soft cloth and try charging the battery again. • If the battery was no longer charge completely, dispose of the old battery properly and replace it with a new battery. Care and maintenance Your device is a product of superior design and craftsmanship and should be treated with care. - Page 70 • Do not store the device in cold areas. When the device returns to its normal temperature, moisture can form inside the device and damage electronic circuit boards. • Do not use harsh chemicals, cleaning solvents, or strong detergents to clean the device.
-
Page 71: Environmental Instructions
Environmental Instructions Hazardous Substance Parts Cr6+ PBDE Phone Battery Accessori... - Page 72 O:Indicates the content of this hazardous substance in the all materials of the device is lower than the required volume in the standard of SJ/T 11363-2006. X:Indicates the content of this hazardous substance in the all materials of the device is higher than the required volume in the standard of SJ/T 11363-2006.
Need help?
Do you have a question about the RG930 and is the answer not in the manual?
Questions and answers