
Related Manuals for Animo CB 5W


Summary of Contents for Animo CB 5W
- Page 1 CB 5W ComBi line CB 10W CB 20W ma x 2x 10 0W Gebruiksaanwijzing Manual Betriebsanleitung Mode d’emploi Animo...
- Page 2 Nederlands English Deutsch Français Code nr PIN code/Geheimzahl Code nr PIN code/Geheimzahl ComBi line 03/04...
- Page 3 ComBi-line Wandmodel ComBi-line Wall model ComBi-line Wandmodell 6.10 max 2x1 Fig. 1/ Abb. 1 ComBi line 03/04...
- Page 4 Afmetingen / Dimensions / Maße ComBi-line CB 5W CB 10W CB 20W V olt Fig. 2/ Abb. 2 ComBi line 03/04...
- Page 5 Nederlands ............1 English .............. 49 Deutsch ............. 97 Français ............144 Français ............55 ComBi line 03/04...
-
Page 6: Table Of Contents
TABLE OF CONTENTS Preface ....................... Introduction ....................... Safety instructions and danger warnings ..............Safeguards ....................... Appliance and the environment .................. GENERAL ....................... A quick look at the appliance ............... 1.1.1 Most important parts (fig. 1) ............TECHNICAL DETAILS ....................INSTALLATION ....................... -
Page 7: Preface
The content of this manual can also be changed without prior notification. This manual covers the standard model of the appliance. Animo can therefore not be held liable for any losses arising from the fact that the specifications of the appliance supplied to you deviate from the standard model. Please contact your supplier’s service department for information concerning adjustment, maintenance or repairs not covered by this manual. -
Page 8: Introduction
Introduction Congratulations on your purchase of one of our products. We hope that you will enjoy using it. Models This manual covers the following coffeemakers of the ComBi-line range: CB 5/10/20W Purpose of the appliance This machine can only be used for brewing and distributing coffee and/or tea. The use of the appliance for other purposes is not permitted and may be hazardous. -
Page 9: Safety Instructions And Danger Warnings
Safety instructions and danger warnings This appliance meets the mandatory safety regulations. Inexpert use can result in personal injury and material damage. The following warnings and safety instructions must be observed before using the coffee maker. Instructions for use Read these instructions for use carefully, before using this appliance. This will protect your safety and prevent damage being caused to the appliance. -
Page 10: Safeguards
Safeguards The appliance is fitted with the following safeguards: On/off switch (fig. 1-2) The on/off switch is used to switch the appliance on and off. Remember that the appliance can still be live after being switched off! For this reason you should always remove the plug from the socket to render the appliance voltage-free. -
Page 11: General
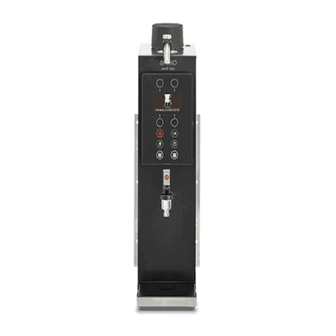
GENERAL The ComBi-line 5 W - 20 W is a professional coffee maker, equipped with a continuous flow heater. The CB5 - 20 W wall model, in combination with a serving trolley and container, offers a unique coffee and tea making system. -
Page 12: Technical Details
TECHNICAL DETAILS Model CB 5W CB 10W CB 20W Article number 10635 10675 10715 Capacity coffee system Brew time (water dosing time) approx. 10 min./5 liter approx. 10 min./10 liter approx. 14 min./ 20 liter Hour capacity (water volume) 30 liter... - Page 13 This recommended amount can be set completely according to your preference through the operator menu, see chapter 12.4.8. Only use the supplied Animo basket filter paper or filter paper of the same measurements and quality. See chapter 10 for information on how to order usable parts.
-
Page 14: Installation
INSTALLATION This appliance may only be positioned and connected by a qualified service engineer. The following rules must be observed: • only suitable for indoor use • not suitable for use in humid areas • not suitable for areas with explosion hazard Unpacking The machine has been carefully packed to prevent damage being caused to your new appliance. -
Page 15: 3.3 Water Connection
3.3 Water connection Connect the appliance using the water hose to an easily accessible aeration tap that can be closed quickly if problems arise. The minimum water pressure may not be under 0,2 Bar (at 5L/min. flow pressure) The appliance can only be connected to a cold water outlet. 3.3.1 Water treatment You are emphatically advised to use a water softener and/or a water filter if the water contains too much chlorine... -
Page 16: Mounting The Dwi On A Wall
Mounting the DWI on a wall Mount the appliance on the wall with the aid of the bracket supplied in accordance with the condition of the mounting wall and with the aid of suitable plugs. In case of cellular concrete, plasterboard or similar walls of other materials screw right through them or apply extra wall reinforcement. -
Page 17: First Time Use
FIRST TIME USE The instructions given in chapter 3-INSTALLATION must be carried out before the new appliance can be put into operation. This appliance may only be used in combination with the supplied coffee containers and synthetic filters. When used for the first time the appliance works according to the standard factory settings. The various settings can be altered by trained, authorized personnel. -
Page 18: First Settings Operator Menu
First settings operator menu The following details are set in the operator menu immediately after being used for the first time. Please note: The default language setting is English. To gain access to the operator menu see chapter 11. System settings (menu 2) 2.0 Language See 12.3.1 2.1 Time... -
Page 19: Operating Panel
OPERATING PANEL Overview control panel buttons CAUTION • Never press de buttons with a sharp object. • Protect the controls against dirt and grease. The control panel contains a number of SOFT buttons and a graphic display. After the operator menu has been activated via a PIN, the selection, start and stop buttons have an extra function besides their basic functions. -
Page 20: Overview Display Symbols
Overview display symbols Boiler system Swivel arm in position The hot water system is The swivel arm is in the correct switched on. The tap symbol can position above a filter. If the be replaced by the actual boiler swivel arm is moved away the temperature display via the symbol disappears from the operator menu. -
Page 21: Overview Error Reporting Symbols
Overview error reporting symbols Container position failure This symbol appears in the display if the coffee container Swivel arm not in position gets out of position during a This symbol appears in the brewing process. The arrow display if the swivel arm gets out shows on which side the of position during a making problem occurs. -
Page 22: Daily Use
DAILY USE This chapter describes the daily use of the appliance by partly qualified personnel. When the machine is used for the first time, it works in accordance with the standard factory settings. The different settings can be changed later by trained, qualified personnel. See chapter 11-The operator menu for more details. WARNING •... -
Page 23: Brewing Coffee
Brewing coffee Switch on the appliance by putting the ON/OFF switch (fig. 1-2) in position I, the display (fig. 7A) lights up and you will hear a beeping sound (1x short). Then the display indicates the standard brewing amounts. Select one of the four brewing amounts. The selected brewing amount including a recommended coffee dosage appears in the display (fig. -
Page 24: Brewing Tea
6.1.1 Brewing tea For the preparation of tea you can follow the same steps as the ones described for the coffee brewing process. However, instead of using a coffee making unit, you should use a tea filter and disk (optional). Put the tea, loose or in bags, in the tea filter, approximately 6 grams per liter. -
Page 25: Timer Function
6.1.2 Timer function The appliance comes with a built-in timer clock as standard. You can use this to start a coffee brewing process and/or hot water system at a certain time. Press the timer button (fig.. 1-6.9). The following possible settings (fig. 9A) appear in the display. Select the system you want to switch on automatically. -
Page 26: Draining Off Hot Water
Draining off hot water The appliance comes with a separate hot water system with a no-drip tap (fig. 10A) through which it is possible to draw off hot water during the coffee brewing process. WARNING • The hot water system steam outlet can be found on the top of the column (fig. -
Page 27: Maintanance
7.1.2 Cleaning daily Rinse the inner pot of the container after use with hot water, or use if necessary Animo coffee fur remover. Empty the container with the no-drip tap. The filter, water distributor lid, blender and drip tray can be washed normally and rinsed clean. The filter and water distributor lid are allowed to be cleaned in the dishwasher. -
Page 28: Cleaning Weekly
7.1.3 Cleaning weekly A sachet of coffee fur remover is supplied with the machine. Use is extremely simple. Removal of coffee deposits from the inner pot. Fill half of the container with warm water and dissolve a sachet of coffee fur remover in it. Let the solution work for 15 to 30 minutes, then empty the container. -
Page 29: Cleaning The Gauge Glass
7.1.5 Cleaning the gauge glass WARNING • Risk of burning! Empty the container before you remove the gauge glass for cleaning. • Always treat the gauge glass with the necessary caution. Take the glass out of the protector with the help of a dry cloth and hold the gauge glass firmly with the cloth as you clean it with the gauge glass brush. -
Page 30: Periodic Descaling Activities
Periodic descaling activities This chapter describes the periodic descaling activities of the machine that can only be executed by trained, qualified personnel. WARNING • Observe the descaling intervals indicated by the descaling indicator symbol. • Overdue maintenance to the heating system can result in high repair costs and annulment of the guarantee. •... -
Page 31: Consumer Articles And Accessories
CONSUMER ARTICLES AND ACCESSORIES See the list below for the consumer articles and accessories available for the appliance. You can order these parts at your dealer, stating the details of the appliance given on the type plate, a description of the item, article number and quantity. -
Page 32: Table Of Contens Operator Menu
TABLE OF CONTENTS THE OPERATOR MENU .................... 11.1 Menu functions .................... SETTINGS STEP BY STEP ................ 12.1 Counters (Menu 0) ..................12.2 Descaling (Menu 1) ..................12.2.1 Flow counters (Menu 1.0) ............. 12.2.2 Starting the coffee maker descaling program (Menu 1.1) ..... 12.2.3 Hot water counter (Menu 1.2) ............ -
Page 33: The Operator Menu
THE OPERATOR MENU This chapter describes how the different settings can be changed by trained, qualified personnel. To gain access to the operator menu, read below. Once in the operator menu the control panel has the following functions: Button selection arrow Button selection arrow down... -
Page 34: Settings Step By Step
How can you go through the menu and activate a function? Move the arrow to the required menu item using the selection buttons You activate the required menu by using the START button By pressing the STOP button you go back to the previous screen without saving the changes made. How can you confirm a change? You confirm a change by pressing the START button . -
Page 35: Descaling (Menu 1)
12.2 Descaling (Menu 1) Descaling then select function An overview of all descaling functions follows in the display. At the top of the display is a navigation bar on which the selected menu function number is shown. Menu Explanation of Descaling items: Flow counter see 12.2.1 Start flow counter program... -
Page 36: Starting The Coffee Maker Descaling Program (Menu 1.1)
Carefully read the caution notice and the directions on the sachet Animo scale remover. Start descaling program Dissolve 2 sachets of 50 gram Animo scale remover Fig. 18 coffee maker into 2 litre of warm water (60°C). Stir the solution thoroughly so that the powder is completely dissolved. - Page 37 Display: 2/5 Place filter. Press Start The program is now ready to flush the system 3 times, so that the remaining scale remover can be removed from the heating system. Remove the funnel and replace the cap. Remove the plastic container with the collected scale remover and replace the filter.
-
Page 38: Hot Water Counter (Menu 1.2)
Read the warnings and user guide on the sachets of the Animo scale remover first. Dissolve 2 x 50g sachets of Animo scale remover in 1 litre of warm water (60°C). Stir the solution thoroughly so that the powder is completely dissolved. - Page 39 Display: 2/5 Act solution. Wait approx. 5 min. It now takes about 5 minutes for the descaling solution to take effect on the limescale. When the waiting period is over, 3 beeping signals will sound. The program is now ready to be rinsed through 3 times so that the residue from the descaling solution can be removed from the boiler.
-
Page 40: System Settings (Menu 2)
12.3 System settings (Menu 2) System settings then select function An overview of all system settings follows in the display. At the top of the display is a navigation bar on which the selected menu function number is shown. Menu Explanation of System settings items: Language see 12.3.1 Time... -
Page 41: Sound Signal (Menu 2.3)
12.3.4 Sound signal (Menu 2.3) When in use the appliance makes different sound signals. You can switch the sound signals off if desired. See fig. 22. Select the required choice and confirm your changes with the START button 12.4 Coffee settings (Menu 3) Coffee settings then select function System settings... -
Page 42: Volume Of Water (Menu 3.0)
6% - 10% extra water as standard. Table 1 shows the settings scope. Factory- Model settings Settings CB 5W 5.300 ml 4.800-5.800 ml CB 10W 10.800 ml 9.800-11.800 ml CB 20W 22.000 ml... -
Page 43: Jug Volume (Menu 3.3)
Factory Settings Model settings scope Step CB 5W 1-3-4-5 litre 1- 5 litre 0,5 l CB 10W 2,5-5-7,5-10 2- 10 litre 0,5 l CB 20W... -
Page 44: Switching On The Container Heating Automatically (Menu 3.8)
Factory Settings scope Model settings jugs = 250 ml Step CB 5W 4-12-16-20 jugs 1 jug 4-20 CB 10W 10-20-30-40 jugs 1 jug 8-40 CB 20W 20-40-60-80 jugs 1 jug 16-80 Table 4. Selection buttons unit jugs 12.4.6 Switching on the container heating automatically (menu 3.8) -
Page 45: Coffee Dosage (Menu 3.10)
Set the required number of litres and confirm your changes with the START button or go back without making any changes using the STOP button • Contact your local water company if you are unsure about the hardness of your tap-water. 12.4.8 Coffee dosage (menu 3.10) When an amount is selected, the recommended amount of ground coffee (grams) that should be put in the filter unit in... -
Page 46: Interval (Menu 3.11)
12.4.9 Interval (menu 3.11) Using very finely ground coffee or very soft water will result in the water running through the coffee filter more slowly. Pausing the hot water pouring after the 1st charge volume (half way through the making process) for periodic intervals (that can be set) can prevent the coffee filter from overflowing. -
Page 47: St Charge (Menu 3.12)
START button or go back without making any changes using the STOP button Standard Settings scope Model charge Step CB 5W 2.500 ml 2500 - 4500 ml CB 10W 5.000 ml 5000 - 9000 ml CB 20W 10.000 ml 8000 - 18.000 ml... -
Page 48: Hot Water Settings (Menu 4)
12.5 Hot water settings (Menu 4) Hot water settings then select function An overview of all hot water settings follows in the display. At the top of the display is a navigation bar on which the selected menu function number is shown. Menu Explanation of hot water settings items Temperature unit see 12.5.1... -
Page 49: Temperature (Menu 4.2)
12.5.3 Temperature (menu 4.2) You can change the water temperature of the hot water system with this function. The temperature is set at 90°C as standard. The settings scope is 60-97 °C (in steps of 1 °C). Set the required temperature and confirm your changes with the START button or go back without saving any changes by pressing the STOP button... -
Page 50: Load Defaults (Menu 5)
Set the required number of litres and confirm your changes with the START button or go back without making any changes using the STOP button • Contact your local water company if you are unsure about the hardness of your tap-water. 12.6 Load defaults (menu 5) You can restore all the default settings except for the... -
Page 51: Troubelshooting
TROUBLESHOOTING WARNING • Have all repairs to the electrical system performed by a qualified service technician. If your appliance is not functioning correctly, use the troubleshooting guide below to see whether you can resolve the problem yourself. If not, please contact your dealer. Error message Possible cause Action... - Page 52 Error message Possible cause Action Display B7 (boiler) Minimum electrode fault. Call the service engineer or dealer. B8 (boiler) Error C3 changes to C8 after approx. 10 Check the water pressure, turn the water supply minutes. The inlet valve is closed for safety. taps completely open, check the connecting hose is fastened.
- Page 53 Animo Animo B.V. Headoffice Dr. A.F. Philipsweg 47 P.O. Box 71 9400 AB Assen The Netherlands Tel. no. +31 (0)592 376376 Fax no. +31 (0)592 341751 E-mail: info@animo.nl Internet: http://www.animo.nl Accredited by the Dutch Council for Certification Rev. 1 07/04 Art.nr 09867...
Need help?
Do you have a question about the CB 5W and is the answer not in the manual?
Questions and answers