Table of Contents
Advertisement
Quick Links
Advertisement
Table of Contents

Related Manuals for ASPERA R12


Summary of Contents for ASPERA R12
-
Page 1: User Manual
ASPERA R12 USER MANUAL... -
Page 2: Table Of Contents
CONTENTS: WELCOME THANK YOU FOR PURCHASING ASPERA R12, A WATERPROOF, DUSTPROOF MOBILE PHONE. PLEASE READ CAREFULLY THIS USER MANUAL BEFORE STARTING TO USE YOUR PHONE. 01 SAFETY INSTRUCTIONS 02 OVERVIEW 03 PREPARATIONS BEFORE USING 3.1 Install SIM card / micro SD card / battery 3.2 Passwords... -
Page 3: Safety Instructions
Only authorized organizations can repair the mobile phone. • Please ONLY use original battery, charger and accessories of the Aspera R12. • Please do not join the two poles of the battery, or you may short-circuit the battery. - Page 4 01 SAFETY INSTRUCTIONS: C0NTINUED • Please keep the mobile phone, battery and charger out of the reach of children. Please do not let children use the mobile phone, battery and charger in the absence of adult supervision. • Please power off the mobile phone before cleaning and maintenance. If the mobile phone is connected to the charger, you need to unplug the charger from the power outlet, and disconnect the connection between the charger and the mobile phone in order to avoid electric shock, short circuit of battery or charger.
- Page 5 Please refer to the relevant help or network providers notes for detailed information. Warning Aspera will not take on any responsibility for the users who are not in compliance with the above advice or improper use of the mobile phone. Statement The Company reserves the right to improve the product without making any advance notice, and keeps final interpreting rights on the product performance.
-
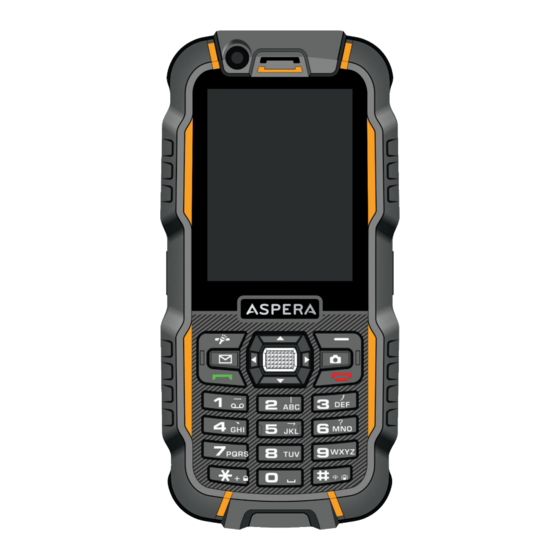
Page 6: Overview
02 OVERVIEW: PHONE LAYOUT... - Page 7 KEYPAD DESCRIPTION FUNCTION Press to confirm an operation Left soft key Press to confirm an operation / to enter main menu when the phone is in standby mode. Long press to activate the torch. Right soft key press to cancel an operation / to return to previous page / to enter phonebook when the phone is in standby mode...
- Page 8 02 OVERVIEW: ICONS Network Signal Keypad Blocked Music Playing Alarm On Earphone Mode Network Data Connection Established Missed Calls New SMS New MMS Profile ‘General’ Meeting Mode On Bluetooth On Battery...
-
Page 9: Preparations Before Using
03 PREPARATIONS BEFORE USE: 3.1 INSTALL SIM CARD / MICRO SD CARD / BATTERY Before installing the SIM card / micro SD card, please power off the mobile phone and do not connect the phone to the charger. • Power off the phone, unscrew the screws on the battery cover and open it. Remove the battery from the battery compartment. -
Page 10: Charging
03 PREPARATIONS BEFORE USE: 3.2.3 PIN2 CODE PIN2 code (consists of 4~8 digits) is provided together with SIM card by the network provider. It’s set for “Call time” and “Call cost” functions. Please check with the network provider if your SIM card is offered with these functions. If the PIN2 code is input incorrectly 3 times , the SIM card is blocked. -
Page 11: Basic Operations
04 BASIC OPERATIONS: 4.1 MAKE A CALL In standby mode, input the phone number then press the Dialing key to make a call. International call: Press * twice to input “+”, then input the country code and phone number Call an extension number: Dial the host number, then dial the extension number according to the corresponding voice hints. - Page 12 05 MAIN MENU: 5.1.2 ADD NEW CONTACT The contact can be saved to SIM or the phone telephone. • Save to SIM: only “Name” and “Number ” are able to be saved. • Save in telephone: More information can be saved in telephone (Name, Number, Fax, Email, etc.).
-
Page 13: Camera
• Delete all contacts: Delete all the contacts from phonebook of SIM or the phone or both. • Name display: Decide how to display the last name and first name of the contact when there is an incoming call. 5.2 CAMERA 5.2.1 CAMERA •... -
Page 14: Calls
05 MAIN MENU: • Auto search: Search for the channels and save them automatically. • Settings: Activate or deactivate “Background play” and “Loudspeaker” Note: In FM radio mode, press * or # to volume up or down. 5.2.4 EDITOR Edit a photo. Please refer to 5.2.2 Album > Edit 5.2.5 RECORDER The recorded audios are saved by default in folder “Audio”... -
Page 15: Settings
• Call divert: Transfer the call to another designated number. The success of call divert setting is related with the network and SIM card. The system will give appropriate setting tips • Call barring: This function also requires network support. Please contact your network provider to activate this function. - Page 16 05 MAIN MENU: 5.4.2 PHONE SETTINGS 5.4.2.1 TIME AND DATE Set home city, time and date, and format of time and date 5.4.2.2 SCHEDULE POWER ON/OFF Set a time for automatic Power on / off for the phone. Please activate this function before setting a automatic Power on/off time.
- Page 17 5.4.2.10 RESTORE FACTORY SETTINGS The phone password is required to restore factory settings. Attention: the data saved in the phone will be completely erased after this operation. Please make sure that any important data is properly backed up. 5.4.3 DISPLAY SETTINGS Set wallpaper and screen saver.
-
Page 18: Messages
05 MAIN MENU: 5.5 MESSAGES 5.5.1 NEW MESSAGE Edit a new SMS or MMS. Press the central key for further operations as below: Send the SMS or MMS, Add recipient , Insert symbols, Select a preferred input method, Add CC / BCC / Subject, Add picture, Add audio, Add video, Switch between SMS and MMS, Insert templates, Save as drafts, etc. -
Page 19: Wlan
5.5.11 TEMPLATES Edit the templates of SMS and MMS. 5.6 WLAN Activate the WLAN to search for any WLAN nearby and available. Some WLAN require a password. 5.7 TOOLS 5.7.1 BLUETOOTH • Power: turn on / off Blue tooth. When Bluetooth is turned off, all Bluetooth connections are ended. -
Page 20: Wifi Hotspot
05 MAIN MENU: 5.7.7 WORD CLOCK 5.8 WIFI HOTSPOT WiFi Hotspot is to share the internet connection of your phone with other digital devices. Note: Your phone will incur data charges for using the WiFi Hotspot function. When WiFi Hotspot is activated, your phone will have no access to the internet via a secondary WiFi connection. -
Page 21: Easy Troubleshooting
06 EASY TROUBLESHOOTING: TROUBLES CAUSES AND RESOLUTIONS PHONE CAN’T BE POWERED ON Check if the battery is installed properly. Take out the battery and reinstall it. Check if the battery is empty and charge it. CONNECTION PROBLEM TO NETWORK Signals are too weak, please try in another open area. THE CELL PHONE IS OUT OF THE NETWORK COVERAGE OF SERVICE PROVIDER / SIM CARD IS INVALID please contact your network supplier.
Need help?
Do you have a question about the R12 and is the answer not in the manual?
Questions and answers