JVC NX-PN10 Instructions Manual
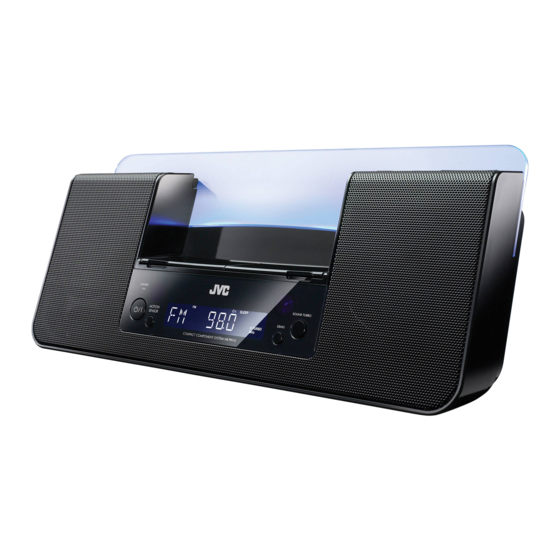
Compact component system
Hide thumbs
Also See for NX-PN10:
- Instructions manual (53 pages) ,
- Information sheet (2 pages) ,
- Specifications (2 pages)
Table of Contents
Advertisement
Advertisement
Table of Contents

Subscribe to Our Youtube Channel
Related Manuals for JVC NX-PN10


Summary of Contents for JVC NX-PN10
- Page 1 COMPACT COMPONENT SYSTEM NX-PN10 INSTRUCTIONS For customer use: Enter below the Model No. and Serial No. which are located either on the rear, bottom or side of the cabinet. Retain this information for future reference. Model No. Serial No. LVT2011-001A...
- Page 2 Connect the equipment into an outlet on a circuit different from that to which the receiver is connected. Consult the dealer or an experienced radio/TV technician for help. CAUTION Changes or modifications not approved by JVC could void the user’s authority to operate the equipment.
- Page 3 For Canada/pour le Canada THIS DIGITAL APPARATUS DOES NOT EXCEED THE CLASS B LIMITS FOR RADIO NOISE EMISSIONS FROM DIGITAL APPARATUS AS SET OUT IN THE INTERFERENCE-CAUSING EQUIPMENT STANDARD ENTITLED “DIGITAL APPARATUS,” ICES-003 OF THE DEPARTMENT OF COMMUNICATIONS. CET APPAREIL NUMERIQUE RESPECTE LES LIMITES DE BRUITS RADIOELECTRIQUES APPLICABLES AUX APPAREILS NUMIRIQUES DE CLASSE B...
- Page 4 Caution: Proper Ventilation To avoid risk of electric shock and fire, and to prevent damage, locate the apparatus as follows: 1. Front: No obstructions and open spacing. 2. Sides/Top/Back: No obstructions should be placed in the areas shown by the dimensions below. 3.
-
Page 5: Table Of Contents
Contents Introduction... 2 Precautions ... 2 Getting Started ... 3 Connections... 4 Canceling the Display Demonstration (Demo) ... 6 Turning on the Power Automatically (Motion Sensor) ... 6 Basic Operations ... 7 Main Unit ... 7 Remote Control ... 9 Playing Back from iPod Devices... -
Page 6: Introduction
Thank you for purchasing a JVC product. Please read all instructions carefully before operation, to ensure your complete understanding and to obtain the best possible performance from the unit. Precautions Installation • Install in a place which is level, dry and neither too hot nor too cold—between 5°C and 35°C (41°F and 95°F). -
Page 7: Getting Started
• In this manual, operations using the remote control are mainly explained; however, you can use the buttons and controls on the unit if they have the same (or similar) name and marks. • In this manual, “iPod” means both iPod and iPhone devices. -
Page 8: Connections
Connections Do not connect the AC power cord until all other connections have been made. Connecting the Antenna FM antenna (supplied): Extend it so that you can obtain the best reception. For better FM reception Disconnect the supplied FM antenna and connect to an outdoor FM antenna using a 75 wire with coaxial type connector. - Page 9 Connecting the Video Cord to View a Video/Picture from iPod When viewing a video/picture from iPod on your TV, use a composite video cord (not supplied) to connect the VIDEO OUT jack on the unit and the composite video input on your TV. •...
-
Page 10: Canceling The Display Demonstration (Demo)
Canceling the Display Demonstration (Demo) When you connect the AC power cord for the first time, the display demonstration starts automatically. • When you operate the unit, the display demonstration stops temporarily. If no operation is done for about 2 minutes, the unit starts the display demonstration again. Button On the unit Hold down until “DEMO OFF”... -
Page 11: Basic Operations
Basic Operations Main Unit Illumination panel (P.10) STANDBY lamp Operating on the Main Unit Buttons Turns on or off (standby) the power. Activates or deactivates Motion Sensor (P.6). Dock A Dock B (P.13) (P.13) Display (P.8) Operations Motion sensor (P.6) Remote control sensor... -
Page 12: Display Information
Buttons Activates or deactivates the display demonstration (P.6). Adds the powerfulness to the sound (P.11). Stops the timer sound and restarts it 5 minutes later (P.22). • iPod (P.14): Press: Reverse skip/forward skip. Hold down: Reverse search/forward search. • FM (P.17): Tunes in to a station. •... -
Page 13: Remote Control
Symbols Lights up when FM stereo broadcast is received. Lights up when FM monaural reception mode is activated. MONO Lights up when an FM station of sufficient signal strength is tuned in. TUNED Lights up when FM is selected as the source. •... - Page 14 Buttons Changes the display information. • For iPod A/iPod B/AUDIO IN: Source name • For FM: Frequency Changes the source to FM (P.17) or AUDIO IN (P.19). • Changes the source to iPod • Starts playback and pauses for iPod (P.14). Adjusts the volume level (VOL MIN/VOL 0 to VOL MAX/VOL 30).
- Page 15 To turn off the unit after a certain period of time—Sleep Timer Press repeatedly to specify the time (in minutes) as follows: (Canceled) • To check the time remaining before the shut-off time, press SLEEP once. If you press the button repeatedly, you can change the shut-off time.
-
Page 16: Playing Back From Ipod Devices
• For details about updating iPod, check on the Apple web site <http://www.apple.com>. • JVC does not assure the compatibility of iPod released after April 2009 with this unit. • iPod is a trademark of Apple Inc., registered in the U.S. and other countries. -
Page 17: Connecting Ipod
Connecting iPod Connect iPod to dock A or B on the unit. You can have 2 iPod devices connected at the same time. • Make sure the unit is on standby when you connect iPod. Dock A Dock B To detach the dock adapter from the dock: Pull up the dock adapter with your fingernail or a sharp-pointed tool using the slot. -
Page 18: Operations
Operations For details, also refer to the instruction manual for iPod. NOTES: • Before viewing a video/picture from iPod on your TV, make the appropriate video setting on iPod. For details of the setting, see the instruction manual for iPod. •... - Page 19 Buttons On the On the unit remote — — — Not equipped with iPhone and iPod touch. Operations Confirms an item on the menu/screen. Press: Applies Shuffle Play to iPod selected as the source. Select the desired shuffle mode. “SHUFFLE” appears for a while. •...
- Page 20 NOTES: • JVC is not responsible for any loss of or damage to iPod that might result from the use of this product. • Do not touch or hit the terminals of the dock and of iPod. It might cause damage to these terminals.
-
Page 21: Listening To Fm Broadcasts
Listening to FM Broadcasts Basic Operations Buttons On the unit On the remote — — AM band is not received with this unit. Operations Selects FM as the source. AUDIO IN When an FM program is broadcasted in stereo, ST (stereo) lights up on the display (only when the reception is good). -
Page 22: Presetting Stations
Presetting Stations You can preset 30 FM stations. Select FM as the source. Tune in to the station you want to preset. • You can also store the monaural reception mode for FM preset stations if selected. Activate the preset number entry mode. “SET”... -
Page 23: Playing Back From Other Equipment
Playing Back from Other Equipment Connecting Other Equipment By using a stereo mini plug cord (not supplied), you can connect other equipment with analog audio output jacks, such as a portable audio player, etc. To headphones or audio out Stereo mini plug cord Portable (not supplied) audio player... -
Page 24: Setting The Clock And Timer
Setting the Clock and Timer Setting the Clock Set the built-in clock before using Timer. • You can set the clock when the unit is turned on or on standby. Activate the clock setting mode. “ADJCLOCK” appears then the hour digit of the time indication flashes on the display. - Page 25 Select Timer you want to set. TIMER 1 Select Timer type. WEEKLY WEEKLY: See step 4 below. ONCE: Timer works once on a selected day of the week. Select the desired day of the week. • When “WEEKLY” is selected in step 3: SUN DAY THU DAY MON-SAT...
- Page 26 To Cancel Timer Select Timer you want to cancel. TIMER 1 “CANCEL” flashes on the display. NOTE: The settings you have made are memorized though you cancel Timer. To Turn off the Timer Sound briefly Using Snooze, you can have the timer sound stop and restart it 5 minutes later. Set Timer following the steps 1 to 6 on pages 20 and 21.
-
Page 27: Troubleshooting
If you have a problem with your unit, check this list for a possible solution before calling for service. General Power does not come on. The power plug is not inserted securely. Plug it in securely (P.5). Power turns on even though you turned off. -
Page 28: Specifications
Accessories See page 3. Amplifier Output Power 10 W (5W+5W) at 8 (10%THD) Ω Terminals AUDIO IN Input Sensitivity/Impedance (1 kHz): LEVEL 1: 500 mV/47 k Ω LEVEL 2: 315 mV/47 k Ω LEVEL 3: 125 mV/47 k Ω Dock A and B for iPod/iPhone Compatible iPod/iPhone models: See page 12. - Page 29 Do not attempt to service the product yourself...
- Page 31 © 2009 Victor Company of Japan, Limited 0409YAMMDWBET...
Need help?
Do you have a question about the NX-PN10 and is the answer not in the manual?
Questions and answers