
Subscribe to Our Youtube Channel
Related Manuals for Sharper Image GT800


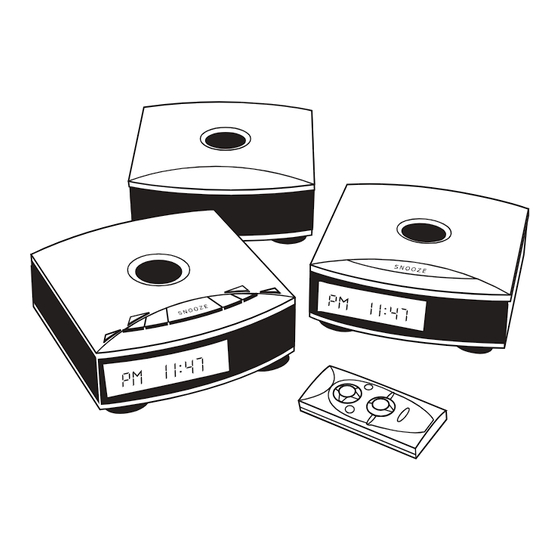
Summary of Contents for Sharper Image GT800
- Page 1 Bedside CD/AM/FM Stereo & Dual Alarm Clocks with Remote Control and Powered Subwoofer GT800 Instructions Read and save these instructions.
- Page 3 We offer generous return privileges and excellent warranties on all our products. For more than 25 years, The Sharper Image has shared the fun of discovering innovative products that make life better and more enjoyable.
-
Page 4: Battery Precautions
Warnings Please read this instruction manual and familiarize yourself with the unit before using it for the first time. Please retain this manual for future reference. Caution The exclamation point within the triangle is a warning sign alerting the user to important instructions accompanying the product. -
Page 5: Quick Start
Battery Precautions •Do not mix different types of batteries together (e.g. alkaline and carbon-zinc) or old batteries with fresh ones. •If the device will not be used for a long period of time, remove the batteries to prevent damage or injury from possible battery leakage. •Nonrechargeable batteries should not be recharged;... -
Page 6: Battery Installation
Quick Start Stereo Setup 2. Plug the SYSTEM CONTROL cord (D) from the main unit into the SYSTEM CONTROL cord (E) from the satellite unit. 3. Plug one end of the audio cable (C) into the AUDIO jack on the back cabinet of the main unit and the other end into the AUDIO jack on the satellite unit. - Page 7 Quick Start Clock Setting 1. To open the CD lid and access the control buttons, press the OPEN button on the top of the main unit. The CD lid automatically powers open. 2. To enter the clock setting mode, press the CLOCK SET button. The hour flashes. 3.
- Page 8 Quick Start CD Playback " 8. To pause playback, press the PLAY/PAUSE/STOP button. To resume play- " back, press the PLAY/PAUSE/STOP button again. " 9. To stop playback, press and hold the PLAY/PAUSE/STOP button for two seconds. Tuner 1. To select the tuner function, press the POWER/FUNCTION button on the main unit until a radio frequency appears on the LCD.
-
Page 9: Diagram Of Parts
Instructions Diagram of Parts Main Unit Tune/Clock Up/Dn Play/ Pause/ Stop " Display AM/FM AM/FM Volume Memory Up/Dn Up/Dn Skip/ Memory VOLUME SKIP/MEMORY Close DISPLAY AM/FM Function POWER/FUNCTION MEMORY TUNE. TUNE. CLOCK CLOCK VOLUME FUNCTION CLOSE SNOOZE PRESET EQ ALARM SET CLOCK SET Power/ Alarm... -
Page 10: Stereo Setup
Stereo Setup Cables Display Buzzer Alarm Day of the Week Alarm 2 On Indicator CD Icon CD Repeat Icon Alarm 1 On CD/Radio Alarm Indicator AM/PM Indicator Clock Equalizer Mode... - Page 11 Stereo Setup Remote REPEAT MEMORY TUNE TUNE VOLUME FUNCTION Stereo Setup 1. Unpack the stereo and all included cords. Note: First determine where the units will be located, then connect all cables. 2. Plug the SYSTEM CONTROL cord (D) from the main unit into the SYSTEM CON- TROL cord (E) from the satellite unit.
-
Page 12: Clock Setting
Clock Setting Important: Remove the protective sheet of paper from the CD tray in the main unit. To open the CD lid, press the OPEN button Battery Installation Remove the battery compartment cover from the back of the remote and insert 2 AAA batteries, observing proper +/- polarities as indicated inside the compartment. -
Page 13: Alarm Functions
Clock Setting 9. To close the CD lid, press the CLOSE button. Note: Do not push or forcibly close the CD lid on the main unit by hand. Press the CLOSE button. Alarm Functions This unit allows you to individually program two different alarms, Alarm 1 and Alarm 2, to sound at different times. -
Page 14: Display Function
Alarm Functions 10.To confirm the alarm type, press the CLOCK SET button. If “Buzzer” or “Radio” is selected, “VOL” flashes. (Skip to Step 13.) If “CD” is selected, “TRACK” flashes. 11.To select the CD track you wish to wake to, press the TUNE UP or TUNE DOWN button. - Page 15 CD Functions Note: If the CD lid is left open for more than one minute, it automatically powers closed. 4. To turn the unit on in the CD mode, press the POWER/FUNCTION button until a appears on the LCD. 5. To start playback at the beginning of the CD, press the PLAY/PAUSE/STOP "...
- Page 16 Station Memory Presets 8. To begin programmed playback, press the MEMORY button and then the PLAY/PAUSE button. “MEMORY” appears in the display and playback will begin on the first track that you programmed. The player continues to play all of the tracks you have programmed in the order in which they were pro- grammed.
-
Page 17: Auxiliary Function
Station Memory Presets 4. To confirm the preset number position, press the MEMORY button on the remote. 5. To enter up to 40 AM or FM stations into the preset memory, repeat steps 1 through 4 above. 6. To tune in a preset station, ensure that the unit is in tuner mode, and press the MEMORY UP or MEMORY DOWN button on the remote or the main unit until the desired preset number appears. -
Page 18: Specifications
Backlight Functions Single Color Mode: To lock the color display on one color, press and hold the COLOR MODE button on the back cabinet of the desired unit until the display turns white, then release. To select the desired display color, either press and release the COLOR MODE button until the desired color appears or wait for the unit to automatically rotate in 2-second intervals through all the colors, then press the COLOR MODE button again when the desired color appears. -
Page 19: Statement Of Fcc/Dhhs Compliance
Statement of FCC/DHHS Compliance WARNING: Changes or modifications to this unit not expressly approved by the party respon- sible for compliance could void the user’s authority to operate the equipment. NOTE: This product complies with DHHS Rule 21 subchapter J at date of manufacture. This equipment has been tested and found to comply with the limits for a Class B digital device, pursuant to Part 15 of the FCC Rules. -
Page 20: Warranty
What The Sharper Image Will Do The Sharper Image will repair any defects in materials or workmanship. In the event repair is not possible, The Sharper Image will either replace this product with one of similar features and price, or refund the full purchase price of the product, whichever you prefer.
Need help?
Do you have a question about the GT800 and is the answer not in the manual?
Questions and answers