Table of Contents
Advertisement
Quick Links
Download this manual
See also:
User Manual
Advertisement
Table of Contents
Troubleshooting

Related Manuals for EPS Bio Technology EasyPlus mini


Summary of Contents for EPS Bio Technology EasyPlus mini
- Page 2 EasyPlus mini Self-Monitoring Blood Glucose System User’s Manual Please read this User’s Manual thoroughly before using your blood glucose meter.
- Page 3 Please read this manual thoroughly before you begin testing. This manual will help you get the most from your EasyPlus mini SMBG System. It provides you and your diabetes care team with important information and step-by-step direction to use the EasyPlus mini Self-Monitoring Blood Glucose System. To start testing quickly, you can also refer to the Quick Reference Guide.
-
Page 4: Optional Accessories
Standard Accessories Your new EasyPlus mini Blood Glucose meter and accessories work together to measure the amount of glucose in your blood. The system includes: • Wallet • EasyPlus mini Blood Glucose • User’s Manual Test Strips (25 pcs) • Self-Test Log Book •... - Page 5 Please complete your warranty card and mail it, so you receive the best customer service possible and product update news. Although the EasyPlus mini SMBG System is easy to use, you may need to consult your healthcare professional (this may be your doctor, pharmacist or diabetes nurse educator) for instructions on how to use the system.
- Page 6 Important Information About Your New Meter EasyPlus mini blood glucose meter is designed and approved for testing fresh plasma from fingertip. The meter is for outside the body (in vitro) use. It should not be used to diagnose diabetes. EasyPlus mini blood glucose meter only use with EasyPlus mini Blood Glucose Test Strips. Other test strips will give inaccurate results.
- Page 7 Remove batteries if the meter will not be used for one month or more. Warning for potential biohazard: Healthcare professionals using this system on multiple patients should be aware that all products or objects that come in contact with human blood, even after cleaning, should be handled as if capable of transmitting viral disease.
- Page 8 Health-Related Information If you are very dehydrated, urinating frequently, low blood pressure, shock or hyperosmolar hyperglycemic nonketotic coma (HHNK), you may get a test result that is lower than what your blood glucose really is. If you think you are dehydrated, call your doctor right away. If you have followed the steps in the user’s manual, but still have symptoms that don’t seem to match your test results, or if you have questions, please talk to your doctor.
- Page 9 Explanation of Symbols Please read instructions Attention, read instructions for use thoroughly before use Lot number Single use only For in vitro diagnostic use only 1.5V(AAA) x 2 batteries only Expiration date Storage temperature range Manufactured by Catalog number Serial number Control solutions Authorized representative in the Contains sufficient for <n>...
-
Page 10: Table Of Contents
Checking Your System …...........................13 Coding Your Meter .............................14 Setting The Time And Date ........................15 Using EasyPlus mini Blood Glucose Test Strips ..................17 Chapter 2: Control Solution Test ........................18 Why Run A Control Solution Tests ......................18 About The Control Solutions ........................19 Running A Control Solution Test ........................20... - Page 11 Chapter 4: Meter Memory, Setup ….......................37 Memory, Storing Test Result …........................38 Viewing & Deleting Test Results …......................38 Setting The Alarm …...........................39 Chapter 5: Maintenance And Troubleshooting …..................42 Installing Batteries …..........................42 Cleaning Your Meter ……...........................43 Maintenance And Testing ..........................44 Cleaning Your Lancing Device ….......................44 Screen Messages And Troubleshooting …....................45 Chapter 6: Technical Information …......................49 Specifications …............................49...
-
Page 12: Chapter 1: Understanding Your Meter
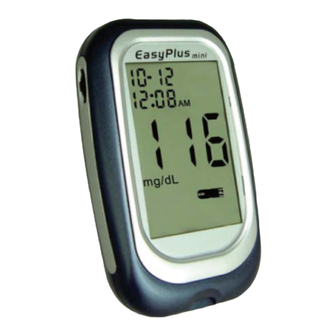
Chapter 1: Understanding Your Meter The EasyPlus mini Blood Glucose Meter The Overview of the Display: A. Year, month and date B. Time C. Test result D. Glucose unit E. Apply blood or control solution F. Error code G. Code number H. - Page 13 The Overview of the Meter: A. Manufacturer information B. Smart Jog Wheel C. Serial number D. Display E. Anti-Slippery Pad F. Battery Cover G. Strip slot The Overview of the Jog Wheel The Overview of the Test Strip: A. Blood collection area B.
- Page 14 Setting The Time and Date—First Time Use Setting the current time and date in your meter is important if you use the meter memory or if you want to download your results to a computer. 1. Press the wheel inwards until 2.
- Page 15 4. Press inwards and release 5. Press inwards and release 6. Repeat step 3 and 4 to set the the wheel to set the month. the wheel to set the date. hour and minute. The date will then flash. The colon will then flash. The flashing field is the one Repeat step 3 to set the date.
-
Page 16: Checking Your System
Checking Your System A new check strip is included with your meter. 1. Make sure your check strip is 2. The display shows "OK". 3. Remove the check strip and inserted. The meter will turn the meter will turn off on automatically. -
Page 17: Coding Your Meter
Coding Your Meter A new Code Card is inside each new box of test strips. Code your meter every time you open a new box of test strips. 1. The display will show "no 3. The code number will be 2. -
Page 18: Using Easyplus Mini Blood Glucose Test Strips
Using EasyPlus mini Blood Glucose Test Strip Use only with EasyPlus mini Blood Glucose Meter. Code your meter and run a control test every time you open a new box of test strips (See Chapter 2 "Control Solution Testing.") Keep the test strips in their original bottle. -
Page 19: Chapter 2: Control Solution Test
Running a control test lets you know that your meter and test strips are working properly to give reliable results. You should run a control test when: You use the EasyPlus mini Blood Glucose Meter for the first time. You open a new bottle of test strips. -
Page 20: About The Control Solution
About The Control Solution Use only with EasyPlus mini test strips. Write the date you opened the bottle on the bottle label. The control solution is good for three months from the date the bottle is opened or until the expiration date on the bottle, whichever comes first. -
Page 21: Running A Control Solution Test
Running A Control Solution Test You need the meter, a test strip, and control solution. 1. Put a test strip into the meter in the direction of 2. If you miss seeing the code number, take the the arrow. The meter turns on. test strip out and reinsert it into the meter. - Page 22 3. Place the meter on a flat surface, like a table. Squeeze the bottle until a tiny drop forms at the tip of the bottle. Remove the control solution bottle cap and Touch the drop to the Blood collection area at wipe the tip of the bottle with a tissue.
- Page 23 6. A result appears on the display. Remove the test strip and throw it away Don’t remove the test strip yet. after you have compared the reading to the Check if the reading falls within the range range printed on the test strip bottle. printed on the test strip bottle.
-
Page 24: Understanding Control Test Results
Understanding Control Test Results The label on your test strip bottle shows the acceptable ranges for the Control Solutions. The result you get should be inside this range. Make sure you compare the result to the correct level of control. When the control result is inside the range on the test strip bottle, your test strips and your meter is working properly. - Page 25 Troubleshooting Checks Action Repeat the control test with properly stored strips. Was the test strip exposing to open air for a long period of time? Was the test strip bottle capped tightly? This will humidify strips inside. Replace the test strips.
-
Page 26: Chapter 3: Testing Your Blood Glucose
Chapter 3: Testing Your Blood Glucose Using The Lancing Device The best depth setting is the lowest number that draws enough blood for a test. Try different settings to find the one that’s right for you. Please do not share your lancing device with anyone. And always use a new, sterile lancet. Lancets are for one time use only. -
Page 27: Inserting A Lancet Into The Lancing Device
Inserting A Lancet Into The Lancing Device You must first load the lancet into the lancing device to get it ready for use. 1. Unscrew the Cap. 2. Insert the lancet into the lancing device firmly then twist off the protective cover. - Page 28 3. Recap the front cap. 4. Select the desired penetration depth. Select 1-3 for soft or thin skin. 4-5 for average. 6-8 for thick or calloused skin.
- Page 29 5. Pull on the sliding barrel of the lancing device until it clicks and then release. Now the lancing device is ready. Do not prick your finger until your meter and strip are prepared. 6. Set the lancing device aside until later in the test.
-
Page 30: Running A Blood Glucose Test With Blood From Your Fingertip
Running A Blood Glucose Test With Blood From Your Fingertip 1. Wash your hands with soap 2. Put a test strip into the meter 3. If you miss seeing the code and warm water. in the direction of the arrow. number, take the test strip Rinse and dry thoroughly. - Page 31 4. Swab the blood collection area on your finger 6. Place the lancing device against the pad of with an alcohol swab. your finger. Please wait at least 5 seconds until the intended Press the trigger button to activate the lancing device.
- Page 32 7. Gently squeeze your finger to assist the flow 8. The meter will beep when enough blood has of blood. This helps you get a blood drop. entered the strip’s reaction zone. Touch the drop to the tip of the transparent The result will appear on the display after 5 window of the test strip.
-
Page 33: Alternative Site Testing
Alternative Site Testing 1. This graphic shows where 2. Massage the puncture area of 3. Press and hold the device with the meter cleared for forearm or palm for a few one clear adjustable tip against alternative site testing. seconds. the forearm. - Page 34 4. If you choose the palm, 5. Press the trigger button to 6. Hold the device against repeat step 1-3 to obtain a activate the lancing device. forearm or palm and increase drop of blood sample. pressure until the blood sample size is sufficient...
-
Page 35: Discarding Used Lancets
Discarding Used Lancets 1. Unscrew and remove the adjustable cap. 2. Discard the used disposable lancet into an Without touching the used lancet, stick the appropriate sharps or biohazard container. lancet tip into its protective cover. Grip the lancet carrier firmly and pull the lancet safely out. -
Page 36: Understanding Your Test Results
Understanding Your Test Results The EasyPlus mini Blood Glucose test strips are plasma referenced and calibrated for easier comparison to lab results. The normal fasting blood glucose range for an adult without diabetes is 70~120 mg/dL (3.9~6.7 mmol/L). Two hours after meals, the blood glucose range for an adult without diabetes is less than 140 mg/dL (7.8 mmol/L). -
Page 37: Comparing Your Meter Result To A Lab Result
Keep in mind that the lab could use different technology than EasyPlus mini blood glucose meter, and that blood glucose meters for self testing generally read somewhat lower or higher than the lab result. -
Page 38: Chapter 4: Meter Memory, Setup
Chapter 4: Meter Memory, Setup Memory, Storing Test Results Your meter stores a maximum of 480 test results with the time and date of the test. You can review them at any time. When the memory is full, the oldest result is dropped as the newest is added, so it is very important to have the correct time and date set in the meter. -
Page 39: Memory, Storing Test Result
Viewing & Deleting Test Results 1. Press inwards and hold the 3. To delete a test result, press 5. Press inwards and release wheel until turning the meter inwards and hold the wheel to review the average for more than 3 seconds. results. -
Page 40: Setting The Alarm
Setting The Alarm The meter can set 4 alarm, that your control your test time as your requirements. 4. Push the wheel up or down to 1. Press inwards and hold the 3. Push the wheel down to choose “On” and press inwards wheel until turning the meter choose 4 alarm set. - Page 41 5. If the time sets at 12:00 AM, 7. And then can set up other 8. If you don’t want to turn on push up or down for twelve alarms fitting in with your the alarm at all, turn every times to set at "12".
- Page 42 9. If you want to set one or more 10. If you turn the alarm OFF, 11. If you don’t want to turn alarms, repeat step 1-6. press inwards to confirm the any alarms On, make sure setting and then enter the all OFF at the upper left next setting mode.
-
Page 43: Chapter 5: Maintenance And Troubleshooting
Chapter 5: Maintenance and Troubleshooting Installing Batteries The meter uses two alkaline 1.5V (AAA) batteries. Batteries will normally last for over 2000 tests. Other types of 1.5V (AAA) batteries are also acceptable, yet the capacity of test times may differ. Install the batteries when you first use the meter or replace with new batteries when the "LP"... -
Page 44: Cleaning Your Meter
Cleaning Your Meter Caring for your EasyPlus mini SMBG system does not require special cleaning. Please keep the meter free of dirt, dust, bloodstain, and water stains. Follow these guidelines carefully to help you get the best performance possible: Do Not: Make sure the meter is turned off. -
Page 45: Maintenance And Testing
Maintenance And Testing Your meter needs little or no maintenance with normal use. It automatically tests its own systems every time you turn it on and lets you know if something is wrong. (See "Screen Messages" and what to do about them.) To make sure the display is working properly, turn off the meter. -
Page 46: Screen Messages And Troubleshooting
Screen Messages And Troubleshooting Never make treatment decisions based on an error message. If you have any concerns, please contact your healthcare professional. Code transmission failure Humidified / Used strips Low power Action: Re-insert the code Action: Replace with a new Action: Replace with new card. - Page 47 System fault System fault Replace the batteries first. If 001 Replace the batteries first. If Err Action: Action: ERROR appears again, contact your local appears again, contact your local dealer for dealer for repair. repair.
- Page 48 The "Ht" and thermometer icon appears. The "Lt" and thermometer icon appears. Temperature is too high, outside the required Temperature is too low, outside the required range of 50°F ~104°F (10°C ~40°C). This alerts range of 50°F ~104°F (10°C ~40°C). This users that an incorrect result may occur if the alerts users that an incorrect result may test continues.
- Page 49 Test result is higher than The test result is lower First time installation of 630 mg/dL. than 20 mg/dL. batteries and the meter Test again. If the result Test again. If the result Action: Action: has not yet been coded. is still the same, please is still the same, please Code your meter.
-
Page 50: Chapter 6: Technical Information
Chapter 6: Technical Information Specifications Brand name EasyPlus mini Blood Glucose Meter Range 20~630 mg/dL Response time 5 seconds Memory sets 480 test results Temp. 50°F ~104°F (10°C ~40°C) Operating condition Relative Humidity R.H. ≦ 90% 0.6 μL Blood sample... -
Page 51: Device Information
Device Information EasyPlus mini SMBG System, EasyPlus mini Blood Glucose Test Strips, EasyPlus mini Blood Glucose Meter. GlucoManager Software Set Manufacturer: EPS BIO TECHNOLOGY CORP. 2F, No.49-2, Lane 2, Guang-Fu Rd., Sec. 2, Hsinchu City, Taiwan 300 TEL:+886-3-5752522 FAX:+886-3-5752552 E-mail:info@epsbio.com.tw Website:http://www.epsbio.com.tw... -
Page 52: Warranty
warranty period if your Self-Monitoring Blood Glucose System does not work for any reason (other than obvious abuse), EPS will replace it with a new system or an equivalent product free of charge. Lancing Device Meets the requirements of MDD 93/42/EEC Manufacturer: STAT MEDICAL DEVICES INC.
Need help?
Do you have a question about the EasyPlus mini and is the answer not in the manual?
Questions and answers