Table of Contents
Advertisement
Advertisement
Table of Contents
Troubleshooting

Related Manuals for Sailor Sailor 6300 MF/HF DSC


Summary of Contents for Sailor Sailor 6300 MF/HF DSC
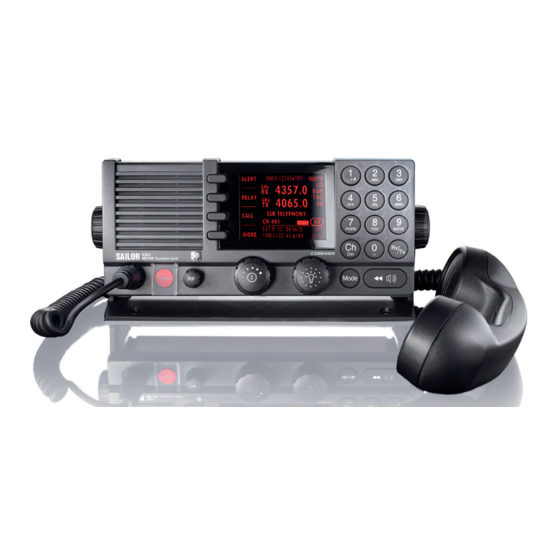
- Page 1 SAILOR 6300 MF/HF DSC 150W/150W FCC/250W/500W User manual...
- Page 3 SAILOR 6300 MF/HF DSC 150W/150W FCC/250W/500W User manual Document number: 98-131070-THR-C Release date: August 20, 2013...
- Page 4 Thrane & Thrane is not responsible for the content or accuracy of any translations or reproductions, in whole or in part, of this manual from any other source. Thrane & Thrane A/S trading as Cobham SATCOM. Copyright © 2013 Thrane & Thrane A/S. All rights reserved. Printed in Denmark.
- Page 5 Please write "source for product SAILOR 6300 MF/HF DSC" in the memo line of your payment. This offer is valid to anyone in receipt of this information. Please write "source for product SAILOR 6300 MF/HF DSC" in the memo line of your payment.
- Page 6 Safety summary The following general safety precautions must be observed during all phases of operation, service and repair of this equipment. Failure to comply with these precautions or with specific warnings elsewhere in this manual violates safety standards of design, manufacture and intended use of the equipment.
- Page 7 RF exposure hazards and instructions Your Thrane & Thrane radio generates electromagnetic RF (radio frequency) energy when transmitting. To ensure that you and those around you are not exposed to excessive amounts of energy and thus to avoid health hazards from excessive exposure to RF energy, all persons must obey the following: Caution! Never touch the...
-
Page 8: Emergency Calls
Emergency calls L L L L L if if if if ift C t C t C t Cov ov ov ov over er er er er P P P P P r r r r r e e e e e s s s s s s RED Button s RED Button s RED Button s RED Button... -
Page 9: Manual Overview
Equipment and is intended for use in maritime environment. SAILOR 6300 MF/HF DSC is designed for occupational use only and must be operated by licensed personnel only. SAILOR 6300 MF/HF DSC is not intended for use in an uncontrolled environment by general public. Manual overview This manual has the following chapters: •... - Page 10 Training information (for FCC approved equipment) The SAILOR 6300 MF/HF DSC is designed for occupational use only and is also classified as such. It must be operated by licensed personnel only. It must only be used in the course of employment...
- Page 11 Exposure (MPE) radius of 6 ft. (1.8m) for the maximum power of your radio (150 W selected) with a whip antenna having a maximum gain of 3.0 dBi. This means all persons must be at least 6 ft. (1.8m) away from the antenna when the radio is transmitting. Installation 1.
- Page 12 Related documents Title and description Document number SAILOR 630x MF/HF Control Unit, 98-132396 Installation Guide SAILOR 6300 MF/HF Transceiver Unit & 98-133081 Antenna Tuning Unit 150/250/500 W, Installation Guide SAILOR 6000 MF/HF 150/250/500 W 98-130890 System, Installation Manual SAILOR 6300 MF/HF Radiotelex, 98-132519 User Manual SAILOR 6101 and SAILOR 6103 Multi Alarm...
-
Page 13: Table Of Contents
Table of contents Chapter 1 Introduction SAILOR 6300 MF/HF DSC ............ 1 Accessories available ............5 Chapter 2 Operation Overview ................7 General use and navigation ..........7 Basic MF/HF radio communication ........15 Watch function ..............17 Scan ................. 18 DSC calls ................19 Phone book ..............36... - Page 14 Table of contents Glossary ..................63 Index ..................65...
-
Page 15: Chapter 1 Introduction
The SAILOR 6300 MF/HF DSC is available as a basic MF radio that can be upgraded with an HF DSC option and a telex option. Telexes are sent using the... -
Page 16: System Overview
SAILOR 6000 SAILOR 6362 MF/HF 150 W DSC Class A SAILOR 6320 SAILOR 6363 MF/HF 250 W SAILOR 6350 SAILOR 6364 MF/HF 500 W SAILOR 6383 ATU a. An additional SAILOR 6301 Control Unitcan be added. SAILOR 6300 MF/HF DSC... - Page 17 11. Selector and dim knob with key-press function for radio operation and setup. 12. Mode key to select the work mode: SSB, AM Broadcast, DSC, Telex (optional). 13. Replay button to play back up to 240 s voice messages. SAILOR 6300 MF/HF DSC...
-
Page 18: Display Overview
5. Service line containing mode of operation and channel number. 6. DSC window with MMSI number, position information and source. For a detailed description of the information shown for each of the functions available see the chapter Operation on page 7. SAILOR 6300 MF/HF DSC... -
Page 19: Accessories Available
SAILOR 6201 One SAILOR 6201 Handset with cradle Handset with cradle is included in the delivery of the SAILOR 6300 MF/HF DSC. If needed, you can connect another SAILOR 6201 Handset with cradle. SAILOR 6203 SAILOR 6203 Handset with cradle, Handset with cradle waterproof to IPx6. - Page 20 Chapter 1: Introduction Accessory Description SAILOR 6197 The SAILOR 6197 Ethernet Switch is Ethernet Switch used in installations with SAILOR 6103 GMDSS Alarm Panels and in installations with ThraneLINK. The Ethernet switch has 5 ports. SAILOR 6006 Necessary for telex option Message Terminal SAILOR H1252B Necessary for telex option...
-
Page 21: Chapter 2 Operation
Chapter 2 Operation Overview In this chapter you find detailed instructions and guidelines for: • General use and navigation • Basic MF/HF radio communication • Watch function • DSC calls • Handling multiple calls — DSC and voice • Phone book •... - Page 22 Chapter 2: Operation Power on, speaker volume and antenna tuning The MF/HF radio has a dual-function on/off knob for power on/off and volume control. Action Procedure Power on Press the on/off knob. Power off Press and hold the on/off knob and follow the instructions in the display.
- Page 23 Chapter 2: Operation SSB, AM BROADCAST, DSC or TELEX mode Press the Mode button to select a primary work and emission mode of the MF/HF radio. • SSB: In this mode the MF/HF radio listens for CALL 4357.0 voice on a single RX frequency and transmits kHz/Rx 4065.0 on the corresponding TX frequency.
- Page 24 Chapter 2: Operation • Press and hold RX/TX button to enter simplex frequencies. Then the same frequency is copied to both RX and TX fields on the radio. For fine tuning of frequencies (voice clarify) press the selector knob. Fine tuning step sizes Selector knob SSB mode AM mode...
- Page 25 Chapter 2: Operation Soft-key functions A number of functions of the SAILOR CALL 4357.0 6300 MF/HF DSC are accessed using kHz/Rx the four soft keys to the left of the 4065.0 ALERT display. The current function of a soft kHz/Tx key is shown in the display next to the DROBOS MMSI: 123456789...
- Page 26 Chapter 2: Operation Position and MMSI Information The position and MMSI information for the CALL 4357.0 SAILOR 6300 MF/HF DSC radio is shown in the kHz/Rx 4065.0 lower part of the radio’s display. The current ALERT (latest) position of the connected GPS, the UTC...
- Page 27 Chapter 2: Operation If the GPS was present and then disappears a warning appears in the display after 10 minutes, then you can enter the position and UTC time manually as described above. Channel information always available in the display For some functions and for the setup pages, EXIT RADIO SETUP...
- Page 28 Chapter 2: Operation Speaker devices The MF/HF radio can be equipped with the following speaker devices: • Additional SAILOR 6301 Control Unit • SAILOR 6201 Handset with cradle, microphone, ear piece and PTT (Push To Talk) button. • SAILOR 6202 Hand Microphone with PTT button. See Controller setup on page 46 for managing the connected speaker devices.
-
Page 29: Basic Mf/Hf Radio Communication
Chapter 2: Operation Basic MF/HF radio communication You can make radio calls using the Handset or another speaker device. • Ship-to-ship communication: Use simplex channels. • Ship-to-shore communication: Use duplex channels. Only valid frequencies and channel numbers are accepted. Quick guide to radio telephone calls 1. - Page 30 Chapter 2: Operation The radio tunes first time you press the PTT button on a Note new frequency. As long as the tuning symbol is in the display, the radio is not transmitting. Wait until the tuning symbol has disappeared before talking. Tuning may take from 0.1 s to 8 s. 4.
-
Page 31: Watch Function
Chapter 2: Operation Making a radio telephone call 1. Enter RX and TX frequencies or select an CALL 4357.0 ITU channel. kHz/Rx 4065.0 ALERT 2. Lift the Handset or take a speaker device kHz/Tx and press the PTT button, then wait until DROBOS the tune icon has disappeared. -
Page 32: Scan
Chapter 2: Operation Scan The radio has a scanning function for tagged voice channels. Any SSB voice channel can be tagged and added to the scanning sequence. In scan mode MULTI, the tagged SSB voice channels and the DSC channel are watched in turn (SSB voice —... -
Page 33: Dsc Calls
Chapter 2: Operation DSC calls In this section of the manual you find information on: • Own Distress — sending, acknowledging and cancelling • Sending a Distress from the SAILOR 6103 Multi Alarm Panel • DROBOS — Distress relay on behalf of someone else •... - Page 34 Chapter 2: Operation 2. Press the soft key FREQ if you want to specify a certain band out of the 6 available as the next distress frequency. Thereafter all 6 distress frequencies are transmitted. 3. Press the soft key VIEW (press MORE to advance to VIEW) to see details and start radio communication on the frequency 2182 kHz (automatically set) to inform about your Distress situation.
- Page 35 Chapter 2: Operation Item Description All or single frequency, if you only want to send the Distress alert on one of the 6 Distress frequencies. Mode Radio sub communication mode: SSB or Telex FEC. 3. Lift the cover of the red Distress button and push the Distress button for 3 seconds.
- Page 36 Power failure while in Distress In case of a power failure or switch-off during the transmission of a Distress the SAILOR 6300 MF/HF DSC gives an audible warning after power-up and automatically resumes sending Distress 10 seconds after power up. Within the 10 seconds you have the following options: •...
- Page 37 Chapter 2: Operation Sending a Distress from the SAILOR 6103 Multi Alarm Panel The optional SAILOR 6103 Multi Alarm Panel will, when connected to the MF/HF radio, indicate in the SAILOR 6103 display that a Distress can be sent over MF/HF. Note Only undesignated Distress messages can be initiated from the Alarm Panel.
- Page 38 Chapter 2: Operation DROBOS items Description TYPE: Select RELAY INDIV or RELAY AREA. Distress MMSI: Enter the MMSI number of the vessel in Distress, if known, or else “unknown” Enter the MMSI number of the coast station you are relaying the Distress alert to. DSC: Enter the DSC frequency pair, 6 are available, default: 2182 kHz.
-
Page 39: Receiving Distress Calls
Chapter 2: Operation Receiving Distress calls When the radio receives a Distress call, the 2-tone alarm sounds. The display shows the bands in which the Distress call is received and the category of the Distress call. The types of Distress calls are Distress, Distress ACK, Distress RELAY and DISTR. - Page 40 Chapter 2: Operation Distress call log As long as you are part of a Distress session, i.e. you have not pressed QUIT, you receive Distress messages and can track all Distress messages for the current Distress event. 1. Press the soft key LOG. If it is not in the display, press the soft key MORE until LOG appears.
- Page 41 Chapter 2: Operation DSC call type Cat DSC: Mode CMD DEST CENTRE + RADIUS Position — — — — — Group — — — Area — — 4. Make the entries for the desired call type: Item Description Enter the 9-digit MMSI number of the vessel you want to contact or use the phone book (PHBOOK) to select a contact.
- Page 42 Chapter 2: Operation Printing DSC calls If a printer is connected to the SAILOR 6300 MF/HF DSC via LAN you can print DSC messages automatically. You can also print entire DSC call logs. To set up a default printer, do as follows: 1.
- Page 43 Chapter 2: Operation Sessions in the MF/HF radio What is a session? A DSC session is defined as a collection of DSC calls (transmitted and/or received) that are related to the same event (e.g. a Distress event) or established call (e.g. an individual call request followed by an acknowledgement).
- Page 44 Chapter 2: Operation For more information on the session state icons see Session state icons on page 30 below. Note If two identical polling or test calls are sent from the same MMSI and the operator wants to resend a confirmation to the second call received, it is necessary to put the session on hold and then activate it again.
- Page 45 Chapter 2: Operation Session line Explanation INDIVIDUAL TX/RX You have either sent a call request to a station to establish contact, or another station has made a call to you to establish contact. The call needs a reply. TEST TX/RX You either have sent a SAFETY TEST call or have received a SAFETY TEST call from another station that needs to be replied.
- Page 46 Chapter 2: Operation Soft key — DSC session Radio function HOLD Puts the DSC session on hold if it is active (return to other non-DSC functions) ACTIVE Activates the DSC session VIEW Shows details about the DSC call RESEND Transmits an identical call if available Replies with a new channel if an individual call is NEWCH received with a communication channel specified...
- Page 47 Chapter 2: Operation Soft key — DSC session Radio function INFO (in Cancel Own Turns page of text message. Distress) HIST (Received A filtered version of the log displaying received calls Distress) relevant to the current Distress event. You find detailed information how to handle multiple calls in Handling multiple calls —...
-
Page 48: Receiving Dsc Calls
Chapter 2: Operation For other session types the soft key VIEW typically shows the details from a single call. Detail fields for other calls than Distress are: Details —other calls Explanation CALL Type (on received call) – The call type may be shown on call reception Category of the call: Urgency, Safety or Routine FROM... - Page 49 Chapter 2: Operation Handling multiple calls — DSC and voice The SAILOR 6300 MF/HF DSC can control multiple DSC sessions simultaneously with a voice communication session. All sessions can keep track of their session state and the communication channel used. They are handled in their respective sessions, in the order as they are started up.
-
Page 50: Phone Book
Chapter 2: Operation square. The center point is the position of the ship measured in degrees and minutes, whereas the radius of interest is in nautical miles. The corner point of the square (a ) and the length of its sides is given in degrees. - Page 51 Chapter 2: Operation Adding a contact to the phone book To add a contact to the phone book do as follows: 1. Press the soft key PHBOOK. If it is not in the display, press the soft key MORE until PHBOOK appears in the display. 2.
-
Page 52: Radiotelex
Chapter 2: Operation Editing a contact 1. Press the soft key PHBOOK. If it is not in the display, press the soft key MORE until PHBOOK appears. 2. Press the soft key EDIT. 3. Press and turn the selector knob to browse through the details of the contact and continue as described in Adding a contact to the phone book from step 2 onwards. -
Page 53: Replay Function
Chapter 2: Operation Replay function With replay you can playback received voice messages in the loudspeaker. Recording is activated automatically when a signal is received. Recording is not possible during playback. Up to 60 tracks or 240 seconds can be handled. Note To record messages only (without the continuous background noise) activate the squelch function. -
Page 54: Setup
Chapter 2: Operation Setup The following setup pages are described in this section of the manual: • Radio setup • Channel setup • Power Supply • DSC setup • DSC call logs • System setup • Controller setup Accessing a setup page To change a setting in one of the SETUP pages, do as follows 1. -
Page 55: Radio Setup
Chapter 2: Operation Note Telex option must be enabled in order for the transceiver to communicate with the optional 406006A telex terminal. Radio setup Item Description Scan Scan hang time, in seconds on an active receiving working channel. Hang The time is measured from the signal is detected. The radio remains Time on the channel for the set time interval, if a signal was detected. -
Page 56: Power Supply
Chapter 2: Operation Item Description Private Read only. Contact your local distributor for adding private channels. Channels The frequency watched for dual watch or multi scan. To receive routine Watch DSC calls set this frequency to 2177. Power Supply Item Description Monitor Set this to ENABLED if the radio is connected to a SAILOR 6081 Power... - Page 57 Chapter 2: Operation Item Description Auto-Ack Polling ON or OFF Auto-Ack Position ON or OFF Auto-Ack Individual Auto acknowledgement of individually addressed, non Distress DSC messages OFF - Disabled (default) ON – Enabled Non-Distr. Inactivity Inactivity time-out to exit non-Distress functions (e.g. in setup) without automatic time-out: Range: OFF, 1 to 30 minutes, in 1 min.
-
Page 58: System Setup
Chapter 2: Operation Item Description Print DSC ON: Automatic printing of DSC messages on a selected network printer, accessible via LAN. DSC Self Test OFF: Disabled (default), no DSC self test. RUN: Run a DSC self test. For further details about this test see DSC routine testing on page 57. - Page 59 Chapter 2: Operation Item Description Inactivity timeout Inactivity time-out to exit functions (e.g. in setup) and return to the application. • Range: 1 to 30 minutes, in 1 minute steps Default: 10 min. Language English Theme Changes the display colour. 0: Black text on white background 1: White text on black background GPS input...
-
Page 60: Controller Setup
Chapter 2: Operation Controller setup Item Description Handset 1 vol: Adjust earpiece volume for handset 1: can be adjusted from 0 to 100, in steps of 5. Note: Default setting is 80. The handset connected to the front connector has top priority and is configured to 80. The volume can be adjusted from 0 to 100, in steps of 5. - Page 61 Chapter 2: Operation Top-level soft key functions and setup pages TOP LEVEL SOFT KEYS SETUP PAGES CALL EXIT RADIO SETUP Scan Hang Time PHBOOK Scan Resume Scan Mode ALERT EXIT External PTT DROBOS EXIT CHANNEL SETUP Watch Receiver PHBOOK Private Channels DSC Watch HI/LO* POWER SUPPLY...
- Page 62 Chapter 2: Operation Setup...
-
Page 63: Chapter 3 Service & Maintenance
Maintenance Preventive maintenance Maintenance of the SAILOR 6300 MF/HF DSC can be reduced to a weekly check and a maintenance check at each visit of the service staff. Inspect the radio for mechanical damages, salt deposits, corrosion and any foreign material. - Page 64 Chapter 3: Service & maintenance Salt deposits In case the equipment has been exposed to sea water there is a risk of salt crystallization on the keys and knobs and they may become inoperable. Clean the MF/HF radio and speaker microphones with fresh water. Weekly installation check Go through the following weekly check procedure: 1.
- Page 65 Chapter 3: Service & maintenance DSC self test To run a control routine DSC self test, do as follows: 1. Press the soft key SETUP. If it is not in the display, press the soft key MORE until SETUP appears. 2.
-
Page 66: Diagnostics & Troubleshooting
Chapter 3: Service & maintenance Diagnostics & troubleshooting Diagnostics You can view logged system status messages that were recorded during the use of the radio and test the radio installation. In the Diagnostics menu in SYSTEM SETUP the following submenus are available: •... - Page 67 Chapter 3: Service & maintenance Most of the messages are marked as TU (transceiver unit) or ATU (Antenna Tuning Unit) messages. Text in the display Explanation Possible cause(s) Low Tune Power Too little power reaches Poor antenna installation or the antenna tuner to tune bad cable etc.
- Page 68 Chapter 3: Service & maintenance Text in the display Explanation Possible cause(s) TU: TX Inhib. Transmission inhibited. TX_INHIBIT switch is set or a severe protection of the transmitter has set in TU: LO Error Local Oscillator is not LO PCB is defective within valid range.
- Page 69 Chapter 3: Service & maintenance Self Test Two different self tests are available: • Tx single-band transmission test • Tx multi-band transmission test The Tx single Band test performs a two-tone transmitter test on the current TX frequency shown in the display. Note This test transmits a short two-tone test signal at full power —...
-
Page 70: Troubleshooting Guide
Chapter 3: Service & maintenance Troubleshooting guide Action Symptom Remedy The radio will The display is Check if power is present. not turn on empty. Check performance of power supply if connected to one. No commu- Check the antenna installation. nication loudspeaker is Check antenna cable. - Page 71 Chapter 3: Service & maintenance Action Symptom Remedy DSC routine Check the DSC function regularly. Verify the testing complete DSC installation, with antennas, by transmitting a Safety Test call to another station (coast or ship). The test call is generated using the DSC call flow via menu CALL.
- Page 72 Chapter 3: Service & maintenance Action Symptom Remedy Radio time DSC logs are A wrong radio time indication should occur only sorted with if GPS position source is not connected nor wrong time providing correct time data. A valid GPS time stamp or radio signal will update the UTC time used for time time is...
- Page 73 Chapter 3: Service & maintenance Action Symptom Remedy Device failure If any of the checks and tests described in this section do not assist in resolving the difficulties experienced in the operation and/or performance of the installation, a fault may have developed in the MF/HF radio itself.
-
Page 74: Warranty And Returning Units For Repair
Chapter 3: Service & maintenance Warranty and returning units for repair Should your Thrane & Thrane product fail, please contact your dealer or installer, or the nearest Thrane & Thrane partner. You will find the partner details on thrane.com where you also find the Thrane & Thrane Self Service Center web-portal, which may help you solving the problem. - Page 75 Chapter 3: Service & maintenance 4. Seal the shipping container securely. 5. Mark the shipping container FRAGILE to ensure careful handling. Failure to do so may invalidate the warranty. Warranty and returning units for repair...
- Page 76 Chapter 3: Service & maintenance Warranty and returning units for repair...
- Page 77 Glossary Glossary Amplitude Modulation Antenna Tuning Unit DROBOS Distress Relay On Behalf Of Someone else Forward Error Correction. A system of error control for data transmission, whereby the sender adds redundant data to its messages, also known as an error-correcting code. This allows the receiver to detect and correct errors without the need to ask the sender for additional data.
- Page 78 Glossary Medium Frequency MMSI Maritime Mobile Ship Identification Push To Talk Receive Single Side Band Standing Wave Ratio Thin Film Transistor. type of liquid crystal display. Transceiver Unit Transmit Coordinated Universal Time. The International Atomic Time (TAI) with leap seconds added at irregular intervals to compensate for the Earth’s slowing rotation.
- Page 79 Index Index buttons description, 3 accessories, 5 acknowledgement, Distress, 21 action line, display, 4 activate CALL, 36 scan resume, 41 call scanning, 18 activate, 35 watch, 17 Distress procedure, vi ACTIVE DSC, 19 activate call, 35 end, 13 session, 29 hold, 35 ADD, 37 quick guide, 15...
- Page 80 Index cradle for 6201, installation, 5 DSC alarms non distress, 43 DSC message print, 28, 44 deactivate DSC session, 29 watch, 17 typical display, 29 default reset, 45 DSC soft keys, 31 DELETE, 38 DSC window, 29 delete contact, 38 diagnostics, 45, 52 dim, 9 display, 4...
- Page 81 Index GPS position log, 45 display, 12 system messages, 52 louder, volume, 8 Handmicrophone, 14 handset cradle maintenance, 49 installation, 5 manual, document number, i hang time, 41 MAYDAY, vi HOLD medical transport, 43 holding a call, 35 menus session, 29 overview, 47 soft key functions, 11 message...
- Page 82 Index night vision, how to dim, 9 Non-dist Inactivity, 43 QUIT, 13 Non-distr.alarms, 43 radio call password, 45 making, 17 PHBOOK, 36 receiving, 16 phone book, 36 radiotelex, 38 add contact, 37 received Distress calls, 25 delete a contact, 38 repacking for shipment, 60 edit a contact, 38 repair, 60...
- Page 83 Index self test, 51, 52 soft key, 11 multi-band, 55 ADD, 37 single band, 55 CALL, 36 self test, DSC, 51 DELETE, 38 serial number DISACK, 25 Control Unit, 46 DSC, 31 Transceiver Unit, 45 FILTER, 18 service line, display, 4 MORE, 11 service procedure PHBOOK, 36...
- Page 84 Index subcommunication mode, 20 urgency call, 30 telex, 20 Use GPS, 12 voice, 20 UTC time, 4 support, 49 enter manually, 12 SW version, 45 system configuration example, 6 system messages, 45 system overview, 2 variants, 2 system setup, 44 voice system status messages, 52 call, 30...
- Page 86 98-131070-THR-C www.cobham.com/satcom...
Need help?
Do you have a question about the Sailor 6300 MF/HF DSC and is the answer not in the manual?
Questions and answers