Advertisement
Advertisement
Table of Contents

Related Manuals for HERO Archimede


Summary of Contents for HERO Archimede
- Page 1 ARCHIMEDE ● A100/A150 ● Automatic Colourant Dispenser USER MANUAL...
- Page 2 Declaration of Compliance with CE Regulations HERO EUROPE S.r.l. Fraz. Buretto, 12/A 12041 – Bene Vagienna (CN) ITALY Declares that: The Automatic Dispenser model: ARCHIMEDE A100-A150 Serial number:________ Is in compliance with the EC Machinery Directives: Machinery Directive 98/37/EEC Low tension 73/23/EEC Electromagnetic Compatibility 89/336/EEC Is in compliance with the standardized European Regulations: EN 292-1, EN 292-2, EN 418 &...
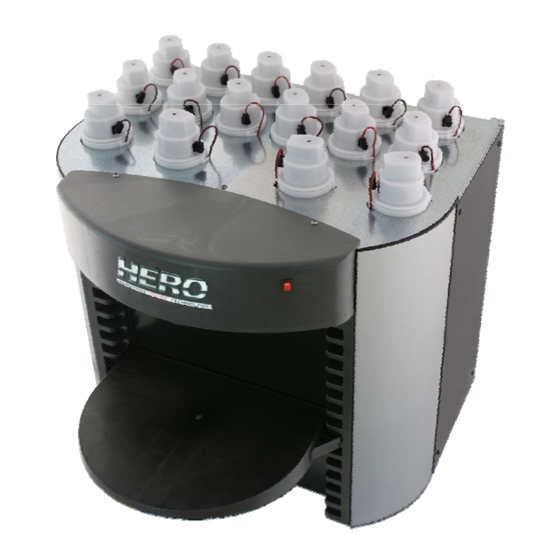
- Page 3 A100-A150 Automatic Dispenser Key Can loading Nylon shelf for positioning the paint Colourant dispensing nozzles Electronic control board (open the front panel) Canisters and covers...
-
Page 4: General Conditions
General Conditions By choosing the ARCHIMEDE A100-A150 automatic colourant dispenser manufactured by HERO EUROPE, you have selected a product which represents the result of intensive research in the field of high-tech fluid dispensing equipment. Top quality materials, modern designing tools such as the use of CAD three-dimensional parametrical systems, together with the attention given to ergonomics, guarantee an easy to use, long lasting machine. -
Page 5: Warranty Terms
The ARCHIMEDE A100-A150 automatic dispenser terms of warranty are summarized as follows: 1. HERO EUROPE provides a one year warranty on the correct functioning of the products supplied, except for break downs due to normal usage. If a breakdown is... - Page 6 6. In case of a PC breakdown, the customer has the option to install the program on another PC until the original PC is repaired, however, HERO EUROPE must be notified within 5 days. 7. In case of a PC break down, the PC manufacturer’s terms of warranty will be considered valid, even if the PC was supplied by HERO EUROPE.
-
Page 7: Safety Instructions
Please read the instructions carefully before installing and operating the dispenser, as a personal safety measure as well as to avoid needless damage to the equipment. HERO EUROPE declines any responsibility should the following instructions not be followed: • Do not turn on a damaged machine (for example, if the machine is damaged during transportation). - Page 8 Machine Positioning and Installation Instructions for correct positioning Be certain to respect the following details while positioning the machine: • Place the machine on a steady, horizontal surface by using a level. • The area must be well ventilated. To avoid drying of colourants, make sure the machine is not exposed to the sun or near heaters or any other source of heat.
- Page 9 Computer and Monitor Assembly After having positioned the PC, you must connect it to the electronic card that commands and controls the dispenser. In order to do so, you will find a USB connecting cable included inside the package. On one side, connect the USB cable to the appropriate socket positioned on the electronic card in the dispenser and on the other side, connect it to one of the USB sockets on the PC.
-
Page 10: Starting The Dispenser
Starting the Dispenser Connect the AC power cords of the dispenser and the PC to a wall socket (refer to “General conditions” and “Safety instructions” sections) then turn on the PC. By following the instructions in the software handbook, install the software on the PC. Load the colourants into the canisters but be careful not to overfill. - Page 11 Canister Replacement WARNING: Ensure that the machine is turned off • To disconnect the machine’s power supply, pull the power plug out of the socket • Disconnect all the cables from the covers and remove all the covers • Remove the upper front cover of the nozzle assembly, the canister plate that surrounds all of the canisters and open the front panel •...
- Page 12 • Remove the wing nut that holds the canister, located under the lower canister support plate • Disconnect the canister power cable from the electronic board and pull the canister away from its seating • Disconnect the cable connector from the electric stepper motor located in the lower part of canister and pull the thin agitation cable out of its hooks on the side of the canister •...
- Page 13 • Cut the tubing at the proper length and attach it on the canister by screwing the metal ring nut on the nipple • Insert the spring and screw the other stainless steel nut onto the nozzles • Put the new canister in its appropriate place and lock it in place by tightening the wing nut •...
- Page 14 Canister/Pump/Stepper Motor Assembly Agitation paddle Hook for agitation motor power cable Hook for agitation motor power cable Canister drain plug Pump nipple Stepper motor connector Electric stepper motor...
-
Page 15: Power Supply Replacement
Power Supply Replacement WARNING: Ensure that the machine is turned off • To disconnect the machine’s power supply, pull the power plug out of the socket • Remove the rear cover • Remove the screws on the sides of the power supply with a wrench •... - Page 16 Simultaneous Control Board Replacement (USA market) WARNING: Ensure that the machine is turned off • To disconnect the machine’s power supply, pull the power plug out of the socket • Remove the rear cover • Remove the power supplies without disconnecting the cables •...
- Page 17 • Connect the cables following the number markings on the board and on the cables • Replace the rear cover Sequential Control Board Replacement WARNING: Ensure that the machine is turned off • To disconnect the machine’s power supply, pull the power plug out of the socket •...
- Page 18 Automatic Cap Replacement WARNING: Ensure that the machine is turned off • To disconnect the machine’s power supply, pull the power plug out of the socket • Remove the upper front cover of the nozzle assembly and open the front panel •...
- Page 19 • Install the new cap by inserting it into the proper slots on the chassis • Connect the cable from the cap to the appropriate wiring harness • Replace the upper front cover of the nozzle assembly and close the front panel...
- Page 20 Automatic Cap Attachment hooks Power supply The dispenser is equipped with an automatic cap, connection that helps prevent the drying of colourants in the nozzles. The “pull back” function within the software parameters must be set correctly, to avoid problems of contamination or dripping of colourants.
-
Page 21: Equipment Specifications
Equipment Specifications Description: ARCHIMEDE A100-A150 Automatic Colourant Dispenser Capacity: Up to sixteen (16) 2.5lt canisters Pumps: Each canister is fitted out with a progressive cavity pump. The pump rotors are made of metal treated with a hardening chroming so as minimize wear. The stators are made of Viton elastomer. -
Page 22: Suggested Spare Parts
Suggested Spare Parts • Complete canister/stepper motor assembly • Canister lid with agitation motor • 3 m of flexible tubing for outlet lines from pumps to nozzles • Set of nozzles (8 pieces) • Canister power cable • Electronic board •... -
Page 23: Troubleshooting Guide
Troubleshooting Guide The following chart listing “Problem”, “Cause” and “Solution” should be consulted before requesting service. When in doubt, please contact HERO EUROPE S.r.l.’s service department before any attempts are made to repair the equipment. PROBLEM CAUSE SOLUTION Colourant leaks from the flange... - Page 24 Replace the electronic damaged card If necessary, please contact HERO EUROPE ‘s service department. When doing so, be sure to have the machine’s serial number, which can be found on the identification plate on the back panel of the machine HERO EUROPE S.r.l.
-
Page 25: Standard Parameters
Standard Parameters The following chart shows the parameters related to running a machine together with their respective default values. PARAMETER MEANING DEFAULT VALUE Mixing – Time ON Mixing time ON 1 min – 0 sec Mixing – Time OFF Mixing time OFF 120 min –... - Page 26 Warning level Below this level you are warned 0,4 litres to fill the canister Alarm level Below this level dispensing is no 0,2 litres longer permitted Steps alarm Number of motor steps possible 1.013.854.085 steps before proceeding with a (1.760,00 litres) precautionary substitution Purging alarm Maximum time lapse without...
- Page 27 Parameters Images...
Need help?
Do you have a question about the Archimede and is the answer not in the manual?
Questions and answers
SHOULD YOU KEEP CANISTERS FULL IN ORDER TO KEEP TINT FROM SOLIDIFYING TO THE INSIDE CANISTER WALLS OF THE 360 MODEL