Advertisement
Quick Links
Advertisement

Subscribe to Our Youtube Channel
Related Manuals for HERO EUREKA A450


Summary of Contents for HERO EUREKA A450
- Page 1 EUREKA ● ● A450 – A550 ● ● Automatic colorant dispenser USER MANUAL...
- Page 2 Declaration of Compliance with the CE Regulations HERO EUROPE S.r.l. Fraz. Buretto, 12/A 12041 – Bene Vagienna (CN) ITALY Declares that: The Automatic Dispenser model: EUREKA A-450 – A550 Serial number:____ Is in compliance with the EC Machinery Directives: Machinery Directive 2006/42/CEE...
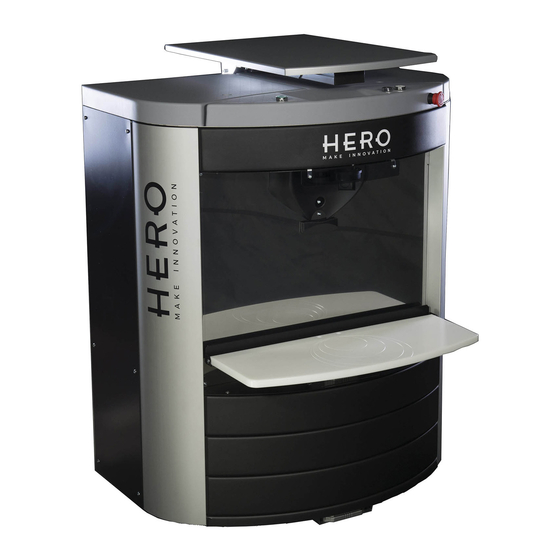
- Page 3 EUREKA Automatic Dispenser key Personal Computer Automatic plane for cans Canister door Canisters for colorants Elevator command buttons Emergency button Nozzles dispensing colorants...
- Page 4 PC sliding plane Identification Label with trade mark and certification logos Cartridge Pumps Electronic Board (PCB) Ground Main switch and connections power supplier plug comunication cable...
-
Page 5: General Conditions
European Community Council of Ministers, and is provided with the EC trademark. The handbook explains how to install an HERO EUROPE automatic dispenser and provides all the necessary information in order to insure easy use and good maintenance. -
Page 6: Terms Of Warranty
The terms of warranty, herewith described , solely apply if the products supplied by HERO EUROPE are used in compliance with what is stated in the handbook. The number of working hours necessary to implement the work related to the warranty, together with transfer time, travel, meals and accommodation expenses will be calculated according to current tariffs. -
Page 7: Safety Instructions
Please read the instructions carefully before installing and operating the machine, as a personal safety measure as well as to avoid needless damage to the machine HERO EUROPE declines any responsibility should the following instructions not be followed: Do not turn on a damaged machine (for example, if the machine is damaged during carriage). - Page 8 MACHINE POSITIONING AND INSTALLATION Instructions for correct positioning Be certain to respect the following details whilst positing the machine: Place the machine on a steady, horizontal surface by using a level. The area must be well ventilated. To avoid pastes from drying, make sure the machine is not exposed to the sun or near heaters or any other source of heat.
- Page 9 Computer and monitor assembly The EUREKA dispenser is provided with a shelf in the upper part of the machine at an ergonomic height of approximately 110 centimetres. The shelf can be used to position the PC , the LCD monitor and the keyboard, or in alternative a laptop computer Moreover, the PC could also be placed in another compartment located in...
- Page 10 Starting the dispenser Connect the power cables of the machine and the PC to a wall socket (refer to what is stated in the paragraphs regarding “General conditions” and “Safety instructions”) then turn on the PC. By following the instructions in the software handbook, install the software, which is provided with the machine, on the PC.
- Page 11 CARTRIDGE PUMP SUBSTITUTION When a pump needs to be replaced please proceed as follows: In order to disconnect the machine‟s power supply, pull the power plug out of the socket. Remove the transparent panel placed in the back side of the machine Disconnect the pump connector that you intend to substitute.
- Page 12 AUTOMATIC CAP Fixing hooks Power supply The Eureka dispenser is equipped of an automatic connection cap, necessary to avoid the exsiccation of the colorants. Set the “suck back” function with the software parameters in the correct way, to avoid problems of contamination or dripping of colorant.
- Page 13 TELESCOPIC ELEVATOR The automatic dispenser Eureka is equipped of a telescopic elevator for the lifting of the supporting plane for cans; this device permit that even the little cans can be positioned very near to the dosage nozzles. The elevator driving buttons are positioned onto the top of the machine. In case of necessary substitution of the telescopic column, please proceed as explained below: Switch off the machine and disconnect the plug of the electrical power supply.
- Page 14 Fix the new telescopic column with the four screws previously removed (Picture d). Fix the supporting plane for cans onto the top of the telescopic column with the four screws previously removed (Picture e). Reassemble the horizontal fixing of the telescopic column with the screws previously removed (Picture f).
- Page 15 SIMULTANEOUS ELECTRONIC BOARD The Eureka automatic dispenser realize all its functions thanks to the PCB electronic board located onto the base of the machine. The simultaneous model permit to the machine to do dosages of many colorants simultaneously. The PCB electronic board is fixed on two practical slides that make it simply extractable;...
- Page 16 PCB electronic board (simultaneous) Slides Wires from canister agitators and pumps Fixing screws...
- Page 17 SEQUENTIAL ELECTRONIC BOARD The sequential electronic board permit to the machine to do dosages of only one colorant sequentially. Analogously to the simultaneous electronic board, it is fixed on two practical slides that make it simply extractable; thanks to this device, the PCB board is accessible for maintenance or eventual substitution.
- Page 18 PCB electronic board (sequential) Slides Wires from canister agitators and pumps Fixing screws...
- Page 19 DISPENSE TUBE SUBSTITUTION The Eureka automatic dispenser execute its dosages through the dispense tubes of the machine; these are that pipes that connect the delivery side of the pumps with the dosage head situated in the front part of the machine. In case of necessary substitution of a dispense tube, please proceed as explained below: Implement the “empty dispense tube”...
- Page 20 Select the circuit that have to be emptied and click on Next button in the canister selection window; click on the Ok button in the dispense window (Pictures c and d). Picture c Picture d...
Need help?
Do you have a question about the EUREKA A450 and is the answer not in the manual?
Questions and answers