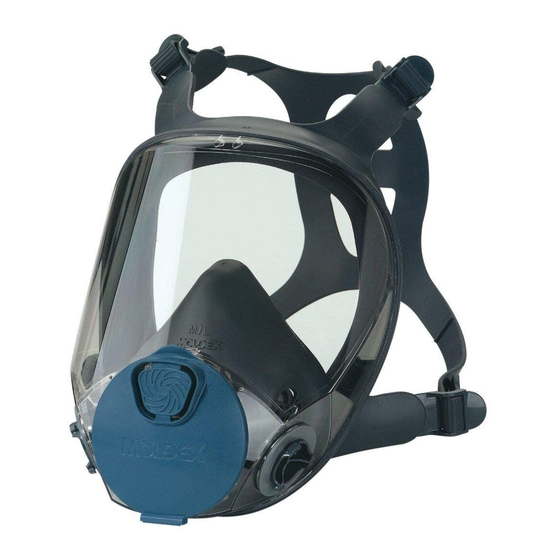
Moldex 9001 User Instruction Manual
9000 series
Hide thumbs
Also See for 9001:
- Instructions manual (44 pages) ,
- Quick start manual (2 pages) ,
- User instruction manual (19 pages)
Table of Contents
Advertisement
Quick Links
ENGLISH – USER INSTRUCTIONS
APPLICATIONS
RESTRICTIONS
USE AGAINST
01. This respirator does not supply oxygen and must not be used in atmospheres
®
1. Contaminants specified on NIOSH approval label, matrix, cartridges or filters and
containing less than 19.5% oxygen.
in accordance with all limitations and applicable safety and health regulations,
02. Do not remain in contaminated area if any physical distress occurs, for
including OSHA.
example breathing difficulty, dizziness or nausea.
2. Contaminants with good warning properties, i.e., smell, taste or irritation.
03. Leave contaminated area and replace respirator and/or cartridge or filter if it is
damaged, distorted, a proper fit cannot be obtained, you taste, smell or become
DO NOT USE AGAINST
irritated by contaminants, or breathing becomes difficult.
1. Concentrations of contaminants which are unknown, or are immediately
04. Do not alter, modify, or abuse this respirator.
dangerous to life or health.
05. Store respirator in sealed bag in a clean, dry, non-contaminated area.
2. Concentrations of contaminants which exceed the maximum use concentration
06. Dispose of facepiece, and/or cartridges and disks/filters according to your
9000 Series
or 10X the OSHA Permissible Exposure Limit, (PEL), when qualitatively fit tested,
employer's policy and applicable regulations.
or 50X the PEL when quantitatively fit tested, or according to applicable
07. N, R or P filters are required for particulates.
Respirator
government regulations.
08. Where oil mists are present, either alone or in combination with solid
3. Gases or vapors with poor warning properties or those which generate high
particulates, do not use the R or P filters for longer than one eight-hour work
User
heats of reaction, or paint sprays containing isocyanates.
shift. Dispose no later than eight hours after first use. Do not exceed 10X or
4. Sandblasting.
50X PEL depending on whether the user was quantitatively or qualitatively fit
Instruction
5. Oil-based mists with N filters.
tested (see Do Not Use Against, item 2) or 200 mg loading per respirator. It is
the user's responsibility to know the PEL and concentration of the contami-
Manual
WARNINGS TO USER
nant, the maximum work rate of the employee, and any other work site-spe-
1. Follow all instructions and warnings on the use of this respirator and wear
cific
during all times of exposure. Failure to do so will reduce respirator effectiveness,
information to calculate the loading of the filter. Where oil mists are present do
wearer protection, and may result in sickness or death.
not use N filters.
2. For proper use, ask your supervisor or call +1 (800) 421-0668 or
09. Dispose of all cartridges and N, R and P filters no later than thirty days after
+1 (310) 837-6500, ext. 512/550.
a) first use, and/or b) removing from sealed bag.
3. The user must first be trained by the employer in proper respirator use, in
10. Use cartridges, filters, and facepieces before the "use by" expiration date
accordance with applicable safety and health standards, for the contaminant
printed on box or bag.
and exposure level in the assigned work area. A written Respiratory Training
Program must be in place and followed by each user before first use. It must
meet all requirements of all applicable standards, including OSHA 29 CFR
NIOSH CAUTIONS AND LIMITATIONS
IMPORTANT NOTICE TO USERS
1910.134, and in Canada CSA Z 94.4, e.g. training, fit testing, medical
evaluation, and applicable OSHA substance specific standards.
The following restrictions may apply. See NIOSH Approval Label.
4. The vapors, gases, dusts, mists, fumes, and other contaminants which can be
You are responsible to understand and follow all warnings, restrictions and
A. Not for use in atmospheres containing less than 19.5% oxygen.
dangerous to your health include those which you cannot see, taste, or smell.
B. Not for use in atmospheres immediately dangerous to life or health.
other information contained in this instruction manual before you enter a
5. Check with your supervisor for the appropriate cartridges and/or filters for the
contaminated work area. Failure to do so may result in sickness or death.
C. Do not exceed maximum use concentrations established by regulatory
contaminants in your work area.
standards.
6. A qualitative fit test for up to 10X PEL, or quantitative fit test, for up to 50X PEL,
H. Follow established cartridge change schedules to ensure that cartridges are
must be performed before a respirator is assigned. Refer to current OSHA 29
MOLDEX-METRIC, INC.
CANADIAN CUSTOMER SERVICE
replaced before breakthrough occurs.
10111 W. Jefferson Blvd., Culver City, CA 90232
Tel: +1 (800) 421-0668, Ext. 517
CFR 1910.134 (f).
J. Failure to properly use and maintain this product could result in injury or death.
Tel: +1 (800) 421-0668 or +1 (310) 837-6500
Fax: +1 (310) 837-9563
L. Follow the manufacturer's User's Instructions for changing cartridges,
Fax: +1 (310) 837-9563
and/or filters.
Email: sales@moldex.com www.moldex.com
BRAZIL – MOLDEX-METRIC LTDA
M. All approved respirators shall be selected, fitted, used, and maintained in
Rua tucuma 353 sobreloja Jardim Europa
accordance with MSHA, OSHA, and other applicable regulations.
MOLDEX TECHNICAL
Sao Paulo, SP 01455-010 Brasil
SERVICE DEPARTMENT
TEL: +55 (11) 2659-2108
N. Never substitute, modify, add, or omit parts. Use only exact replacement parts
in the configuration as specified by the manufacturer.
+1 (800) 421-0668 or
E-mail: moldexbrazil@moldex.com
+1 (310) 837-6500, ext. 512/550
O. Refer to User's Instructions, and/or maintenance manuals for information on
use and maintenance of these respirators.
Moldex and Ideas that wear well are registered trademarks.
P. NIOSH does not evaluate respirators for use as surgical masks.
U.S. Patents Pending. The PVC-Free logo is a trademark
S. Special or critical User's Instructions and/or specific use limitations apply.
of Moldex-Metric, Inc.
Refer to User's Instructions before donning.
9000-710 REV H 11/13
TECHNICAL SERVICE LINE
Moldex maintains a toll-free Technical Service Line to answer questions about the
use of Moldex respirators, contaminants and regulations. If you have any questions
call +1 (800) 421-0668 or +1 (310) 837-6500, ext. 512/550 or
FAX +1 (310) 837-9563 or e-mail at: tech@moldex.com.
LIST OF PARTS FOR 9000
LISTA DE PARTES PARA MODELO 9000
9001 – Small
9002 – Medium
9003 – Large
9001-Pequeño 9002-Mediano
9003-Grande
Parte#
Descripción
Part #
Description
0073-1
Inhale Diaphragm
0073-1
Diafragma de inhalación
0073-2
Diafragma de exhalación
0073-2
Exhale Diaphragm
0074
Cartucho Retenedor de Junta
0074
Cartridge Retainer Gasket
0092
Arnés de la Cabeza
0092
Head Harness
0094
Nose Cup M/L
0094
Copa Nasal M/G
0095
Copa Nasal S
0095
Nose Cup S
0092
LISTE DES PIÈCES POUR LE 9000
9001-Petit
9002-Moyen
9003-Grand
Pièce#
Description
0073-1
0073-1
Diaphragme inhalation
0094/5
0073-2
Diaphragme expiration
0074
Joint d'Étanchéité
0092
Harnais de Tête
0094
Demi-masque intérieur M/L
0095
Demi-masque intérieur S
0073-1
0074
Fig. 1
Fig. 2
0073-2
ESPAÑOL – INSTRUCCIONES DEL USUARIO
APLICACIONES
RESTRICCIONES
USE CONTRA
01. Este respirador no suministra oxígeno y no debe usarse en atmósferas que
1. Contaminantes especificados en las etiquetas de aprobación de NIOSH, etiquetas
contengan menos de 19.5% oxígeno.
tipo matriz, cartuchos o filtros y de acuerdo con todas las limitaciones y regula-
02. No permanezca en el área contaminada si siente algún malestar físico, como
ciones aplicables de seguridad y salud, incluyendo OSHA.
dificultades respiratorias, mareos o náuseas.
2. Contaminantes con claras indicaciones de advertencia, es decir, por su olor,
03. Deje el área contaminada y reemplace el respirador o cartucho o filtro si está
sabor o porque son irritantes.
dañado, deformado, si no puede obtener un ajuste correcto, si usted percibe,
huele o si se irrita por contaminantes, o si se vuelve difícil respirar.
NO USE CONTRA
04. No altere, modifique ni abuse de este respirador.
1. Concentraciones de contaminantes que son desconocidos, o que son inmediata-
05. Almacene el respirador en una bolsa sellada en un lugar limpio, seco y no
mente peligrosos para la vida o a la salud.
contaminado.
Manua de
2. Concentraciones de contaminantes que exceden la máxima concentración o
06. Deseche su máscara facial y/o los cartuchos, discos y filtros de acuerdo con la
10 veces el Límite de exposición permisible (PEL, por sus siglas en inglés) de
política de su empleador y las regulaciones aplicables.
ns ucc ón
OSHA, cuando se han probado cualitativamente, o 50 veces el PEL cuando se
07. Debe usar filtros N, R o P para partículas.
han probado cuantitativamente, o de acuerdo con las regulaciones
08. Donde existan nieblas de petróleo, ya sea solas o en combinación con
de usua o
gubernamentales.
partículas sólidas, no use los filtros R o P más que un turno de ocho horas de
3. Gases o vapores con pocas indicaciones de advertencia o aquellos que producen
trabajo. Deséchelas después de ocho horas de su primer uso. No exceda 10 o
Resp ado
grandes calores de reacción, o pintura en aerosol que contiene isocianatos.
50 veces el valor de PEL dependiendo de si se probó el ajuste del usuario en
4. Arenado.
forma cuantitativa o cualitativa (consulte la sección No use contra, punto 2) ni
se e 9000
5. Nieblas con base de petróleo con filtros N.
200 mg de carga por respirador. Es responsabilidad del usuario saber el PEL y
la concentración del contaminante, la máxima tasa de trabajo del empleado, y
ADVERTENCIAS AL USUARIO
cualquier otra información específica del lugar de trabajo para estimar la carga
1. Siga todas las instrucciones y advertencias sobre el uso de este respirador y
del filtro. Donde existan nieblas de petróleo, no use los filtros N.
úselo durante todo el tiempo de exposición. No hacerlo reducirá la efectividad
09. Deseche todos los cartuchos y filtros N, R y P no después de treinta días
del respirador, la protección al portador y puede producir enfermedades o la
después del a) primer uso y/o b) retirarlos de la bolsa sellada.
muerte.
10. Use cartuchos, filtros y máscaras faciales antes de la fecha de expiración
2. Para conocer el uso adecuado, pregunte a su supervisor o llame al
impresa en la caja o en la bolsa.
+1 (800) 421-0668 o al +1 (310) 837-6500, ext. 512/550.
3. El usuario primero debe ser entrenado por el empleador acerca del uso correcto
del respirador, de acuerdo con las normas aplicables de seguridad y salud, para
PRECAUCIONES Y LIMITACIONES DE
AVISO IMPORTANTE PARA LOS
el contaminante y el nivel de exposición en el área de trabajo asignada. Debe
NIOSH
USUARIOS
haber un Programa de capacitación en protección respiratoria activo y seguido
por cada usuario antes de usarlo por primera vez. Debe cumplir todos los requi-
Pueden aplicarse las siguientes restricciones. Consulte la etiqueta de aprobación
sitos de las normas aplicables, incluyendo OSHA 29 CFR 1910.134, y en Canadá
de NIOSH.
Usted es responsable de comprender y seguir todas las advertencias, restric-
CSAZ 94.4, como por ejemplo, pruebas de ajuste, evaluación médica, y normas
A. No apropiado para uso en atmósferas que contienen menos de 19.5% de oxíge-
ciones y cualquier otra información contenida en este manual de instrucción
OSHA de sustancias específicas aplicables.
no.
antes de ingresar a un área de trabajo contaminada. No hacerlo puede producir
4. Los vapores, gases, polvos, nieblas, humos y otros contaminantes que pueden
B. No para uso en atmósferas inmediatamente peligrosas para la vida o la salud.
ser peligrosos para su salud incluyen algunos a los que no puede ver, oler o
.
enfermedades o la muerte.
C. No exceda las máximas concentraciones de uso establecidas por las normas
percibir.
regulatorias.
5. Consulte con su supervisor sobre los cartuchos apropiados y/o filtros para los
MOLDEX-METRIC, INC.
H. Siga los programas de sustitución de cartuchos establecidos para asegurar que
contaminantes en su área de trabajo.
10111 W. Jefferson Blvd., Culver City, CA 90232
los cartuchos se reemplacen antes de que se produzca una penetración.
6. Debe realizarse una prueba de ajuste cualitativo para hasta 10X PEL, o una
Tel: +1 (800) 421-0668 or +1 (310) 837-6500
J. No usar y mantener adecuadamente este producto puede ocasionar lesiones o
Fax: +1 (310) 837-9563
prueba de ajuste cuantitativo, por hasta 50X PEL, antes de asignar un respira-
la muerte.
Email: sales@moldex.com www.moldex.com
dor. Consulte la norma OSHA 29 CFR 1910.134(f).
L. Siga las instrucciones para el usuario del fabricante para cambiar cartuchos o
el filtro.
DEPARTAMENTO DE SERVICIO
TÉCNICO DE MOLDEX
M. Los respiradores con aprobación M.AII deberán ser seleccionados, instalados,
+1 (800) 421-0668 or
usados y mantenidos de acuerdo con MSHA, OSHA y otras regulaciones
+1 (310) 837-6500, ext. 512/550
aplicables.
N. Jamás substituya, modifique, agregue ni omita componentes. Solo use
Moldex e Ideas that wear well son marcas comerciales registradas. Patentes pendientes en EE.UU.
partes de reemplazo exactas en la configuración como es especificado por el
El logotipo PVC-Free es una marca comercial de Moldex-Metric, Inc.
fabricante.
0. Consulte las instrucciones para el usuario o los manuales de mantenimiento
para obtener información sobre el uso y mantenimiento de estos respiradores.
P. NIOSH no evalúa respiradores para uso como máscaras quirúrgicas.
S. Se aplican instrucciones importantes o especiales para el usuario y limita-
ciones de uso específicas. Consulte las instrucciones para el usuario antes de
colocárselo.
LÍNEA DE SERVICIO TÉCNICO
Moldex mantiene una línea gratuita de servicio técnico para responder pregun-
tas sobre el uso de los respiradores Moldex, contaminantes y regulaciones. Si
tiene alguna pregunta, llame al +1 (800) 421-0668 o al +1 (310) 837-6500,
ext. 512/550 o envíe un fax al +1 (310) 837-9563 o un correo electrónico a:
tech@moidex.com.
N
Manue de
u
sa eu
Resp a eu
sé es 9000
M
M
PRE-INSPECTION
Inspect your respirator before and after each wearing. Do not wear, and return
to your supervisor if:
1. Head harness is torn, cut, or damaged in any way.
2. Buckles or flanged tabs are missing, damaged or broken.
3. Facepiece is cracked, torn, distorted, dirty, or has holes.
4. Inhalation/Exhalation diaphragms and/or gaskets are missing, torn, damaged, or
not properly seated.
5. Cartridges are at the end of their service life, cracked, damaged, or not
properly seated.
6. Any other plastic or rubber part is cracked, distorted, or damaged.
FITTING INSTRUCTIONS
1. Users must follow instructions each time respirator is worn.
2. OSHA regulation 29 CFR 1910.134 (f) requires that the user be fit tested.
3. Do not wear with any facial hair, such as beards, or any other facial features
which may prevent a proper fit.
4. If you cannot obtain a proper fit, do not enter the contaminated area and see your
supervisor.
DONNING – PUTTING ON
1. Grab lower lengths of head harness with each hand, just above each adjustment
buckle, and while positioning chin in flange, pull harness over the head. (Fig. 2)
2. Push facepiece onto face and chin with one hand and position for most comfort-
able and secure seal while pulling and tightening neck tab of harness with other
hand. Repeat for other neck tab. For easiest, most secure and best fit always
adjust neck harness tabs first before tightening top harness tabs. (Fig. 3)
3. All four harness tabs must be adjusted so that the pressure of the face seal on
the face is distributed evenly. Head harness must lay flat on head. Adjust both
lower and top harness tabs evenly for most comfortable and leak-tight fit of
the face flange.
DOFFING – TAKING OFF
To take off, first pull lower/neck harness tabs away from face to loosen harness
straps, then pull chin area away and upwards from face. (Fig. 4)
FIT TESTS
A qualitative fit test for up to 10x PEL, or quantitative, for up to 50x PEL must be
performed before a respirator is assigned. Refer to current OSHA 29 CFR 1910.134
(f). Qualitative fit testing can be performed using the Moldex BITREX
®
fit test kit
with appropriate cartridges or filters. Quantitative fit testing can be performed with
probed cartridge kit. Call +1 (800) 421-0668 or +1 (310) 837-6500, ext. 512/550
for a copy of the selection guide or you may access via website at
www.moldex.com.
Fig. 3
Fig. 4
Fig. 5
PRE-INSPECCIÓN
Inspeccione su respirador antes y después de usarlo. No lo use para después
devolverlo a su supervisor si:
1. El arnés de cabeza está rasgado, cortado o dañado en alguna manera.
2. Faltan las hebillas o las lengüetas bridadas para cabeza, o si están dañadas o
rotas.
3. La máscara facial está rajada, desgarrada, deformada, sucia, o si tiene agujeros.
4. Faltan los diafragmas de inhalación/exhalación y/o las juntas, o si están desgar-
rados, dañados o no asentados correctamente.
5. Los cartuchos están al final de su vida de servicio, o si están rajados, dañados o
no asentados correctamente.
6. Cualquier otra parte plástica o de caucho está rajada, deformada o dañada.
INSTRUCCIONES DE AJUSTE
1. Los usuarios deben seguir las instrucciones cada vez que usen un respirador.
2. La regulación OSHA 29 CFR 1910.134 (f) requiere que se pruebe el ajuste al
usuario.
3. No lo use con ningún vello facial, como barba, que puede evitar un ajuste
correcto.
4. Si no puede obtener un ajuste correcto, no ingrese al área contaminada y
consulte a su supervisor.
COLOCACIÓN
1. Tome las longitudes inferiores del arnés de cabeza con cada mano, justo encima
de cada hebilla de ajuste, y mientras coloca la quijada en la brida, tire del arnés
sobre la cabeza. (Fig. 2)
2. Empuje la máscara facial en la cara y quijada con una mano y colóquela para su
mayor comodidad y sello seguro mientras tira y aprieta la lengüeta del cuello del
arnés con la otra mano. Repita para la otra lengüeta de cuello. Para un ajuste
más sencillo, seguro y mejor, siempre ajuste las lengüetas del arnés del cuello
antes de apretar las lengüetas superiores del arnés. (Fig. 3)
3. Las cuatro lengüetas del arnés deben estar ajustadas de modo que la presión en
el sello de la cara se distribuya uniformemente. El arnés de cabeza debe descan-
sar horizontal en la cabeza. Ajuste las lengüetas inferiores y superiores del arnés
uniformemente para su mayor comodidad y ajuste hermético a prueba de fugas
de la brida de la cara.
QUITÁNDOSE EL RESPIRADOR
Para quitarse el respirador, primero tire las lengüetas inferiores/del cuello del arnés
alejándolas de la cara para aflojar las correas del arnés y después tire del área de la
quijada y hacia arriba de la cara. (Fig. 4)
PRUEBAS DE AJUSTE
Debe realizarse una prueba de ajuste cualitativo para hasta 10X PEL, o una prue-
ba de ajuste cuantitativo, por hasta 50X PEL, antes de asignar un respirador.
Consulte la norma OSHA 29 CFR 1910.134 (f). La prueba de ajuste cualitativo puede
realizarse usando el equipo de prueba de ajuste Moldex BITREX* con los cartuchos
o fil¬tros apropiados. La prueba de ajuste cuantitativo puede realizarse con el juego
del cartucho probado. Llame al +1 (800) 421 -0668 o al +1 (310) 837-6500, ext.
512/550 si desea una copia de la Guía de selección o puede acceder a ella a
través del sitio Web en www.moldex.com.
M
USER SEAL CHECK
CHANGE OUT SCHEDULES
CARTRIDGE CHANGE OUT
SCHEDULE WORKSHEET
Perform both negative and positive seal checks each time you enter a
OSHA 1910.134 (d) requires that the employer implement a change out schedule
contaminated area.
for cartridges based on objective information or data that will ensure cartridges
Duties / Job Classification:
are changed before the end of their service life (see OSHA 1910.134 for complete
NOTE: Do not perform user seal check with the #7999 Splash/Spark Protector
text). A cartridge's useful service life is how long it provides adequate protection
Location:
in place.
from harmful chemicals in the air. The service life of a cartridge depends on many
factors, including environmental conditions, breathing rate, cartridge filtering
Negative Pressure Seal Check: Cover both cartridges and gently inhale and
capacity and the amount of contaminants in the air.
CHEMICAL INFORMATION
hold your breath. The facepiece should slightly collapse. If air leakage is detected,
re-adjust the position of the facepiece and increase tension of head harness and
If you know what the chemical is and how much of it you are exposed to, then you
(FROM MSDS OR MANUFACTURER)
repeat the seal check until leakage is eliminated. (Fig. 5)
are ready to estimate how long your respirator cartridges will work and apply the
Chemical:
safety factor.
Positive Pressure Seal Check: Cover the exhalation valve vent and exhale gently to
Exposure Limit:
create a slight positive pressure. If air leakage is detected, re-adjust the position of
You must use some type of objective data to develop a change out schedule.
Maximum Concentration:
the facepiece and tension of head harness and repeat the seal check until leakage
Options for determining a cartridge's service life include:
is eliminated. (Fig. 6)
Boiling Point:
1. Conducting experimental tests.
WARNINGS: If you cannot obtain a proper fit, do not enter the contaminated area
2. Using a mathematical model https://www.osha.gov/SLTC/etools/respiratory/
Molecular Weight:
and see your supervisor.
index.html
Liquid Density:
Seal check your respirator each time you enter and periodically while wearing the
OSHA has on its website other means of calculating breakthrough times for various
Vapor Pressure:
respirator in the contaminated area.
chemicals. You may also wish to consider use of this website in developing your
Molecular Polarization:
change out schedules. Be advised that actual service life can vary considerably
It is the responsibility of the Safety Director or your supervisor to assist you in
from those calculated using these models. These models only provide rough esti-
Refractive Index:
determining how tight the 9000 Series respirator should be on the users face. Prior
mates. Some of the data you will need specific to the Moldex cartridges in order to
to and during use the user has the final responsibility to determine how tight the
use the models on the OSHA website are:
respirator should be and when it needs to be adjusted to always maintain a proper
WORKSITE CONDITIONS
seal. Do not over or under tighten as either may cause leakage and reduce
• #7100 has an adsorbing equivalent of 42.5 grams Organic Vapor Carbon, its
Maximum Expected Temperature (ºC):
protection.
height is 2.06 cm, inside diameter is 7.81 cm.
• #7600 has an adsorbing equivalent of 36.0 grams Organic Vapor Carbon, it's
Expected Relative Humidity (%)*:
height is 2.06 cm, inside diameter is 7.81 cm.
CARTRIDGES
• A change out schedule worksheet is provided.
Work Rate:
Number of Shifts/Week:
CHEMICAL CARTRIDGE SERVICE LIFE
CARTRIDGE DETAILS
Hours Cartridge Used/Shift:
Leave contaminated area, and replace cartridges, if you smell, taste, or feel any
irritation, in your nose or throat. Consult your supervisor. Replace according to your
change out schedule per OSHA 1910.134, or no more than eight hours after first
READ THIS WARNING
DATA FOR #7100 AND #7600 CARTRIDGES
use, or sooner if breakthrough occurs.
These weights were estimated by Miller-Nelson using methods based on their
tests. It is suggested that you use default values provided by OSHA for the other
# of Cartridges:
CARTRIDGE/FILTER DISK ASSEMBLY
cartridge specific parameters. Lastly, in order for the OSHA models to be used
#7100 Adsorbing Equivalent (grams):
First inspect the facepiece, cartridge or filter disk sealing surfaces to make sure it's
you may have to provide other pertinent data on the challenge agent which may
clean and undamaged. Check to see that cartridge retainer gasket is in place and
be found on the MSDS or from the chemical manufacturer. These models can be
#7100 & #7600 Cartridge Bed Height (cm):
is clean and undamaged. (FIG. 7) DO NOT ATTACH CARTRIDGE OR FILTER DISK
found at https://www.osha.gov/SLTC/etools/respiratory/index.html.
WITHOUT A GASKET. SEE YOUR SUPERVISOR. Only use cartridges or filter disks
#7600 Adsorbing Equivalent (grams):
from sealed bags. To attach the cartridge or filter disk to the facepiece, align the
Moldex suggests that you use the OSHA models, or other means provided by
#7100 & #7600 Bed Diameter (cm):
three cartridge or filter disk notches with the three bayonets protruding from the
OSHA. Moldex always recommends that you utilize the most conservative
facepiece and firmly turn clockwise until the cartridge or filter disk is locked into
(shortest) breakthrough times. For more detailed information on these methods,
position and is unable to turn any further. (Fig. 8) Check to see that it is seated and
refer to OSHA's website at: https://www.osha.gov/SLTC/etools/respiratory/
Service Life Estimate:
flush against the facepiece gasket. Then check the inhalation diaphragms for dirt
index.html
and/or damage and see that they are seated properly.
If you have any questions please feel free to call Moldex Technical Services
Basis Used:
at +1 (800) 421-0668 or +1 (310) 837-6500, ext. 512/550.
Cartridge Change Out Schedule Every:
After Each Shift:
Other:
This form may be used to assist you in developing a change out schedule when
using #7100 or #7600 cartridges for protection against organic vapors. Be advised,
this is simply a tool to help you collect some of the pertinent data in developing a
change out schedule. It is your responsibility to ensure the accuracy of the
schedules that you develop for each operation and work site.
* Moldex suggests that you use a range and use the lowest predicted
breakthrough.
Fig. 6
Fig. 7
Fig. 8
Fig. 9
VERIFICACIÓN DEL SELLO DEL USUARIO
PROGRAMA DE SUSTITUCIÓN
Realice las verificaciones del sello negativo y positivo antes de ingresar a un
OSHA 1910.134 (d) requiere que el empleador implemente un Programa de sus-
área contaminada.
titución para cartuchos basado en información o datos objetivos que aseguren
que los cartuchos sean cambiados antes del final de su vida útil (consulte el texto
Verificación de sello de presión negativa: Verificación de sello de presión
completo en OSHA 1910.134). La vida útil de un cartucho es el tiempo que pro-
negativa: Cubra ambos cartuchos y suavemente inhale y contenga su aliento. La
porciona adecuada protección contra los productos químicos dañinos en el aire. La
máscara facial debe hundirse ligeramente. Si se detecta una fuga de aire, reajuste
vida útil de un cartucho depende de muchos factores, incluyendo las condiciones
la posición de la máscara facial y aumente la tensión del arnés de cabeza y repita la
medioambientales, el ritmo respiratorio, la capacidad de filtrado del cartucho y la
verificación de sello hasta que se elimine la fuga. (Fig. 5)
cantidad de contaminantes en el aire.
Verificación de sello de presión positiva: Cubra el venteo de la válvula de exha-
Si sabe cual es el producto químico y a que cantidad de él estará expuesto, está
lación y exhale suavemente para crear una ligera presión positiva. Si se detecta
listo para estimar cuanto tiempo funcionarán los cartuchos de su respirador y para
una fuga de aire, reajuste la posición de la máscara facial y la tensión del arnés de
aplicar el factor d
cabeza y repita la verificación de sello hasta que se elimine la fuga. (Fig. 6)
ADVERTENCIAS: Si no puede obtener un ajuste correcto, no ingrese al área con-
taminada y consulte a su supervisor.
Verifique el sello de su respirador antes de ingresar y periódicamente mientras use
el respirador en un área contaminada.
Es responsabilidad del Director de seguridad o de su supervisor ayudarlo a determi-
nar cuán ajustado debe estar el respirador serie 9000 en la cara del usuario. Antes
y durante el uso, el usuario tiene la responsabilidad final de determinar cuán ajusta-
do debe estar el respirador y cuando necesita ser reajustado para mantener siempre
un sello adecuado. No debe ajustar muy poco ni demasiado por que podría causar
una fuga y reducir la protección.
CARTUCHOS
VIDA ÚTIL DEL CARTUCHO QUÍMICO
Deje el área contaminada y reemplace los cartuchos, si huele, percibe o siente
alguna irritación, en su nariz o garganta. Consulte a su supervisor. Reemplace de
acuerdo con su programa de sustitución y según OSHA 1910.134, o no después de
ocho horas después del primer uso, o antes si se produce una penetración.
CONJUNTO CARTUCHO/DISCO DEL FILTRO
Primero inspeccione las superficies de sellado de la máscara facial al cartucho o
disco del filtro para asegurarse de que estén limpias y sin daños. Verifique que
la junta del retén del cartucho esté en su lugar limpia y sin daños. (FIG. 7) NO
INSTALE EL CARTUCHO O EL DISCO DEL FILTRO SIN UNA JUNTA. CONSULTE
A SU SUPERVISOR. Solo use cartuchos o discos de filtro de bolsas selladas. Para
asegurar el cartucho o disco de filtro a la máscara facial, alinee las tres muescas
del cartucho o disco de filtro con las tres bayonetas que sobresalen de la máscara
facial y gire firmemente hacia la derecha hasta que el cartucho o disco de filtro
esté asegurado en su posición y ya no pueda girar más. (Fig. 8) Verifique que está
asentado y a nivel contra la junta de la máscara facial. Después verifique que los
diafragmas de inhalación no tengan suciedad ni daños y revise que estén asentados
correctamente.
M
M
FILTER DISKS
MAINTENANCE
FILTER DISK/PIGGYBACK ADAPTER/CARTRIDGE ASSEMBLY (Fig. 10)
FACEPIECE SERVICE LIFE
The effective life of the facepiece will be influenced by the use conditions and con-
Before assembling filter disk #7940 to the piggyback adapter #7920, inspect the
sealing surface, to make sure it is clean and undamaged and the gasket is in place.
taminants to which it is exposed. This includes concentration of the contaminants
(e.g. ketones and aromatic solvents will increase the rate of deterioration), duration
(Fig. 9) Push the piggyback adapter onto the cartridge until it snaps into place all
of exposure, ambient temperature, etc. Do not use solvents to wipe or clean the
around the cartridge. First check that the cartridge retainer gasket is in place and
facepiece as these will reduce the life of the respirator and pose a health hazard
undamaged, then attach the cartridge to the facepiece, align the three cartridge
to the user. If the material shows any signs of cracking, wrinkling, or aging, then
notches with the three bayonets protruding from the facepiece and firmly turn
discard the facepiece immediately. Do not expose to high ambient temperatures
clockwise until the cartridge is locked into position and is unable to turn any further.
(above 160° F) as this will distort the facepiece, and may affect fit.
Check to see that it is seated properly, both on the inside and outside and flush
against the facepiece. Inspect the piggyback adapter, sealing ring and gasket each
CLEANING FACEPIECE ASSEMBLY
time the filter disk is changed. If gasket is broken, cracked or damaged replace
Cleaning is recommended after each day's use or more frequently if necessary.
gasket or entire piggyback adapter. Insert filter disk into the piggyback adapter
Remove all filters, cartridges, gaskets, inhalation & exhalation diaphragms, and
and turn clockwise until the filter disk is locked into position and is unable to turn
head harness and nose cup from the facepiece. Gently scrub the facepiece with a
any further and until both surfaces are tightly sealed together at all points. (Fig. 9)
soft brush in a mild germicidal detergent, rinse with clean water and air dry. DO
Check the inhalation diaphragms for dirt or damage and see that they are properly
NOT CLEAN WITH SOLVENTS OR EXPOSE TO HIGH TEMPERATURES. Inspect
components and reassemble, or replace respirator if worn, damaged or deformed.
seated.
INHALATION & EXHALATION DIAPHRAGMS INSPECTION/CLEANING
Warning: Only use #7920 disk piggyback adapter with the #7940 filter disks.
Two inhale diaphragms are located inside the nose cup and two for each of the
Failure to do so may result in sickness or death.
cartridge retainers. The exhale diaphragm is located under the valve cover. Open
the valve cover by pulling on the latch then remove the diaphragm. Clean and
FILTER DISK SPLASH/SPARK PROTECTION
check the diaphragms for dirt, leaks, distortion, or any other damage. After wash-
#7999 can be used with #7940, #7950 and #7960 filter disks. Push #7999 over
ing and/or inspection, replace all five diaphragms and check to see that they are
filter disk until it snaps into place. (Fig. 11)
properly seated.
FILTER DISK SERVICE LIFE
Caution: Do not twist the exhale cover. Twisting may result in seperation from the
Leave contaminated area and replace filters, disks or cartridges, if they become
exhale assembly. Do not use this facepiece without the exhale cover in place.
damaged, soiled, torn, or if you experience increased breathing resistance. Use
Restrictions: Where oil mists may be present in the work area you must follow
REPLACEMENT PARTS
restrictions, item 8, 9 and 10 for important restrictions on the use of these filters.
Use only Moldex replacement parts for Moldex respirators.
FILTER DISK REPLACEMENT
WARNING
To remove the used filter disk, gently turn the filter disk counter clockwise and
When cleaning or sanitizing a respirator that has accumulated hazardous contami-
then remove it from the #7920 piggyback adapter. Discard used filter disk. Then
nants, the person doing the cleaning must wear the respiratory protection required
gently pull off the #7920 piggyback adapter. Inspect and clean the piggyback
to assure they will be protected from inhaling any hazardous contaminants on
adapter each time the filter disk is changed. If gasket is worn, cracked or dam-
masks being cleaned. Caution should be exercised to assure such contaminants
aged, then replace gasket. If the piggyback adapter or sealing ring is worn or dam-
are not spread into respirable air, and that hazardous contaminants, when removed
aged, then entire adapter must be replaced. To remove the cartridge or filter disk,
from the respirator, are properly disposed of. Failure to take these precautions
gently turn counter clockwise and remove from facepiece. Before replacing with a
could result in sickness or death, depending upon the contaminant. Check with
2
new cartridge or filter disk, inspect the facepiece to cartridge sealing surface, to
your safety supervisor if you are unsure and always comply with all applicable
42.5
make sure it is clean and undamaged. Only use replacement cartridges/filter disks
workplace safety regulations including any substance specific standards.
from sealed bags.
2.18
STORAGE
36.0
CAUTION: When not in use or during storage, do not expose respirator to excessive
FILTERS
7.81
heat (above 135˚ F/57˚ C) or hazardous substances. Such exposure, or storing in
any other manner that may also distort the facepiece, may prevent a proper fit and
FILTER ASSEMBLY
expose you to the risk of sickness or death.
Before assembling cartridges, inspect the facepiece sealing surface to make sure
it is clean and undamaged. (Fig. 7) To attach the cartridge to the facepiece, align
REPLACEMENT PARTS & INSTRUCTIONS
the three cartridge notches with the three bayonets protruding from the facepiece
USE ONLY MOLDEX REPLACEMENT PARTS FOR MOLDEX RESPIRATORS.
and firmly turn clockwise until the cartridge is locked into position and is unable
to turn any further. Check to see that it is seated properly, both on the inside and
Nose Cup #0094/0095 – (Fig. 14)
Hours:
outside and flush against the facepiece. Insert filter into the #7020 retainer so that
• Remove by pulling away from center and over the two locating stud heads, inside
the side indicated is away from face. (Fig. 12) Check to see that filters are properly
facepiece.
• Replace by pushing over two locating stud heads in center and ensuring
seated then push the retainer onto the cartridge until it snaps into place. Check
the inhalation and exhalation diaphragms for dirt or damage and see that they are
perimeter of cup fits over center locating ring. Nose cup inhale diaphragms
must be present and properly in place.
properly seated.
Inhale Diaphragms #0073-1
FILTER REPLACEMENT
• Pull off, or push onto and under three lug retainer head and seat properly.
To remove the old filter, gently pull off the filter retainer. Remove the old filter and
There are two located on nose cup and two on cartridge retainers.
place a new filter inside the retainer so that the side indicated is away from face.
Inspect cartridge lid to be sure it is clean and undamaged. Replace the retainer.
Exhale Diaphragm #0073-2 – (Fig. 13)
• Open the exhale cover, pull out old diaphragm and discard.
Warning: Use the #7020 filter retainer with the #8910 or #8970 filters only.
• Insert new diaphragm by pushing locator pin into center hole.
Failure to do so may result in sickness or death.
• Ensure locator pin is fully inserted into diaphragm holder and seat properly.
Order Inhale/Exhale Diaphragm Kit #0073
Gasket Kit #0074 – (Figs. 7 and 9)
• #9000 - Pull off old gasket over three bayonet prongs on cartridge retainer and
discard. Push new gasket onto retainer and check that it is seated properly.
• #7920 Piggyback Adapter - Pull off and discard. Push new gasket onto retainer
and check that it is seated properly.
Fig. 10
Fig. 11
Fig. 12
M
DISCOS DEL FILTRO
DISCO DE FILTRO CON ADAPTADOR DE KIT DE REEMPLAZO/CONJUNTO
DE CARTUCHO (Fig. 10)
Antes de ensamblar el disco de filtro #7940 al adaptador de kit de reemplazo #7920,
inspeccione la superficie de sellado para asegurarse de que esté limpia y sin daños y
que la junta esté en su lugar. (Fig. 9) Empuje el adaptador de kit de reemplazo sobre
el cartucho hasta que se ajuste a presión alrededor del cartucho. Para asegurar el
cartucho a la máscara facial, alinee las tres muescas del cartucho con las tres bayo-
netas que sobresalen de la máscara facial y gire firmemente hacia la derecha hasta
que el cartucho esté asegurado en su posición y ya no pueda girar más. Verifique
que está asentado correctamente, tanto por dentro como por fuera y a nivel contra
la máscara facial. Inspeccione el adaptador de kit de reemplazo, anillo de sello y
junta cada vez que se cambie el disco de filtro. Si la junta del sello está rota, rajada
o dañada, reemplace la junta el adaptador de kit de reemplazo completo. Inserte el
disco de filtro en el adaptador de kit de reemplazo y gire hacia la derecha hasta que
el disco de filtro esté bloqueado en su posición y ya no pueda girar más y hasta que
ambas superficies estén herméticamente selladas juntas en todos los puntos. (Fig. 9)
Verifique que los diafragmas de inhalación no tengan suciedad ni daños y revise que
estén asentados correctamente.
Advertencia: Solamente use el Adaptador de kit de reemplazo #7920 con los discos
de filtro #7940. No hacerlo puede producir enfermedades o la muerte.
PROTECCIÓN CONTRA SALPICADURAS/CHISPAS DEL DISCO DE FILTRO
El retén #7999 puede usarse con los discos de filtro #7940, #7950 y #7960. Empuje
el #7999 sobre el disco de filtro hasta que entre a presión en su lugar. (Fig. 11)
VIDA ÚTIL DEL DISCO DE FILTRO
Deje el área contaminada y reemplace el filtro, discos o cartuchos, si se dañan,
ensucian, desgarran, o si experimenta mayor resistencia para respirar. Restricciones
de uso: Si existen nieblas de petróleo en el área de trabajo, debe seguir las
Restricciones #8, #9 y #10 que indican importantes restricciones en el uso de
este filtro.
REEMPLAZO DEL DISCO DEL FILTRO
Para retirar el disco de filtro #7940 usado, suavemente gire el disco de filtro hacia
la izquierda y luego retírelo del adaptador de kit de reemplazo #7920. Deseche el
disco de filtro usado. Después, suavemente tire del adaptador de kit de reemplazo.
Inspeccione y limpie el adaptador de kit de reemplazo cada vez que se cambie
el disco de filtro. (Fig.14) Si la junta del sello está desgastada, rajada o dañada,
M
M
reemplace la junta. Si el adaptador de kit de reemplazo o anillo de sellado está des-
gastado o dañado, debe reemplazar el adaptador completo. Para retirar el cartucho
o disco de filtro, suavemente gire hacia la izquierda y retírelo de la máscara facial.
Antes de reemplazarlo con un nuevo cartucho o disco de filtro, inspeccione la super-
ficie de sellado de la máscara facial al cartucho para asegurarse de que esté limpia
y sin daños. (Fig. 10) Solo use cartuchos o discos de filtro de reemplazo de bolsas
selladas.
M
FILTROS
CONJUNTO DEL FILTRO
Antes de ensamblar los cartuchos, inspeccione la superficie de sellado de la máscara
facial para asegurarse de que esté limpia y sin daños. (Fig. 7) Para asegurar el car-
tucho a la máscara facial, alinee las tres muescas del cartucho con las tres bayonetas
que sobresalen de la máscara facial y gire firmemente hacia la derecha hasta que el
cartucho esté asegurado en su posición y ya no pueda girar más. Verifique que está
asentado correctamente, tanto por dentro como por fuera y a nivel contra la máscara
facial. Inserte el filtro en el retén #7020 de modo que el lado indicado esté lejos de la
cara. (Fig. 12) Verifique que el filtro esté correctamente asentado y empújelo sobre
el cartucho hasta que entre a presión en su lugar verifique que los diafragmas de
inhalación y exhalación no tengan suciedad ni daños y revise que estén asentados
correctamente.
REEMPLAZO DEL FILTRO
Para retirar el filtro viejo, tire suavemente del retén del filtro. Retire el filtro viejo y
coloque uno nuevo dentro del retén de modo que el lado indi¬cado esté lejos de
la cara. Inspeccione la tapa del cartucho para asegurarse de que esté limpia y sin
daños. Reemplace el retén.
Advertencia: Use el retén del porta filtro #7020 con el filtro #8910 o #8970
solamente. No hacerlo puede producir enfermedades o la muerte.
MANTENIMIENTO
VIDA ÚTIL DE LA MÁSCARA FACIAL
La vida útil de la máscara facial será afectada por las condiciones de uso y los
con¬taminantes a los que está expuesta. Esto incluye la concentración de los con-
taminantes (por ejemplo, las acetonas y los solventes aromáticos aumentarán la
velocidad de deterioro), duración de la exposición, temperatura ambiente, etc.No use
solventes para limpiar la máscara facial, ya que éstos productos reducen la vida del
respirador y son un riesgo para la salud del usuario. Si el material muestra algún
signo de rajaduras, arrugas o envejecimiento, deseche la máscara facial de inmedia-
to. No la exponga a altas temperaturas ambiente (por encima de 160° F/71º C) ya que
la máscara facial se deformará y podrá afectar su ajuste.
M
M
Head Harness #0092 – (Fig. 15)
• Use other personal protective equipment, as directed by your employer. Where
• Remove strap by pulling each of the 4 harness tabs through buckles and discard.
appropriate use protective gloves when handling or removing respirator and dis-
• Install new strap with Moldex logo facing out and up.
pose of respirator and then gloves in accordance with your employer's directions.
• Insert straps into buckles and tighten as needed.
• If CDC or other Local, State or Federal agency issues new or revised guidelines
for respirator use against specific hazards, users must strictly comply.
Spectacle Kit #0098
Available for users with prescription eyewear.
WARNINGS FOR USE OF PARTICULATE
Lens Shields #0093
RESPIRATORS AGAINST TB
Available for protection of lens against scratching and overspray.
OSHA and CDC have recommended the use of any of the particulate respirators
approved under 42CFR84 as a means of providing help in complying with a pro-
SUPPLEMENTAL HAZARD WARNINGS FOR
gram designed to reduce occupational exposure to tuberculosis.
MOLDEX
®
PARTICULATE RESPIRATORS
The level of effectiveness of respiratory protection from tuberculosis cannot be
These are Warnings and Limitations that all users must be made aware of in
determined with currently available data. However, proper use of appropriate
Moldex respirators in conjunction with a comprehensive respiratory protection pro-
addition to all warnings and other information on the outside of the Moldex respirator
gram may reduce, but will not eliminate, risk of infection.
packaging or other published related information. You must read and comply with
these Warnings and Limitations at all times and only when your employer has
• Be sure to read the Limitations outlined below and strictly follow all Warnings set
determined that it is appropriate to use this respirator.
forth under the WARNINGS FOR ALL USERS.
• When using any Moldex respirator, filter replacement and/or disposal must be
Proper use of this respirator may reduce but will not eliminate the risk of
handled in accordance with your Healthcare Facility's comprehensive respiratory
illness or death from exposure to some Chemical, Biological, Radiological, or
Nuclear (CBRN) hazards. CBRN hazards include, but are not limited to, bacteria,
protection program.
• If disinfectants are used to sanitize reusable facepieces, you must consult with
toxins, and viruses that can cause death, serious bodily injury or disfigurement. The
your Healthcare Facility and run tests to ensure the compatibility of any disinfec-
long-range and short-range risks of CBRN hazards and the amount and manner of
exposure that may produce such risks remain to a great extent unknown. Use of this
tant with Moldex reusable facepiece materials. Use of disinfectants could impair
the efficiency of the respirator and result in a loss of protection.
respirator must be in accordance with the Centers for Disease Control (CDC) Health
Advisories or any other Local, State or Federal recommendations for use of respira-
LIMITATIONS
tors against specific CBRN hazards.
• Respirators may reduce but do not eliminate wearer exposure to airborne
hazards or the risk of contracting any disease or infection. Only use this
Moldex does not make recommendations for any type of respirator to be used
respirator as part of a comprehensive respiratory protection program. You
against CBRN hazards for workers or the general public.
will receive no respiratory protection if this respirator is not properly fitted
and worn. Additionally, potentially hazardous particles, including infectious
You should know that there may be no obvious warnings of the presence or release
agents, smaller than the particle sizes used in NIOSH certifications are
of CBRN hazards.
likely to exist in certain environments. Some published data indicates that
There are more efficient models of respirators with a higher level of protection
these smaller particles may not be filtered out as effectively as the particle
sizes used by NIOSH [N Series Count Median Diameter (CMD) 0.075 ± .02µm
available from other manufacturers. It is up to the employer, and not Moldex,
Geometric Standard Deviation 1.86 (GSD), and R & P Series CMD 0.185
to determine if a respirator should be worn and if so, which type, size, level of
protection, and model.
± .02µm 1.6 (GSD)] when certifying respirators. It is imperative that you
determine the size and potential hazards of the particles that may be pres-
ent in the environment before selecting appropriate respiratory protection,
BACKGROUND
and that you refer to CDC guidelines when selecting and using any respira-
The National Institute for Occupational Safety and Health (NIOSH), a branch of the
tor, particularly in environments where smaller types of particles, such as
CDC and a U.S. Government agency, is responsible for testing and certifying respira-
those referenced above, may be present.
tors for protection against hazardous industrial contaminants. Procedures for select-
• If the respirator comes in contact with blood or fluids, including body flu-
ing and using proper respiratory protection are regulated by various governmental
ids, leave contaminated area as soon as possible and discard and replace
agencies, such as the Occupational Safety and Health Administration (OSHA).
the respirator.
• Moldex respirators must not be used on children.
NIOSH tests and certifies certain respirators for use against chemical warfare
agents, biological warfare agents or biohazards and provides advisory information
for some biohazards, but OSHA and other government agencies have not set any
For further information on use of respirators contact Moldex at +1 (800) 421-0668
or +1 (310) 837-6500, ext. 512/550, your Employer, or CDC at www.cdc.gov or
exposure standards for these agents or biohazards, in general.
+1 (800) 311-3435 or +1 (404) 498-6500.
WARNINGS FOR ALL USERS
LIMITED WARRANTY
• This respirator must only be used for substances having Permissible Exposure
IMPORTANT NOTICE TO PURCHASER
Limits (PELs) and only where deemed appropriate by your employer.
This limited warranty is made in lieu of the warranties of merchantability,
• This respirator must be fit tested. If you cannot obtain a proper fit, do not use the
fitness for particular purposes and all other warranties, express or implied.
respirator and do not enter the risk area.
• This respirator is not for use with beards or other facial hair that prevents direct
There are no other warranties which extend beyond the description on the face
hereof. The physical standards and specifications of Moldex will be met by prod-
contact between the face and sealing surface of the respirator.
ucts sold. Exclusive Remedies: damages for the breach of this limited warranty
• Moldex respirators, when properly fitted and used as part of a comprehensive
respiratory protection program, may reduce wearer exposure to some airborne
are limited to the replacement of such quantity of Moldex products proved to be
defectively manufactured. Except as provided above, Moldex shall not be liable or
hazards, but not all.
responsible for any loss, damage, or liability, direct, indirect, incidental, special, or
• In the event of a sudden or unexpected CBRN hazard release, you may use this
consequential, arising out of sale, use, or misuse, or the inability to use products
respirator for escape only if you have not been provided with a more appropriate
by the user.
respirator for this type of situation. Do not remove the mask from the face until
you have left the contaminated area.
• Do not reuse or store for reuse or hang around neck unless your employer specif-
ically authorizes reuse. Dispose of respirator as a hazardous waste in accordance
with your employer's directions.
Fig. 13
Fig. 14
Fig. 15
M
M
M
M
M
M
M
M
M
Advertisement
Table of Contents

Related Manuals for Moldex 9001


Summary of Contents for Moldex 9001
- Page 1 9000 Series respirator should be on the users face. Prior mates. Some of the data you will need specific to the Moldex cartridges in order to exposure that may produce such risks remain to a great extent unknown. Use of this tant with Moldex reusable facepiece materials.
- Page 2 Do not over or under tighten as either may cause leakage and reduce data you will need specific to the Moldex cartridges in order to use the models could result in sickness or death, depending upon the contaminant. Check with...
Need help?
Do you have a question about the 9001 and is the answer not in the manual?
Questions and answers