Unitron Smart Control Manual
Hide thumbs
Also See for Smart Control:
- Manual (28 pages) ,
- User manual (17 pages) ,
- Quick reference (2 pages)
Table of Contents
Advertisement
Available languages
Available languages
Advertisement
Table of Contents

Subscribe to Our Youtube Channel
Related Manuals for Unitron Smart Control


Summary of Contents for Unitron Smart Control
- Page 1 Smart Control remote guide Guide de la télécommande Smart Control...
-
Page 2: Thank You
Thank you Thank you for choosing Unitron Smart Control remote for your Unitron hearing aids. At Unitron, we care deeply about people with hearing loss. We work closely with hearing healthcare professionals to make advanced, purpose-driven solutions available to everyone. Because hearing matters. - Page 3 Your Smart Control remote Hearing healthcare professional: _______________ __________________________________________ Telephone: _________________________________ Model: ____________________________________ Serial number:______________________________ Replacement batteries: One AAA (1.5 Volt), Standard or Rechargeable Warranty: __________________________________ Date of purchase: ___________________________...
-
Page 4: Quick Reference
Quick reference Changing batteries Battery size 1 On-off switch 2 Left-both-right switch 3 Left (blue) indicator light 4 Right (red) indicator light Low battery Warning 5 Scroll wheel left and right 6 +/– buttons indicator lights 7 Home button blink alternately 8 Telephone (or program) for 2 minutes button... - Page 5 Votre télécommande Smart Control Audioprothésiste :___________________________ __________________________________________ Téléphone : ________________________________ Modèle : ___________________________________ Numéro de série : ___________________________ Piles de remplacement : Une pile AAA (1,5 V), classique ou rechargeable Garantie : __________________________________ Date de l’achat : ____________________________...
- Page 6 Aide-mémoire Remplacement des piles Type de pile 1 Bouton marche/arrêt 2 Bouton gauche/ bilatéral/droit 3 Voyant gauche (bleu) Avertissement de 4 Voyant droit (rouge) pile faible 5 Molette les voyants gauche 6 Boutons +/– et droit clignotent 7 Bouton d’accueil alternativement 8 Bouton téléphone pendant 2 minutes...
-
Page 7: Table Of Contents
Table of contents / Table des matières Your Smart Control at a glance ..........2 Turning your Smart Control on and off........4 Replacing the battery ..............5 Operating instructions.............7 Adjusting your hearing aids with Smart Control.....8 Accessories ................14 Caring for your Smart Control..........15 Cleaning your Smart Control ..........16... -
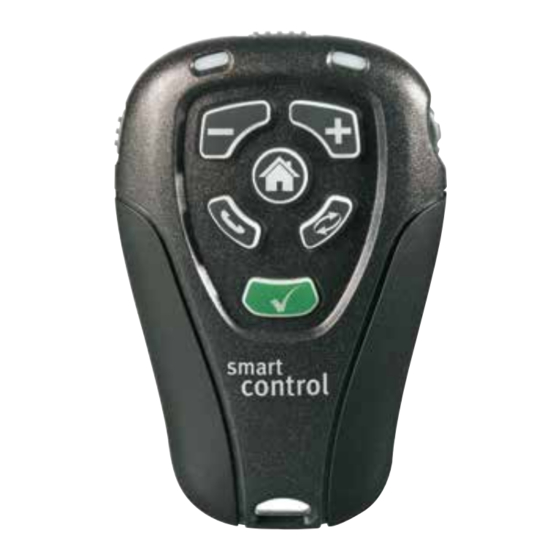
Page 8: Your Smart Control At A Glance
Your Smart Control at a glance 1 On-off switch - turn your remote control on or off and also lock it to avoid sending unintentional commands 2 Left-both-right switch - allows you to select the hearing aid you want to adjust... -
Page 10: Turning Your Smart Control On And Off
Turning your Smart Control on and off Your Smart Control has an On-Off (or travel lock) switch on the left side of the remote. To turn the remote control on, slide the switch into the On or unlocked position To turn the remote control off, slide the switch into the Off or locked position . -
Page 11: Replacing The Battery
Replacing the battery The battery compartment is located on the back of the Smart Control. 1. Slide the battery cover in the direction of the arrow. 2. Grasp the old battery with your thumb and index finger and remove. 3. Insert the new battery into the battery compartment in the correct +/- position, placing the battery’s minus (-) end into the... - Page 12 Smart Control is warning you that the battery in your remote is low. You will see the warning every time you turn on your Smart Control or send a command to your hearing aids until you change the battery or the battery dies.
-
Page 13: Operating Instructions
Operating instructions Before using your Smart Control, turn on your hearing aids to ensure they are able to receive the Smart Control commands. Smart Control is designed to be used comfortably in your hand at a maximum distance of one arm’s length. You do not have to point the remote at your hearing aids. -
Page 14: Adjusting Your Hearing Aids With Smart Control
Adjusting your hearing aids with Smart Control Your Smart Control provides backlighting when it is first turned on and each time a button is pressed, allowing you to see the remote buttons in dimly lit environments. - Page 15 Volume control buttons To increase the volume on your hearing aids, press the + button on your Smart Control. To decrease the volume on your hearing aids, press the – button on your Smart Control. As the volume is adjusted, your hearing aids...
- Page 16 may beep. Please refer to your hearing aid guide for more information on your hearing aids’ volume beeps. Note: Your hearing healthcare professional may configure the scroll wheel as your volume control and your +/– buttons as your comfort- clarity control. Telephone (or program) button To switch to the telephone program, press the T T e e l l e e p p h h o o n n e e button.
- Page 17 Telephone button with Binaural Phone (Binaural Phone exclusive to wireless styles of Quantum 20 and 12, Moxi 20 and 12 as well as Passport and Latitude 16 hearing aids) To switch to the Binaural Phone program, press the T T e e l l e e p p h h o o n n e e button once.
- Page 18 When you press the L L e e a a r r n n N N o o w w button, Smart Control sends a command to your hearing aids to learn your current settings more quickly.
- Page 19 Note: The LearnNow button on your Smart Control may be deactivated by your hearing healthcare professional and, therefore, could be inactive. Note: On Passport and Yuu the LearnNow button will only work when your hearing aids are set to the automatic program. Home button The H H o o m m e e button returns both of your hearing aids to their start-up program,...
-
Page 20: Accessories
Accessories Your Smart Control can be used with a lanyard so that you can carry the remote around your neck or wrist. Attach the lanyard to the remote, as illustrated below. -
Page 21: Caring For Your Smart Control
Open the battery compartment and remove the battery if the remote control will not be used for long periods of time. Do not use your Smart Control in the bath or shower or immerse it in water. If your remote control does become wet, do not attempt to dry it in an oven or microwave. -
Page 22: Cleaning Your Smart Control
Cleaning your Smart Control Do not use alcohol to clean your remote control. Use a damp cloth to clean the outside of the remote. -
Page 23: Troubleshooting Guide
Troubleshooting guide Refer to the troubleshooting table below if you are having problems with your Smart Control. For problems with your hearing aids, please consult your hearing aid guide. Cause Possible remedy Indicator lights not flashing Not turned on Turn on... -
Page 24: Warnings
Warnings Smart Control should only be used as directed by your hearing healthcare professional. Smart Control uses a low-power, digitally coded inductive transmission to communicate to your hearing aids. Although unlikely, interference with medical devices such as pacemakers is possible. Interference should not occur... - Page 25 Store your Smart Control in a safe location for CT and MRI scans or for other electromagnetic procedures. Changes or modifications made to the Smart Control not expressly approved by Unitron Hearing may void the user’s authority to operate the equipment.
- Page 26 Your Smart Control and your hearing aids are given a unique communication code. Because of this code, your Smart Control will not affect hearing aids worn by others. Your Smart Control uses the most modern components to provide an extremely reliable experience with virtually no interference from other devices.
- Page 27 Labeling The serial number and year of manufacture are located inside the battery compartment. Please fill out the contact information sticker provided with your new Smart Control which is located inside the battery compartment.
-
Page 28: Aperçu De Votre Télécommande Smart Control
Aperçu de votre télécommande Smart Control 1 Interrupteur marche/arrêt : vous permet de mettre en marche et d’arrêter votre télécommande, ainsi que de la verrouiller pour éviter d’envoyer accidentellement des commandes 2 Interrupteur gauche/bilatéral/droit : vous permet de sélectionner l’instrument auditif que vous voulez régler... - Page 29 9 Bouton de changement de programme : permet de faire passer vos instruments auditifs au prochain programme d’écoute 10 Bouton LearnNow : permet à vos instruments auditifs d’enregistrer vos réglages préférés pour différents programmes d’écoute 11 Compartiment à pile : vous permet d’avoir accès à la pile pour la remplacer...
-
Page 30: Mise En Marche Et Arrêt De Votre Télécommande Smart Control
Mise en marche et arrêt de votre télécommande Smart Control Votre télécommande Smart Control est dôtée d’un interrupteur marche/arrêt (ou de verrouillage de voyage) sur le côté gauche. Pour mettre la télécommande en marche, faites glisser l’interrupteur vers la position Marche ou la position de déverrouillage... - Page 31 Arrêt Marche...
-
Page 32: Remplacement De La Pile
Remplacement de la pile Le compartiment à pile est situé à l’arrière de la télécommande Smart Control. 1. Faites glisser le couvercle du compartiment à pile dans le sens de la flèche. 2. Attrapez la pile usagée à l’aide de votre pouce et de votre index puis retirez-la. - Page 33 Lorsque vous voyez les voyants gauche et droit clignoter alternativement du bleu au rouge pendant deux secondes, votre télécommande Smart Control vous avertit que sa pile est presque épuisée. Vous verrez cet avertissement chaque fois que vous mettrez votre télécommande Smart Control en marche ou lorsqu’un signal est envoyé...
-
Page 34: Instructions D'utilisation
Smart Control. La télécommande Smart Control a été conçue pour tenir de façon confortable dans votre main et être utilisée à une distance maximale équivalente à la longueur d’un bras. Il n’est pas nécessaire de pointer la télécommande... - Page 35 Faites glisser l’interrupteur vers la position gauche pour régler uniquement votre instrument auditif gauche. Le voyant gauche (bleu) clignotera pour indiquer que vous êtes en train de régler votre instrument auditif gauche. Faites glisser l’interrupteur vers la position droit pour régler uniquement votre instrument auditif droit.
-
Page 36: Réglage De Vos Instruments Auditifs Avec La Télécommande Smart Control
Réglage de vos instruments auditifs avec la télécommande Smart Control Votre télécommande Smart Control est rétroéclairée lorsqu’elle est mise en marche pour la première fois, puis chaque fois qu’un bouton est utilisé. Cela vous permet de voir les boutons de la télécommande dans les environnements peu éclairés. - Page 37 Boutons de commande de volume Pour augmenter le volume de vos instruments auditifs, appuyez sur le bouton + + de votre télécommande Smart Control. Pour diminuer le volume de vos instruments auditifs, appuyez sur le bouton – – de votre...
- Page 38 Lors du réglage du volume, vos instruments auditifs peuvent émettre un bip. Veuillez consulter le manuel de vos instruments auditifs pour obtenir plus de renseignements sur les bips de volume. Remarque : votre audioprothésiste peut configurer la molette comme une commande de volume et vos boutons +/–...
- Page 39 Pour quitter le programme téléphonique, appuyez sur le bouton d’a a c c c c u u e e i i l l . Bouton téléphone avec programme téléphonique binaural (le programme téléphonique binaural est exclusif aux modèles d’instruments auditifs sans fil Quantum 20 et 12, Moxi 20 et 12, ainsi qu’aux les instruments auditifs Passport et Latitude 16)
- Page 40 Lorsque vous appuyez sur le bouton L L e e a a r r n n N N o o w w , la télécommande Smart Control envoie une commande à vos instruments auditifs leur intimant d’enregistrer plus...
- Page 41 émettront un bip si la commande a bien été reçue. Remarque : le bouton LearnNow de votre télécommande Smart Control peut avoir été désactivé par votre audioprothésiste et, en conséquence, être inactif. Remarque : sur les modèles Passport et Yuu, le bouton LearnNow ne fonctionne que lorsque vos instruments auditifs sont réglés sur le...
- Page 42 Bouton d’accueil Le bouton d’a a c c c c u u e e i i l l fait passer vos deux instruments auditifs à leur programme de démarrage, comme lors de leur mise en marche initiale. Ce bouton peut être utile lorsque vous souhaitez rétablir le programme de démarrage et les réglages de volume et de confort/clarté...
-
Page 43: Accessoires
Accessoires Votre télécommande Smart Control peut être utilisée avec un cordon de manière à pouvoir la porter autour de votre cou ou de votre poignet. Attachez le cordon à la télécommande, comme le montre l’illustration ci-dessous. -
Page 44: Entretien De Votre Télécommande Smart Control
Entretien de votre télécommande Smart Control Ouvrez le compartiment à pile et retirez la pile si vous ne pensez pas utiliser la télécommande pendant une longue période. N’utilisez pas votre télécommande Smart Control dans le bain ou sous la douche et ne l’immergez pas dans l’eau. -
Page 45: Nettoyage De Votre Télécommande Smart Control
Nettoyage de votre télécommande Smart Control N’utilisez pas d’alcool pour nettoyer votre télécommande. Utilisez un chiffon humide pour nettoyer l’extérieur de la télécommande. -
Page 46: Guide De Dépannage
(+) vers le haut Les voyants clignotent rapidement Pile faible Remplacer la pile Les instruments auditifs ne répondent pas aux commandes de la télécommande Smart Control Rapprocher la La télécommande télécommande vers vous se situe trop loin Éloigner la télécommande à... - Page 47 Pour tout problème ne figurant pas dans ce guide, communiquez avec votre audioprothésiste. Si vous êtes à la recherche d’un audioprothésiste, veuillez communiquer avec l’agence la plus proche, dont les coordonnées figurent au dos de ce livret.
-
Page 48: Avertissements
Avertissements La télécommande Smart Control doit être utilisée conformément aux instructions de votre audioprothésiste. La télécommande Smart Control utilise une transmission inductive numérisée à faible puissance pour communiquer avec vos instruments auditifs. Bien qu’improbables, des interférences avec des appareils médicaux, comme des stimulateurs cardiaques, sont possibles. - Page 49 La télécommande Smart Control ne doit pas être utilisée dans des zones présentant un danger d’explosion. N’utilisez pas la télécommande Smart Control dans les endroits où l’utilisation d’appareils électroniques est interdite, comme les avions. Rangez votre télécommande Smart Control dans un endroit sûr lors de tomodensitogrammes, d’examens par IRM...
- Page 50 Ne mettez jamais votre télécommande ou les piles dans votre bouche. Si une pile est ingérée, appelez immédiatement un médecin. Précautions Si votre télécommande Smart Control ne fonctionne pas une fois la pile neuve correctement installée, communiquez avec votre audioprothésiste. Apportez toujours votre télécommande Smart Control ainsi...
- Page 51 Votre télécommande Smart Control utilise les composants les plus modernes pour vous offrir une expérience extrêmement fiable et une absence quasi-totale d’interférences avec d’autres appareils. Toutefois, lorsque vous utilisez la télécommande Smart Control près d’un ordinateur, d’un appareil de communication, comme un téléphone cellulaire numérique, ou d’un autre champ...
- Page 52 Identification Le numéro de série et l’année de fabrication sont indiqués à l’intérieur du compartiment à pile. Veuillez indiquer vos coordonnées sur l’autocollant fourni avec votre nouvelle télécommande Smart Control et situé à l’intérieur du compartiment à pile.
-
Page 53: Declaration Of Conformity
Declaration of conformity Hereby, Unitron Hearing declares that Smart Control is in compliance with the essential requirements and other relevant provisions of Directive 93/42/EEC. To obtain a copy of the Declaration of Conformity, please contact your local representative from the list of Unitron Hearing Distributors. - Page 54 Guidance and manufacturer’s declaration - electromagnetic emissions The Model Smart Control is intended for use in the electromagnetic environment specified below. The customer or the user of the Model Smart Control should assure that it is used in such an environment.
- Page 55 Guidance and manufacturer’s declaration – electromagnetic immunity The Model Smart Control is intended for use in the electromagnetic environment specified below. The customer or the user of the Model Smart Control should assure that it is used in such an environment.
- Page 56 If the measured field strength in the location in which the Model Smart Control is used exceeds the applicable RF compliance level above, the Model Smart Control should be observed to verify normal operation. If abnormal performance is observed, additional measures may be necessary, such as re-orienting or relocating the Model Smart Control.
- Page 57 Recommended separation distances between portable and mobile RF communications equipment and the Model Smart Control The Model Smart Control is intended for use in an electromagnetic environment in which radiated RF Disturbances are controlled. The customer or the user of the...
- Page 58 Unitron distributors/Distributeurs Unitron Corporate office/International 20 Beasley Drive, P.O. Box 9017, Kitchener, ON N2G 4X1 Canada Australia/Australie France Spain/Espagne Level 2, Norwest Quay, 5 bis, rue Maryse Avenida de la 21 Solent Circuit, Bastié - BP 15 69671 Industria nº13/15, Baulkham Hills, NSW, Bron Cedex Polígono de...
- Page 59 Distributor/Distributeur www.unitron.com/ca K/10-047 029-5645...
Need help?
Do you have a question about the Smart Control and is the answer not in the manual?
Questions and answers