Table of Contents
Advertisement
Advertisement
Table of Contents

Related Manuals for Unitron Unitron remote control


Summary of Contents for Unitron Unitron remote control
- Page 1 Unitron remote control guide...
-
Page 2: Thank You
Thank you Thank you for choosing a Unitron remote control for your Unitron hearing aids. At Unitron, we care deeply about people with hearing loss. We work closely with hearing healthcare professionals to make advanced, purpose-driven solutions available to everyone. -
Page 3: Your Remote Control
Your remote control _____________ Hearing healthcare professional: ____________________________________ Telephone: __________________________________ Serial number: _______________________________ Replacement batteries: One AAA (1.5 Volt), standard or rechargeable Warranty: ___________________________________ Date of purchase: _____________________________ Changing batteries Battery size Low battery warning Light indicator changes to yellow... -
Page 4: Quick Reference
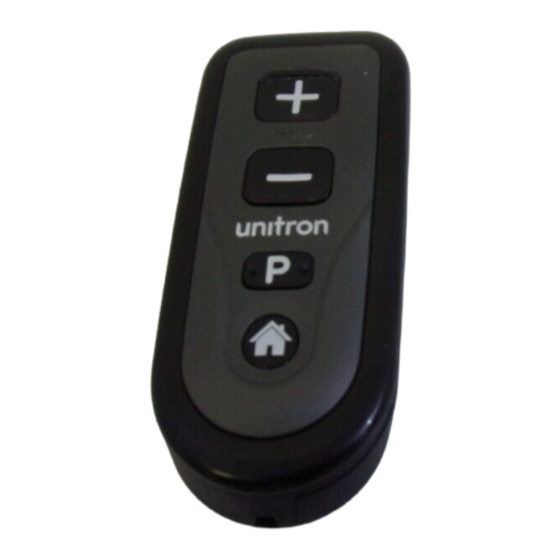
Quick reference 1 On/off switch 2 Indicator light 3 +/– buttons 4 Program change button 5 Home button 6 Battery compartment On/Off... -
Page 5: Table Of Contents
Table of contents Your remote control at a glance ............2 Turning your remote control on and off ...........4 Replacing the battery ...............5 Operating instructions ..............7 Adjusting your hearing aids with your remote control ....9 Caring for your remote control ............13 Cleaning your remote control ............14 Troubleshooting guide .............. -
Page 6: Your Remote Control At A Glance
Your remote control at a glance On-off switch - turn your remote control on or off and lock it to avoid sending unintentional commands Indicator light - will light up when you turn on the remote control or press any button green light = battery OK yellow light = low battery +/- buttons... -
Page 8: Turning Your Remote Control On And Off
Turning your remote control on and off Your remote control has an On-Off switch located on the left side of the remote. • To turn the remote control on, slide the switch to the On or unlocked position, revealing a white dot. -
Page 9: Replacing The Battery
Replacing the battery The battery compartment is located on the back of the remote control. 1. Slide the battery cover in the direction of the arrow. 2. Grasp the old battery with your thumb and index finger and remove. 3. Insert the new battery into the battery compartment in the... -
Page 10: Low Battery Warning
Low battery warning When the indicator light shines yellow instead of green, your remote control is warning you that the battery in your remote is low. You will see the warning every time you turn on your remote control or send a command to your hearing aids until you change the battery or the battery dies. -
Page 11: Operating Instructions
Operating instructions Before using your remote control, turn on your hearing aids to ensure they are able to receive the remote control commands. Your remote control is designed to be used comfortably in your hand at a maximum distance of one arm’s length. You do not have to point the remote at your hearing aids. - Page 12 Interference with medical devices: This remote control uses low-power, digitally coded transmission to communicate to your hearing system. Although unlikely, interference with medical devices such as pacemakers is possible. Therefore pacemaker users must not keep this remote control in or near a breast pocket.
-
Page 13: Adjusting Your Hearing Aids With Your Remote Control
Adjusting your hearing aids with your remote control +/- buttons as comfort-clarity control The comfort-clarity control allows you to manage the levels of speech and background noise in your hearing aids and provides an additional fine tuning adjustment beyond a traditional volume control. - Page 14 +/- buttons as volume control Press + to increase the volume. Press – to decrease the volume. As the volume is adjusted, your hearing aids may beep. Please refer to your hearing aid guide for more information on your hearing aid volume beeps.
- Page 15 Program change button Press the program change button to change to the next listening program in your hearing aids. Please refer to your hearing aid guide to determine which programs are available to you and your program beep notifications. Home button Press the Home button to return your hearing aids and settings to their start-up program and the settings.
- Page 16 Accessories Your remote control can be used with a lanyard so that you can carry the remote around your neck. It can also be attached to a keychain. Attach the lanyard or keychain to the device, as illustrated below. Your remote control can also be carried in its pouch and attached to items like your belt or handbag.
-
Page 17: Caring For Your Remote Control
Caring for your remote control Open the battery compartment and remove the battery if the remote control will not be used for long periods of time. Do not use your remote control in the bath or shower or immerse it in water. If your remote control does become wet, do not attempt to dry it in an oven or microwave. -
Page 18: Cleaning Your Remote Control
Cleaning your remote control Do not use alcohol to clean your remote control. Use a damp cloth to clean the outside of the remote. -
Page 19: Troubleshooting Guide
Troubleshooting guide You can refer to the troubleshooting table below if you are experiencing problems with your remote control. For problems with your hearing aids, please consult your hearing aid guide. Cause Possible remedy Indicator light not working Not turned on Turn on Low/dead battery Replace battery... - Page 20 Cause Possible remedy Hearing aids not responding to remote control commands Holding the remote Move the remote control control too far away closer to you Holding the remote Move the remote control to control too close a maximum distance of one arm’s length For any problems not listed in the guide, contact your hearing healthcare professional.
-
Page 21: Warnings
CT and MRI scans or for other electromagnetic procedures. Changes or modifications made to the remote control not expressly approved by Unitron Hearing may void the user’s authority to operate the equipment. Battery warnings Never leave your remote control or batteries where small children and pets can reach them. - Page 22 Never put your remote control or batteries in your mouth. If a battery is swallowed, call a physician immediately. Precautions If your remote control fails to operate after you have correctly inserted a new battery, contact your hearing healthcare professional. Always bring both your remote control and your hearing aids for service questions.
- Page 23 inches (60 centimeters) away to ensure proper operation. If your hearing aids do not respond to the remote control because of an unusual field disturbance, move away from the disturbing field.
- Page 24 Labeling The serial number and year of manufacture are located inside the battery compartment. Please fill out the contact information sticker provided with your new remote control and affix it to the inside of the battery door.
-
Page 25: Declaration Of Conformity
Declaration of conformity Hereby, Unitron Hearing declares that this device meets the requirements of the Medical Device Directive 93/42/EEC & the Radio and Telecommunications Terminal Equipment Directive 1999/5/EC. The full text of the Declaration of Conformity can be obtained from the addresses below. - Page 26 2) this device must accept any interference received, including interference that may cause undesired operation. Changes or modifications made to this device not expressly approved by Unitron Hearing may void the FCC authorization to operate this device. Australia: N15398 New Zealand:...
- Page 27 With the CE symbol, Unitron confirms that this Unitron product, including accessories, XXXX meets the requirements of the Medical Devices Directive 93/42/EEC as well as the R&TTE Directive 1999/5/EC on radio and telecommunications transmitters. The numbers after the CE symbol correspond...
- Page 28 Australian EMC and Radiocommunications compliance label in Australia. This device is designed such that it functions Operating conditions without problems or restrictions if used as intended, unless otherwise noted in these user guides. -10° – 55° Celsius and relative humidity of <95% (non condensing). During transport or storage, the temperature Transport and storage...
- Page 29 The symbol with the crossed-out garbage bin is to make you aware that this device may not be thrown away as normal household waste. Please dispose of old or unused device at waste disposal sites intended for electronic waste, or give your device to your hearing care professional for disposal.
- Page 31 U.S.A. Denmark 14755 27th Avenue Østre Hougvej 42-44 Russia North, Plymouth, MN Tverskaya str. 12, 5500 Middelfart 55447 bldg. 9, 1th floor, office 98 125009 Moscow Unitron Hearing Ltd. 20 Beasley Drive, P.O. Box 9017, Kitchener, ON N2G 4X1 Canada...
- Page 32 Distributor www.unitron.com 11-021 029-5887-02...
Need help?
Do you have a question about the Unitron remote control and is the answer not in the manual?
Questions and answers