Table of Contents
Advertisement
Advertisement
Table of Contents

Related Manuals for Robe Color Spot 1200 AT


Summary of Contents for Robe Color Spot 1200 AT
-
Page 2: Table Of Contents
Colorspot 1200 AT Table of contents 1. Safety instructions ......................3 2.Operating determinations ....................4 3. Description of the fixture ....................5 4. Installation ........................7 4.1 Connection to the mains .................... 7 4.2 Changing the power supply settings - magnetic ballast ..........7 4.3 Fitting the lamp ...................... -
Page 3: Safety Instructions
CAUTION! Keep this device away from rain and moisture! Unplug mains lead before opening the housing! FOR YOUR OWN SAFETY, PLEASE READ THIS USER MANUAL CAREFULLY BEFORE YOU INITIAL START - UP! 1. Safety instructions Every person involved with installation and maintenance of this device have to: - be qualilfied - follow the instructions of this manual CAUTION! -
Page 4: Operating Determinations
2.Operating determinations This device is a moving-head spot for creating decorative effects and was designed for indoor use only. If the device has been exposed to drastic temperature fluctuation (e.g. after transportation), do not switch it on immediately. The arising condensation water might damage your device. Leave the device switched off until it has reached room temperature. -
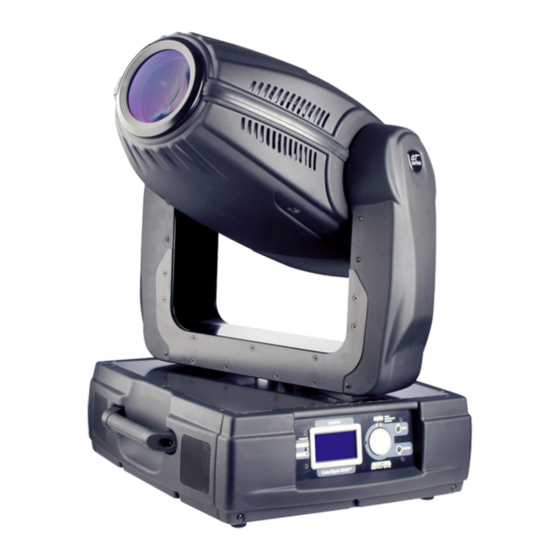
Page 5: Description Of The Fixture
3. Description of the fixture 1 - Yoke 2 - Front panel 3 - Moving head 4 - Tilt lock button (red) 5 - Tilt unlock button (green) 6 - Pan lock/unlock lever 7 - Handle 8 - Base The head can be locked for transportation- the tilt lock button (4) is pushed and the pan lock/unlock lever (6) is in lock position.To unlock the head,press the tilt unlock button (5) and move the pan lock/unlock lever (6) to unlock position. - Page 6 Head inside-top side 1 - Gobo wheel 2 2 - Colour wheel 3 - CMY/conver.filter module 4 - Objective 5 - Effect wheel 6 - Gobo wheel 1 7 - Lamp chamber Head inside-bottom side 8 - Frost lamellas 9 - Iris 10 - Termostat 11 - Zoom/Focus module 12 - Igniter...
-
Page 7: Installation
4. Installation 4.1 Connection to the mains Verify the power supply settings before applying power! The factory settings are printed next to the power switch.If you wish to change the power supply settings,see the next chapter. Installl a 3-prong grounding-type plug on the power cable (only for US version 208V AC/60Hz).The earth has to be connected! If you have any doubts about proper installation,consult a qualified electrician. -
Page 8: Fitting The Lamp
4.3 Fitting the lamp DANGER ! Install the lamps with the device switched off only. Unplug from mains before ! To insert the lamp (MSR 1200 AT SA): 1.Disconnect the fixture from power and allow it to cool. 2.Loosen the 2 quarter-turn fasteners marked "X, Y," on the lamp cover at the back of the head. 3.Gently pull the lamp cover with lamp holder out of the head. -
Page 9: Lamp Adjustment
4.4 Lamp adjustment 3 adjustment screws "A,B,C" The lamp holder is aligned at the factory. Due to differences between lamps, fine adjustment may improve light performance: 1.Switch on the fixture and after reset turn on the lamp. 2.Cancel all effects, open the shutter and focus the light on a flat surface (wall) using either DMX controller or function "Lamp adjustment"... - Page 10 CAUTION! The gobo holder with the magnet must be placed in the same gobo position as it was placed before gobo replacement! Colour-wheel: 1.Gently bend out the colour module to release it from the fixative holes and eject it from the pressing snap. 2.Put the new colour module back under the pressing snap and push it to the 3 fixative notches.
-
Page 11: Rigging The Fixture
4.6 Rigging the fixture DANGER TO LIFE! Please consider the respective national norms during the installation! The installation must only be carried out by an authorized dealer! The installation of the fixture has to be built and constructed in a way that it can hold 10 times the weight for 1 hour without any harming deformation. - Page 12 For overhead use, always install a safety-rope that can hold at least 10 times the weight of the fixture. You must only use safety ropes with screw-on carabines. Pull the safety rope through the two apertures on the bottom of the base and over the trussing system etc.
-
Page 13: Dmx-512 Connection/Connection Between Fixtures
4.7 DMX-512 connection/connection between fixtures The fixture is equipped with both 3-pin and 5-pin XLR sockets for DMX input and output.The sockets are wired in parallel. Only use a shielded twisted-pair cable designed for RS-485 and 3-pin or 5-pin XLR-plugs and connectors in order to connect the controller with the fixture or one fixture with another. -
Page 14: Ethernet Connection
4.8 Ethernet connection The fixtures on a data link are connected to the Ethernet with Art-Net communication protocol.The controlling software from PC (or lighting console) has to supported Art-Net protocol. Art-Net communication protocol is a 10 Base T Ethernet protocol based on the TCP/IP.Its purpose is to allow transfer of large amounts of DMX 512 data over a wide area using standard network technology. -
Page 15: Dmx Protocol
Colorspot 1200 AT- DMX protocol-Version 1.5 Mode 1 Mode 2 Value Function Type of control channel channel 0-255 Pan movement by 530° proportional Pan Fine 0-255 Fine control of pan movement proportional Tilt 0-255 Tilt movement by 280° proportional Tilt fine 0-255 Fine control of tilt movement proportional... - Page 16 Mode 1 Mode 2 Value Function Type of control channel channel UV filter proportional 128 129 White proportional 130-139 Deep red step 140-149 Deep blue step 150-159 Green step 160-169 Orange step 170-179 6000 K temperature filter step 180-189 UV filter step 190-215 Forwards rainbow effect from fast to slow proportional...
- Page 17 Mode 1 Mode 2 Value Function Type of control channel channel 108-111 Macro 27 step 112-115 Macro 28 step 116-119 Macro 29 step 120-123 Macro 30 step 124-127 Macro 31 step 128-131 Macro 32 step 132-135 Macro 33 step 136-139 Macro 34 step 140-143 Macro 35 step...
- Page 18 Mode 1 Mode 2 Value Function Type of control channel channel Rotation - set rotation on channel(s) 14 (18,19) 34-37 Gobo 1-Rainbow Chips (15030012) step 38-41 Gobo 2-Sun Man (15030013) step 42-45 Gobo 3-Water Drops(15030014) step 46-49 Gobo 4-Triangle Spiral (15020123) step 50-53 Gobo 5-Eccentric Rayes (15020124)
- Page 19 Mode 1 Mode 2 Value Function Type of control channel channel 46-49 Gobo 4-Bubbles 1 (15020128) step 50-53 Gobo 5-Dots in Circle (15020129) step 54-57 Gobo 6-Radial Dashes (15020130) step Shaking gobos from slow to fast Index - set indexing on channel(s) 16 (21,22) 58-69 Gobo 1-Glass Ring (15040020) proportional...
- Page 20 Mode 1 Mode 2 Value Function Type of control channel channel 196-199 Macro 5 step 200-203 Macro 6 step 204-207 Macro 7 step 208-211 Macro 8 step 212-215 Macro 9 step 216-219 Macro 10 step 220-223 Macro 11 step 224-227 Macro 12 step 228-231 Macro 13 step...
- Page 21 Mode 1 Mode 2 Value Function Type of control channel channel 32-63 No function (Shutter open) step 64-95 Strobe-effect from slow to fast proportional 96-127 No function (Shutter open) step 128-143 Opening pulse in sequences from slow to fast proportional 144-159 Closing pulse in sequences from fast to slow proportional 160-191 No function (Shutter open)
-
Page 22: Controller Mode
6. Controller mode The fixtures are individually addressed on a data link and connected to the controller.The fixtures respond to the DMX signal from the controller. 6.1 DMX addressing There are 512 available channels on DMX link.Every fixture on DMX link must have a DMX start address, which is defined as the first channel from which the fixture will respond to the controller. - Page 23 Iris Motorized adjustable iris,wide range of variable pulse effects. Frost Frost module provides variable frost for fine frosting. Focus-multistep zoom Motorized focus enables the beam to be focused anywhere on stage ,provided by the special multistep zoom with range 13°-42°. Dimmer/Shutter/Strobe Smooth 0 - 100 % dimming is provided by the combined mechanical dimmer/shutter unit.
-
Page 24: Control Menu Map
7.Control menu map Default settings=Bold print Fixture Address DMX Address Ethernet Settings Set Ethernet Mode Disable Ethernet Enable Ethernet Set IP Address Default IP Address Custom IP Address Set ArtNet Universe (0 -255) Fixture information Power On Time Total Hours Resetable Hours Lamp On Time Total Hours... - Page 25 Personality User Mode User A Settings User B Settings User C Settings DMX Presetting Mode 1 Ch.1 Pan Ch.24 Dimmer Set Active Mode 2 Ch.1 Pan Ch.32 Dimmer Fine Set Active Pan Reverse (On,Off) Tilt Reverse (On,Off) Lamp Presetting Lamp On/Power On (On,Off) Lamp Off via DMX (On,Off) Lamp On if DMX Present (On,Off) Lamp Off if not DMX (On,Off)
- Page 26 Manual Mode Presetted Effect Control Pan (Position 1,...,Position 6) Dimmer (Position 1,...,Position 5) Manual Effect Control Pan (0-255) Dimmer Fine (0-255) Stand- alone setting Music Trigger (On,Off) Presetting Playback Disabled Test Program Program 1 Program 2 Program 3 Playing Program Test Program In Loop Program 1 In Loop Program 2 In Loop...
-
Page 27: Control Menu
[RNS] encoder wheel-moves between menu items on the the same level, scrolls between values. [ESC] button-leaves menu without saving changes [ENTER] button-enters menu,confirms adjusted values and leaves menu After switching the fixture on,the display shows the initial screen: ROBE Show Lighting Press [ENTER],the display shows current address: DMX ADDRESS The main menu of the control panel is accessed by pressing [ENTER] button.To browse through the menu, rotate... - Page 28 1200 AT has been fabricated. Resetable Hours --- The function shows the number of the operation hours that the COLORSPOT 1200 AT has been powered on since the counter was last reset.In order to reset this counter to 0,press [ENTER] twice. Lamp On Time --- Select this submenu to read the number of the operation hours with the lamp on.
- Page 29 Fixture head (Top view) Board 3 Board 1 Fan 9 Fan 8 Board 2 Fan 7 Fan 5 Fan 6 Fan 3 Fan 4 Near Lamp Temp. Fan 2 Fan 1 Fixture base (Top view) IC3 MB Board Temp. IC4 MB IC2 MB Fan 11 IC1 MB...
-
Page 30: Personality
Display module (rear view) Display Memory Display processor 8.3 Personality Use this menu to to modify COLORSPOT 1200 AT operating behavior. User mode --- Colorspot 1200 AT allows you to recall up to 3 user settings.After switching the fixture on for the first time, the User A settings are active.All changes made in "Personality"... - Page 31 Special Functions Gobo 2 F. Indexing Pan/Tilt Macro Effect Wheel P./T. Macro Speed Effect Indexing Colour Wheel Effect F. Index. Cyan Frost Magenta Iris Yellow Zoom Conversion Filter Focus CMY Colour Macro Shutter/Strobe Effect Speed Dimmer Effect Spd Assig. Dimmer Fine Please refer to the chapter "DMX- protocol"...
-
Page 32: Lamp On/Off
Time mode --- Pan and tilt will move with different speeds and they will come at the same time to end point (pan and tilt sets its optimal speed). Speed Mode --- Pan and tilt will move with the same speed as adjusted by the channel 6 (Pan/Tilt speed).E.g. -
Page 33: Reset Functions
in a loop. Test Program In Loop --- The option starts built-in test program. Program 1 In Loop --- The option starts created program No. 1 Program 2 In Loop --- The option starts created program No. 2 Program 3 In Loop --- The option starts created program No. 3 Select the program you wish and press [ENTER].The selected program is paused.Press [ENTER] again and the program starts runnig.Button [ENTER] pauses program running. -
Page 34: Special Functions
Focus/Zoom/Frost --- This function resets focus,zoom and frost. Iris/Effect --- This function resets iris and effect wheel. 8.9 Special functions Use this menu for special services like adjusting lamp or adjusting effects. Lamp Adjustment --- This function can be used when you make the fine adjustment of the lamp.If you select this function,all effects will be canceled,shutter will be opened and the dimmer intensity will be set onto 100%.By using the options "PAn, Tilt, Zoom,Focus"... -
Page 35: Error And Information Messages
10. Error and information messages Occured errors during fixture operation are signaled by warning icon on the display: Press [ESC] to see the current error messages. Description of error messages: Active Lamp Timer This message appears: 1. If you try to switch on the lamp within 5 minutes after having switched it off (the lamp is too hot). The message will appear on the display if the lamp doesn't ignite within 28 seconds. - Page 36 Colour Wheel Error 1 (Colour Wheel Error 2 ) The messsages will appear after the reset of the colour wheel if this wheel is not located in the default position. Gobo 1 Wheel Error 1 (Gobo 1 Wheel Error 2 ) The messsages will appear after the reset of the gobo wheel 1 if this wheel is not located in the default position.
-
Page 37: Technical Specifications
11. Technical specifications Power supply: Magnetic ballast: Voltage:......208/230/250V AC, 50/60Hz ~ Main fuses: Live fuse:..T10A@230V Neutral fuse:..T10A@230V Electronic ballast: Voltage:......100/120/208/230/250V AC, 50/60Hz ~ Main fuses: Live fuse:..T10A@230V Neutral fuse:..T10A@230V Live fuse:..T20A@120V Neutral fuse:..T20A@120V Power consumption:....1600 VA Lamp: Philips MSR 1200 SA,base:GY22,colour temperature:5600 K,average lamp life:750 h Optical System: - High luminous-efficiency parabolic reflector - Focus lens and multistep zoom lenses system... - Page 38 Effect wheel - 3-facet prism, 5-facet prism and 2 glass effects rotating in both directions at different speeds. Prism outside diameter= 46.8 mm - Fine prism indexing and rotation - 16 Prism/gobo macros Strobe - Strobe effect with variable speed (1 - 10 flashes per second) - Preprogrammed macros with variable/random pulse effects Dimmer - Smooth micro-step driven dimming...
- Page 39 Temperatures -Maximum ambient temperature : 40° C -Maximum housing temperature : 135° C Minimum distances -Min.distance from flammable surfaces: 1.2m -Min.distance to lighted object: 2.5m Dimensions and weight -Weight (magnetic ballast: 51.5 kg -Weight (electronic ballast): 42 kg Accessories: Additional gobos....6 pieces Spring gobo-lock....1 piece Distance ring......1 piece Omega holders.....2 pieces...
- Page 40 Beam path Lamp: MSR 1200 SA...
-
Page 42: Maintenance And Cleaning
12. Maintenance and cleaning It is absolutely essential that the fixture is kept clean and that dust, dirt and smoke-fluid residues must not build up on or within the fixture. Otherwise, the fixture‘s light-output will be significantly reduced. Regular cleaning will not only ensure the maximum light-output, but will also allow the fixture to function reliably throughout its life.
Need help?
Do you have a question about the Color Spot 1200 AT and is the answer not in the manual?
Questions and answers