Table of Contents
Advertisement
Advertisement
Table of Contents

Related Manuals for AgaMatrix Presto


Summary of Contents for AgaMatrix Presto
- Page 1 OWNER’S GUIDE...
- Page 2 Key Feature in the AgaMatrix Presto® No Coding Required - The AgaMatrix Presto doesn’t require you to code your meter. Insert a test strip and you are ready to test. Toll Free, 24-Hour Customer Service: +1 (866) 906 4197 In case of emergency, contact your healthcare professional or emergency medical response.
-
Page 3: Table Of Contents
Setting Alarms Important Information About Your AgaMatrix Setting Meter Volume and Backlight Presto System Setting Time Format, Time, and Date About the AgaMatrix Presto System Setting Hypoglycemic and Hyperglycemic Meter Basics Warning Alarms Performing a Control Solution Test Error Messages and Troubleshooting... -
Page 4: Getting Started
Time, and Date.” [7] If you are experiencing symptoms that are not consistent with your blood glucose test and you have followed all instructions described in the AgaMatrix Presto Owner’s Guide, Important Health-related Information follow your healthcare professional’s recommendations. [8] Do not use test strips that are expired or appear to be Please Read the Following: damaged as they may return inaccurate results. - Page 5 Possible test sites: The AgaMatrix Presto System requires only 0.5 μL of blood to CAUTION: Please read all the instructions provided in this perform a glucose test. For the best results, test glucose from owner’s guide and practice the testing procedures before...
-
Page 6: About The Agamatrix Presto System
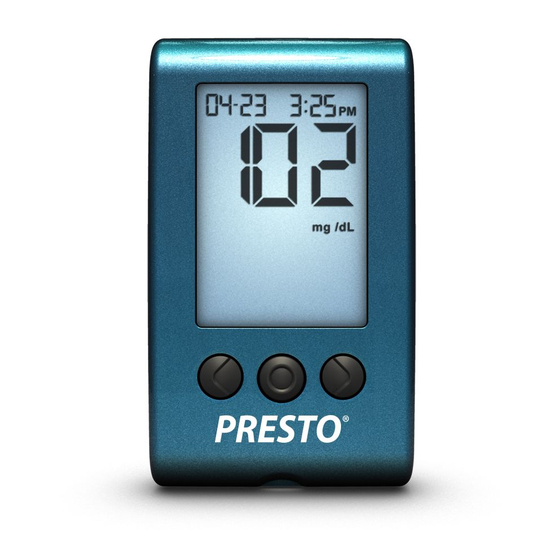
Important Test Strip Information: About the AgaMatrix Presto System [1] Store the AgaMatrix Presto Test Strip vial in a cool, dry About the AgaMatrix Presto Test Strip place at 46 °F to 86 °F (8 °C to 30 °C). With your AgaMatrix... - Page 7 (3) RIGHT Arrow Button: Use the RIGHT arrow button to scroll forward through options. (4) Test Strip Port: Insert the AgaMatrix Presto Test Strip, with the contact bars facing up, into the test strip port. (1) Date and Time: Appears here, including when the meter (5) LEFT Arrow Button: Use the LEFT arrow button to scroll is deactivated.
- Page 8 About the AgaMatrix Lancing System (8) Apply Sample to Test Strip: The test strip symbol and flashing droplet symbol will signal you to apply sample to the test strip. (1) Cocking Handle: Cocks the device so it is ready to lance.
-
Page 9: Meter Basics
[2] Press the RIGHT or LEFT arrow buttons to view the options: MEM (14, 30, and 90 Day Averages and Graphs), SET (meter Meter Basics settings), and AL1 to AL6 (reminder alarms 1 thru 6). METER SYSTEM CHECK Enter MEM (Memory) Mode to view 14, 30, and 90 Day Each time your meter is first activated, the Averages and Graphs: meter will perform a meter system check. -
Page 10: Performing A Control Solution Test
Performing a Control Solution Test your discard date. Write the discard date on the AgaMatrix Control Solution bottle. The AgaMatrix Presto system has 2 different levels of control solution: normal and high. Select the level of control solution you want to use. - Page 11 AgaMatrix Presto System to test turn blue. your blood glucose. Call customer service. Your meter will beep once indicating that you should remove the tip of the AgaMatrix Presto Test Strip from the control solution sample.
-
Page 12: How To Test Your Blood Glucose Level
How to test your blood glucose level: [5] Meter malfunction. [1] Preparing the AgaMatrix Lancing Device: Use the gray [6] Control solution test done outside the system operating cap for testing on a fingertip and the clear cap for testing on temperature of 50 °F to 104 °F (10 °C to 40 °C). -
Page 13: Testing On Your Palm Or Forearm
Be careful not to touch the exposed AgaMatrix Presto System is now ready for you to apply blood. needle on the lancet. You do not need to set a calibration code for this meter. Set the Lancing Level: The AgaMatrix Lanc- [3] Lancing: To ensure accurate results, wash hands with ing Device offers 8 depth settings. - Page 14 Bring Test Strip to Blood Sample: The meter now displays the [3] Do not scrape blood onto the AgaMatrix Presto Test Strip. blood drop and test strip symbols. This means your AgaMatrix Presto System is now ready for you to apply blood. Immediately [4] Do not apply blood to the top side of the AgaMatrix bring the AgaMatrix Presto Test Strip to the blood sample.
-
Page 15: Testing On Your Palm Or Forearm
Your test result is now stored in the Discard Properly: Discard the used AgaMatrix memory. Presto Test Strip and Lancet properly. WARNING: The lancing device and lancets should only be used by one person. Never share lancing devices or lancets. Used test... - Page 16 make sure there is no grease, oil or lotion on the test site. [4] Express Blood Drop: After lancing, hold the lancing device against your skin until a blood droplet forms. Do not squeeze directly around the lanced area. Make sure the blood Follow chapter 7, steps 1-2, to begin blood glucose testing.
-
Page 17: View 14, 30, And 90 Day Averages And Graphs
The display shows your 14 day numerical average. Press the RIGHT or mg /dL The AgaMatrix Presto Meter calculates the averages from the LEFT arrow buttons to view your 14 day last 14, 30 and 90 days, starting from the current time and date trend graph. -
Page 18: Time-Of-Day Averages And Individual Results
– 300 Past Glucose Test Results, with time and date – Breakfast, Lunch, Dinner and Bedtime Averages 14 day view 30 day view The AgaMatrix Presto Meter calculates averages of all the 90 day view test results during breakfast, lunch, dinner and bedtime. Days... -
Page 19: Display Messages
Press and release the CENTER button. The display retest with a new AgaMatrix Presto Test Strip. If you still get will show the most recent glucose test result with a Lo test result, follow the treatment plan recommended by the time and date. - Page 20 Flashing message, with double beep (if volume is enabled in SET retest with a new AgaMatrix Presto Test Strip. If you still get Options) a Hi glucose test result, follow your healthcare professional’s recommendations.
-
Page 21: Setting Alarms
Your selections will be highlighted by a When alarms are activated: blinking symbol. [1] If an alarm is set and the AgaMatrix Presto Meter is deacti- [4] Setting Alarm Times: You can now set the vated, the alarm will activate the meter. “AL1” thru “AL6” (de- alarm time. -
Page 22: Setting Meter Volume And Backlight
will not sound, regardless of the individual alarm setting. Also, if [4] Setting Backlight Option: You can enable or your meter is set to low volume mode, then an alarm set for high disable the backlight. The default setting for the volume will default to low volume mode. -
Page 23: Setting Hypoglycemic And Hyperglycemic Warning Alarms
Press the CENTER button to confirm your selection and move Setting Hypoglycemic and on to the hour setting. Hyperglycemic Warning Alarms Set the hour (flashing) with the RIGHT or LEFT arrow buttons. Press the CENTER button to confirm and continue on to set [1] Enter MENU Mode: When your meter is deactivated, press the minute. -
Page 24: Error Messages And Troubleshooting
On rare occasions, the meter will display an error [4] Setting Your Hyperglycemic Warning Alarm: message instead of a glucose result. The AgaMatrix Presto system is able to detect specific problems which may allow WARNING: Your healthcare professional should recommend you to determine the cause of the error without wasting what your hyperglycemic limit is. - Page 25 Error 5: Error 2: The meter was unable to produce a reliable result. The meter has detected an irregularity with the sample. [1] This may be caused by a non-blood sample, or a [1] The test strip may be partially filled; you should check the combination of high glucose and other medical conditions.
-
Page 26: Batteries
[1] CAUSE: Defective test strip. ACTION: Repeat the test with mental regulations. Your meter is an electronic device. When dis- a new AgaMatrix Presto Test Strip. If this does not work, call posing of your meter follow all local environmental regulations. -
Page 27: Caring For Your Meter And Lancing Device
battery door. Be careful not to misplace the battery door. Caring for Your Meter and Lancing Device [2] Remove and Install 1st Battery: To remove the used battery, use a non- When using your meter, avoid getting dirt, dust, blood, metallic tool at point A to control solution, water, or any other liquid into the test strip pop out the battery. -
Page 28: Meter Specifications
Memory: 300 blood glucose and control solution test results with date, time, and averaging (14, 30, 90 days and time-of-day) Meter Specifications Power Source: Two CR2032, 3 volt, lithium batteries, replaceable Assay Method: Dynamic Electrochemistry Automatic Shutoff : 3 minutes after last user action Maximum Altitude: 10,000 ft Size: Width 1.7”... -
Page 29: Warranty
Meter is covered for the period of ownership as long as it has not been modified, altered, or misused. Under this warranty AgaMatrix will replace, free of charge, Your meter if it is defec- tive in material or workmanship. No other warranties, express or implied, are made.
Need help?
Do you have a question about the Presto and is the answer not in the manual?
Questions and answers
do I have to periodically recalibrate my Presto glucose monitor
No, the AgaMatrix Presto glucose monitor does not require periodic recalibration. It is a no-code meter, meaning it does not need manual coding or recalibration when using new test strips.
This answer is automatically generated