Table of Contents
Advertisement
Advertisement
Table of Contents

Related Manuals for KitchenAid KHB3581


Summary of Contents for KitchenAid KHB3581
- Page 1 KHB3581 INSTRUCTIONS INSTRUCTIONS INSTRUCCIONES...
- Page 2 #1 goal. Remember to register your product online at www.kitchenaid.com or by mail using the attached Product Registration Card. Join us in the kitchen at www.proline.kitchenaid.com. Scan with your mobile device for recipes, tips, and more. USA: 1.800.832.7173 KitchenAid.com Canada: 1.800.807.6777...
-
Page 3: Table Of Contents
Blender, please fill out and mail your product registration card packed with the unit, or register on-line at www.kitchenaid.com. This card will enable us to contact you in the unlikely event of a product safety notification and assist us in complying with the provisions of the Consumer Product Safety Act. -
Page 4: Hand Blender Safety
Authorized Service Facility for examination, repair, or electrical or mechanical adjustment. 6. The use of attachments not recommended or sold by KitchenAid may cause fire, electric shock, or injury. 7. Do not let power cord on charger hang over edge of table or counter. Excess cord may be wrapped on the underside of the charger. -
Page 5: Electrical Requirements
Input : 110-120 V / 60 Hz / 18 W Output : 18 V / 660 mA Charger Adapter Model No.: W10533412 Disposing of KitchenAid Lithium-Ion (Li-Ion) battery packs Always dispose of your battery pack RBRC Battery Recycling according to federal, state, and local The RBRC™... -
Page 6: Parts And Features
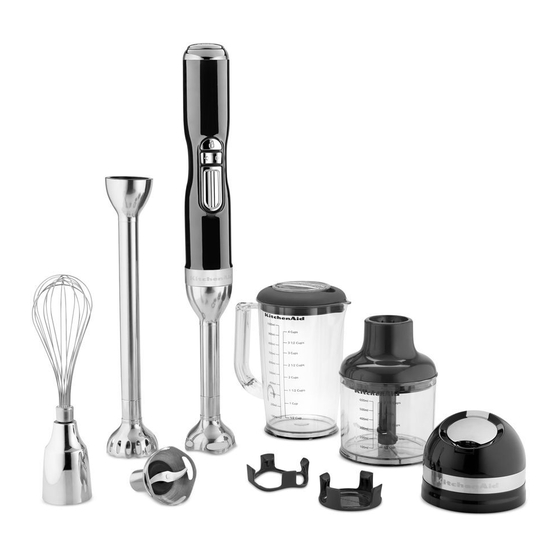
PARTS AND FEATURES Parts and accessories Battery location Back of motor body Front of Battery motor body release lever Unlock button LED display speed selection Speed control indicator buttons grip LED display Pulse button battery life indicator Battery Charger base 8"... - Page 7 PARTS AND FEATURES Parts and accessories gUARDS BELL BLADES Bell guard S-blade Pan guard Star blade 13" (33 cm) Frother/Beater Blending arm 4 C u p 3 1 /2 C 3 C u p 2 1 /2 C 2 C u p 1 1 /2 C 1 C u p 1 /2 C u...
-
Page 8: Attachment Guide
PARTS AND FEATURES Attachment guide Attachment Best used to S-Blade Blend, Crush, Puree Soups, Cooked vegetables, Sauces, Baby food, Smoothies, Milk shakes, Frosting, Crushed ice Star Blade Shred, Mince Cooked meats, Beef gravy, Minces Frother/Beater Froth, Mix Milk (for Latte, Cappuccino...), Cake batter, Pancake batter, Muffin batter Whisk Whip, Emulsify, Aerate... -
Page 9: Before First Use: Charging The Battery
ASSEMBLINg THE HAND BLENDER Before first use: charging the battery Plug in the charger. Push the lid release button to open the lid. Slide the battery into the charger, The LED indicator will begin to flash aligning the flat side of the battery to the slowly as it charges. -
Page 10: Assembling The Blending Arm
ASSEMBLINg THE HAND BLENDER Assembling the blending arm IMPORTANT: Always wait to insert battery into Hand Blender until accessories are attached. After using, always remove battery before disassembling Hand Blender. Insert blending arm into desired bell Remove the bell guard from the blade. blade (see “Attachment guide”). -
Page 11: Assembling The Chopper Attachment
ASSEMBLINg THE HAND BLENDER Assembling the chopper attachment IMPORTANT: Always wait to insert battery into Hand Blender until accessories are attached. After using, always remove battery before disassembling Hand Blender. Add small food items to be chopped to Insert the chopper blade into the the bowl. -
Page 12: Operating The Hand Blender
OPERATINg THE HAND BLENDER Using the LED display panel IMPORTANT: The unlock button must be pressed before the Hand Blender will operate. Battery life indicator LED display Unlock button When operating the controls on the The bottom bar on the LED display Hand Blender, always make sure the panel is the battery life indicator. -
Page 13: Using The Blending Arm
OPERATINg THE HAND BLENDER Using the blending arm The blending arm is ideal to use for blending, crushing, or puréeing. It is best used for soups, cooked vegetables, sauces, baby food, smoothies, milk shakes, frosting, or crushed ice. IMPORTANT: Always wait to insert battery into Hand Blender until accessories are Slide the charged battery into the top attached. -
Page 14: Using The Whisk Attachment
OPERATINg THE HAND BLENDER Using the whisk attachment Use the whisk to whip cream, beat egg whites, mix instant puddings, vinaigrettes, mousse, or for making mayonnaise. IMPORTANT: Always wait to insert battery into Hand Blender until accessories are attached. After using, always remove battery before disassembling Hand Blender. Unlock button Slide the charged battery into the top... -
Page 15: Using The Chopper Attachment
OPERATINg THE HAND BLENDER Using the chopper attachment Use the chopper attachment to chop small amounts of food such as cooked meat, cheese, vegetables, herbs, crackers, bread, and nuts. IMPORTANT: Always wait to insert battery into Hand Blender until accessories are attached. After using, always remove battery before disassembling Hand Blender. -
Page 16: Chopper Processing Guide
• The stainless steel whisk may scratch or battery is already fully charged, and the mark non-stick coatings; avoid using the unit fails to operate, contact KitchenAid. whisk in non-stick cookware. • When blending in a saucepan on a • To avoid splattering, use the whisk cooktop, remove the pan from the attachment in deep containers or pans. -
Page 17: Techniques For Better Blending And Crushing
TIPS FOR gREAT RESULTS Techniques for better blending and crushing Wrist Drawing up movement For better blending: Rest the Hand Blender on the bottom of the container momentarily, then hold at an angle and using a light circular motion, slowly draw it upwards against the side of the Do not pound down on the mixture with the Hand Blender. -
Page 18: Care And Cleaning
CARE AND CLEANINg Cleaning the Hand Blender NOTE: Always remove the battery from the Hand Blender if it is left unattended and before assembling, disassembling or cleaning. Remove the adapters and attachments. Do not immerse the motor body or the adapters in water. -
Page 19: Service And Warranty
50 United States, the District of Columbia, Puerto Rico, and Canada This warranty extends to the purchaser and any succeeding owner for KitchenAid Pro-Line products operated in the 50 United States, the District of Columbia, Puerto Rico, and Canada. - Page 20 Outside the United States and Puerto Rico: Consult your local KitchenAid dealer or the store where you purchased your Pro-Line product for information on how to obtain service. ®/™ © 2013 KitchenAid. All rights reserved. Used under license in Canada.
Need help?
Do you have a question about the KHB3581 and is the answer not in the manual?
Questions and answers
I have the set but not the charger for the lithium battery 12 volt where can I buy it