JVC RV-DP100BK Instructions Manual
Powered woofer cd system
Hide thumbs
Also See for RV-DP100BK:
- Instructions manual (31 pages) ,
- Service manual (106 pages) ,
- Instructions manual (28 pages)
Table of Contents
Advertisement
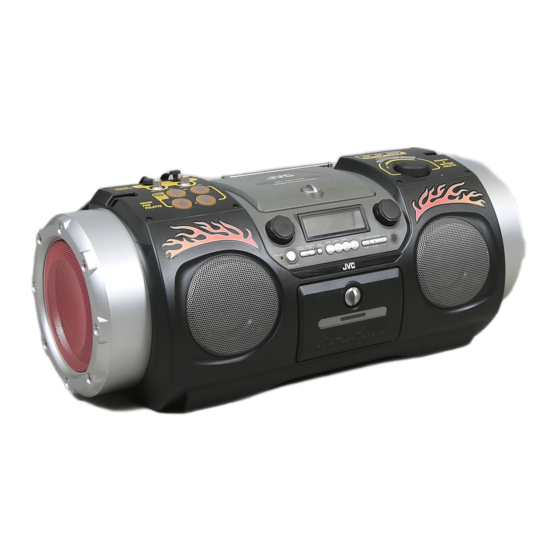
POWERED WOOFER CD SYSTEM
CD-SYSTEM MIT POWER WOOFER
CHAIN CD A WOOFER AMPLIFIE
CD-SYSTEEM MET POWER WOOFER
CD CON ALTAVOZ DE GRAVES Y AMPLIFICADOR INCORPORADO
SISTEMA POWERED WOOFER CD
RV-DP100BK
TIMER
CLOCK
TIMER
ON/OFF
SLEEP
DOWN
UP
SET
PROGRAM
RANDOM
AUTO
PRESET
REPEAT
TUNER
AUX
CD
TAPE
BAND
FM MODE
REVERSE MODE REW
MULTI CONTROL
FF
DISPLAY
MID /
TREBLE
SUPER WOOFER
VOLUME
VOLUME
RM-SRVDP100E
REMOTE CONTROL
SUPER WOOFER
VOLUME
PRESET
ONE TOUCH
MID /
TUNING
REC
TREBLE
STANDBY
%
C D
STANDBY/ON
OPEN
INSTRUCTIONS
BEDIENUNGSANLEITUNG
MANUEL D'INSTRUCTIONS
GEBRUIKSAANWIJZING
MANUAL DE INSTRUCCIONES
ISTRUZIONI
VOLUME
MID
/
TREBLE
BAND
MULTI CONTROL
TAPE
TUNER
AUX
REW
STOP
FF
For Customer Use:
Enter below the Model No. and Serial No.
which are located either on the rear, bot-
tom or side of the cabinet. Retain this
information for future reference.
Model No.
Serial No.
LVT0439-003A
[E]
Advertisement
Table of Contents

Related Manuals for JVC RV-DP100BK


Summary of Contents for JVC RV-DP100BK
- Page 1 POWERED WOOFER CD SYSTEM CD-SYSTEM MIT POWER WOOFER CHAIN CD A WOOFER AMPLIFIE CD-SYSTEEM MET POWER WOOFER CD CON ALTAVOZ DE GRAVES Y AMPLIFICADOR INCORPORADO SISTEMA POWERED WOOFER CD RV-DP100BK TIMER CLOCK TIMER ON/OFF SLEEP DOWN PROGRAM RANDOM AUTO PRESET...
- Page 2 2. Ne pas exposer l’appareil à la pluie ni à l’humidité. Per l’Italia: "Si dichiara che il questo prodotto di marca JVC è conforme alle prescrizioni del Decreto Ministeriale n.548 del 28/08/95 pubbli- cato sulla Gazzetta Ufficiale della Repubblica Italiana n.301 del 28/12/95."...
- Page 3 Caution: Proper Ventilation To avoid risk of electric shock and fire, and to prevent damage, locate the apparatus as follows: 1 Front: No obstructions and open spacing. 2 Sides/ Top/ Back: No obstructions should be placed in the areas shown by the dimensions below.
- Page 4 IMPORTANT FOR LASER PRODUCTS/ WICHTIGER HINWEIS FÜR LASER-PRODUKTE / IMPORTANT POUR LES PRODUITS LASER / BELANGRIJKE INFORMATIE VOOR LASERPRODUKTEN / IMPORTANTE PARA LOS PRODUCTOS LÁSER / IMPORTANTE PER I PRO- DOTTI LASER REPRODUCTION OF LABELS/ANBRINGUNGSORTE FÜR LASER-PRODUKTE/REPRODUCTION DES ETIQUETTES/VERKLARING VAN DE LABELS/REPRODUCCIÓN DE ETIQUETAS/RIPRODUZIONE DELLE ETICHETTE 1 CLASSIFICATION LABEL, PLACED ON EXTERIOR SURFACE 1 KLASSIFIZIERUNGSHINWEIS BEFINDET SICH AUF DER AUS-...
-
Page 5: Table Of Contents
The controls and operations have been redesigned to make them very easy to use, freeing you to just enjoy the music. • With JVC's COMPU PLAY you can turn on the System and automatically start the Radio, CD Player, or Casette Deck with a single touch. (Only when AC power is used.) The System is equipped with 16-cm dia. -
Page 6: Getting Started
Getting Started Accessories Check that you have all of the following items, which are supplied with the System. Power Cord (1) Remote Control (1) Batteries (2) Shoulder Strap (1) If any of these items are missing, contact your dealer immediately. How To Carry the System To carry the System, attach the supplied shoulder strap to each end of the System. -
Page 7: Using The Remote Control
Firmly insert the supplied AC power cord into the AC inlet on the back of the System. CAUTIONS: • ONLY USE THE JVC POWER CORD PROVIDED WITH THIS SYSTEM TO AVOID MALFUNCTION OR DAM- AGE TO THE SYSTEM. • BE SURE TO UNPLUG THE POWER CORD FROM THE OUTLET WHEN GOING OUT OR WHEN THE SYS- TEM IS NOT IN USE FOR AN EXTENDED PERIOD OF TIME. -
Page 8: Memory Backup Batteries
Memory Backup Batteries It is recommended that memory backup batteries are loaded in the System to prevent the contents of the memory from being erased when a power failure occurs. 1. Open the battery cover on the back of the System by pulling it toward you while pressing the tabs as shown by the arrows. -
Page 9: Compu Play
CAUTION: Use the System in a car properly. • Be sure to use the specified car adapter (JVC model CA-R120E) to prevent mishaps or damage resulting from different polarity design. • Unplug the AC power cord from the System when using the System with a car adapter. -
Page 10: Basic Operations
Basic Operations TIMER CLOCK TIMER ON/OFF SLEEP DOWN PROGRAM RANDOM AUTO PRESET REPEAT TUNER TAPE BAND FM MODE REVERSE MODE REW MID/ MULTI CONTROL TREBLE DISPLAY DISPLAY MID / TREBLE SUPER VOLUME+,– WOOFER SUPER WOOFER VOLUME VOLUME+,– VOLUME RM-SRVDP100E REMOTE CONTROL Turning the Power On and Off Note: The lighting condition for the "STANDBY"... -
Page 11: Showing The Time (Display)
Adjusting the Super Woofer Volume You can adjust the bass level between BASS 1 (minimum) and BASS 6 (maximum). You can use this effect only for playback. Using the Unit ——————————— Turn the SUPER WOOFER VOLUME control clockwise to in- crease the bass level or turn it counterclockwise to decrease the bass level. -
Page 12: Using The Tuner
Using the Tuner TIMER CLOCK TIMER ON/OFF SLEEP DOWN PROGRAM Number RANDOM Keys AUTO AUTO PRESET PRESET REPEAT TUNER TAPE TUNER BAND BAND ¢ FM MODE REVERSE MODE REW MULTI CONTROL DISPLAY MID / TREBLE SUPER WOOFER VOLUME VOLUME RM-SRVDP100E REMOTE CONTROL When the System is in use, the display shows oth- er items as well. -
Page 13: Presetting Stations
Presetting Stations You can preset up to 30 FM stations and up to 15 AM (MW/LW) stations. Note: Preset numbers may have been set to factory test frequen- cies prior to shipment. This is not a malfunction. You can preset the stations you want into memory by following one of the presetting methods below: Manual Presetting —————————... -
Page 14: Using The Cd Player
2. Press the CD The first track of the CD begins playing. • The CD Player automatically stops when the last track of the CD has finished playing. To stop playing the CD, press the The following information for the CD is displayed. -
Page 15: Programming The Playing Order Of The Tracks
Control. You can program up to 20 tracks in any desired order including the same tracks. You can only make a program when the CD Player is stopped. 1. Set a CD. 2. Press the CD6 button. 3. Press the 7 button to stop the CD. -
Page 16: Using The Cassette Deck (Listening To A Tape)
Using the Cassette Deck (Listening to a Tape) TIMER CLOCK TIMER ON/OFF SLEEP DOWN PROGRAM RANDOM AUTO PRESET REPEAT TUNER TAPE TAPE BAND FM MODE REVERSE MODE REW MULTI CONTROL ¢ REVERSE MODE DISPLAY MID / TREBLE SUPER WOOFER VOLUME VOLUME RM-SRVDP100E REMOTE CONTROL... -
Page 17: Using The Cassette Deck (Recording)
Using the Cassette Deck (Recording) TIMER CLOCK TIMER ON/OFF SLEEP DOWN PROGRAM RANDOM AUTO PRESET REPEAT TUNER TAPE BAND TAPE FM MODE REVERSE MODE REW MULTI CONTROL REVERSE MODE DISPLAY MID / TREBLE SUPER WOOFER VOLUME VOLUME RM-SRVDP100E REMOTE CONTROL When the System is in use, the display shows other items as well. -
Page 18: One Track Recording
• After the CD Player has played the entire CD, or all the pro- grammed tracks, the tape automatically stops. To stop at any time during the recording process, press the e button. -
Page 19: Using The Rhythm Machine
Using the Rhythm Machine MIXING PALETTE GUITAR PAD MODE MODE DRUM PALETTE Drum Pads A to D You can enjoy to play the Rhythm Machine that can generates many sound patterns shown below. Ambient pattern : WAVES and BIRDS • Rhythm pattern : 36 rhythm patterns •... - Page 20 Basic Operation-Adjusting the Rhythm Machine Volume You can adjust the volume for the Rhythm Machine at any time ex- cept when Tuner is selected. 1. Press the LEVEL button on the Unit. The current level will appear on the display for five seconds. 2.
- Page 21 [36-Rhythm Pattern Table 2/2] GROOVE1 (10 patterns) Ideal for street performances with group music concentrating on "rap" or "house." Pattern Name Tempo Drum & Bass Pattern No. 1 DR'B-1 Abbreviation for Drum & Bass DR'B-2 Drum & Bass Pattern No. 2 DR'B-3 Drum &...
- Page 22 Changing the Playing Rhythm Pattern ——————————————— (During playing the rhythm pattern) (Within 5 seconds) 1. During playing the rhythm pattern, press MODE button on the Unit to select your favorite Rhythm mode. 2. Within five seconds, turn the Jog dial to select your favorite rhythm pattern.
- Page 23 Rhythm Machine Demo Mode You can play the demo pattern repeatedly. (For 2 seconds) 1. When the Rhythm Machine is stopped, press and hold the MODE and LEVEL but- tons on the Unit for more than two sec- onds. Demonstration starts and a series of demo pattern is played. ENGINE DR'B-1 DR'B-3...
-
Page 24: Listening To An Auxiliary Equipment
Listening to an Auxiliary Equipment CLOCK DOWN REVERSE MODE REW DISPLAY SUPER WOOFER VOLUME Listening to External Equipment You can listen to an auxiliary equipment. First make sure that the auxiliary equipment is properly con- nected to the System.(See page 3). 1. -
Page 25: Using The Microphone/Guitar
Using the Microphone/Guitar MIC jack (Use a 6.3 mm diameter plug) GUITAR Jack (Use a 6.3 mm diameter plug) Microphone Mixing Using a microphone (not supplied), you can mix the microphone sound with a source sound. 1. Set the MIC LEVEL control to MIN by turn- ing it fully counterclockwise. -
Page 26: Using The Timers
Using the Timers TIMER TIMER CLOCK TIMER ON/OFF TIMER ON/OFF CLOCK SLEEP DOWN SLEEP DOWN PROGRAM RANDOM AUTO PRESET REPEAT TUNER TAPE BAND FM MODE REVERSE MODE REW MULTI CONTROL DISPLAY MID / TREBLE SUPER WOOFER VOLUME VOLUME RM-SRVDP100E REMOTE CONTROL The timers let you control listening and recording functions auto- matically. -
Page 27: Setting The Sleep Timer
3. Setting the OFF time (Example: 13:15). 1. Set the OFF time by pressing the UP or DOWN button. Pressing and holding the button will change the time rapidly. 2. Press the SET button. The music source "TUNER" blinks on the display. 4. -
Page 28: Care And Maintenance
Care And Maintenance Handle your CDs carefully, and they will last a long time. Compact Discs • Only CDs bearing this mark can be used with this System. However, continued use of irregu- lar shape CDs (heart-shape, octagonal, etc.) can damage the System. •... -
Page 29: Troubleshooting
Troubleshooting • If you are having a problem with your System, check this list for a possible solution before calling for service. • If you cannot solve the problem from the hints given here, or the System has been physically damaged, call a qualified person, such as your dealer, for service. -
Page 30: Specifications
Output Sensitivity/Impedance (1 kHz) Phones 16 ohms - 1 kohm Cassette Deck Frequency Response TypeII (CrO Wow and Flutter 0.15% (WRMS) CD Player Wow And Flutter Unmeasurable Tuner FM Tuner Tuning Range 87.5 MHz - 108.0 MHz AM Tuner Tuning Range (MW) 522 kHz - 1,629 kHz... - Page 31 VICTOR COMPANY OF JAPAN, LIMITED EN, GE, FR, NL, SP , IT 0200MNMCREJEIN...
Need help?
Do you have a question about the RV-DP100BK and is the answer not in the manual?
Questions and answers
I want to repeat play a cd.I do not have a remote.