Table of Contents
Advertisement
V O I C E
SYSTEMS
D ATA F I L E R
F1
F4
PAGE
SOURCE
PREV .
NEXT
DISK MEMORY
EDIT
LIST
TRACK
SONG
TOOLS
DISK
FILES
MIDI
SYSTEM T . INFO
REW
FF
PAUSE
Manuale Operativo
Operating Manual
DA T A FILER
VOICE SYSTEMS
F2
F3
F5
F6
CONFIRM
ESC
ENTER
REAL TIME ADJ.
REAL TIME ADJ.
L YRICS
MUTE
TRANSP
TEMPO
MODE
SONG
LIST
VOLUME
PLA Y
STOP
REC
Advertisement
Table of Contents

Subscribe to Our Youtube Channel
Related Manuals for Voice Systems VOICE SYSTEMS Data Filer


Summary of Contents for Voice Systems VOICE SYSTEMS Data Filer
- Page 1 V O I C E D ATA F I L E R SYSTEMS DA T A FILER VOICE SYSTEMS PAGE SOURCE CONFIRM PREV . NEXT DISK MEMORY ENTER EDIT REAL TIME ADJ. REAL TIME ADJ. LIST TRACK SONG L YRICS MUTE TRANSP TEMPO...
- Page 2 CAUTION RISK OF ELECTRIC SHOCK DO NOT OPEN WARNING! TO REDUCE THE DANGER OF ELECTRIC SHOCK: DO NOT REMOVE COVER (OR BACK) DO NOT EXPOSE THIS APPLIANCE TO RAIN OR MOISTURE NO USER SERVICEABLE PARTS INSIDE REFER SERVICING TO QUALIFIED SERVICE PERSONNEL This simbol is intended to This simbol is intended to alert alert the user to the presence...
-
Page 3: Table Of Contents
DA T A FILER CONTENTS 1. IMPORTANT NOTES ......................97 1.1 Looking after the product ....................97 1.2 Notes about the instrument....................97 1.3 Notes about the manual ....................98 2. MAIN CHARACTERISTICS ....................99 2.1 The Genius’s structure ....................99 2.2 Data format ........................ - Page 4 DA T A FILER 8.2.3 Rename ......................... 140 8.2.4 Check ........................141 8.2.5 Error messages - Files section ................143 8.3 MIDI functions ........................ 145 8.3.1 Out Router ......................145 8.3.2 In Filter ........................147 8.3.3 Out Filter ........................ 148 8.3.4 karaoke Out ......................
-
Page 5: Important Notes
DA T A FILER 1. IMPORTANT NOTES 1.1 LOOKING AFTER THE PRODUCT • Do not apply excessive force to the structures and controls (knobs, switches, etc.). • Protect the instrument from heavy stresses both during transport and in use. The instrument should be transported in its original packaging or an equivalent. -
Page 6: Notes About The Manual
DA T A FILER resides on the floppy disk, or during the performance of lists resident on the disk. Also, never extract the disk when the instrument is in “system busy” condition, i.e. when the name of the song resident on the floppy disk is displayed in brackets (). •... -
Page 7: Main Characteristics
DA T A FILER 2. MAIN CHARACTERISTICS 2.1 THE GENIUS’S STRUCTURE The Genius is a MIDI Data Filer, meaning a device capable of reading MIDI files and playing them back in audio format thanks to its own internal sound generator. For a clearer idea of how it works, we can divide the Genius into two sections: a file management section, which from now on we will call the Data Player , and a generation system, called the Sound Generator . -
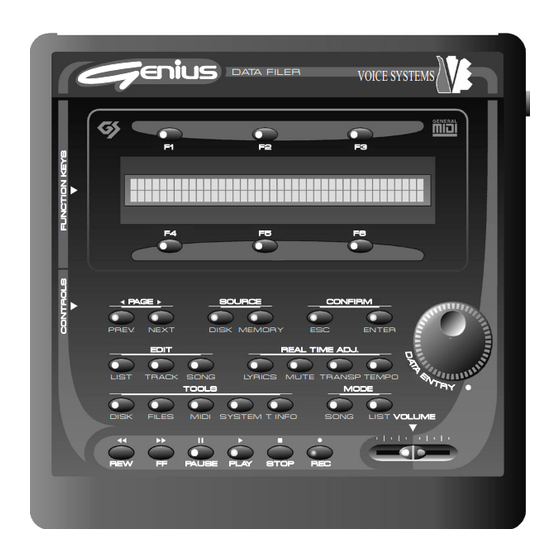
Page 8: Controls And Connections
DA T A FILER 3. CONTROLS AND CONNECTIONS 3.1 THE FRONT PANEL 1. FUNCTION KEYS: these buttons can be used to select the functions or options selected on the display in line with the button concerned. When the LED of the key is on, the key is enabled. - Page 9 DA T A FILER 3. PAGE section: this section contains the buttons used for displaying the display pages when more than one page is present. When a button is active, its LED will be constantly on. o [PREV.]: selects the page before the one currently shown on the display. o [NEXT]: selects the next page.
-
Page 10: The Floppy Disk Driver
DA T A FILER 10. [REW] button: allows rapid reversing by bar pointing. 11. [FF] button: allows rapid forward scanning by bar pointing. 12. [PAUSE] button: stops playback temporarily. 13. [PLAY] button: starts the performance. 14. [STOP] button: stops the performance. 15. -
Page 11: The Rear Panel
DA T A FILER 3.3 THE REAR PANEL 1. AUDIO OUT section: the section contains the outputs of the signal generated by the Genius’s internal sound card. o [PHONES]: connector for connection of stereo headphones. Only headphones with impedance of at least 100Ω should be used. o AUDIO OUT [R] and [L/MONO]: connect the cables leading from your amplification system to these connectors. -
Page 12: Connections
DA T A FILER 4. CONNECTIONS CAUTION! ü The Joy Port-to-MIDI adapter must have internal optoisolator. ü If the Joy Port has an additional parallel connector on the adapter, this must not be used for connecting peripherals. -
Page 13: Playing Back Songs
DA T A FILER 5. PLAYING BACK SONGS 5.1 THE MAIN PAGE After making all the connections correctly, switch on the Genius; the display will first show the information relating to activation of the software: then the presentation video page: which gives information about the total size of the internal memory and the software version currently installed on the instrument. - Page 14 DA T A FILER INFORMATION ABOUT DISPLAY FIELDS As the illustration above indicates, the display shows six fields, in line with the six function keys. Each field may identify: ü A variable field: identified by illumination of the LED of the function key in line with the field concerned, this contains a value which can be set by the user.
- Page 15 DA T A FILER Press the [MEMORY] key to select the internal memory. If you then press the [ENTER] key when selecting a new song, the instrument will load the song, displaying a round bracket at either end of the file name. The round brackets indicate a system busy condition.
-
Page 16: Error Messages
DA T A FILER Pressing the [STOP] key will stop playing of the song, while if [PAUSE] is pressed the playback is interrupted and the display will show: where you can see the message indicating that the song being played has Paused... -
Page 17: Use The [Rew] And [Ff] Keys
DA T A FILER N.B.: in view of the special features of the Direct-to-Disk reading system, disks in perfect condition should be used; any errors inside the file may cause sudden breaks in performance. Never remove the floppy disk if it contains the musical backing being played. 5.2 USING THE [REW] AND [FF] KEYS The [REW] (Rewind) and [FF] (Fast Forward) keys on the device panel can be used to locate a given bar number inside the active song. -
Page 18: Multitask Song Selection (Song Next Field)
DA T A FILER 5.3 MULTITASK SONG SELECTION (SONG NEXT FIELD) MULTITASK SONG SELECTION (M.S.S.) means the possibility of booking the song after the one being played. Two types of M.S.S. are possible, both during Play and in Stop condition. The setup procedure for this function is identical regardless of which option is use. -
Page 19: Directory Function
DA T A FILER field will now be made available for a new selection. SONGNEXT To modify the booked song before it is played, simple select the field again SONGNEXT (button F2]) and set the song of your choice (pressing [ENTER] to confirm all settings). The user can also opt between the conditions in which the song is played automatically or by pressing the [PLAY] key (see PLAY MODE utility in the TOOLS section, point 8.4.6). -
Page 20: Displaying The Lyrics Of The Song
DA T A FILER 5.5 DISPLAYING THE LYRICS OF THE SONG The Genius allows display of the lyrics of the song being played back on the screen by means of the LYRICS function. Naturally, the lyrics of a given song can only be displayed if the lyrics information is present in the permitted formats in the file. - Page 21 DA T A FILER During display of the lyrics, the user can return to display of the MAIN PAGE by pressing the [LYRICS] button. press the [LYRICS] button to return to display of the lyrics: Note that the Lyrics function will be automatically disabled if the system needs to display the MAIN PAGE (pressing of one of the REAL TIME ADJ.
-
Page 22: Real Time Functions
DA T A FILER 6. REAL TIME FUNCTIONS Thanks to the REAL TIME ADJ section of the front panel, the Genius makes available some important functions in Real Time. In other words, they can be activated during playback of a song, thus giving the considerable advantage of very quick application, of great help when making temporary changes to the songs being performed. -
Page 23: Track Muting
DA T A FILER 6.2 TRACK MUTING The Mute function allows performance of one or more tracks to be eliminated from the performance during playback of a song. This means that any note events on the track to be eliminated will be filtered, i.e. the instrument assigned to them will not be heard. As for the other REAL TIME ADJUST functions, pressing the [MUTE]) key quickly activates (LED on) and/or deactivates (LED off) the current function, while pressing it for longer gives access to the setting page of the function itself. -
Page 24: Trasposing The Key
DA T A FILER 6.3 TRANSPOSING THE KEY This function allows the user to change the key of the song being played, or in other words to transpose the notes being played on all the tracks (the MIDI channels) by a number of semitones which can be set by the user, except for the drum kit track. -
Page 25: Setting The Metronome Tempo
DA T A FILER 6.4 SETTING THE METRONOME TEMPO The Tempo function allows the user to vary the metronome tempo of a song being played. As for the other REAL TIME ADJUST functions, pressing the [TEMPO] key quickly activates (LED on) and/or deactivates (LED off) the variation in tempo which can be set in the Tempo Setup function, while keeping the key pressed for a longer time accesses the video page for setting the variation in tempo to be implemented. -
Page 26: Recording Song
DA T A FILER 7. RECORDING SONG 7.1 FOREWORD As well as playing back songs in Standard MIDI File 0 and 1 format (see point 2.2), the Genius is also able to record the MIDI events received on the MIDI IN port, made available with the aid of an optional Joy-to-MIDI adapter (see section 4). -
Page 27: Saving The Recording
DA T A FILER As the screen shows, the field warns the user that the Genius is recording Recording Song the data, the field indicates the metronome tempo with which the song is being Tempo recorded, and the fields display the bar number reached and the beat Meas. -
Page 28: Error Messages
DA T A FILER 7.3.1 ERROR MESSAGES DISK ERROR – DISK FULL There is not enough room on the disk to save the song recorded. Press [ESC] to return to the Finalize prompt, then replace the disk or select the internal memory. FLASH ERROR –... -
Page 29: System Utilities
DA T A FILER 8. SYSTEM UTILITIES The system utilities, found in the TOOLS section of the front panel, are accessory functions not closely linked to the playback and recording of songs, but which are a useful backup to the operations the Genius offers. Unlike the functions in the REAL TIME ADJ. -
Page 30: Format
DA T A FILER To exit from this function press [ESC] or [DISK] and the display will return to the MAIN PAGE; otherwise, use the selection keys referred to above to access the various functions of the TOOLS section. 8.1.1 FORMAT Each freshly-purchased floppy disk must be formatted before use for writing songs. -
Page 31: Quick Format
DA T A FILER At this point, the Genius requests further confirmation to proceed, and as the display indicates, pressing the [ENTER] key will start the formatting procedure. If the [ESC] key is pressed the operation will be aborted and the display will return to the FORMAT page. If confirmation is given, the instrument will proceed with formatting of the floppy disk, and a video page will indicate the percentage of formatting completed. -
Page 32: File Sort
DA T A FILER pending completion of the operation. If you have confirmed the floppy disk quick formatting procedure but there is no disk in the drive, the display will signal that there is no disk present by displaying: DISK NOT IN DRIVE! The same error will be displayed if a Quick Format is attempted on a “virgin”... -
Page 33: Fd Label
DA T A FILER 8.1.4 FD LABEL The FD LABEL function allows the user to change the label (name) of the floppy disks inserted in the drive. This can be useful when the user has an archive of songs on various floppy disks, since it allows them to be identified without having to scroll through their contents in the MAIN PAGE . -
Page 34: Fd Copy
DA T A FILER Once the operation is concluded, the usual procedure applies, as shown by the display: pressing the [ENTER] key confirms the operation, while pressing the [ESC] key aborts the current procedure. 8.1.5 FD COPY The Genius allows you to copy the contents of a whole floppy disk onto another disk or into the internal flash memory. - Page 35 DA T A FILER N.B.: if this video page continues to displayed even after a floppy disk has been inserted in the drive, this means that the system does not recognise it (the disk is not formatted or not valid). After checking the source disk, the instrument will proceed to read the data: When reading is complete, the system will prompt you to remove the source disk: Remove the disk and wait for the prompt to insert the destination disk:...
- Page 36 DA T A FILER Since this is a physical copy, the whole of the disk is copied regardless of the quantity of data memorised. This cannot be done in a single pass, so the instrument will request a number of SOURCE –...
- Page 37 DA T A FILER FLOPPY TO MEMORY COPY We have described how to copy one floppy disk onto another. We will now look at the procedures used to make a copy of a floppy disk in the internal memory. Unlike the previous type of copy procedure, in the FLOPPY TO MEMORY procedure only the files appropriate to the instrument will be considered as valid for copying.
-
Page 38: Info
DA T A FILER Once the source disk has been inserted, the Genius will proceed to read it, and will automatically write the data it contains in the internal memory. This procedure will be displayed by the following video page: field displays the number of files copied in relation to the total number on the (nn/nn) disk. -
Page 39: Error Messages - Disk Section
DA T A FILER The preselected field, next to the [F2] function key, allows you to use the encoder to select the memory until about which you require information. The display parameters are: : displays the amount of user memory installed in the unit or the capacity of the Total disk inserted. - Page 40 DA T A FILER DISK ERROR – FAT ERROR DISK ERROR – BOOT ERROR The magnetic medium of the disk is seriously damaged in the system areas. Replace the floppy disk. DISK ERROR – LOAD CLUSTER A reading error has occurred due to a damaged cluster on the disk. The file is not legible. DISK ERROR –...
- Page 41 DA T A FILER A serious error has occurred during reading/writing on the disk. Very probably, the disk’s magnetic medium is damaged. DISK NOT IN DRIVE! You have attempted a floppy disk operation with no disk inserted. If the disk is inserted, wait a few moments (to allow the instrument to acquire the floppy disk) and then retry the procedure.
-
Page 42: Files
DA T A FILER 8.2 FILES Pressing the [FILES] key of the TOOLS section will give access to the section for management of the individual files. The display will show the following video page: The procedures relating to the files are: : can be selected using the [F1] function key, procedure for copying given files. - Page 43 DA T A FILER To deselect the file, press the relative function key again. After selecting the files you wish to copy, press the [ENTER] key to start the copying procedure. The display will show: You can use the field to select the destination memory unit, i.e. where the COPY FILES TO selected files will be memorised.
- Page 44 DA T A FILER COPYING FILES FLOPPY TO FLOPPY If the files to be copied are resident on a floppy disk and the option has Floppy Disk been selected, pressing [ENTER] from the video page described previously will start reading of the floppy inserted in the drive.
- Page 45 DA T A FILER Once the disk has been inserted, the system will proceed to write the data: Depending on the files selected, the instrument may require more than one SOURCE – DESTINATION cycle to complete the operation. Extract the destination disk: and re-insert the source disk: whenever the instrument gives the relative prompt.
- Page 46 DA T A FILER CAUTION! Users are urged to take special care over disk removal and insertion, which must only be carried out when the instrument displays the relative prompt. This is because it takes a short time for the drive heads to locate in a safe position. If the floppy disk is inserted before the system prompt, remove it again and wait for the prompt.
-
Page 47: Delete
DA T A FILER Note that no check on existence of the file is made in case of disk-to-disk copying. In this case, any files already present are overwritten. When the operation is complete, the message will appear on the display for a COMPLETED few moments. -
Page 48: Rename
DA T A FILER Once [ENTER] has been pressed, the display will show the following video page. in which you can confirm deletion of the files already selected. If the operation is confirmed, for a few moments the display will show: option displays the number of files deleted in relation to the total number (nn/nn) selected for deletion. -
Page 49: Check
DA T A FILER You can use the keys in the SOURCE section of the front panel to select the memory unit for which you wish to display the list of files present. The [SONG] and [LIST] keys in the front panel MODE selection allow you to display the two types of files, while you can use the [PREV.] and [NEXT] keys to display the pages containing the files saved in the selected memory unit. - Page 50 DA T A FILER Refer to the buttons in the SOURCE and MODE sections for selection of the unit and the type of file required. You can now use the [PAGE] buttons and function keys to select the file for which you wish to display the information;...
-
Page 51: Error Messages - Files Section
DA T A FILER : displays the file type, i.e. whether it is a song ( ) or a List Type Type=Song Type=List : indicates the number of steps of which the List consists, or in other words the Steps number of songs it contains. - Page 52 DA T A FILER You have attempted a floppy disk operation with no disk inserted. If the disk is inserted, wait a few moments (to allow the instrument to acquire the floppy disk) and then retry the procedure. Also try removing and re-inserting the disk. DISK WRITE PROTECTED! The floppy inserted has write protection: extract the disk and remove the protection.
-
Page 53: Midi Functions
DA T A FILER 8.3 MIDI FUNCTIONS The MIDI function of the TOOLS section, which can be activated using the key of the same name, allows you to set up all the instrument’s MIDI parameter, such as the output Router, input and/or output MIDI filters, synchronisation setting, etc.. - Page 54 DA T A FILER You can use the field, with the aid of the [F2] function key, to select the track (from 1 Track to 16) the contents of which you intend to display. The current association will be displayed in the field.
-
Page 55: In Filter
DA T A FILER 8.3.2 IN FILTER The IN FILTER function is provided to filter specific MIDI messages reaching the MIDI IN port (if any) connected to the JOY PORT. The filters are of global type, meaning that they act on all the MIDI channels for the type of message assigned to them. -
Page 56: Out Filter
DA T A FILER 8.3.3 OUT FILTER The OUT FILTER, similar to the IN FILTER, allows you to set the operating modes of the filters on the MIDI messages transmitted by the instrument. Filtering a message means that it will not be transmitted on any channel (any track), either to the internal sound generator or to the [MIDI OUT] port. -
Page 57: Karaoke Out
DA T A FILER 8.3.4 KARAOKE OUT This function allows you to enable to disable the transmission of the MIDI data relating to the Karaoke on the [MIDI OUT] port. Transmission of these data must only be enabled with optional peripherals connected. To access this setting, from the MIDI menu press the [F4] function key to select the KARAOKE field. -
Page 58: Sync Out
DA T A FILER You can use this video page to enable the messages it describes, thus: ü Message=ON: message interpreted. ü Message=OFF: message ignored. The messages are: : selectable using the [F2] function key – enables/disables reception of the MIDI Clock CLOCK. -
Page 59: System
DA T A FILER 8.4 SYSTEM The SYSTEM function of the TOOLS section allows you to make all the general settings of the instrument, such as adjustment of the display contrast, assignment of given functions to the pedals, switch-on mode, etc... When the [SYSTEM] key is pressed, the display will show: containing the following functions: : recalled using the [F1] function key –... -
Page 60: Foot Switch
DA T A FILER 8.4.2 FOOT SWITCH Two footswitch pedals with normally open contact can be connected to the instrument by means of the FOOT [PEDAL1] and [PEDAL2] connectors. This section allows you to set the way the instrument will respond to pressing of the pedal. When the [F2] function key is pressed, the display will show: In the field, selectable with the [F2] function key, you can use the encoder to set the... -
Page 61: Sys Info
DA T A FILER The START-UP MODE function allows you to set the instrument’s switch-on mode, meaning whether, at start-up, the display is to show the presentation page ( ) or move directly Normal to the MAIN PAGE ( Fast 8.4.4 SYS INFO This function allows you to display the main characteristics of the system, such as the quantity of memory installed and the system software version installed on the Genius, with the relative... -
Page 62: Play Mode
DA T A FILER From the SYSTEM-INFO video page: press the [F6] function key to activate the Factory Settings procedure. The display will show the following video page. informing you that the modifications you make to the system will be lost irretrievably. However, the files saved in the internal memory will be retained. -
Page 63: Mem. Compact
DA T A FILER 8.4.6 MEM. COMPACT In view of the special hardware characteristics of the Genius’s internal flash memory, when a file is deleted or modified the amount of memory available is not updated. To make the free space available, the MEMORY COMPACT procedure has to be carried out. WHEN TO CARRY OUT THE MEMORY COMPACT PROCEDURE The Memory Compact procedure must be carried out when space needs to be cleared in the internal memory (e.g. -
Page 64: The Track Info Functions
DA T A FILER CAUTION!! Never switch the instrument off during Memory Compact operations. In this case, all the contents of the internal memory, including the operating system, will be lost irretrievably. 8.5 THE TRACK INFO FUNCTION The TRACK INFO function allows the user to obtain the main parameters for each individual track in the song being played. -
Page 65: Edit
DA T A FILER 9. EDIT In the REAL TIME ADJ section (point 6) we have seen that the Genius is able to modify a number of the characteristics of the song currently selected. The Real Time modifications can be activated in real time, but they cannot be saved differently for each song. The purpose of the EDIT section is to allow the user to modify the overall parameters and those of each individual track of each song and to save them (whether the song file is on a floppy disk or in the internal memory). -
Page 66: Edit Song - Transposer
DA T A FILER When the [ESC] key is pressed, the instrument will return to the MAIN PAGE. A PIECE OF ADVICE. In case of complex songs, recalculation of the songs with the modifications made and the relative saving procedure (which we will discuss below) may take several minutes. -
Page 67: Edit Song - Tempo
DA T A FILER 9.1.2 EDIT SONG – TEMPO The EDIT SONG – TEMPO procedure allows you to modify the metronome tempo of the active song. After selecting the song you require, press the [SONG] button in the EDIT section and then key [F2] associated to the field. -
Page 68: Edit Song - Track Mute
DA T A FILER Use the encoder to change the value of the parameters. When the procedure is complete, press the [ENTER] key to confirm or [ESC] to abort the modifications, after which the menu of the EDIT SONG function will be displayed. You can use the temporary Play procedure (point 9.1.5) to listen to the modifications made before memorising them definitively by exiting from the EDIT SONG function. -
Page 69: Edit Song - Temporary Play
DA T A FILER 9.1.5 EDIT SONG – TEMPORARY PLAY The Genius allows the user to listen to the song modified using the EDIT SONG functions, before it is definitively saved; you can therefore listen to the changes you have made and assess their effectiveness before saving them. - Page 70 DA T A FILER press the [ESC] button. The display will show the prompt to proceed with saving the song. Pressing the [SONG] button (EDIT section) the display will show the MAIN PAGE and all the modifications will be lost. Pressing [ESC] will abort the memorisation operation, meaning that the modifications made will be lost.
-
Page 71: Edit Track
DA T A FILER IMPORTANT NOTES ü When songs resident on a floppy disk are edited, the disk cannot be removed. If this occurs, the current edit operation will be aborted. ü Before modifying files resident in the internal memory or on disk make sure that there is enough room for the new file to be written, even if it is to be rewritten, because temporary files are generated in the memory. -
Page 72: Edit Track - Program Change & Bank Select
DA T A FILER : [F6] – allows regulation of the amount of the Chorus effect. CHORUS If the [ESC] key is pressed the instrument will leave the EDIT SONG menu and display the MAIN PAGE. 9.2.1 EDIT TRACK – PROGRAM CHANGE & BANK SELECT The PRG &... -
Page 73: Edit Track - Volume & Pan
DA T A FILER CAUTION! ü At the end of the modification range (from bar to bar) the Genius will restore the original Program Change value. ü The first bars of SMF backings often contain system exclusive Reset codes, which might annul the Program Change modifications;... - Page 74 DA T A FILER From the above menu, press the [F2] function key, assigned to the field; the VOL & PAN display will show the first video page of the function, relating to the volume control: featuring the following parameters which can be selected using the function keys and modified using the encoder: : selectable using the [F2] function key –...
-
Page 75: Edit Track - Expression
DA T A FILER 9.2.3 EDIT TRACK – EXPRESSION The EXPRESSION function allows you to regulate the expression control relating to the individual tracks. Modifying this control therefore modifies the value of Control Change 11. From the EDIT TRACK video page, press the [F3] function key and the display will show the video page: in which we can see the usual edit parameters, modifiable using the encoder: : selectable using the [F2] function key –... -
Page 76: Edit Track - Reverb
DA T A FILER The page contains the following programming parameters: : selectable using the [F2] function key – allows the user to specify the track on Track which the note velocity is to be modified. : [F3] – identifies the number of the first bar from which the variation in velocity StartMsr is to be made. -
Page 77: Edit Track - Chorus
DA T A FILER : [F5] – allows modification of the value of the control relating to the reverb effect in Var. the track in question and in the set range of bars. As for the functions described previously, the Genius uses the rule of relative editing, which involves a percentage rescaling of the data in the track. -
Page 78: Edit Track - Saving The Modifications
DA T A FILER The field next to the [F1] function key contains the name of the song on which the temporary Play is being carried out. This condition will be displayed by the field next to the [F4] function key. - Page 79 DA T A FILER As the display indicates, if the [ENTER] key is pressed, the Genius will prompt the user to enter the file name, suggesting the existing name: The encoder (for letter selection) and the PAGE section keys (for moving the cursor) can be used to assign a new name to the song to be saved, while you can use the SOURCE section keys to specify the memory unit in which the new song will be saved.
-
Page 80: Error Messages - Edit Section
DA T A FILER IMPORTANT NOTES ü When songs resident on a floppy disk are edited, the disk cannot be removed. If this occurs, the current edit operation will be aborted. ü Before modifying files resident in the internal memory or on disk, make sure that there is enough room for the new file to be written, even if it is to be rewritten, because temporary files are generated in the memory. - Page 81 DA T A FILER You have attempted a floppy disk operation with no disk inserted. If the disk is inserted, wait a few moments (to allow the instrument to acquire the floppy disk) and then retry the procedure. Also try removing and re-inserting the disk. DISK WRITE PROTECTED! The floppy inserted has write protection: extract the disk, remove the protection and repeat the editing operations.
-
Page 82: List
DA T A FILER 10. LIST A LIST is a pre-arranged sequence of songs which the instrument will load and play back automatically one after the other. This sequence can be programmed by the user and saved in the form of a LIST file (extension.LST). Lists created using the Genius consist of STEPS, each containing the information relating to each song to be performed, such as the name of the file and its location in the memory units. - Page 83 DA T A FILER You can use the [PAGE] keys to scroll through the contents of the unit and press the function key relating to the song to create the assignment. You can also change memory unit (Memory or Floppy Disk): during performance of the List the Genius will automatically change the active unit.
-
Page 84: Saving The List
DA T A FILER 10.2 SAVING THE LIST From the EDIT LIST main page: press the [ENTER] button; the display will show the video page: as prompt for proceeding with the saving operation. Press [ENTER] and the video page for assigning the name to the List will be displayed. -
Page 85: Playing A List
DA T A FILER 10.3 PLAYING A LIST Once the List has been created, it can be recalled from the MAIN PAGE by simply pressing the LIST] button in the MODE section. The first List on the active unit will be displayed on the selection field. The user can scroll through the Lists present using the encoder or by means of the DIRECTORY function which in this case will only display the files relating to this category (the songs are not displayed). -
Page 86: Modifying A List
DA T A FILER The selected List does not contain any assigned steps or the first step is empty. Check the contents of the List using the operations for modification of the existing List (point 10.4). SONG NOT FOUND None of the songs in the List is found to be present in the system (e.g. they have been deleted after creation of the List). -
Page 87: Appendix
DA T A FILER APPENDIX UPDATING THE OPERATING SYSTEM The Genius operating system is resident in the instrument’s internal memory. Updating to later releases is simple and immediate. Switch off the instrument and insert the floppy disk containing the file with the new operating system: then switch on the instrument and the display will show: After this, the instrument will proceed to load the new release. - Page 88 DA T A FILER After the check, the instrument will save the new firmware definitively in the its own internal memory: and then check it again: The saving and verification procedures are very delicate phases in which the instrument is virtually without an operating system.
-
Page 89: Operating System Failure
DA T A FILER OPERATING SYSTEM FAILURE If the following video page appears when the instrument is switched on: the instrument’s operating system is damaged or not present: reinstall the operating system using the procedures described in the previous point. If the operation is not concluded successfully, contract an authorised Voice Systems service centre. - Page 90 DA T A FILER Then insert the expansions. CAUTION! ü When inserting the memory expansions take great care that they are the correct way round. The cards are printed with a white circle; insert the expansion so that this reference coincides with the circle printed on the board.
-
Page 91: Sound List
DA T A FILER SOUND LIST MAIN SOUND – GENERAL MIDI (all channels except 10) GENERAL MIDI GENERAL MIDI GENERAL MIDI GENERAL MIDI Grand Piano Acoustic Bass 1 Soprano Sax Rain Bright Piano Finger Bass Alto Sax 1 Soundtrack E. Grand Piano Pick Bass Tenor Sax Crystal... - Page 92 DA T A FILER SOUND VARIATION (all channels except 10) Bank Select Bank Select Bank Select GENERAL MIDI 1st VARIATION 2nd VARIATION 3rd VARIATION Grand Piano Piano 1w Piano 1d Bright Piano E. Grand Piano Honky Tonk Electric Piano 1 Detune El.
- Page 93 DA T A FILER Bank Select Bank Select Bank Select GENERAL MIDI 1st VARIATION 2nd VARIATION 3rd VARIATION Alto Sax 1 Tenor Sax Baritone Sax Oboe English Horn Bassoon Clarinet 1 Piccolo Flute Recorder Pan Flute Blow Bottle Shakuhachi Wistle Ocarina Square 1 Square 2...
- Page 94 DA T A FILER DRUM SET TABLE (MIDI channel 10) Prog 1: Prog 2: Prog 9: Prog 17: Prog 25: HQ STD SET1 HQ STD SET2 HQ ROOM SET HQ POWER SET HQ ELEC. SET 27 - D#1 High Q 28 - E1 Slap 29 - F1...
- Page 95 DA T A FILER Prog 26: Prog 27: Prog 33: Prog 41: Prog 49: Prog 57: HQ TR808 SET HQ DANCE SET JAZZ SET BRUSH ORCHESTRA SFX SET 27 - D#1 Closed Hi Hat 28 - E1 Pedal Hi Hat 29 - F1 Open Hi Hat 30 - F#1...
- Page 96 DA T A FILER Prog 65: Prog 73: Prog 81: Prog 89: Prog 90: STANDARD SET ROOM SET POWER SET ELECTR. SET TR-808 SET 27 - D#1 High Q 28 - E1 Slap 29 - F1 Scratch Push 30 - F#1 Scratch Pull 31 - G1 Sticks...
- Page 97 MIDI IMPLEMENTATION CHART – Sound Generator Section - Voice Systems GENIUS Date: 25/01/2000 Data Filer Version: 1.0 FUNCTION ... TRANSMITTED RECOGNIZED REMARKS 1-16 BASIC DEFAULT CHANNEL CHANGED MODE Default Mode 3 Messages Altered 0-127 NOTE NUMBER True Voice VELOCITY Note ON Note OFF AFTER Key’s...
- Page 98 MIDI IMPLEMENTATION CHART – Data Filer Section - Voice Systems GENIUS Date: 25/01/2000 Data Filer Version: 1.0 FUNCTION ... TRANSMITTED RECOGNIZED REMARKS 1-16 1-16 BASIC DEFAULT CHANNEL CHANGED MODE Default Mode 3 Messages Altered 0-127 0-127 NOTE NUMBER True Voice VELOCITY Note ON Note OFF...
- Page 99 NOTE: This equipment has been tested and found to comply with the limits for a Class B digital Device, persuant to Part 15 if the FCC Rules. These limits are designed to provide reasonable protection against harmful interference in a residential installation. This equipment generates, uses and can radiate radio frequency energy and, if not installed and used in accordance with the instruction, may cause harmful interference to radio comunications.
- Page 100 Sales Division: Via Belvedere Fogliense 8, I-47836 Mondaino (RN) Italy tel.+39-0541-981700 - fax +39-0541-869605 - e-mail: viscount@omniway.sm - Internet: www.viscount-organs.com - www.viscount.it Distribution for Italy: TITAN MUSIC S.A. Strada Genghe di Atto, 80 - 47031 Acquaviva – Repubblica di San Marino tel.0549-999164 - fax 0549-999490 e-mail: viscount@omniway.sm - Internet: www.viscount-organs.com - www.viscount.it...
Need help?
Do you have a question about the VOICE SYSTEMS Data Filer and is the answer not in the manual?
Questions and answers
Der Genius Data Filer zeigt an, wenn ich eine Diskette einlege: Init Engine! Die Diskette wird **** "gelesen". Was bedeutet dieser Hinweis? Vielen Dank!