JVC KD-G411 Instructions Manual
Jvc cd receiver instructions
Hide thumbs
Also See for KD-G411:
- Instructions manual (58 pages) ,
- Service manual (53 pages) ,
- Instructions manual (86 pages)
Table of Contents
Advertisement
CD RECEIVER
RECEPTEUR CD
KD-G411
For canceling the display demonstration, see page 7.
Pour annuler la démonstration des affichages, référez-vous à la page 7.
For installation and connections, refer to the separate manual.
Pour l'installation et les raccordements, se référer au manuel séparé.
INSTRUCTIONS
MANUEL D'INSTRUCTIONS
GET0257-003A
[EX/EU]
Advertisement
Chapters
Table of Contents
Troubleshooting

Related Manuals for JVC KD-G411


Summary of Contents for JVC KD-G411
- Page 1 CD RECEIVER RECEPTEUR CD KD-G411 For canceling the display demonstration, see page 7. Pour annuler la démonstration des affichages, référez-vous à la page 7. For installation and connections, refer to the separate manual. Pour l’installation et les raccordements, se référer au manuel séparé.
-
Page 2: How To Reset Your Unit
Keep the card in a safe place, as it will help the authorities to identify your receiver if stolen. Thank you for purchasing a JVC product. How to forcibly eject a disc If a disc cannot be recognized by the receiver or cannot be ejected, ejects the disc as follows. -
Page 3: Table Of Contents
How to reset your unit ... How to forcibly eject a disc... How to read this manual... How to use the MODE button ... Control panel — KD-G411 Parts identification... Getting started... 6 Basic operations... Canceling the display demonstrations ... -
Page 4: How To Read This Manual
How to read this manual The following methods are used to made the explanations simple and easy-to-understand: • Some related tips and notes are explained in “More about this receiver” (see page 25). • Button operations are mainly explained with the illustrations as follows: Press briefly. -
Page 5: Display Window
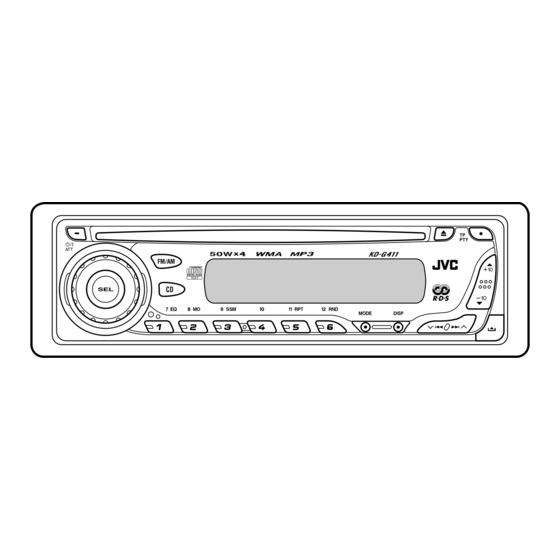
SSM (Strong-station Sequential Memory) button y RPT (repeat) button u RND (random) button i MODE button o DISP (display) button KD-G411 Parts identification 4/¢ (control panel release) button s ∞ (down) button / –10 button Display window d Tuner reception indicators—... -
Page 6: Getting Started
Getting started Ÿ You cannot select “CD” as the playback source if there is no disc in the loading slot. Volume level appears. Volume level indicator ⁄ Adjust the sound as you want. (See pages 18 and 19.) Basic operations To drop the volume in a moment (ATT) To turn off the power Caution on volume setting:... -
Page 7: Canceling The Display Demonstrations
Canceling the display demonstrations If no operations are done for about 20 seconds, display demonstration starts. [Initial: DEMO ON]—see page 20. Finish the procedure. To activate the display demonstration In step 3 above... Setting the clock Set the hour, minute, and clock system. -
Page 8: Radio Operations
Radio operations Lights up when receiving an FM stereo broadcast with sufficient signal strength. Selected band appears. Ÿ Start searching for a station. When a station is received, searching stops. To stop searching, press the same button again. To tune in to a station manually In step Ÿ... -
Page 9: Storing Stations In Memory
Storing stations in memory You can preset six stations for each band. FM station automatic presetting — SSM (Strong-station Sequential Memory) Select the FM band (FM1 – FM3) you want to store into. “SSM” flashes, then disappears when automatic presetting is over. Local FM stations with the strongest signals are searched and stored automatically in the FM band. -
Page 10: Searching For Your Favorite Fm Rds Programme
FM RDS operations Searching for your favorite FM RDS programme You can tune in to a station broadcasting your favorite programme by searching for a PTY code. The last selected PTY code appears. Ÿ Select one of your favorite programme type. Select one of the twenty-nine PTY codes. -
Page 11: Storing Your Favorite Programmes
What you can do with RDS RDS (Radio Data System) allows FM stations to send an additional signal along with their regular programme signals. By receiving the RDS data, this receiver can do the following: • Programme Type (PTY) Search (see page 10) •... -
Page 12: Pty Standby Reception
PTY Standby Reception PTY Standby Reception allows the receiver to switch temporarily to your favorite PTY programme from any source other than AM. To activate and select your favorite PTY code for PTY Standby Reception, see page The PTY indicator either lights up or flashes. •... -
Page 13: Disc Operations
Disc operations About MP3 and WMA discs MP3 and WMA (Windows Media “tracks” (words “file” and “track” are used interchangeably) are recorded in “folders.” • When inserting an MP3 or a WMA disc: Total folder Total file number number When playback starts, disc information will automatically appear (see page 16). - Page 14 To fast-forward or reverse the track Reverses. To go to the next or previous tracks To the beginning of the current track, then the previous tracks. To go to the next or previous folders (only for MP3 or WMA disc) To locate a particular track (for CD) or folder (for MP3 or WMA discs) directly To select a number from 01 –...
-
Page 15: Other Main Functions
Other main functions Skipping a track quickly during play • For MP3 or WMA disc, you can skip a track within the same folder. Ex.: To select track 32 while playing track 6 First time you press +10 or –10 button, the track skips to the nearest higher or lower track with a track number of multiple ten (ex. -
Page 16: Changing The Display Information
While playing an audio CD or a CD Text If the current disc is an audio CD, “NO NAME” appears. While playing an MP3 or WMA disc • When “TAG DISP” is set to “TAG ON” (see page 21) If an MP3/WMA file does not have ID3 tags, folder name and file name appear. In this case, the TAG indicator will not light up. -
Page 17: Repeat Play
Selecting the playback modes You can use only one of the following playback modes at a time. Select your desired playback mode. Repeat play Ex.: When “TRK RPT” is selected while playing an MP3 disc Random play Ex.: When “DISC RND” is selected while playing an MP3 disc * Only while playing an MP3 or WMA disc. -
Page 18: Sound Adjustments
Sound adjustments Selecting preset sound modes You can select a preset sound mode suitable to the music genre. Ÿ Ex.: When “ROCK” is selected Indication pattern for each sound mode: (C-EQ: custom equalizer) Indication For: BAS * USER (Flat sound) ROCK Rock or disco music... -
Page 19: Adjusting The Sound
Adjusting the sound You can adjust the sound characteristics to your preference. Ex.: When “TRE” is selected Indication pattern changes as you adjust the level. Indication To do: BAS* Adjust the bass. (bass) TRE* Adjust the treble. (treble) FAD* Adjust the front (fader) and rear speaker balance. -
Page 20: General Settings - Psm
General settings — PSM Basic procedure You can change PSM (Preferred Setting Mode) items listed in the table that follows. Select a PSM item. Ex.: When you select “DIMMER” Indications DEMO Display demonstration CLOCK H Hour adjustment CLOCK M Minute adjustment 24H/12H 24 hours or 12 hours time display... - Page 21 Indications AF-REG Alternative frequency/ regionalization reception PTY STBY PTY standby TA VOL Traffic announcement volume P-SEARCH Programme search DIMMER Dimmer Telephone muting SCROLL Scroll TAG DISP Tag display AMP GAIN Amplifier gain control Selectable settings, [reference page] When the received signals from the current station become weak... [Initial];...
-
Page 22: Detaching The Control Panel
Detaching the control panel Attaching the control panel When detaching or attaching the control panel, be careful not to damage the connectors on the back of the control panel and on the panel holder. Detaching the control panel Before detaching the control panel, be sure to turn off the power. -
Page 23: Using The Remote Controller
Using the remote controller — This receiver can be remotely controlled as instructed here (with an optionally purchased remote controller). We recommend that you use remote controller RM-RK60 with your receiver. • When operating, aim the remote controller directly at the remote sensor on the receiver. -
Page 24: Maintenance
Maintenance How to clean the connectors Frequent detachment will deteriorate the connectors. To minimize this possibility, periodically wipe the connectors with a cotton swab or cloth moistened with alcohol, being careful not to damage the connectors. Connector Moisture condensation Moisture may condense on the lens inside the CD player in the following cases: •... -
Page 25: More About This Receiver
More about this receiver Basic operations Turning off the power • If you turn off the power while listening to a disc, disc play will start from where playback has been stopped previously, next time you turn on the power. Tuner operations Storing stations in memory •... -
Page 26: Playing An Mp3/Wma Disc
Playing an MP3/WMA disc • This receiver can play back MP3/WMA files with the extension code <.mp3> or <.wma> (regardless of the letter case—upper/lower). • This receiver can show the names of albums, artists (performer), and ID3 Tag (Version 1.0, 1.1, 2.2, 2.3, or 2.4) for MP3 files and for WMA files. -
Page 27: Troubleshooting
Troubleshooting What appears to be trouble is not always serious. Check the following points before calling a service center. Symptoms • Sound cannot be heard from the speakers. • The receiver does not work at all. • SSM automatic presetting does not work. - Page 28 Symptoms • Disc cannot be played back. • Noise is generated. • A longer readout time is required (“CHECK” keeps flashing on the display). • Tracks cannot be played back as you have intended them to play. • Elapsed playing time is not correct.
-
Page 29: Specifications
Specifications AUDIO AMPLIFIER SECTION Maximum Power Output: Front: 50 W per channel Rear: 50 W per channel Continuous Power Output (RMS): Front: 19 W per channel into 4 Ω, 40 Hz to 20 000 Hz at no more than 0.8% total harmonic distortion. - Page 30 Having TROUBLE with operation? Please reset your unit Refer to page of How to reset your unit Vous avez des PROBLÈMES de fonctionnement? Réinitialisez votre appareil Référez-vous à la page intitulée Comment réinitialiser votre appareil EN, FR © 2004 Victor Company of Japan, Limited 1004DTSMDTJEIN...
-
Page 31: Installation (In-Dash Mounting)
INSTALLATION (MONTAGE DANS LE TABLEAU DE BORD) L’illustration suivante est un exemple d’installation typique. Si vous avez des questions ou avez besoin d’information sur des kits d’installation, consulter votre revendeur d’autoradios JVC ou une compagnie d’approvisionnement. • Si l’on n’est pas sûr de pouvoir installer correctement cet appareil, le faire installer par un technicien qualifié. -
Page 32: Electrical Connections
• Be sure to ground this receiver to the car’s chassis again after installation. Notes: • Replace the fuse with one of the specified rating. If the fuse blows frequently, consult your JVC IN-CAR ENTERTAINMENT dealer. • It is recommended to connect to the speakers with maximum power of more than 50 W (both at the rear and at the front, with an impedance of 4 Ω... - Page 33 CD RECEIVER CD-RECEIVER РЕСИВЕР С ПРОИГРЫВАТЕЛЕМ КОМПАКТ-ДИСКОВ KD-G411 For canceling the display demonstration, see page 7. Zum Abbrechen der Displaydemonstration siehe Seite 7. Информацию об отмене демонстрации функций дисплея см. на стр. 7. For installation and connections, refer to the separate manual.
-
Page 34: How To Forcibly Eject A Disc
Keep the card in a safe place, as it will help the authorities to identify your receiver if stolen. Thank you for purchasing a JVC product. How to forcibly eject a disc If a disc cannot be recognized by the receiver or cannot be ejected, ejects the disc as follows. - Page 35 How to reset your unit ... How to forcibly eject a disc... How to read this manual... How to use the MODE button ... Control panel — KD-G411 Parts identification... Getting started... 6 Basic operations... Canceling the display demonstrations ...
-
Page 36: How To Read This Manual
How to read this manual The following methods are used to made the explanations simple and easy-to-understand: • Some related tips and notes are explained in “More about this receiver” (see page 25). • Button operations are mainly explained with the illustrations as follows: Press briefly. -
Page 37: Control Panel
SSM (Strong-station Sequential Memory) button y RPT (repeat) button u RND (random) button i MODE button o DISP (display) button KD-G411 Parts identification 4/¢ (control panel release) button s ∞ (down) button / –10 button Display window d Tuner reception indicators—... -
Page 38: Getting Started
Getting started Ÿ You cannot select “CD” as the playback source if there is no disc in the loading slot. Volume level appears. Volume level indicator ⁄ Adjust the sound as you want. (See pages 18 and 19.) Basic operations To drop the volume in a moment (ATT) To turn off the power Caution on volume setting:... -
Page 39: Canceling The Display Demonstrations
Canceling the display demonstrations If no operations are done for about 20 seconds, display demonstration starts. [Initial: DEMO ON]—see page 20. Finish the procedure. To activate the display demonstration In step 3 above... Setting the clock Set the hour, minute, and clock system. -
Page 40: Radio Operations
Radio operations Lights up when receiving an FM stereo broadcast with sufficient signal strength. Selected band appears. Ÿ Start searching for a station. When a station is received, searching stops. To stop searching, press the same button again. To tune in to a station manually In step Ÿ... -
Page 41: Storing Stations In Memory
Storing stations in memory You can preset six stations for each band. FM station automatic presetting — SSM (Strong-station Sequential Memory) Select the FM band (FM1 – FM3) you want to store into. “SSM” flashes, then disappears when automatic presetting is over. Local FM stations with the strongest signals are searched and stored automatically in the FM band. -
Page 42: Fm Rds Operations
FM RDS operations Searching for your favorite FM RDS programme You can tune in to a station broadcasting your favorite programme by searching for a PTY code. The last selected PTY code appears. Ÿ Select one of your favorite programme type. Select one of the twenty-nine PTY codes. -
Page 43: Storing Your Favorite Programmes
What you can do with RDS RDS (Radio Data System) allows FM stations to send an additional signal along with their regular programme signals. By receiving the RDS data, this receiver can do the following: • Programme Type (PTY) Search (see page 10) •... -
Page 44: Tracking The Same Programme-Network-Tracking Reception
PTY Standby Reception PTY Standby Reception allows the receiver to switch temporarily to your favorite PTY programme from any source other than AM. To activate and select your favorite PTY code for PTY Standby Reception, see page The PTY indicator either lights up or flashes. •... -
Page 45: Disc Operations
Disc operations About MP3 and WMA discs MP3 and WMA (Windows Media “tracks” (words “file” and “track” are used interchangeably) are recorded in “folders.” • When inserting an MP3 or a WMA disc: Total folder Total file number number When playback starts, disc information will automatically appear (see page 16). - Page 46 To fast-forward or reverse the track Reverses. To go to the next or previous tracks To the beginning of the current track, then the previous tracks. To go to the next or previous folders (only for MP3 or WMA disc) To locate a particular track (for CD) or folder (for MP3 or WMA discs) directly To select a number from 01 –...
-
Page 47: Other Main Functions
Other main functions Skipping a track quickly during play • For MP3 or WMA disc, you can skip a track within the same folder. Ex.: To select track 32 while playing track 6 First time you press +10 or –10 button, the track skips to the nearest higher or lower track with a track number of multiple ten (ex. -
Page 48: Changing The Display Information
While playing an audio CD or a CD Text If the current disc is an audio CD, “NO NAME” appears. While playing an MP3 or WMA disc • When “TAG DISP” is set to “TAG ON” (see page 21) If an MP3/WMA file does not have ID3 tags, folder name and file name appear. In this case, the TAG indicator will not light up. -
Page 49: Selecting The Playback Modes
Selecting the playback modes You can use only one of the following playback modes at a time. Select your desired playback mode. Repeat play Ex.: When “TRK RPT” is selected while playing an MP3 disc Random play Ex.: When “DISC RND” is selected while playing an MP3 disc * Only while playing an MP3 or WMA disc. -
Page 50: Sound Adjustments
Sound adjustments Selecting preset sound modes You can select a preset sound mode suitable to the music genre. Ÿ Ex.: When “ROCK” is selected Indication pattern for each sound mode: (C-EQ: custom equalizer) Indication For: BAS * USER (Flat sound) ROCK Rock or disco music... -
Page 51: Adjusting The Sound
Adjusting the sound You can adjust the sound characteristics to your preference. Ex.: When “TRE” is selected Indication pattern changes as you adjust the level. Indication To do: BAS* Adjust the bass. (bass) TRE* Adjust the treble. (treble) FAD* Adjust the front (fader) and rear speaker balance. -
Page 52: General Settings - Psm
General settings — PSM Basic procedure You can change PSM (Preferred Setting Mode) items listed in the table that follows. Select a PSM item. Ex.: When you select “DIMMER” Indications DEMO Display demonstration CLOCK H Hour adjustment CLOCK M Minute adjustment 24H/12H 24 hours or 12 hours time display... - Page 53 Indications AF-REG Alternative frequency/ regionalization reception PTY STBY PTY standby TA VOL Traffic announcement volume P-SEARCH Programme search DIMMER Dimmer Telephone muting SCROLL Scroll TAG DISP Tag display AMP GAIN Amplifier gain control Selectable settings, [reference page] When the received signals from the current station become weak... [Initial];...
-
Page 54: Detaching The Control Panel
Detaching the control panel Attaching the control panel When detaching or attaching the control panel, be careful not to damage the connectors on the back of the control panel and on the panel holder. Detaching the control panel Before detaching the control panel, be sure to turn off the power. -
Page 55: Using The Remote Controller
Using the remote controller — This receiver can be remotely controlled as instructed here (with an optionally purchased remote controller). We recommend that you use remote controller RM-RK60 with your receiver. • When operating, aim the remote controller directly at the remote sensor on the receiver. -
Page 56: Maintenance
Maintenance How to clean the connectors Frequent detachment will deteriorate the connectors. To minimize this possibility, periodically wipe the connectors with a cotton swab or cloth moistened with alcohol, being careful not to damage the connectors. Connector Moisture condensation Moisture may condense on the lens inside the CD player in the following cases: •... -
Page 57: More About This Receiver
More about this receiver Basic operations Turning off the power • If you turn off the power while listening to a disc, disc play will start from where playback has been stopped previously, next time you turn on the power. Tuner operations Storing stations in memory •... - Page 58 Playing an MP3/WMA disc • This receiver can play back MP3/WMA files with the extension code <.mp3> or <.wma> (regardless of the letter case—upper/lower). • This receiver can show the names of albums, artists (performer), and ID3 Tag (Version 1.0, 1.1, 2.2, 2.3, or 2.4) for MP3 files and for WMA files.
-
Page 59: Troubleshooting
Troubleshooting What appears to be trouble is not always serious. Check the following points before calling a service center. Symptoms • Sound cannot be heard from the speakers. • The receiver does not work at all. • SSM automatic presetting does not work. - Page 60 Symptoms • Disc cannot be played back. • Noise is generated. • A longer readout time is required (“CHECK” keeps flashing on the display). • Tracks cannot be played back as you have intended them to play. • Elapsed playing time is not correct.
-
Page 61: Specifications
Specifications AUDIO AMPLIFIER SECTION Maximum Power Output: Front: 50 W per channel Rear: 50 W per channel Continuous Power Output (RMS): Front: 19 W per channel into 4 Ω, 40 Hz to 20 000 Hz at no more than 0.8% total harmonic distortion. - Page 62 Having TROUBLE with operation? Please reset your unit Refer to page of How to reset your unit Haben Sie PROBLEME mit dem Betrieb? Bitte setzen Sie Ihr Gerät zurück Siehe Seite Zurücksetzen des Geräts Затруднения при эксплуатации? Пожалуйста, перезагрузите Ваше устройство Для...
-
Page 63: In-Dash Mounting
The following illustration shows a typical installation. If you have any questions or require information regarding installation kits, consult your JVC IN-CAR ENTERTAINMENT dealer or a company supplying kits. • If you are not sure how to install this receiver correctly, have it installed by a qualified technician. - Page 64 Chassis des Fahrzeugs geerdet wird. Hinweise: • Die Sicherung mit einer der entsprechenden Nennleistung ersetzen. Brennt die Sicherung häufig durch, wenden Sie sich an ihren JVC Autoradiohändler. • Es wird empfohlen, Lautsprecher mit einer Maximalleistung von mehr als 50 W anzuschließen (sowohl hinten als auch vorne, mit einer Impedanz von 4 Ω...
- Page 65 ENGLISH Typical Connections / Typische Anschlüsse / Типичные подключения Before connecting: Check the wiring in the vehicle carefully. Incorrect connection may cause serious damage to this receiver. The leads of the power cord and those of the connector from the car body may be different in color. Connect the colored leads of the power cord in the order specified in the illustration below.
- Page 66 If your car is equipped with the steering wheel remote controller, you can operate this receiver using the controller. To do it, a JVC’s OE remote adapter (not supplied) which matches with your car is required. Consult your JVC IN-CAR ENTERTAINMENT dealer for details.
Need help?
Do you have a question about the KD-G411 and is the answer not in the manual?
Questions and answers