Strand Lighting ClassicPalette Installation & Setup Manual
Lighting control console
Hide thumbs
Also See for ClassicPalette:
- User manual (459 pages) ,
- Installation and setup gude (90 pages)
Table of Contents
Advertisement
Quick Links
Advertisement
Table of Contents

Related Manuals for Strand Lighting ClassicPalette


Summary of Contents for Strand Lighting ClassicPalette
- Page 2 Strand Lighting le plus proche. Information contained in this document may not be duplicated in full or in part by any person without prior written approval of Strand Lighting Inc and Horizon Control Inc.
- Page 3 Palette & S IGHTING ONTROL ONSOLE NSTALLATION ETUP UIDE FOREWORD 1. PALETTE Software License SET OUT BELOW ARE THE TERMS AND CONDITIONS UNDER WHICH YOU ARE PERMITTED TO USE THE BUNDLE OF SOFTWARE COLLECTIVELY CALLED THE PALETTE SOFTWARE ("PALETTE"). PLEASE READ THIS INFORMATION CAREFULLY.
- Page 4 Palette & S IGHTING ONTROL ONSOLE NSTALLATION ETUP UIDE Notes FOREWORD...
-
Page 5: Table Of Contents
Optional Accessories (sold separately) .................... 4 Software Upgrades ........................... 5 Control Channel Upgrades ....................... 5 FEATURES Standard Features ..........................6 classicPalette, presetPalette and subPalette Lighting Control Consoles ........6 Optional Add-On Features ....................... 7 SOFTWARE OVERVIEW PALETTE Software ......................... 8 Off-Line Editor..........................8 Control of Connected Devices...................... - Page 6 UIDE Chapter 3. Controls DESK LAYOUT Console Overview .......................... 14 presetPalette Lighting Control Console................... 14 classicPalette Lighting Control Console..................15 subPalette Lighting Control Console....................16 Programming Buttons Layout ......................17 Information ..........................17 Action Keys ..........................17 Numerical Keypad........................18 Misc ............................
- Page 7 Palette & S IGHTING ONTROL ONSOLE NSTALLATION ETUP UIDE Up / Down Buttons......................... 26 Update Button..........................26 View ............................... 27 Processor Keyboard Shortcuts......................27 SOFTWARE CONFIGURATION PALETTE Software Screen ......................28 User-Programmable Macro Buttons....................29 Cue List Directory .......................... 29 Cue List ............................
- Page 8 Palette & S IGHTING ONTROL ONSOLE NSTALLATION ETUP UIDE Chapter 4. Setup ACCESSORY - HARDWARE COMPONENTS Overview............................48 Channel Faders (Wide Mode)......................48 Preset Scene Mode ........................49 Look Master Mode ........................49 A/B C/D (X1 - X2) ......................... 49 Dead Black Out (DBO) ........................
-
Page 9: Introduction
INTRODUCTION 1. About This Guide Congratulations on your purchase of a Strand Lighting Palette Lighting Control Console. This guide provides important information regarding safety, installation, and operation for all console hardware components. Familiarizing yourself with this information will help you get the most out of your lighting system. -
Page 10: Customer Service And Support
At Strand Lighting, we are committed to providing you the highest quality in customer service. Our comprehensive resources are available to help your business succeed and ensure you get the full benefit of being an Strand Lighting customer. Whether your needs are telephone troubleshooting assistance or technical service, our full-time staff of experienced professionals are on-hand to provide support. -
Page 11: Chapter 1. Overview
Palette & S IGHTING ONTROL ONSOLE NSTALLATION ETUP UIDE Overview • COMPONENTS • FEATURES • SOFTWARE OVERVIEW... -
Page 12: Components
Note: Using a touchscreen can enhance the usability of the console software and is highly recommended. 4. Optional Accessories (sold separately) To purchase any PALETTE products or accessories, please contact your Authorized Strand Lighting Dealer. Accessories: 66216 Palette Keyboard (included with classicPalette, subPalette) -
Page 13: Software Upgrades
The PALETTE control channel functionality included with your console is pre-authorized at the level initially purchased. However, the functionality can be easily upgraded at any time. To purchase a control channel upgrade for your PALETTE Lighting Control Console, please contact your Authorized Strand Lighting Dealer. Software Upgrades... -
Page 14: Features
ONTROL ONSOLE NSTALLATION ETUP UIDE FEATURES 1. Standard Features classicPalette, presetPalette and subPalette Lighting Control Consoles General: Control: - 300 channel memory operation - Split up/down fade times (presetPalette expandable) - Split up/down wait times - 450 channel memory operation... -
Page 15: Optional Add-On Features
Palette & S IGHTING ONTROL ONSOLE NSTALLATION ETUP UIDE 2. Optional Add-On Features Connectivity To... External Control - RS232 out - Remote Focus Unit (RFU) - Wired - PowerPoint - Remote Focus Unit (RFU) - Wireless Optional Add-On Features... -
Page 16: Software Overview
Palette & S IGHTING ONTROL ONSOLE NSTALLATION ETUP UIDE SOFTWARE OVERVIEW 1. PALETTE Software The PALETTE processor utilizes an embedded version of Microsoft® Windows XP to run a specially designed PALETTE lighting control software developed by Horizon Control, Inc. The PALETTE application works in conjunction with console hardware buttons/sliders/playback faders/and encoders to provide control of external devices, data management, and show file storage. -
Page 17: Chapter 2. Installation And Power Up
Palette & S IGHTING ONTROL ONSOLE NSTALLATION ETUP UIDE Installation and Power Up • UNPACK • HOOK-UP • CONSOLE POWER UP... -
Page 18: Unpack
Palette & S IGHTING ONTROL ONSOLE NSTALLATION ETUP UIDE UNPACK 1. Site Requirements The console and its components require a sturdy, flat surface for installation. The surface should be able to support the weight of the console (including the processor, monitor, etc.) and should provide suitable ventilation. Also, the site should be clean (i.e. -
Page 19: Hook-Up
Palette & S IGHTING ONTROL ONSOLE NSTALLATION ETUP UIDE HOOK-UP 1. Connecting Console Components Step 1. At console rear panel, connect monitor or touchscreen (sold separately). Step 2. At console power port, connect power supply cord (included). Step 3. At console lighting ports, install gooseneck lamps (sold separately) as required. Step 4. -
Page 20: Console Power Up
Palette & S IGHTING ONTROL ONSOLE NSTALLATION ETUP UIDE CONSOLE POWER UP 1. Power Up Procedure Once the console has been installed and all components connected, the console and processor can be powered up. To power up: Step 1. At front of console, press power on/off button. Processor will boot. Step 2. -
Page 21: Chapter 3. Controls
Palette & S IGHTING ONTROL ONSOLE NSTALLATION ETUP UIDE Controls • DESK LAYOUT • CONSOLE BUTTONS • SOFTWARE CONFIGURATION • RESTORING THE SOFTWARE... -
Page 22: Desk Layout
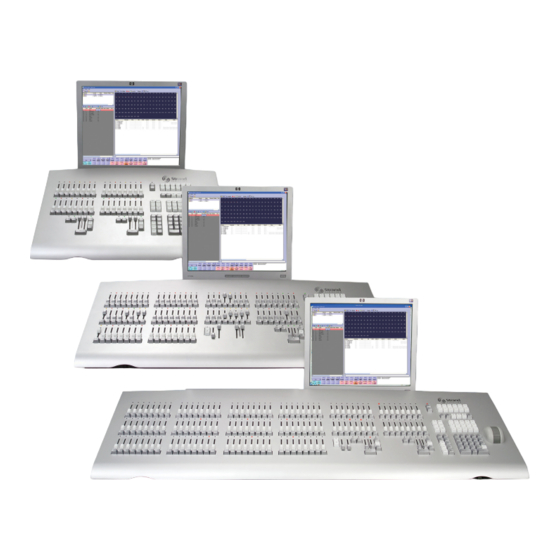
Palette & S IGHTING ONTROL ONSOLE NSTALLATION ETUP UIDE DESK LAYOUT 1. Console Overview presetPalette Lighting Control Console The following illustration provides an overview of console desk controls. Refer to subsequent pages for more in depth explanations of individual button and slider functions. Channel Faders - (configurable) 64 (96) Softkeys -12 Context proportional, fully overlapping sliders and... -
Page 23: Classicpalette Lighting Control Console
ONTROL ONSOLE NSTALLATION ETUP UIDE 2. classicPalette Lighting Control Console The following illustration provides an overview of console desk controls. Refer to subsequent pages for more in- depth explanations of individual button and slider functions. Softkeys -12 Context sensitive functionality... -
Page 24: Subpalette Lighting Control Console
Palette & S IGHTING ONTROL ONSOLE NSTALLATION ETUP UIDE 3. subPalette Lighting Control Console The following illustration provides an overview of console desk controls. Refer to subsequent pages for more in- depth explanations of individual button and slider functions. Softkeys -12 Context Dead Black Out Buttons - sensitive functionality (configurable) Provides a... -
Page 25: Programming Buttons Layout
Palette & S IGHTING ONTROL ONSOLE NSTALLATION ETUP UIDE 4. Programming Buttons Layout The programming section of the desk provides direct access to intensity channels, channel attributes, playback control, console setup and display options. Information [Live] - Brings Up the Output Screen of the Console [Blind] - Activates Blind Mode to allow modification of cues, looks or palettes without affecting stage levels or Loads Cue and Looks. -
Page 26: Numerical Keypad
Palette & S IGHTING ONTROL ONSOLE NSTALLATION ETUP UIDE [Cue] - Recalls specific cue or initiates cue dialog box. [Edit] - Opens currently selectedcontrol for data entry (to change cue times, cue labels, etc.). [Look] - Recalls user-programmed scenes. [Group] - Specifies group selection. [Goto] - initiates goto cue dialog box. -
Page 27: Dialog Navigation Function
Palette & S IGHTING ONTROL ONSOLE NSTALLATION ETUP UIDE Dialog Navigation Function Depending on the currently active PALETTE software dialog box, each of the Softkeys will provide a related function. For example, if the Record As Cue dialog is active, pressing: [S1] prompts Cue List, [S2] prompts the Cue Number, [S4] prompts Name, etc. -
Page 28: Playback Controls Layout
Palette & S IGHTING ONTROL ONSOLE NSTALLATION ETUP UIDE 7. Playback Controls Layout The playback section of the desk provides controls for executing active cues and fading between two pre-stored scenes. These faders consist of A/B and C/D pile-on, automatic timed sliders. Playbacks [Select] - Selects cue list to display and default record location. -
Page 29: Console Buttons
Palette & S IGHTING ONTROL ONSOLE NSTALLATION ETUP UIDE CONSOLE BUTTONS 1. Plus, Minus, @ (At), Full, Out Buttons • [FULL] and [OUT] will set the level of selected channels without having to press [ENTER]. • When editing split up/down times, use [FULL] to highlight the Wait time (start of line) and [OUT] to edit the Fade time (end of line). -
Page 30: Edit Button
Palette & S IGHTING ONTROL ONSOLE NSTALLATION ETUP UIDE 6. Edit Button • Pressing this button allows changes to the highlighted cells in the cue list (times, labels, follows etc.) or in the patch displays. Move the blue highlighted cells using the [ARROW KEYS]. •... -
Page 31: Load Button
Palette & S IGHTING ONTROL ONSOLE NSTALLATION ETUP UIDE 11. Load Button • Press [LOAD] then the desired Cue number to load a cue. The pink status bubble will tell you what is loaded. • Press [S4] to load the entire State of the cue (all the cumulative levels that got you to the look on stage at that point in the cue list). -
Page 32: Number Buttons
Palette & S IGHTING ONTROL ONSOLE NSTALLATION ETUP UIDE 16. Number Buttons • By default, typing on an empty command line, these buttons will select channels or channels. • Use in conjunction with the other keys (+, -, Thru etc.) close to these to select ranges of channels. •... -
Page 33: Select Button
Palette & S IGHTING ONTROL ONSOLE NSTALLATION ETUP UIDE 20. Select Button • Press a Select button to determine which cue list cue will be written to by default when you record cues. The 'selected' cue list will have an Amber LED on. •... -
Page 34: Step Forward / Step Back Buttons
Palette & S IGHTING ONTROL ONSOLE NSTALLATION ETUP UIDE 24. Step Forward / Step Back Buttons • Pressing the relevant button steps you through the Selected cue list using the step-time set in the properties of the cue list ([VIEW] [SELECT]). •... -
Page 35: View
Palette & S IGHTING ONTROL ONSOLE NSTALLATION ETUP UIDE 29. View • Opens the View Properties dialog box where properties are displayed: • Press [VIEW] [NUMBER] [ENTER] to see a channel's Label Dialog box. • Press [VIEW] [SELECT] to get a Cue List's properties. •... -
Page 36: Software Configuration
Palette & S IGHTING ONTROL ONSOLE NSTALLATION ETUP UIDE SOFTWARE CONFIGURATION 1. PALETTE Software Screen The following pages are brief descriptions of the main PALETTE software screen and its elements. More thorough information is always available in the software’s Help Menu. Help Menu User-Programmable Function Keys Virtual Look Masters... -
Page 37: User-Programmable Macro Buttons
Palette & S IGHTING ONTROL ONSOLE NSTALLATION ETUP UIDE 2. User-Programmable Macro Buttons To view these buttons, select "Macro Buttons" from Display menu. Right-click on a button to enter Macro Editor. 3. Cue List Directory The cue list directory shows what cue lists are programmed and ready for playback. -
Page 38: Channel And Attribute Grids
Palette & S IGHTING ONTROL ONSOLE NSTALLATION ETUP UIDE 6. Channel and Attribute Grids The PALETTE software provides a real-time status of all levels and effects in a cue in an user-friendly display. Users can select levels, blind, or times to see what is happening during playback or programming. If you have patched moving lights in your show, the Attribute Grid will appear below the channel Grid. -
Page 39: Palette Control Panel
Palette & S IGHTING ONTROL ONSOLE NSTALLATION ETUP UIDE 9. PALETTE Control Panel The PALETTE software runs on a custom processor under the Windows® XP Embedded operating system (OS). An embedded operating system means that only the software necessary to run the console is installed. There are no extra user-configurable applications that are included in the OS. - Page 40 Palette & S IGHTING ONTROL ONSOLE NSTALLATION ETUP UIDE Explanations of the icons (shown below) are covered in the following pages. System Date, Time, DST, & Time-Zone Screen Resolution & Screen Saver Mouse/Trackpad Setup Keyboard Options Accessibility Options Network Configuration Monitor Power Saver Printers and Printing Shutdown System...
-
Page 41: Accessibility Options
Palette & S IGHTING ONTROL ONSOLE NSTALLATION ETUP UIDE Accessibility Options • Use the Accessibility options in the Control Panel to change things such as: • Sticky Keys (one press on [SHIFT] - then one press on letter to get an upper case letter). •... -
Page 42: Windows Explorer
Palette & S IGHTING ONTROL ONSOLE NSTALLATION ETUP UIDE To adjust the Time Zone (which is important if using Astronomical Events or want to synchronize the system with World Time Services), select the second tab and choose the appropriate time zone. Check Daylight Savings Time box for adjusting to time changes. -
Page 43: Hardware Test
(s) or slider(s). Buttons or sliders that have been tested will display a green box. If a LED is not flashing, console lights that are not responding, buttons that are not responding, or buttons and sliders that turn green before you touch them, contact customer service at Strand Lighting. Internet Explorer... -
Page 44: Keyboard Options
Palette & S IGHTING ONTROL ONSOLE NSTALLATION ETUP UIDE Keyboard Options To change the repeat properties of the keys on the PALETTE processor's keyboard, choose Keyboard Options from the PALETTE Control Panel. Adjust the properties accordingly. Monitor Power Saver If the system is running 24 hours a day, seven days a week, it may be a good idea to use the Screen Saver option in from the PALETTE Control Panel. -
Page 45: Palette Mouse Properties
Palette & S IGHTING ONTROL ONSOLE NSTALLATION ETUP UIDE PALETTE Mouse Properties PALETTE's mouse has many options that can be adjusted by selecting the Mouse/Trackpad options from the PALETTE Control Panel. To setup mouse properties: Step 1. To enable or disable tap clicks or to change the button functions, select the "Taps and Buttons" tab. Step 2. -
Page 46: Network Configuration
Palette & S IGHTING ONTROL ONSOLE NSTALLATION ETUP UIDE Network Configuration If the PALETTE console can be connected to the facility's network, networking capabilities such as mapped network drives and Internet connection can be accessed. Most LANs have a DHCP Server (Dynamic Host Configuration Protocol) that automatically assigns network properties such as the IP address. -
Page 47: Notepad Text Editor
Palette & S IGHTING ONTROL ONSOLE NSTALLATION ETUP UIDE Step 4. Select "Internet Protocol (TCP/IP)" and click "Properties." a. Choose "Use the following IP address" (typically 192.168.0.68). b. Type in the static IP address and appropriate Subnet mask provided by the network administrator. c. -
Page 48: Outlook Express
Palette & S IGHTING ONTROL ONSOLE NSTALLATION ETUP UIDE Outlook Express An e-mail application, Outlook Express, is included. If the console is connected to a Local Area Network that is connected to the Internet, e-mails can be sent and received mail directly from PALETTE. -
Page 49: Read Release Notes
Palette & S IGHTING ONTROL ONSOLE NSTALLATION ETUP UIDE Read Release Notes Each and every update to the PALETTE software will have accompanying Release Notes that explains what is new or what has changed in latest release. After installation of the software, a dialog box will appear showing the release notes. -
Page 50: Changing The Screen Saver
Palette & S IGHTING ONTROL ONSOLE NSTALLATION ETUP UIDE Step 3. Click "OK." The screen may blank for a moment or two and may ask you if you want to keep the settings. If you monitor cannot handle the new resolution after a short period of time, the settings will revert to their original state. -
Page 51: Elo Touchscreens
The PALETTE processor supports the use of a touchscreen monitor. Due to mouse driver requirements, only ELO Touchscreens should be used. ELO touchscreens can be purchased from your local Strand Lighting dealer The AccuTouch 3000 series models are recommended, since they feature resistive technology (i.e. you can point with objects other than your finger such as a pen, etc.) Purchase the USB type, NOT the serial type. -
Page 52: On-Screen Keyboard
Palette & S IGHTING ONTROL ONSOLE NSTALLATION ETUP UIDE On-Screen Keyboard If you are using touchscreens with your console, you may want to launch the On-Screen Keyboard from the "Additional Apps" button in the Control Panel. Additional Applications This button is used to view and run additional factory-installed applications (or to set up touchscreens as detailed above). -
Page 53: Printers And Printing
Palette & S IGHTING ONTROL ONSOLE NSTALLATION ETUP UIDE Printers and Printing Printing is achieved by connecting the PALETTE processor to a Local Area Network Printer, which saves you from having to move the printer close to the console. It also allows you to use any new printer you have successfully installed on your LAN without having to find printer drivers. -
Page 54: Restoring The Software
PALETTE Application CD or USB Key in the processor. This method does not archive the install, but you can always store the CD. Follow the procedure below to re-install. To re-install PALETTE software: Step 1. Install PALETTE PC on computer. Step 2. Contact Strand Lighting Technical Service. RESTORING THE SOFTWARE... -
Page 55: Chapter 4. Setup
Palette & S IGHTING ONTROL ONSOLE NSTALLATION ETUP UIDE Setup • ACCESSORY - HARDWARE COMPONENTS Note: This chapter provides software operations which are necessary to configure console hardware components. -
Page 56: Accessory - Hardware Components
Palette & S IGHTING ONTROL ONSOLE NSTALLATION ETUP UIDE ACCESSORY - HARDWARE COMPONENTS 1. Overview The PALETTE console is highly configurable and can be set up in different ways depending on your requirements. The Hardware Setup window provides setup options. Components such as slider and button array panels, Grandmasters, triggers, and console lights can be configured by pressing the appropriate tab in the window. -
Page 57: Preset Scene Mode
Palette & S IGHTING ONTROL ONSOLE NSTALLATION ETUP UIDE Preset Scene Mode Scene Mode allows you to operate the PALETTE as a common 2-Scene console. This is achieved by setting up two slider banks, one as Scene A and the other as Scene B, and assigning the A/B fader pair as the A/B Two Scene Master. If you set a slider bank to be either Scene A, B, C or D, the intensity level of the specified channels will be multiplied by the level of the appropriate Scene Master (see A/B C/D (X1 - X2) setup below). - Page 58 Palette & S IGHTING ONTROL ONSOLE NSTALLATION ETUP UIDE • Disabled - If you chose this option, the sliders will do nothing. If you are just doing a "GO SHOW," this is the saf- est mode of operation as inadvertent moves on these faders will have no affect. •...
-
Page 59: Dead Black Out (Dbo)
Palette & S IGHTING ONTROL ONSOLE NSTALLATION ETUP UIDE • It does not matter if the handle is at the top or bottom when you start to use it. As long as it is at one end, it will function as a manual crossfader, moving you forward through the cue list. •... -
Page 60: Last Action Editing
Palette & S IGHTING ONTROL ONSOLE NSTALLATION ETUP UIDE Last Action Editing This option affects the way the [REL] key or [ESC] key releases channels. By default, it is not checked in new show files. When it is checked, the multi-stage release and undo of released channels ([SHIFT]+[REL]) is disabled. Instead, pressing [REL] simply deselects the selected channels keeping them "captured."... - Page 61 Palette & S IGHTING ONTROL ONSOLE NSTALLATION ETUP UIDE Click on Macro or press [F5] to add a Macro Command. The Macro Editor will appear. The main [F11] tab on the left should be set to Command, showing the commands available in the list under [F1]. Press the softkey until the desired command is highlighted, then press [F3] to insert it into the list on the right.
- Page 62 Palette & S IGHTING ONTROL ONSOLE NSTALLATION ETUP UIDE Notes ACCESSORY - HARDWARE COMPONENTS...
-
Page 63: Chapter 5. Operation
Palette & S IGHTING ONTROL ONSOLE NSTALLATION ETUP UIDE Operation • SELECTING CHANNELS and SETTING LEVELS • RECORDING A CUE OR LOOK Note: This chapter provides software operations which will get the system up and running. For complete software operation instructions, refer to the PALETTE Software User Manual. -
Page 64: Selecting Channels And Setting Levels
Palette & S IGHTING ONTROL ONSOLE NSTALLATION ETUP UIDE SELECTING CHANNELS and SETTING LEVELS 1. Channel Grid Overview Channel information is displayed on the Channel Grid (shown below) with the channel number on the top row of numbers and the level on the bottom row. Selecting a channel is the first step towards setting or modifying levels. Channels may be selected with the mouse or with keystrokes. -
Page 65: Using The Keypad To Select Channels
Palette & S IGHTING ONTROL ONSOLE NSTALLATION ETUP UIDE 2. Using the Keypad to Select Channels To Select Channels Using Keypad: Step 1. At keypad, enter number of channel(s) you wish to select. (Typing will be reflected in the Command Line.) Step 2. -
Page 66: Recording A Cue Or Look
Palette & S IGHTING ONTROL ONSOLE NSTALLATION ETUP UIDE RECORDING A CUE OR LOOK 1. Recording a Cue Fast Description Step 4. Select channels and set levels. Step 5. Press [REC] [ENTER] or [REC] [SELECT] on the Playback you want to use. Step 6. - Page 67 Palette & S IGHTING ONTROL ONSOLE NSTALLATION ETUP UIDE The following properties are optional: [S1] - If needed, select the "Cue List" to record to. The default is the cue list you currently have selected. [S3] - Change the "Record" option if needed. The default option is to record your Changed Attributes or those marked by the delta symbol: To find out what the other options mean and when to use them, refer to the PALETTE Software Help Menu.
- Page 68 Palette & S IGHTING ONTROL ONSOLE NSTALLATION ETUP UIDE [S10] - De-select "Edits Track Forward" if you are updating a cue which is not the last cue in the cue list and you don't want the changes you've just made to go past this cue. This option is ON by default. You can change the default in [S2] "Show Options."...
-
Page 69: Recording A Look (Submaster)
Palette & S IGHTING ONTROL ONSOLE NSTALLATION ETUP UIDE As soon as you type the "/" symbol for Thru, the Label, Cue Timing and Update control become inactive. When recording through a range of cues, new cues will never be created as this type of recording is necessarily an update operation. - Page 70 Palette & S IGHTING ONTROL ONSOLE NSTALLATION ETUP UIDE Step 6. Enter number of the Look Master you wish to record. Step 7. Enter a Look Master label in the text box (optional). Step 8. From drop down list box, select which channels will be recorded in this Look Master a.
-
Page 71: Appendix A. Specifications
• 91802 48/96 presetPalette Console 52.7 x 17.8 x 4.5" (1339 x 452 x 115mm) • 91803 150 classicPalette Console 25.2 x 17.8 x 4.5" (640 x 452 x 115mm) • 91804 250 classicPalette Console 25.2 x 17.8 x 4.5" (640 x 452 x 115mm) •... - Page 72 Palette & S IGHTING ONTROL ONSOLE NSTALLATION ETUP UIDE Notes Specifications...
-
Page 73: Appendix B. Palette Software Tips
Palette & S IGHTING ONTROL ONSOLE NSTALLATION ETUP UIDE PPENDIX PALETTE Software Tips 1. Helpful Tips and Shortcuts Below are some helpful tips and shorts to operate and program your PALETTE Lighting Control Console. Take a few moments to review these for future use. The tips are also available through the PALETTE software. •... - Page 74 Palette & S IGHTING ONTROL ONSOLE NSTALLATION ETUP UIDE • Using the command line, you can alter intensity levels relative to their current position using the [1] [THRU] [10] [@] [+] [15] [ENTER] syntax. The command line will read “Up” when you press [+]. Similarly you can press [-] for “Down”.
- Page 75 Palette & S IGHTING ONTROL ONSOLE NSTALLATION ETUP UIDE • The release button has multiple functions. It will close any open dialog box or it will release selected channels if no dialog box is open. Press SHIFT + REL to bring back what you just cleared. •...
- Page 76 Palette & S IGHTING ONTROL ONSOLE NSTALLATION ETUP UIDE • When editing wait/fade times using the blue box, use [FULL] to highlight the Wait time (start of line) and [OUT] to edit the Fade time (end of line). • To enter time in HH:MM:SS format, press the decimal key twice to make the colon. This is used for VERY long fade times or when entering SMPTE times.
- Page 77 Palette & S IGHTING ONTROL ONSOLE NSTALLATION ETUP UIDE • The pink Tools bubble will tell you what tool you will get if you touch the TOOLS button. To change the tool, press and hold TOOLS and select a new tool using the SOFTKEYS. •...
- Page 78 Palette & S IGHTING ONTROL ONSOLE NSTALLATION ETUP UIDE Notes PALETTE Software Tips...
- Page 79 We reserve the right to change details of design, materials and finish in any way that will not alter the installed appearance or reduce function performance. For technical/sales assistance, call: Strand Lighting, Inc. +1- 714-230-8200 A Genlyte Company 6603 Darin Way Made in USA ©...
Need help?
Do you have a question about the ClassicPalette and is the answer not in the manual?
Questions and answers