Allied Telesis AT-2400 Series Installation Manual
Network adapter cards
Hide thumbs
Also See for AT-2400 Series:
- Installation manual (142 pages) ,
- Installation manual (80 pages) ,
- Installation manual (128 pages)
Table of Contents
Advertisement
Quick Links
Download this manual
See also:
Installation Manual
Installation
Guide
BOOK II
FOR MICROSOFT WINDOWS FOR WORKGROUPS
3.11, MICROSOFT DOS CLIENT 3.0, NOVELL
NETWARE 4.X, 5.X, AND 6.X, LINUX 2.2X AND 2.4X,
AND BOOT ROM OPERATING SYSTEMS
PN 613-50383-00 Rev D
Network
Adapter Cards
AT-2400 Series
AT-2450/AT-2451 Series
AT-2500/AT-2501 Series
AT-2700/AT-2701 Series
AT-2745/AT-2746 Series
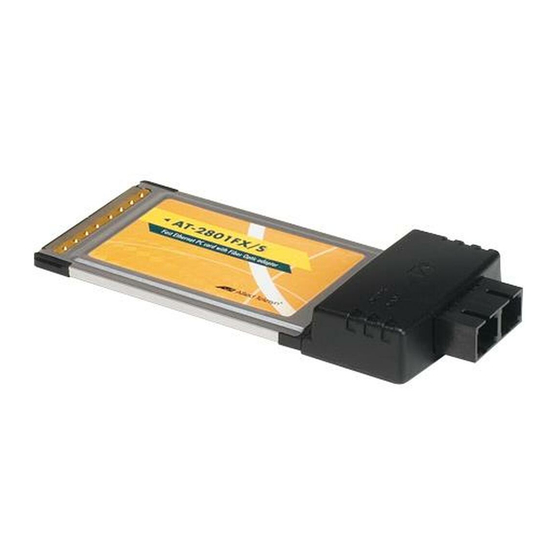
AT-2801FX
AT-2915 Series
AT-2916T Series
AT-2930 Series
AT-2970/AT-2971 Series
®
Advertisement
Table of Contents

Related Manuals for Allied Telesis AT-2400 Series


Summary of Contents for Allied Telesis AT-2400 Series
-
Page 1: Adapter Cards
Network Adapter Cards ® AT-2400 Series AT-2450/AT-2451 Series AT-2500/AT-2501 Series AT-2700/AT-2701 Series AT-2745/AT-2746 Series AT-2801FX AT-2915 Series AT-2916T Series AT-2930 Series AT-2970/AT-2971 Series Installation Guide BOOK II FOR MICROSOFT WINDOWS FOR WORKGROUPS 3.11, MICROSOFT DOS CLIENT 3.0, NOVELL NETWARE 4.X, 5.X, AND 6.X, LINUX 2.2X AND 2.4X,... - Page 2 Allied Telesyn, Inc. has been advised of, known, or...
-
Page 3: Electrical Safety And Emission Statement
Electrical Safety and Emission Statement Standards: This product meets the following standards. U.S. Federal Communications Commission Radiated Energy Note: This equipment has been tested and found to comply with the limits for a Class A digital device pursuant to Part 15 of the FCC Rules. -
Page 5: Table Of Contents
Purpose of this Guide ......................................9 How This Guide is Organized ...................................10 Document Conventions ....................................11 Where to Find Related Guides ..................................12 Contacting Allied Telesyn ....................................13 Online Support......................................13 E-mail and Telephone Support ................................13 Returning Products......................................13 For Sales or Corporate Information ...............................13 Obtaining Management Software Updates ............................13... - Page 6 Table of Contents Chapter 3 Microsoft DOS Client 3.0 ....................................37 Installing a Network Adapter Driver ................................38 Sample Configuration ....................................39 Removing a Network Adapter Driver ................................40 Chapter 4 Microsoft Windows for Workgroups ............................... 41 Installing a Network Adapter Driver ................................42 Installing NDIS2 and ODI Drivers ................................
- Page 7 Network Adapter Card Installation Guide - Book II Chapter 7 AT-2971 Solaris Sparc ......................................69 Installing a Solaris Sparc Driver on a AT-297x Series Adapter ......................70 Overview..........................................70 Required Files ........................................70 Installing the Driver .....................................70 Using pkgadd.........................................70 Procedures During Installation................................72 Removing the Driver ......................................73 Adding Adapters ........................................74 Installing the Adapter using pkgrm and pkgadd ..........................74 Driver Parameters ........................................75...
-
Page 9: Preface
Preface This installation guide contains instructions on how to install an Allied Telesyn adapter card in your computer and how to load the adapter driver. This guide also explains the AT-Setup program which simplifies the task of installing or updating an adapter driver. Purpose of this Guide This guide is intended for anyone who needs to install or update a network adapter card or driver on their PC-compatible system. -
Page 10: How This Guide Is Organized
Sparc, contains the procedures for installing the driver for an AT-2971 adapter in a Solaris Sparc system. Chapter 8, BootROM, contains the procedures for installing and configuring a BootROM on an Allied Telesyn Network Adapter Card. Appendix A, Translated Safety and Emission... -
Page 11: Document Conventions
Network Adapter Card Installation Guide - Book II Document Conventions This guide uses several conventions that you should become familiar with before you begin to install the product. Note Notes provide additional information. Warning Warnings inform you that performing or omitting a specific action may result in bodily injury. -
Page 12: Where To Find Related Guides
Preface Where to Find Related Guides The Allied Telesyn web site at www.alliedtelesyn.com offers you an easy way to access the most recent documentation, software updates, and technical information for all of our products. The documents provided on our web site are available as PDF files. -
Page 13: Contacting Allied Telesyn
To obtain a RMA number, contact Allied Telesyn’s Technical Support at our web site at www.alliedtelesyn.com For Sales or You can contact Allied Telesyn for sales or corporate information at our web site at www.alliedtelesyn.com. To find the contact information for Corporate your country, select “Contact Us”... -
Page 15: Installing The Network Adapter Card
AT-2916T Series AT-2930 Series AT-2970/AT-2971 Series Verifying Make sure the following items are included in your package. If any item is missing or damaged, contact your Allied Telesyn sales representative Package for assistance. Contents Allied Telesyn Network Adapter Card CardAssistant CD... -
Page 16: Reviewing Safety Precautions
Installing the Network Adapter Card Reviewing Safety Precautions Please review the following safety precautions before you install the network adapter card. Warning This is a “Class 1 LED product”. Warning Do not stare into the laser beam. (AT-2450FT, AT-2450FL, AT-2451FTX, AT-2700FX, AT-2701, AT-2970, AT-2971SX Series only) Warning Lightning Danger: Do not work on this equipment or cables during... -
Page 17: Installing A Network Adapter Card
Network Adapter Card Installation Guide - Book II Installing a Network Adapter Card This section explains how to install a network adapter card in most PC- compatible computers. Note If you are installing an AT-2801FX CardBus PC Card, refer to Installing an AT-2801FX on page 19. - Page 18 Installing the Network Adapter Card Note If you cannot locate or know how to find an PCI slot, refer to the documentation that came with your PC. Remove the network adapter card from the shipping package and store the packaging material in a safe location. Caution Wear a grounding device and observe electrostatic discharge precautions when installing the network adapter card in a PC.
-
Page 19: Installing An At-2801Fx
Network Adapter Card Installation Guide - Book II For the AT-2450, AT-2500, or AT-2700 Series adapters, to use the adapter card’s Wake-on-LAN feature in your computer using an Advanced Configuration and Power Interface (ACPI), you must connect the Wake-on-LAN cable to the Wake-on-LAN connector on the adapter card and to the Wake-on-LAN connector on the motherboard of the computer. -
Page 21: Chapter 2 Diagnostics
Chapter 2 Diagnostics This chapter contains the following procedures: Running Diagnostics on page 22 Additional Functions of the Diagnostics Program on page 31... -
Page 22: Running Diagnostics
Diagnostics Running Diagnostics For the AT-24xx Command line option for diag.exe: Series Run command-line diagnostics Enable External Loopback Test when running diagostics -pme Enable PME OverWrite mode -nopxe Disable boot ROM support -pxe Enable boot ROM support Auto-negotiation 100Mb/half-duplex 100Mb/full-duplex 10Mb/half-duplex 10Mb/full-duplex Enable copper port as default... -
Page 23: For The At-2801Fx Series
Network Adapter Card Installation Guide - Book II Diagnostics There are two diagnostic utilities, Card Test and Network Test. Card Test This test checks several parts and functions of the adapter card to ensure proper operation of the adapter card. Network test This test allows the user to send and receive raw packets without a driver loaded to check the card functionality. -
Page 24: For The At-2916T, At-2970, And At-2971 Series
If ON, power OFF your computer and reboot into DOS mode. At the DOS prompt and without the drivers loaded, type diag.exe. The location of the diagnostic files on the CardAssistant CD are: Adapter Card Diagnostic Location AT-2400 Series \drivers\at2400\diag\diag24.exe AT-2500, AT-2501 Series \drivers\at2500\diag\diag25.exe AT-2450, AT-2700, \drivers\at24_27\diag\diag.exe... -
Page 25: Loopback Test For Fiber Adapters
Network Adapter Card Installation Guide - Book II Note The tests do not run in a Windows DOS box. The location of the diagnostic file on the CardAssistant CD is: Adapter Card Driver Location AT-2916T, AT-2970, AT-2971 \drivers\at2971_16\diag\diagGE.exe Series Loopback Test To perform the loopback test on fiber adapters, you will need a loopback connector. - Page 26 Diagnostics From the Main Menu of the diagnostics program, select one of the following: DIAGNOSTICS for the simple test (no loopback) LOOPB. WRAP PLUG for the loopback test The various components will now be tested. This will take between one and two minutes. If the test was successful, a window similar to Figure 6 will be displayed.
-
Page 27: Repeater Test For Copper Adapters
Network Adapter Card Installation Guide - Book II 12. Remove the loopback connector from the port. 13. Re-connect the data cables to the network port. Caution For safety reasons, if the adapter is not connected immediately to the data network, insert the protective plug. Otherwise laser light may be emitted. - Page 28 Diagnostics 12. Insert the CardAssitant CD into the CD-ROM drive. 13. Go to the product directory and type diagGE. 14. Press <Enter>. 15. From the Main Menu of the diagnostics program, select LOOPB.WRAP PLUG. 16. Press <Enter>. When the test was successful, the message All tests passed successfully is dis-played.
-
Page 29: Failure Of A Test
Network Adapter Card Installation Guide - Book II Failure of a Test Figure 7 Diagonstic Window (2 of 5) For a test to be completed successfully, each of the following conditions must be met: The network adapter operates correctly. The network adapter is cabled correctly for the test or is equipped with the correct connectors. - Page 30 Diagnostics If it is necessary to install the network adapter again, perform the following procedure: Switch OFF the computer. Be sure to observe the Translated Safety and Emission Information on page 121. Remove the computer cover. Refer to the manual that came with your computer for instructions or refer to Installing a Network Adapter Card...
-
Page 31: Additional Functions Of The Diagnostics Program
Network Adapter Card Installation Guide - Book II Additional Functions of the Diagnostics Program Checking Other In addition to performing the three network adapter tests, the diagnostics program can also read out network adapter-specific data Displays and that may be useful for pinpointing the causes of failure. Data You can: read sensor data... -
Page 32: Reading Sensor Data
Diagnostics The Main Menu as shown in Figure 8 is displayed: Figure 8 Diagnostic Window (3 of 5) Select the appropriate item from the menu. To quit the program, select EXIT in the Main Menu. This option is automatically offered for selection if you did not select a menu item previously. -
Page 33: Reading Configuration Data
Network Adapter Card Installation Guide - Book II You can close the window by selecting Hide Sensors from the Main Menu. Other windows may be opened while this window is still open, for example, the window displaying the configuration data. Reading To read configuration data, perform the following procedure: Configuration... -
Page 34: Reading Vpd Data
Diagnostics Figure 9 Diagnostic Window (4 of 5) Reading VPD To read VPD data (Vital Product Data), perform the following procedure: Data Start the main program. Refer to Main Program on page 31 for instructions. Select VPD Data from the Main Menu. A submenu with the following options will be displayed: EXIT (return to the Main Menu) DISPLAY VPD DATA... - Page 35 Network Adapter Card Installation Guide - Book II Figure 10 Diagnostic Window (5 of 5) Select the desired option or return to the Main Menu by selecting Exit (default option).
-
Page 37: Microsoft Dos Client 3.0
Chapter 3 Microsoft DOS Client 3.0 This chapter contains the following procedures for the AT-24xx, AT-25xx, and AT-2700 Series adapters: Installing a Network Adapter Driver on page 38 Removing a Network Adapter Driver on page 40... -
Page 38: Installing A Network Adapter Driver
Return. If you are using the CD, the location of the adapter driver will differ depending on the type of adapter. Below are the driver locations on the CardAssistant CD: Adapter Card Driver Location AT-2400 Series \drivers\at2400\msclient \drivers\at2500\msclient AT-2500/AT-2501 Series... -
Page 39: Sample Configuration
10. Once you have entered the drive letter and path to the adapter driver and pressed Return. The next screen will display the Allied Telesyn AT-250x PCI Ethernet Adapter. 11. Press Return to select the driver and proceed with the installation according to the Microsoft documentation. -
Page 40: Removing A Network Adapter Driver
Microsoft DOS Client 3.0 Removing a Network Adapter Driver This section contains the procedure for removing an adapter driver from a system running Microsoft Client 3.0. To remove an adapter driver, perform the following procedure: Start the Microsoft setup utility. Select Change Network Configuration. -
Page 41: Microsoft Windows For Workgroups
Chapter 4 Microsoft Windows for Workgroups This chapter contains procedures the following procedures for the AT-24xx, AT-25xx, AT-2700 Series adapters: Installing a Network Adapter Driver on page 42 Removing a Network Adapter Driver on page 48... -
Page 42: Installing A Network Adapter Driver
If you are using the CD, the location of the appropriate driver will differ depending on the type of adapter. Below are the driver locations on the CardAssistant CD: Adapter Card Location AT-2400 Series \drivers\at2400 AT-2500/AT-2501 Series \drivers\at2500 AT-245x Series, AT-27xx... - Page 43 Adapter dialog box, verify that Allied Telesyn PCI Ethernet Adapter is highlighted, then click OK. 15. In the Network Drivers dialog box, verify that Allied Telesyn PCI Ethernet Adapter and its default protocols, Microsoft NetBEUI and IPX/SPX Compatible Transport with NetBIOS, appear in the Network Drivers list, then click Close.
-
Page 44: At-245X, At-27Xx Ndis2 Keywords
Microsoft Windows for Workgroups AT-245x, The AT-245x and AT-27xx series NDIS2 driver supports the following options: AT-27xx NDIS2 Keywords 0 = auto 1 = 100H 2 = 100F 3 = 10H 4 = 10F 5 = hardware Sample [network.setup] version=0x3110 PROTOCOL.INI netcard=ms$a2500,1,MS$a2500,3 File... -
Page 45: Netwareipxodi Support For Netware 3.X
If you are using the CardAssistant CD, the location of the appropriate driver will differ depending on the type of adapter. Below are the driver locations on the CardAssistant CD: Adapter Card Location AT-2400 Series \drivers\at2400\Dosodi AT-2500/AT-2501 Series \drivers\at2500\Dosodi AT-2450 Series, AT-2700... -
Page 46: Netware Ipxodi Support For Netware 4.X
Microsoft Windows for Workgroups 12. From the Windows Setup dialog box, select Continue. 13. Edit the Autoexec.bat file by inserting the following file references before C:\WINDOWS\odihlp.exe: c:\ net\lsl c:\net\a2500 (atnic,a2400) c:\net\ipxodi c:\net\netx 14. Exit Windows and re-boot your PC by powering OFF then ON. NetWare Verify that the ODI drivers for the AT-2500/AT-2501 Ethernet Adapter Card are NOT loaded before setting up Windows for... -
Page 47: Sample Net.cfg And Protocol.ini Files
Network Adapter Card Installation Guide - Book II Sample NET.CFG NET.CFG and Preferred Server = MyServer PROTOCOL.INI Link Driver a2500 Files LineSpeed 100F (optional) Frame Ethernet_802.3 Frame Ethernet_II Frame Ethernet_802.2 Frame Ethernet_SNAP VLM Support NETWARE DOS REQUESTER FIRST NETWORK DRIVE=F PROTOCOL.INI [network.setup] version=0x3110... -
Page 48: Removing A Network Adapter Driver
Microsoft Windows for Workgroups Removing a Network Adapter Driver This section contains the procedure for removing a network adapter driver from a system running Microsoft Windows for Workgroups 3.11. The initial installation copies the OEMSETUP.INF to your WINDOWS\SYSTEM directory. It renames the file to OEMx.INF, where x is a number starting with 0 for drivers that are not shipped with Windows for Workgroups;... -
Page 49: Chapter 5 Novell Netware
Chapter 5 Novell Netware This chapter contains the following procedures: Installing a Network Adapter Driver on Novell Netware 4 Server page 50 Installing a Network Adapter Driver on Novell NetWare 5.x/6.x page 55... -
Page 50: Installing A Network Adapter Driver On Novell Netware 4 Server
Novell NetWare 4 Server. Files Needed for The .LDI file and the .LAN file for your adapter must be present to succesfully complete installation. The location for each Allied Telesyn Installation adapter are as follows:... -
Page 51: Installing The Drivers
LOAD <DRIVE>:<PATH>\<DRIVER> where <DRIVE> and <PATH> are the drive and directory where you copied the NLMs and the adapter file. <DRIVER> is the filename of the adapter driver. Adapter Card Location AT-2400 Series \drivers\at2400\netware\ AT-2500/AT-2501 Series \drivers\at2500\netware\ AT-2450/AT-2451 Series, \drivers\at24_27\netware\... - Page 52 Novell Netware Note The default frame type for Novell file servers is now Ethernet_802.2. If you require Ethernet_802.3, specify FRAME=ETHERNET_802.3 on the command line when loading the driver. To load multiple frame types for a single card, enter a LOAD and BIND statement for each frame type.
-
Page 53: Multiple Adapters
Network Adapter Card Installation Guide - Book II Multiple If a system has multiple Allied Telesyn Ethernet Adapters, you use the keyword SLOT to identify each card to the driver. If you have multiple Adapters adapters in a single server, each adapter must have a different network number and SLOT number. -
Page 54: Removing An Adapter Driver From Novell Netware 4 Server
Novell Netware Removing an This section contains the procedure for removing a network adapter driver from a system running Novell Netware 4 Server. Adapter Driver from Novell Type LOAD INSTALL at the server console to bring up the server Netware 4 installation module. -
Page 55: Installing A Network Adapter Driver On Novell Netware 5.X/6.X
Novell NetWare 5.x/6.x. Files Needed for The .LDI file and the .LAN file for your adapter must be present to succesfully complete installation. The location for each Allied Telesyn Installation adapter are as follows: Adapter Card... -
Page 56: Manual Installation
Novell Netware If you are using the CardAssistant CD, the names and locations of the adapter drivers are as follows: Adapter Card Location AT-2400 Series \drivers\at2400\netware\ AT-2500/AT-2501 Series \drivers\at2500\netware\ AT-2450/AT-2451 Series, \drivers\at24_27\netware\ AT-2700/AT-2701 Series, AT-2745/AT-2746 Series, AT-2915 Series, AT-2930 \drivers\at29xx\netware\... - Page 57 Network Adapter Card Installation Guide - Book II Where <DRIVE> and <PATH> are the drive and directory where you copied the NLMs and the adapter driver file. <DRIVER> is the filename of the driver. Note If MSM and ETHERTSM NLMs are not loaded, they will automatically load before the driver.
-
Page 58: Multiple Adapters
#) Proceed with the installation as outlined by Novell. Multiple If you have multiple Allied Telesyn adapters installed in the system, use the keyword SLOT to identify each card to the driver. If you have Adapters multiple adapters in a single server, each adapter must have a different network number and SLOT number. - Page 59 Network Adapter Card Installation Guide - Book II 1-3 adapters: 100 4 adapters: 150 The maximum you can specify depends on the amount of memory in the server, but it must be greater than the minimum.
-
Page 60: Removing An Adapter Driver From Novell Netware 5/6 Server
Novell Netware Removing an This section contains the procedure for removing a network adapter driver from a system running Novell Netware 5 or Netware 6 Server. Adapter Driver from Novell To remove a driver, you can either use the NWCONFIG program supplied Netware 5/6 with NetWare or edit the AUTOEXEC.NCF in the SYS:SYSTEM directory with a text editor. -
Page 61: Chapter 6 Linux
Chapter 6 Linux This chapter contains the following procedures: Installing the ATNIC Driver for AT-2450/AT-2451, AT-2700/ AT-2701 Series, and AT-2745/AT-2746 Series PCI Ethernet Adapters on page 62 Installing a Linux Driver for an AT-2915 and AT-2930 Series Network Adapter on page 64 Installing Linux Driver on a AT-2916T, AT-2970, or AT-2971 Series Adapters on page 67... -
Page 62: Installing The Atnic Driver For At-2450/At-2451, At-2700/ At-2701 Series, And At-2745/At-2746 Series Pci Ethernet Adapters
If you only see a linux directory, chances are you've got the wrong source files installed. Copy the Allied Telesyn driver source TAR file to a temporary directory, and type tar -xvf <filename> to extract the files. Edit Makefile using VI or your favorite text editor, and change the LINUX path variable to the directory name where the kernel source files are installed. -
Page 63: Dynamic Loading
Network Adapter Card Installation Guide - Book II Dynamic Type insmod atnic32.o to dynamically load the driver without installing it into the operating system. Loading To configure network protocol and address, refer to Linux documentations. Changing To enable Autonegotiation edit the /etc/conf.modules file to add the line options atnic options=0 below the alias eth0 atnic Configuration line. -
Page 64: Installing A Linux Driver For An At-2915 And At-2930 Series Network Adapter
If you only see a linux directory, chances are you've got the wrong source files installed. Copy the Allied Telesyn driver source TAR file to a temporary directory, and type tar -xvf <filename> to extract the files. Edit Makefile using VI or your favorite text editor, and change the LINUX path variable to the directory name where the kernel source files are installed. -
Page 65: Module Parameters
Network Adapter Card Installation Guide - Book II Module Optional parameters for the driver can be supplied as command line arguments to the insmod command. Typically, these parameters are set Parameters in the file /etc/modules.conf (see the man page for modules.conf). These parameters take the form: <parameter>=value[,value,...] where the multiple values for the same parameter are for multiple NICs... - Page 66 Linux rx_flow_control Enables or disables receiving flow control (pause) frames. This parameter is used together with auto_flow_control. The valid values are: pause receive disabled (default) pause receive enabled if auto_flow_control is set to 0, or pause receive advertised if auto_flow_control is set to 1 tx_flow_control Enables or disables transmitting flow control (pause) frames.
-
Page 67: Installing Linux Driver On A At-2916T, At-2970, Or At-2971 Series Adapters
Network Adapter Card Installation Guide - Book II Installing Linux Driver on a AT-2916T, AT-2970, or AT-2971 Series Adapters Overview The sk98lin driver installation script supports the Allied Telesyn AT-2971 and AT-2916 Series Adapters. It has been tested with Linux on Intel/x86 systems. Required FIles The Linux kernel source is available in directory ‘/usr/src/linux’... -
Page 68: Loading The Module Manually
Linux Loading the To load the module manually, perform the following procedure: Module Enter modprobe sk98lin. Manually If an AT-2971 or AT-2916 adapter is installed in your computer and you have a /proc file system, execute the command: # ls /proc/net/sk98lin/ This should produce an output containing a line with the following format: eth0... -
Page 69: At-2971 Solaris Sparc
Chapter 7 AT-2971 Solaris Sparc This chapter contains the following sections: Installing a Solaris Sparc Driver on a AT-297x Series Adapter page 70 Removing the Driver on page 73 Adding Adapters on page 74 Driver Parameters on page 75 Dual Net Operation Mode on page 86 VLAN Configuration and Parameters on page 90... -
Page 70: Installing A Solaris Sparc Driver On A At-297X Series Adapter
AT-2971 Solaris Sparc Installing a Solaris Sparc Driver on a AT-297x Series Adapter Overview The AT-2971 driver supports the Allied Telesyn AT-2970 and AT-2971 Adapter Series on Solaris 7 or higher. Required Files The driver installation files are located in AT2971_sparcv6.08.tar.Z. You can copy this file onto your system, as long as you do not change the files within the package. - Page 71 Network Adapter Card Installation Guide - Book II If no, only the driver will be loaded and you have to configure all the interfaces manually. If successful, you will be prompted to reboot your system. The driver has been loaded. Automatic Installation During automatic installation, you are not required to enter any input.
-
Page 72: Procedures During Installation
AT-2971 Solaris Sparc (Optional) Reboot your system. The driver has been loaded. Procedures This is a brief description of what happens during installation. This information is not needed to install and use the driver but it may be During useful if any problems occur: Installation The driver software package is added to the Solaris package database. -
Page 73: Removing The Driver
Network Adapter Card Installation Guide - Book II Removing the Driver Note In case you have changed the configuration settings in the skge.conf file and you want to keep the settings, make a backup file before removing the driver. To remove the driver, perform the following procedure: Enter pkgrm SKGEsol. -
Page 74: Adding Adapters
AT-2971 Solaris Sparc Adding Adapters There are two ways of adding additional adapters to an existing installation: Remove the driver with pkgrm, insert the additional adapters, and then reinstall the driver using pkgadd. Add the necessary adapters manually. Installing the To add additional adapters, perform the following procedure: Adapter using Enter pkgrm SKGEsol. -
Page 75: Driver Parameters
Network Adapter Card Installation Guide - Book II Driver Parameters Parameters can be set in a file called skge.conf in the directory /kernel/drv. This file is created during installation, but does only contain comments. Edit it to review your settings. The syntax for this file is : for string parameters: ParamName="string";... -
Page 76: Per-Port Parameters
AT-2971 Solaris Sparc 69 1026bb64 322bb skge ... The module ID is the first value in the row above, in our example "69". This ID is needed to unload the driver with the command modunload. Remove the driver module from the kernel with the command: modunload -i <module_id>... - Page 77 Network Adapter Card Installation Guide - Book II Note Sense-mode will fail if your link partner is configured to half-duplex with no auto-negotiation enabled. AutoNegotiation_? and DuplexCapabilities_? have to be set manually in this case. Note Sense-mode is not possible with 1000Base-T (copper) adapters. If you select Sense, it will be mapped to ON automatically.
- Page 78 AT-2971 Solaris Sparc The values represent the following configurations: SymOrRem = SymmetricOrRemote Both or only the remote link partner are allowed to send PAUSE frames (possible results: symmetrical flow control, asymmetrical flow control towards local station, no flow control). Sym = Symmetric Both link partners are allowed to send PAUSE frames (possible results: symmetrical flow control, no flow control).
- Page 79 Network Adapter Card Installation Guide - Book II Role_?_InstX Type: string Default value: Auto Valid values: Auto Master Slave Note This parameter is only valid for SK-982x and SK-982x V2.0 adapters. Note If auto-negotiation is set to OFF, the correct role must be set manually.
-
Page 80: Per-Adapter Parameters
AT-2971 Solaris Sparc Per-adapter In the following description, 'X' stands for the instance number of the according adapter. Parameters PreferredPort_InstX Type: string Default value: Valid values: Note This parameter is only available for dual link adapters. This parameter determines the preferred port RLMT (Redundant Link Management Technology) will use for all network traffic, if more than one port has an active link to the network. - Page 81 Network Adapter Card Installation Guide - Book II CLPSS (Check Local Port and Segmentation Status): This mode supports the same functions as the CLP mode, and additionally checks network segmentation by sending BPDU hello packets. Thus, this mode is only to be used if Gigabit Ethernet switches are installed on the network that have been configured to use the Spanning Tree protocol.
- Page 82 AT-2971 Solaris Sparc To enable support for Jumbo Frames (frames with a length of up to 9014 bytes or up to 9018 bytes in case of VLAN frames), set this parameter to ON. Using Jumbo Frames can speed up network throughput, because longer frames reduce the overhead in the operating system.
- Page 83 Network Adapter Card Installation Guide - Book II Warning If you want to increase the size of the transmit and/or receive descriptor rings, bear in mind that every descriptor needs about 2 KByte of memory for normal ethernet frames and about 10 KByte of memory for jumbo frames.
- Page 84 DescrPollTime_InstX can be used as a workaround for a possible hang- up of the data transmission over one link due to a hardware timing problem. Please do not change the default value without contacting Allied Telesyn support for further advice!
-
Page 85: Global Driver Parameters
Network Adapter Card Installation Guide - Book II Global Driver These parameters will apply to all supported adapters installed on the system. Parameters DisplayMessages Type: string Default value: Valid values: Enable or disable extensive messages during driver load and link up. -
Page 86: Dual Net Operation Mode
AT-2971 Solaris Sparc Dual Net Operation Mode Starting with version 5.00, the driver supports the Dual Net mode on dual link adapters. In this mode, the two ports on one adapter are treated as separate interfaces, with different IP addresses and independent operation. - Page 87 Network Adapter Card Installation Guide - Book II Note Before you choose one of the above possibilities, you MUST remove the device links to the driver in the /dev directory manually. Otherwise these links and the entries in the /devices directory will not be created properly to show the new configuration of the driver.
- Page 88 AT-2971 Solaris Sparc If there are any remaining connections to any of the GE adapters (see Steps 1 and 2), you will see the following error messages: “Device busy Cannot unload module: skge Will be unloaded upon reboot.” Load the driver again into the system with the following command: add_drv -f -c pci -m '* 0660 root sys' -i '"pci1148,5021"...
- Page 89 Network Adapter Card Installation Guide - Book II After the changes have been activated, the adapter will behave as two separate interfaces in Dual Net mode, e.g. skge0 and skge50000. Each of the interfaces in Dual Net mode can be configured as if they were single port adapters.
-
Page 90: Vlan Configuration And Parameters
AT-2971 Solaris Sparc VLAN Configuration and Parameters Note If you want to configure VLANs for an adapter, all traffic on the adapter has to be handled by VLANs. Mixing VLAN interfaces with non VLAN interfaces connected to the same adapter (or one adapter port in case of Dual Net mode) is not allowed! A different adapter can be configured as a non VLAN adapter at the same time. - Page 91 Network Adapter Card Installation Guide - Book II Instance number belonging to skge0: 0 Instance number belonging to skge1: 1 After you have determined the adapters you want to configure, configuration with skge_vlan_config can be started. Start the script by entering the following at the command line: skge_vlan_config The script will prompt you to define the following parameters: Instance number: Enter the instance number of the adapter to...
- Page 92 AT-2971 Solaris Sparc Note If you execute all changes in skge.conf after package installation and before you reboot the system, no additional steps as described below have to be performed. Note Before you choose one of the above possibilities, you MUST remove the device links to the driver in the /dev directory manually.
- Page 93 Network Adapter Card Installation Guide - Book II Remove the driver from the system with the command: rem_drv skge If there are any remaining connections to any of the GE adapters (see Step 2), you will see the following error messages: "Device busy Cannot unload module: skge Will be unloaded upon reboot."...
- Page 94 AT-2971 Solaris Sparc VLAN IP interface naming Example: You have configured two VLANs for instance 0. The values you have chosen might have been the following: First VLAN: ID: 2 Jumbo frame support: OFF Second VLAN: ID: 4 Jumbo frame support: ON The entry in /kernel/drv/skge.conf created with the script will look like this: # BEGIN VLAN configuration settings for...
- Page 95 Network Adapter Card Installation Guide - Book II To start the VLAN interfaces, perform the following procedure: Enter the commands: ifconfig skge0 plumb <hostname> broadcast + netmask + up ifconfig skge100 plumb <hostname> mtu 9000 broadcast + netmask + up Exchange <hostname>...
-
Page 96: Manual Vlan Configuration
AT-2971 Solaris Sparc Manual VLAN The complete VLAN configuration will be carried out in the driver configuration file /kernel/drv/skge.conf. Please refer to 'man driver.conf' Configuration for further information about these files. An excerpt from skge.conf looks like the following: # Configuration file for the skge DualNet/VLAN driver. -
Page 97: Vlan Configuration In Single Net Mode
Network Adapter Card Installation Guide - Book II If you want to change the default values, you only have to uncomment the appropriate parameter and set it to the desired value. Here is an example how the VLAN parameters will look like if configured for Single Net mode: Vlan_Inst0_Enable="Yes";... -
Page 98: Parameters
AT-2971 Solaris Sparc Example: Instance number of the adapter: 0 First VLAN to create: Vlan_0_DevNum, Vlan_0_ID Second VLAN: Vlan_100_DevNum, Vlan_100_ID Third VLAN: Vlan_200_Dev_num, Vlan_200_ID and so on. Instance number of the adapter: 1 First VLAN to create: Vlan_1_DevNum, Vlan_1_ID Second VLAN: Vlan_101_DevNum, Vlan_101_ID Third VLAN: Vlan_201_Dev_num, Vlan_201_ID... - Page 99 Network Adapter Card Installation Guide - Book II Example: Vlan_0_ID=2; Vlan_100_ID=122; This parameter defines the VLAN ID as specified in IEEE 802.1Q. It is used to distinguish the VLANs in VLAN capable drivers and switches. For this reason it is not allowed to use a chosen VLAN ID on the same adapter (in Single Net mode) or on the same port (in Dual Net mode) again! The value for Vlan_<number>_ID can be any value in the range from 1 to 4094.
-
Page 100: Additional Parameters
AT-2971 Solaris Sparc skgeX: GetConfiguration: Missing VLAN parameter Vlan_100_ID! X is the instance number of the according adapter. After the display of this message, the driver will abort the complete configuration of the adapter because it makes no sense to continue. A possible workaround is to look up the configuration file and fill in the missing parameter. - Page 101 Network Adapter Card Installation Guide - Book II after the last VLAN entry belonging to this instance number. <instance> is a placeholder for the instance number you have chosen. A VLAN entry for instance 0 would look like this: # BEGIN VLAN configuration settings for instance 0 Vlan_Inst0_Enable="Yes";...
-
Page 102: Vlan Configuration In Dual Net Mode
AT-2971 Solaris Sparc For details refer to the description in Dual Net Operation Mode on page VLAN In Dual Net mode, one or both ports can be configured for VLANs. Configuration in Dual Net VLAN configuration on one port Mode VLAN configuration for each port has to be enabled separately. - Page 103 Network Adapter Card Installation Guide - Book II When the configuration is finished, you have two possibilities to activate the changes in skge.conf: Reboot the system. Unload the driver with rem_drv and load it again with add_drv. For details refer to the description in Dual Net Operation Mode on page...
-
Page 104: Pci Hot Plug And Power Management
You can configure the value allowed for the idle time in the file /etc/power.conf. If you want to enable device power management for Allied Telesyn adapters you have to edit power.conf. - Page 105 Network Adapter Card Installation Guide - Book II Device_name is the name of the device associated with your adapter in the /dev directory. For all supported adapters they look like: /dev/skge0 /dev/skge1 and so on. Threshold is the idle time value in seconds after which the adapter will be power managed by the system to save energy.
-
Page 106: Tuning
AT-2971 Solaris Sparc Tuning This section describes settings that affect network performance. Also refer to the description of the CopyThreshold parameter above. The TCP/IP protocol stack of Solaris can be tuned to better suit high speed network adapters. This tuning is executed with the "ndd" tool. The startup script /etc/rcS.d/S50skge is created during installation and it sets some of the TCP parameters. -
Page 107: Ndd" Support
Network Adapter Card Installation Guide - Book II “ndd” Support Starting with version 3.10, the driver supports the Solaris tool 'ndd' for reading driver parameters and statistics. For details on 'ndd', refer to the man page. The driver supports the following parameters: : a list of all parameters is displayed. - Page 108 AT-2971 Solaris Sparc - Duplex Mode: half- or full-duplex mode? - Flow Control: used mode - Role: this parameter is only valid with 1000Base-T adapters (SK-9821, SK-9822 and SK-9821 V2.0). Please refer to parameter Role_?_InstX in Per-port Parameters on page 76 for details.
-
Page 109: Virtual Cable Tester (Tm) (Vci)
Network Adapter Card Installation Guide - Book II Virtual Cable Tester (TM) (VCI) The Marvell(R) VCT technology utilizes Time Domain Reflectometry (TDR) technology to remotely diagnose the quality and characteristics of the attached cables. Using this technology it is possible to detect and report potential cabling issues such as cable opens, cable shorts or any impedance mismatches in the cable and accurately report - within one meter - the distance to the fault. - Page 110 AT-2971 Solaris Sparc VCT can not be started if the link on the selected device is active. If you should do this accidentally, you will get the following message: "VCT test not started on device skge0! Link is up!" If you have tried to start VCT on a device not supporting it, you will get the following message: "VCT Error: VCT not supported on device skge0!"...
- Page 111 Network Adapter Card Installation Guide - Book II - Short in cable. : Two or more cable pairs are short-circuited together. VCT reports the distance to the short-circuit in meters. - Open in cable. : Lack of continuity between the pins at each end of the twisted-pair cable, i.e.
-
Page 112: Troubleshooting
AT-2971 Solaris Sparc Troubleshooting This section describes some common problems and their solution. Problem Solution The installation prints the following message: The driver file could not be executed. Check if "Driver (skge) successfully added to system you have the correct driver version for your but failed to attach"... -
Page 113: Error Messages
This section describes error messages that may be printed by the driver. This list is incomplete! If you get other error messages and you can not solve the problem, contact Allied Telesyn technical support. Note In all following error messages, <InstanceNumber> is a placeholder for the instance number assigned to the adapter by the system. -
Page 115: Chapter 8 Bootrom
Chapter 8 BootROM This chapter contains the procedures for installing and configuring an optional BootROM on an AT-2450, AT-2700, and AT-2745 Series Allied Telesyn Network Adapter Card. Managed Boot Managed Boot Agent (MBA) is client-based firmware that allows a client PC to do a "network bootî... - Page 116 BootROM MBA has extra features and options, e.g.: — The ability to configure speed and duplex without DOS configuration tools. — Prompt when network boot fails: PXE ñ waits a definable time period before going to next device MBA ñ waits a definable time period before going to next device OR can display message to user and wait for a key press before going to next device...
-
Page 117: Installing A Bootrom
DOS configuration utility. The Boot ROM Port parameter allows the user to configure the default port on dual-port adapters. Allied Telesyn’s dual-port adapter cards are: AT-2450FTX, AT-2700FTX, and AT-2745FX... - Page 118 BootROM PLCC Socket Installation The PLCC socket has three square corners and one angled corner. The angled corner of the ROM must be oriented to match the angled corner of the socket. Remove the MBA ROM from its anti-static packaging, and align the angled corner of the MBA ROM with the angled corner of the ROM socket on the adapter card.
-
Page 119: Bootrom Parameter
Boot ROM support, start the AT-2500 or AT-2501 DOS diagnostics program, setup25 and enable the Boot ROM from the configuration menu. BootROM Run the diagnostics program that came with your Allied Telesyn adapter. (diag.exe, diag25.exe, etc.). Parameter If using an AT-2450 and AT-2700 series Combo card, set the BootROM Parameter to the desired port (copper or fiber). -
Page 121: Translated Safety And Emission Information
Appendix A Translated Safety and Emission Information Important: This appendix contains multiple-language translations for the safety statements in this guide. Wichtig: Dieser Anhang enthält Übersetzungen der in diesem Handbuch enthaltenen Sicherheitshinweise in mehreren Sprachen. Vigtigt: Dette tillæg indeholder oversættelser i flere sprog af sikkerhedsadvarslerne i denne håndbog. - Page 122 Translated Safety and Emission Information Standards: This product meets the following standards. U.S. Federal Communications Commission Radiated Energy Note: This equipment has been tested and found to comply with the limits for a Class A digital device pursuant to Part 15 of the FCC Rules.
- Page 123 Network Adapter Installation Guide - Book II Normen: Dieses Produkt erfüllt die Anforderungen der nachfolgenden Sicherheitsnormen. Hochfrequenzstörung EN55022 Klasse B Warnung: Bei Verwendung zu Hause kann dieses Produkt Funkstörungen hervorrufen. In diesem Fall müßte der Anwender angemessene Gegenmaßnahmen ergreifen. Störsicherheit EN55024 Sicherheit Elektrische Sicherheit...
- Page 124 Translated Safety and Emission Information Normes: ce produit est conforme aux normes de sécurité suivantes : Emission d’interférences radioélectriques EN55022 Classe B Mise En Garde: dans un environnement domestique, ce produit peut provoquer des interférences radioélectriques. Auquel cas, l’utilisateur devra prendre les mesures adéquates. Immunité...
- Page 125 Network Adapter Installation Guide - Book II Sikkerhetskrav: Dette produktet oppfyller følgende sikkerhetskrav: RFI stråling EN55022 Klasse B Advarsel: Hvis dette produktet benyttes til privat bruk, kan produktet forårsake radioforstyrrelse. Hvis dette skjer, må brukeren ta de nødvendige forholdsregler. Immunitet EN55024 Sikkerhet Elektrisk sikkerhet...
- Page 126 Translated Safety and Emission Information Normer: Denna produkt uppfyller följande säkerhetsnormer. Radiostörning EN55022 Klass B Varning: Denna produkt kan ge upphov till radiostörningar i hemmet, vilket kan tvinga användaren till att vidtaga erforderliga åtgärder. Immunitet EN55024 Säkerhet Elsäkerhet TUV-EN60950, UL1950, CSA 950 Laser EN60825 Detta är en “KLASS 1 LYSDIODPRODUKT”...
Need help?
Do you have a question about the AT-2400 Series and is the answer not in the manual?
Questions and answers