Sam4s SPS-2000 Program Reference Manual
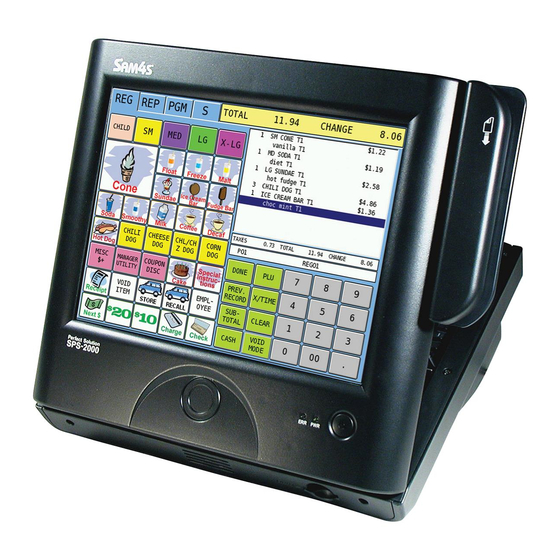
12.1” color lcd touch screen
Hide thumbs
Also See for SPS-2000:
- Manual (17 pages) ,
- Operator's manual (152 pages) ,
- Setup manual (1 page)

Related Manuals for Sam4s SPS-2000


Summary of Contents for Sam4s SPS-2000
- Page 1 SPS-2000 Program Reference Manual 2011, CRS, Inc. All specifications are subject to change without notice. PM-SPS-2000 Manual Revision 1.30...
- Page 2 CRS, Inc. Limited Warranty and Disclaimers of Warranty This manual has been developed by CRS, Inc. It is intended for the use of its customers and service personnel and should be read in its entirety before attempting to install, use or program the product(s). Nothing contained in this manual shall be deemed to be, and this manual does not constitute, a warranty of, or representation with respect to, the product or any of the products to which this manual applies.
-
Page 3: Safety Precautions
Precaution Statements Follow these safety, servicing and ESD precautions to prevent damage and to protect against potential hazards such as electrical shock. 1-1 Safety Precautions 1. Be sure that all built-in protective devices are replaced. Restore any missing protective shields. 6. - Page 4 1-2 Servicing Precautions WARNING: First read the-Safety Precautions-section of this manual. If some unforeseen circumstance creates a conflict between the servicing and safety precautions, always follow the safety precautions. WARNING: An electrolytic capacitor installed with the wrong polarity might explode. 5.
-
Page 5: Table Of Contents
Required Support Resources ..................20 SPS-2000 Program Components ................21 Installing Software Using the TFTP Server Method ............... 22 A. Download SPS-2000 Software Files ..............22 B. Set TCP/IP Protocol Options ................23 C. Install and Start the TFTP Server ................ 25 D. - Page 6 Age Verification ......................89 PLU Quick Registration ....................90 PLU Quick Registration ....................91 PLU Integrity Check....................97 PLU Group ..........................98 Function Key ...........................99 Function Key Program Summary ................100 Function Key Programming Notes ................104 System Options ........................108 6 Contents SPS-2000 Program Manual v1.30...
- Page 7 Employee Time Keeping With MCR – Program Guide ............168 Employee Sign On with MCR – Program Guide..............173 Open Check by MCR – Program Guide ................176 Appendix Report Function Key Report Code Structure................. 179 Contents 7 SPS-2000 Program Manual v1.30...
- Page 8 Report # Table ......................179 Report Option Table ....................181 Special Report Commands ..................182 Glossary of Terms Index Manual Revision Record 8 Contents SPS-2000 Program Manual v1.30...
-
Page 9: Introduction
The SPS-2000 features a 12.1” color LCD touch screen and many popular off-the-shelf POS peripherals can be connected by way of serial communication ports. The SPS-2000 has no hard disk drive, instead running its built-in application software from on-board flash memory and storing data on non-volatile RAM. -
Page 10: Unbox & Install Mcr
Power Requirements Plug the SPS-2000 into a grounded 3-prong outlet. The SAM4s SPS-2000 is a modern computerized network system. As with all network systems, it requires appropriate electrical power wiring and proper routing of communication cabling for reliable operation and maximizing the life of the equipment. -
Page 11: Ecr Controls & Connections
S-Mode compunctions’ options program. Front Panel Angle Adjustment Set the position of the front panel support to adjust the angle of the front panel from 22° to 77°. Introduction 11 SPS-2000 Program Manual v1.30... -
Page 12: Rear Display
Rear Display Standard Rear Display SD Memory Card Slot The SPS-2000 SD Memory Card slot can be used Load Application Program Updates Save/Load End User Program Settings Load Key Images Save Screen Captures 12 Introduction... -
Page 13: Connection Panel
2-USB Ports LPT Port (Parallel) 6-RS-232C Comm Ports (2-DB9 Male/4-RJ45) ECR Power On/Off Switch AC Power Cord Connection Serial Number/ Identification Label The Standard Rear Display uses RS-232C Port #6 Introduction 13 SPS-2000 Program Manual v1.30... -
Page 14: Default Screen Layout
A screen saver can be implemented by going to page #5 of P-Mode General Function Options. Depending upon the setting, the screen saver will display after 1 to 99 minutes of inactivity. When the screen saver is activated, simply touch the screen to restore the normal display. 14 Introduction SPS-2000 Program Manual v1.30... -
Page 15: Keylinks
Keylinks can be programmed to remain open for unlimited entries, with the DONE key used to close the Keylink screen, or can be programmed to close automatically after a set number of entries are completed. Introduction 15 SPS-2000 Program Manual v1.30... -
Page 16: Custom Screen Layouts
Images may be used instead of text for key identification. Keys may be set to open new screens (keylinks). In this example, the beverage key (above) is set to open a new screen offering 5-different beverage sizes 16 Introduction SPS-2000 Program Manual v1.30... -
Page 17: Passwords
(Available at version 2.00s) Initialize To Initialize the SPS-2000, turn the main power switch off, then on again. Note: If you initialize while a transaction is in progress, the transaction will be aborted and totals/counters will not be updated. -
Page 18: Memory All Clear
Memory All Clear Power OFF the SPS-2000 using the main power switch is located on bottom of SPS-2000 in the right-rear corner. Hold front power button down. Turn SPS-2000 main power switch ON while holding down front power button. -
Page 19: Software Installation & Sd Memory Utilities
Software Installation & SD Memory Utilities Overview The latest software revisions will be posted on the SPS-2000 dealer support page of the CRS website: www.crs-usa.com. Software will be revised continually as anomalies are identified, repaired, and as new features and peripherals are supported. -
Page 20: Required Support Resources
With this program running on your support PC connected to an SPS-2000 by LAN, you can access software updates from the SPS-2000. The TFTP Server from SolarWinds will run on any Microsoft Operating System including Windows 95, 98, NT, ME and Windows XP. -
Page 21: Sps-2000 Program Components
It is anticipated that this program area will remain stable. You will be notified in the case that this program changes. 4. KERNAL version v1.10 or later (released 11/04/2008) supports two USB ports and allows screen capture to USB (F10 saves to USB). Software Installation & SD Memory Utilities 21 SPS-2000 Program Manual v1.30... -
Page 22: Installing Software Using The Tftp Server Method
Installing Software Using the TFTP Server Method This software installation method allows you to update any of the SPS-2000 program areas selectively using a network connection. If you are updating an ECR with BootRom version 1.10 or later, you can forgo use of the TFTP server method and use an SD card or USB memory device to update both applidaton and operating system files. -
Page 23: Set Tcp/Ip Protocol Options
1. Click Start, Settings, Network Connections. The Network Connections dialog displays: 2. Select the Local Area Connection listing and right-click. Select Properties from the sub-menu to display the Local Area Connection Properties dialog box. Software Installation & SD Memory Utilities 23 SPS-2000 Program Manual v1.30... - Page 24 3. Select the Internet Protocol TCP/IP listing and click the Properties command button. CAUTION: If you are changing your normal network settings to connect to the SPS-2000, be sure to restore your settings after SPS-2000 Communications are complete. 4. Click the “Use the following IP address” option button and enter the settings displayed in the example above.
-
Page 25: Install And Start The Tftp Server
2. Extract the tftpd32.exe file from the zip file. 3. Connect the SPS-2000 to the PC using a “crossed network cable” and the LAN port on the SPS-2000. 4. Double click the tftpd32.exe file from the zip file. The server window displays: 5. - Page 26 6. Click Browse. Browse to the folder that contains the current SPS-2000 software. Click OK. 7. Click the Events viewer tab. From this tab you will monitor the TFTP Server application window when communication is taking place. NOTE: Do not close the TFTP Server application.
-
Page 27: Install The Updated Software
Optional: Upgrade the BOOT ROM BOOT ROM rarely changes. Update only if specifically instructed to by CRS support. 1. Power down the SPS-2000 (the main power switch is located on bottom of SPS-2000 in the right-rear corner). 2. Hold front power button down. - Page 28 “Sent. . .” displays. Perform an ALL Clear 1. Power down the SPS-2000 (the main power switch is located on bottom of SPS-2000 in the right-rear corner). 2. Hold front power button down. 3. Turn SPS-2000 main power switch ON while holding down front power button.
-
Page 29: Verify Software Version
Boot Version 1. Turn the Power Switch to the ON position while holding down the power button on the front panel below the screen. The Boot Version displays: Software Installation & SD Memory Utilities 29 SPS-2000 Program Manual v1.30... - Page 30 Current Boot Version is 1.16 30 Software Installation & SD Memory Utilities SPS-2000 Program Manual v1.30...
- Page 31 SMART MEDIA CARD SD CARD DALLAS KEY CHECK DALLAS KEY MSR TRACK2 CHECK MSR MSR TRACK1/3 CHECK MSR DRAWER COMPULSORY CLOSED FRONT SWITCH RELEASED MICOM VERSION Micom version 1.01c Software Installation & SD Memory Utilities 31 SPS-2000 Program Manual v1.30...
-
Page 32: Application Upgrade From Sd/Usb Card
1. At your PC, create an “sps2000” folder on SD/USB card. Copy the application image (sps2000) to this folder. 2. Insert SD/USB card into the SPS-2000. 3. From the S-Mode Self Test Menu, touch APPLICATION UPDATE. 4. From the selection window choose Application Update or Application Backup, and then select the memory device: SD or USB. - Page 33 If you are completing application update, you must clear all memory. 6. To Perform an All Clear: a. Power down the SPS-2000 (the main power switch is located on bottom of SPS-2000 in the right-rear corner). b. Hold front power button down.
-
Page 34: Bootloader Upgrade From Sd Card
In Windows Explorer, your view should look similar to this: 3. Insert the SD card into the SPS-2000. 4. Power down the SPS-2000 (the main power switch is located on bottom of SPS-2000 in the right-rear corner). 5. Hold front power button down. -
Page 35: O/S Upgrade From Sd Card
In Windows Explorer, your view should look similar to this: 3. Insert the SD card into the SPS-2000. 4. Power down the SPS-2000 (the main power switch is located on bottom of SPS-2000 in the right-rear corner). 5. Hold front power button down. -
Page 36: Capturing Sps-2000 Screens
6-digit time of capture: HHMMSS Date 10. Remove the SD Memory Card from the SPS-2000 terminal and insert the card into the SD Card Reader at the PC. You can copy the captured screens to your hard drive, or insert them as needed into Microsoft Word documents. -
Page 37: Image Downloads
(viewed in REG mode where key locations are inactive.) Background Image display requires software version 2.00x or later.) Images add style and usability to the SPS-2000 touch screen. This procedure allows you to download images to the SPS-2000 where they can be added to keys in the S- Mode Key Location program. -
Page 38: Image Download Using Sd Memory Card
1. At your PC, create a folder “image” on the SD memory card and copy the images you wish to transfer into this folder. 2. Insert the SD Memory Card into the SD slot on the right-front of the SPS-2000. 3. Select Key Relocation from the S-Mode main menu. -
Page 39: Screen Saver Logo
3. Copy the logo files to this directory. 4. Move the SD card to the SPS-2000. 5. From the SPS-2000 S Mode menu, choose Key Relocation, then Image, then Copy and confirm. 6. The new image(s) will replace the SAM4s logo as the screen saver. -
Page 40: Save/Load End User Programs Using Sd Memory Card
2. Select the backup method, SD, USB, or FTP. 3. Depending upon the method selected, Insert a SD card in the SPS-2000; or insert a USB memory device, or connect the SPS-2000 to the FTP site via a router and internet connection. -
Page 41: Save Reports
1. From the S Mode menu touch SRAM BACKUP and select a backup method, SD, USB or FTP. 2. Depending upon the method selected, Insert a SD card in the SPS-2000; or insert a USB memory device, or connect the SPS-2000 to the FTP site via a router and internet connection. -
Page 43: S Mode Programming
S Mode Programming S- Mode Programming Screen CAUTION: S-Mode functions are reserved for dealers who set-up and service your SPS-2000 system. The user will not normally perform S-Mode functions. The procedures described in this area are security sensitive. Many S-Mode functions, including memory clearing and memory allocation, may cause damage or loss if they are performed without first backing up register data. -
Page 44: Self Tests
The dallas key option is not available on this model. VERSION CHECK This will check and display the current operating version. SD/USB TEST This will test SD card or USB stick. FINGERPRINTS This will test attached MSR. 44 S Mode Programming SPS-2000 Program Manual v1.30... -
Page 45: Memory Clearing
SD/USB Card” on page 32 for details Memory Clearing The Memory Clear selection allows you to selectively clear various areas of the SPS-2000 memory. ► Touch MEMORY CLEAR from the S MODE MAIN MENU to display the S mode MEMORY CLEAR Screen. - Page 46 This will clear the current integrated payment batch. CLEAR GLOBAL ORDER # This will reset the global order number to zero. CLEAR DELIVERY Clears all deliver files. Requires v3.00a or later. 46 S Mode Programming SPS-2000 Program Manual v1.30...
-
Page 47: Memory Allocation
Determine the total number of employees and set the maximum use wish to use here. Employees include all who use the register for any purpose, including those using only the time clock feature for clocking in/out. S Mode Programming 47 SPS-2000 Program Manual v1.30... - Page 48 (15) # OF PRODUCT MIX TIME PERIODS Product mix groups report usage by time period. Determine the number of periods you wish for product mix time reporting. The actual time for each period can be customized. . 48 S Mode Programming SPS-2000 Program Manual v1.30...
- Page 49 Z1, Z2, and Z3 for that report. Each of the five report areas can be read and reset independently. (30) # OF PROMOTION TABLE This option represents the promotion (mix & match, fixed price, or multi buy) tables that will be available. S Mode Programming 49 SPS-2000 Program Manual v1.30...
- Page 50 (33) DELIVERY TABLE The number of customer records maintained in the delivery system. Each record includes Title, First Name, Last Name, Address 1/Address 2, City, ZIP, telephone, email, and birthday fields. 50 S Mode Programming SPS-2000 Program Manual v1.30...
-
Page 51: Key Relocation (V2.Xxx)
PLU descriptor. (If the key descriptor is formatted or abbreviated to fit the key location, the result may not always look pleasing when printed on the receipt or guest check.) S Mode Programming 51 SPS-2000 Program Manual v1.30... - Page 52 • If the DONE key is enabled and you wish to advance to the keylink set in the “FUNCTION LIST KEY LINK” field, set the “NUMBER OF CHOICE:” field to a value of “99”. 52 S Mode Programming SPS-2000 Program Manual v1.30...
-
Page 53: Key Relocation (V3.0 And Later)
If YES, the keylink will ask for the The DISPLAY BACKGROUND IMAGE quantity of items. option is available at version 2.01b or later. Note that you must also download the image. See “Image Downloads” on page 33. S Mode Programming 53 SPS-2000 Program Manual v1.30... -
Page 54: The Design Tab
V3.00g or later.) Use the list tab to select the key function. Touch Function, PLU, or KEY LINK and select a function for the key. 54 S Mode Programming SPS-2000 Program Manual v1.30... -
Page 55: The Select Screen Tab
The Select Screen Tab Use the select screen tab to select the keylink you wish to program. Touch to select another keylink. S Mode Programming 55 SPS-2000 Program Manual v1.30... -
Page 56: Function Key Code List
MACRO 15 MODIFIER 6 EMPLOYEE 4 MACRO 16 MODIFIER 7 EMPLOYEE 5 MACRO 17 MODIFIER 8 EMPLOYEE 6 MACRO 18 MODIFIER 9 EMPLOYEE 7 MACRO 19 MODIFIER 10 EMPLOYEE 8 MACRO 20 56 S Mode Programming SPS-2000 Program Manual v1.30... - Page 57 * Beginning at version 3.00j or later, Macro functions 33-40 are pre-assigned to the eight essential function keys: DONE, PLU, PREV X/TIME, SUBTOTAL, CLEAR, CASH and VOID ITEM. This allows these keys to be reassigned through macro programming. S Mode Programming 57 SPS-2000 Program Manual v1.30...
-
Page 58: Function Key Definitions
DRIVE THRU is a subtotal function. Touch DRIVE THRU to record DRIVE THRU the amount of the transaction in the drive thru total on the financial report. Tax calculation can be changed to accommodate different tax rules for drive thru sales. 58 S Mode Programming SPS-2000 Program Manual v1.30... - Page 59 Beginning at version 3.00j or later, Macro functions 33-40 are pre- assigned to the eight essential function keys: DONE, PLU, PREV X/TIME, SUBTOTAL, CLEAR, CASH and VOID ITEM. This allows these keys to be reassigned through macro programming. S Mode Programming 59 SPS-2000 Program Manual v1.30...
- Page 60 2.02n or later. Items are given a meal order priority through group programming. Each time the PRINT key is touched, the next priority of items will be release to the kitchen printer. 60 S Mode Programming SPS-2000 Program Manual v1.30...
- Page 61 Touch the SPLIT PAY key to divide the amount of a guest check into SPLIT PAY equal segments for payment by more than one person. S Mode Programming 61 SPS-2000 Program Manual v1.30...
- Page 62 Used to start and end entries of items that are wasted. A waste count is WASTE maintained for each item and inventory is adjusted. Use to manually advance to a specific Key Link. Enter the Key link # FUNC.LIST# (1-200), touch the FUNC.LIST# key. 62 S Mode Programming SPS-2000 Program Manual v1.30...
- Page 63 Then when prompted to enter the number of the check where the selected items are to be assigned, enter the number of the new check you previously created. S Mode Programming 63 SPS-2000 Program Manual v1.30...
- Page 64 (Available at v2.03j or later.) Moves the current screen (n) to the PREV LIST previous screen (n-1). (Available at v2.03j or later.) Moves the current screen (n) to the next NEXT LIST screen (n+1). 64 S Mode Programming SPS-2000 Program Manual v1.30...
-
Page 65: System Options
ECR #1. On a more customized system this can be changed so that each tracking file is stored on a different ECR, the information will be available for central use. S Mode Programming 65 SPS-2000 Program Manual v1.30... - Page 66 Set to YES only if you want to get the OP address from the DHCP server. Consult your network administrator. IP ADDRESS Set only for IP polling. SUBET MASK Set only for IP polling. 66 S Mode Programming SPS-2000 Program Manual v1.30...
- Page 67 (28) SAVE PABP LOG FILE TO (V3.00g29 or later) Choose SD or USB for integrated payment applications. This log is a required part of PABP and payment application validation. See the SPS-2000 Integrated Payment Operator’s and Programming Manual for more information about the PABP log file.
-
Page 68: Printer Driver Selections
Printer Driver - Definitions PRINTER TYPE Common printer types have been defined, ELLIX, SAMSUNG, CITIZEN, EPSON etc. These need no modification. The system does have some custom printer types available for technicians to allocate their own settings. -
Page 69: Define Port
LINES ON HARD SLIP When a slip printer is used, this is the number of lines that can be printed on a loose paper printer, before a prompt for the next page appears. S Mode Programming 69 SPS-2000 Program Manual v1.30... - Page 70 The printer will print the receipt upside down so that if the printer is wall-mounted, or placed vertically, the user can read easily. Supported printers are: SAM4s Ellix 10, Ellix 20, Bixolon SRP-350, Epson TM-T88-2. If the number of lines to print in one print job exceeds 1000, the SPS-2000 will ignore the option.
-
Page 71: S-Mode Program Scan Printing
[K] indicates the keystroke is a function key list (keylink); [F] indicates the keystroke is a function key; [P] indicates the keystroke is a PLU entry. When printing is complete, a window displays “INITIALIZE SUPER MACRO?” Touch YES to clear the supermacro memory. S Mode Programming 71 SPS-2000 Program Manual v1.30... -
Page 72: Password Notes
Authority Level option #40 (found in P-Mode/Employee) allows access to Report Mode, P-Mode and S- Mode without password entry. Employees (such as managers) linked to an authority level with this option selected, can conveniently access all modes without password entry. 72 S Mode Programming SPS-2000 Program Manual v1.30... -
Page 73: Load Default Messages
Used in the unlikely event that an open check track number becomes locked and inoperable. CLERK UNLOCK Used in the unlikely event that an open clerk interrupt buffer becomes locked and inoperable. S Mode Programming 73 SPS-2000 Program Manual v1.30... -
Page 74: Sram Backup
NOTE: SD cards must be formatted as FAT 32. To avoid compatibility issues, CRS recommends that you purchase SD cards from CRS. NOTE: This action will backup the SPS-2000 end user program on the SD Card in the path: SPS2000/backup/xxxxxx, where xxxxxx is the store number set in S-Mode system options. When you restore programs, SPS-2000 will look for program data for the store number set in system options. -
Page 75: Save Reports
(Note that the Report Save/Restore feature requires V2.00s software or later.) Previously saved reports may be able to be restored to the memory of the SPS-2000. Report saving is advised whenever service activity or updates are required on installed ECRs. In case of memory clearing, customer totals can be restored without disrupting store security or accounting. -
Page 76: Ftp Transmission
Password will be assigned by the FTP site administrator 3. Touch CONNECT. If the connection is successful, the following screen displays: 4. Select file(s) you want to transmit and touch UPLOAD FILES. 76 S Mode Programming SPS-2000 Program Manual v1.30... -
Page 77: P Mode Programming
P Mode Programming P-Mode Programming Menu ► From the Main Screen, touch the PGM tab. Enter the PGM Mode Password and touch OK to view the PGM Mode screen. P Mode Programming 77 SPS-2000 Program Manual v1.30... -
Page 78: Plu
1. From the PGM mode PROGRAMMING MENU touch PLU to view the PLU program selection window. 2. Touch the PLU program function you wish to perform. (Press PAGE DOWN to view the PLU QUICK REGISTRATION option.) 78 P Mode Programming SPS-2000 Program Manual v1.30... -
Page 79: Plu Add & Change
S mode. Once a new PLU is assigned to a screen, touch the key to add the PLU descriptor and options. PLUs can be randomly added by entering a PLU number and touching OK, or by scanning an item if a scanner is connected. P Mode Programming 79 SPS-2000 Program Manual v1.30... - Page 80 PIECE COUNT Enter a value in this field if you wish to use Product Mix and Product Projection reporting. The number of units entered here will be reflected in product mix reporting. 80 P Mode Programming SPS-2000 Program Manual v1.30...
- Page 81 This feature is not related to the five keyboard levels, they work independently P Mode Programming 81 SPS-2000 Program Manual v1.30...
-
Page 82: Plu Delete
YES at the confirmation screen. 4. To delete a range of PLUs, touch PLU DELETE BY RANGE. Enter the FROM PLU# and TO PLU#. Touch DELETE and then touch YES at the confirmation screen. 82 P Mode Programming SPS-2000 Program Manual v1.30... -
Page 83: Plu Status Group
See “PLU” on page 78 to program the first reporting group for each PLU. See “PLU Group” programming on page 98 to determine whether each individual group adds to the group total on the financial report. P Mode Programming 83 SPS-2000 Program Manual v1.30... - Page 84 (12) IS PLU MEMO? Use Memo PLUs to display a descriptor on the screen or print a descriptor at a printer. Memo PLUs do not add to any total in the SPS-2000. (13) IS PLU SCALEABLE? Choose Yes if you wish to multiply items reporting to this group by a weight from a scale connected to the register.
- Page 85 The color code set here will control the color or screen format displayed on an optional kitchen video system requisition screen. Color codes vary by KVS system. Refer to the documentation for your video system for specific information. P Mode Programming 85 SPS-2000 Program Manual v1.30...
- Page 86 (41) PRODUCT MIX #2 If you are using product mix reporting, enter the number of the second product mix item here. See “Product Mix Items” on page 141 for more information. 86 P Mode Programming SPS-2000 Program Manual v1.30...
-
Page 87: Plu Stock
4. Touch the current stock value, and then enter an inventory value. Use the decimal key to enter whole or partial unit values. When complete, a chit is printed (v3.00g30 or later). P Mode Programming 87 SPS-2000 Program Manual v1.30... -
Page 88: Plu Minimum Stock
3. The NON-PLU# PROGRAMMING screen displays for the identifier you have chosen to program. 4. Use the field definitions below as a reference in filling the fields of this screen. 5. Press CLOSE to return to the NON-CODE PLU PROGRAMMING screen. 88 P Mode Programming SPS-2000 Program Manual v1.30... -
Page 89: Age Verification
2. Type an age for the first age category, press OK. 3. If necessary enter ages for the remaining age categories. 4. Press CLOSE to return to the PGM mode MENU. P Mode Programming 89 SPS-2000 Program Manual v1.30... - Page 90 5. Go to P/PLU/AGE VERIFICATION and make the appropriate entries in the READ TRACK, START OF NUMBER, DIGIT OF NUMBER and DATE TYPE fields. Enter Ages for Each Verification Category Here Enter Mag Stripe Date Identification for Drivers License Here 90 P Mode Programming SPS-2000 Program Manual v1.30...
-
Page 91: Plu Quick Registration
PLU is linked. (The STS GRP and STOCK options will determine the status group to which the PLU is assigned.) STOCK Select a PLU and touch STOCK to set stock levels for the PLU. P Mode Programming 91 SPS-2000 Program Manual v1.30... - Page 92 PROGRAM. You will be prompted: “DO YOU WANT TO MAKE A MENU SCREEN?” If you select YES, new menu screens will be created automatically based upon the group and PLU data you have programmed. 92 P Mode Programming SPS-2000 Program Manual v1.30...
- Page 93 Using a 101-Key Keyboard with PLU Quick Registration When a PS\2 keyboard is connected to the SPS-2000, the keyboard may be used for inputting PLU Quick Registration data. The following keys are control keys: Numeric 1 to 0 – Select a PLU.
- Page 94 17. Touch the REG tab. The newly created menu screen displays: The GRILL key is Key Link function #073 Items linked to the GRILL group display on Key Link screen #073 94 P Mode Programming SPS-2000 Program Manual v1.30...
- Page 95 19. Touch ICE CREAM to view the ice cream items. The ICE CREAM key is Key Link function #081 Items linked to the ICE CREAM group display on Key Link screen #081 P Mode Programming 95 SPS-2000 Program Manual v1.30...
- Page 96 The 10 keys located on the bottom two rows of the main screen will be copied to each screen Function created with the PLU Quick Registration feature. The EMPLOYEE key should be located in Keys this area. 96 P Mode Programming SPS-2000 Program Manual v1.30...
-
Page 97: Plu Integrity Check
COUNT, PRODUCT MIX#, RECIPE#, M&M# and FUNCTION LIST#. When programming at the register it is not possible to program these fields with invalid programming, however if memory allocation is changed after the program is created these fields could become invalid. P Mode Programming 97 SPS-2000 Program Manual v1.30... -
Page 98: Plu Group
ORDER FOR KP” as 1, 2, and 3 respectively. You must also set Print Key (key #190) Function key Program option “Automatically Print Meal Orderly” to Yes. 5. Touch Close to exit. 98 P Mode Programming SPS-2000 Program Manual v1.30... -
Page 99: Function Key
Or, use the PAGE UP/PAGE DOWN keys to view and touch the function key you wish to program. The programming option screen for the function will display. 3. Refer to Function Key Programming Notes on page 104 if you need assistance with specific options. P Mode Programming 99 SPS-2000 Program Manual v1.30... -
Page 100: Function Key Program Summary
Exempt Tax (1-6)? DRIVE THRU KP Period Override (0=No Override) Price Level (0-20) Exempt Tax (1-6)? EAT-IN KP Period Override (0=No Override) Price Level (0-20) EMPLOYEE EMPLOYEE (1-10) ERR.CORR FD/S SHIFT FD/S SUBTL 100 P Mode Programming SPS-2000 Program Manual v1.30... - Page 101 No Sale Inactive After Non-Add Entry? Enforce Non-Add at Beginning of Sale? Comp. Non-Add# Must Match HALO Digit#? Must be Entered at Start of Sale? P/BAL Compulsory P/Bal? PAID OUT 1-5 P Mode Programming 101 SPS-2000 Program Manual v1.30...
- Page 102 Tare Entry in X Only? Tare Entry is Compulsory? Weight Symbol: Kg/Lb Set Tare Weights Function is Stay down/Popup? SEAT # SPLIT ITEM SPLIT PAY Function is Stay down/Popup? STOCK INQ 102 P Mode Programming SPS-2000 Program Manual v1.30...
- Page 103 Print in double Do Not Print Alpha Text on Receipt Do Not Print Alpha Text on Journal Do Not allow Manual Alpha Entry Allow On Screen Alpha Text Edit NEW CHECK1-4 PRICE CHANGE P Mode Programming 103 SPS-2000 Program Manual v1.30...
-
Page 104: Function Key Programming Notes
KP routing manually. Also, a single item, or large order might be required to be sent to a different printer than normal. Select STAYDOWN, TRANS (transaction), POP UP or ITEM POP up operation. 104 P Mode Programming SPS-2000 Program Manual v1.30... - Page 105 At V3.00g29, the option “Use EJ Recall” was added. When selected, this option will display a list of transactions on the left side of the screen. When a transaction is selected, the transaction detail is displayed in the right window of the screen. P Mode Programming 105 SPS-2000 Program Manual v1.30...
- Page 106 Waste Key Program Note AFFECT ON PROJECTIONS If Yes, the projection report will consider actual sale plus waste. If No, the projection report will only consider sales. 106 P Mode Programming SPS-2000 Program Manual v1.30...
- Page 107 If “ALLOW ON SCREEN ALPHA TEXT MESSAGES” is selected, users can define the 10 pre-defined messages on-the-fly. In this manner, if a commonly entered PLU or instruction is not available, it can be created and reused as transactions are entered. P Mode Programming 107 SPS-2000 Program Manual v1.30...
-
Page 108: System Options
2. Touch the System Option Programming area you wish to access. 3. The GENERAL FUNCTION OPTIONS are shown above as an example. Touch the page tabs at the top of the screen to view all of the options in each area. 108 P Mode Programming SPS-2000 Program Manual v1.30... -
Page 109: General Function Option Definitions
(8) ACTIVATE ROUNDING ON CASH Choose to active the rounding system set in option #10 on CASH. (9) ACTIVATE ROUNDING ON SBTL Choose to active the rounding system set in option #10 on SUBTOTAL. P Mode Programming 109 SPS-2000 Program Manual v1.30... - Page 110 Choose Yes to allow tendering after the sale has been finalized, for the purpose of computing change (19) EMPLOYEE: POP UP/STAY DOWN Choose Yes to automatically sign off at the completion of a transaction. Choose No to register sales continuously for the same employee. 110 P Mode Programming SPS-2000 Program Manual v1.30...
- Page 111 (20) EMPLOYEE SIGN ON Select the method you wish to use when signing on to operate the SPS-2000: PUSH BUTTON, OPERATING CODE, EMPLOYEE# or FINGERPRINT . See “Employee Sign-On/Sign-Off” in the SPS-2000 Operation Manual for more information. (21) QTY LIMIT FOR X/TIME KEY Determine the maximum quantity that can be used for a multiplier.
- Page 112 Setting needs to match your scanner setting. If scanner is set to read check digit, this option must be Yes. (52) DISPLAY POPUP ON DESTINATION CHANGE If YES, a pop-up window will display when a destination key (EAT-IN, TAKE OUT, DRIVE THRU) is pressed. 112 P Mode Programming SPS-2000 Program Manual v1.30...
- Page 113 Also added a way to reset this count. In REG mode press [X/TIME]; the number of POWER FAILS displays and the user can press [RESET] to set number of power fails to 0. The manager password will be needed to reset the power fail count. P Mode Programming 113 SPS-2000 Program Manual v1.30...
-
Page 114: Tax Option Definitions
In the default condition (Y), tax eligibility indicators, i.e. 1 display on the screen and print on printers adjacent to the item. Choose No to selectively remove the indicators from the display and/or print. 114 P Mode Programming SPS-2000 Program Manual v1.30... -
Page 115: Cash Drawer Option Definitions
Enter length of time the drawer may be open (in seconds) before the open drawer alarm sounds. (7) OPEN REMOTE DRAWER Always set to NO. (Will allow opening a drawer on a remote register.) P Mode Programming 115 SPS-2000 Program Manual v1.30... -
Page 116: Training Mode Option Definitions
ITEM POP UP: Choice remains active for the next PLU only, and then returns to the default. TRANS POP UP: Choice remains active for the remainder of the transaction, then returns to the default with the transaction is finalized. 116 P Mode Programming SPS-2000 Program Manual v1.30... -
Page 117: Tracking File Option Definitions
(5) WARN IF HELD ITEMS AT FINALIZE If a check with held items is paid, a warning will display. P Mode Programming 117 SPS-2000 Program Manual v1.30... - Page 118 (7) TRACK 4 HOLD CLOSED CHKS FM TRK 3 The SPS-2000 system does not feature a standard closed check file. However, if you do not require all four of the available check files, unused tracking files can be utilized to store closed checks as indicated in options #9 &...
-
Page 119: Kitchen Printing/Video Option Definitions
(6) SEND ORDER TO KP AT SUBTOTAL Choose Yes if you wish to print when the subtotal key is pressed, instead of when the sale is finalized. P Mode Programming 119 SPS-2000 Program Manual v1.30... - Page 120 01 Eggs 01 Orange Juice (18) SEND ALPHA TEXT TO KP/KV (V2.00a or later) Choose Yes to send messages entered by the ALPHA TEXT key to the kitchen printer or kitchen video. 120 P Mode Programming SPS-2000 Program Manual v1.30...
-
Page 121: Validation/Subtotal Print Option Definitions
Indicate the port on the register that is connected to the validation printer. (8) DISPLAY RUNNING SUBTL ON POLE Allows the pole display to show a running subtotal as items are entered. P Mode Programming 121 SPS-2000 Program Manual v1.30... -
Page 122: General Printing Option Definitions
Select the currency symbols to be used for the currency conversion function keys. (18) PRINT TENDER ON RECEIPT If No, the tender will not print on the receipt. (19) DISABLE LINE FIND ON SLIP PRINTER 122 P Mode Programming SPS-2000 Program Manual v1.30... - Page 123 If Yes, only the last 4-digits of the card number are printed. (33) NOT PRINT AN ALPHA TEXT MESSAGES ON THE GUEST CHECK/RECEIPT If Yes, alpha text messages will not print on guest checks or receipts. P Mode Programming 123 SPS-2000 Program Manual v1.30...
- Page 124 (43) NO SIGNATURE SLIP IF TRANSACTION TOTAL IS LESS THAN (requires 2.03j or later) When the MISC TEND transaction is less than XX.XX the merchant copy of the EFT transaction will not print the signature line. 124 P Mode Programming SPS-2000 Program Manual v1.30...
-
Page 125: Report Printing Option Definitions
If Yes, the PLU total cost, profit, and profit ratio will print on the PLU Cost Report. Each PLU cost must be entered the price level identified in the Report Option program. P Mode Programming 125 SPS-2000 Program Manual v1.30... -
Page 126: Report Option Definitions
Select which totals and counters are reset when a Z1 Financial report is executed. (13) VOID MODE TOTALS ADD TO GRAND TTLS If Yes, activity in the VOID key lock position adds to grand totals. (14) ALLOW Z WITH OPEN ORDERS 126 P Mode Programming SPS-2000 Program Manual v1.30... -
Page 127: Time Keeping Option Definitions
(24) ENABLE INVENTORY REPORTING WITHOUT ACTUAL INVENTORY INPUT (V2.02b or later) If YES, the SPS-2000 will use the theoretical values as actual inventory if inventory is not activated through the EDIT INVENTORY ITEM function of X-mode. Time Keeping Option Definitions (1) OVERTIME HOUR IS USED FOR Select Day or Week for overtime hours. -
Page 128: E.j. (Electronic Journal) & Detail Printing Option Definitions
For each type of function or transaction listed, select YES or NO to determine it will be recorded in the electronic journal. **Regardless of other settings, will send only transactions with negative items, % entries, tenders, etc. to the journal. (Reworded to say “only” at v3.00a or later.) 128 P Mode Programming SPS-2000 Program Manual v1.30... - Page 129 ** If both transactions with and without negative items are set to Yes, nothing will be sent to detail. (Reworded to say “only” at v3.00a or later.) (6) SEND TO ELECTRONIC JOURNAL:PLU CODE (requires v3.00w or later) P Mode Programming 129 SPS-2000 Program Manual v1.30...
-
Page 130: Employee
2. Select an employee to program or edit by employee number (touch the current number and enter a new one) or by touching the NEXT RECORD or PREV. RECORD keys until the appropriate employee is in view. 130 P Mode Programming SPS-2000 Program Manual v1.30... -
Page 131: Training Mode
See "Time Clock Procedures" in the SPS-2000 Operation Manual for instructions on clocking on/off for different jobs. Note that the job code you assign for JOB1 is the default job code for clocking in/out. - Page 132 To record the employee fingerprint touch ENROL. The Fingerprints window displays. Touch the employee’s finger to scanner and touch ENROL again. The fingerprint is scanned and displayed. When complete touch CLOSE. 132 P Mode Programming SPS-2000 Program Manual v1.30...
-
Page 133: Authority Level
(27) CAN INVENTORY EDIT PGM MODE (28) ALLOW AUTHORITY LEVEL EDIT (29) COMP SEAT# FOR EACH ENTRY If seat # is implemented, and is not compulsory here, each item will default to seat "01". P Mode Programming 133 SPS-2000 Program Manual v1.30... -
Page 134: Groups By Employee
If ID numbers are not to be used, ignore this field. CHECK CARD ID? Enter Yes to use card ID numbers, or No if you do not wish to use card ID numbers. COLUMN OF CARD ID 134 P Mode Programming SPS-2000 Program Manual v1.30... - Page 135 Enter the number of digits to be read for the Card ID. COLUMN OF NUMBER Enter the number of the column that the Card number starts. CARD NUMBER DIGITS Enter the number of digits to be read for the Card number. P Mode Programming 135 SPS-2000 Program Manual v1.30...
-
Page 136: Reports
Touch TTL# to select the specific total you wish to select from the report. PAGE UP/PAGE DOWN Touch PAGE UP or PAGE DOWN to access up to 50 different totals on the custom report. 136 P Mode Programming SPS-2000 Program Manual v1.30... -
Page 137: Financial Report/Employee Report
4. You can program a descriptor for the string report by touching DESCRIPTOR. 5. Select X or Z, the REP LVL (1-5) and the RPT# for each report you wish to include in the report sequence. 6. Touch CLOSE to exit the program. P Mode Programming 137 SPS-2000 Program Manual v1.30... -
Page 138: Time
2. Touch TIME ACTIVATED FUNCTIONS to make a selection from the TIME ACTIVATED FUNCTONS MENU. 3. Refer to the attached chart to determine the programmability for each time-activated function. 4. Touch CLOSE to exit the program. 138 P Mode Programming SPS-2000 Program Manual v1.30... - Page 139 FTP server address. These settings are found in a separate document titled "SPS-2000/SPS 5X0 FTP Reports” that is posted under Support Documents on the SPS-2000 and SPS-5X0 Dealer Support Pages. Go to this document for complete FTP setup instructions.
-
Page 140: Product & Ingredient
Product & Ingredient NOTE: Be careful not to confuse the separate and distinct inventory features of the SPS-2000: A menu-explosion type inventory system is set up when PLUs are linked to a recipe#. Recipes and Ingredients are programmed with this program. -
Page 141: Recipe Table
Enter the number of pieces in the unit. For the example shown, 120 burgers to the case- Enter 120; 30 cups to the sleeve- Enter 30. UNIT@ Enter a 4 Character descriptor for the unit, using the Alpha-keyboard overlay. This descriptor is for report purposes. P Mode Programming 141 SPS-2000 Program Manual v1.30... -
Page 142: Product Mix Group Time Periods
To inactivate a period replace the "A" (active) for the period with an "I" (inactive). All time units are based upon a 24-hour clock (military time). 142 P Mode Programming SPS-2000 Program Manual v1.30... -
Page 143: Taxes
Taxes The SPS-2000 provides calculation for up to six taxes. Tax calculation can be made by ADD ON percentage, by TAX TABLE, or by VAT (value-added tax). Provisions have been made for the Canadian Goods and Services tax (GST). If GST is to be taxable, you have the option of taxing the GST by other applicable rates (tax on tax). - Page 144 $1.09 - $1.24 Repeat $0.08 $1.25 - $1.41 $0.09 $1.42 - $1.58 $0.10 $1.59 - $1.74 $0.11 $1.75 - $1.91 $0.12 $1.92 - $2.08 $0.13 $2.09 - $2.24 $0.14 $2.25 - $2.41 144 P Mode Programming SPS-2000 Program Manual v1.30...
-
Page 145: Messages
NO CHECK# ANALYSIS 1/2/3 NO DATA ENTER EMPLOYEE CODE NO DRAWER! ENTER EMPLOYEE # NO MANUAL ENTRY ENTER GUEST COUNT NO PAPER ENTER SEAT# NO PLU! ENTER TABLE# NON ADD# REQUIRED P Mode Programming 145 SPS-2000 Program Manual v1.30... - Page 146 PRINT KEY REQUIRED ERROR VALUE SURCHARGE NOT ALLOWED ERROR SYSTEM OPTION DECIMAL ENTRY REQUIRED ERORR EMPLOYEE SYSTEM REG# REQUIRED ERROR TABLE NO. TRAINING EMP FILE# RQUIRED SCALE MOTION TIME IN/OUT REG# REQUIRED 146 P Mode Programming SPS-2000 Program Manual v1.30...
- Page 147 INCORRECT TARE WEIGHT NO ITEM FOR SELECT. DISCOUNT VOID PROMO FIRST RESTORE DALLAS KEY MULTIPLE RECEIPTS NOT ALLOWED MODIFICATION NOT ALLOWED MIX & MATCH ERROR VOID LAST DISCOUNT FIRST CLERK INTERRUPT ERROR P Mode Programming 147 SPS-2000 Program Manual v1.30...
-
Page 148: Default System Descriptors
RESERVED ENTER NEW SEAT# OPERATOR RESERVED ALPHA MESSAGE NON-ADD# RESERVED RESERVED INPUT QTY RESERVED RESERVED ENTER TIME: RESERVED RESERVED TRANS VD RESERVED RESERVED PAYMENT RESERVED RESERVED HOME AMT RESERVED RESERVED FSCRT 148 P Mode Programming SPS-2000 Program Manual v1.30... -
Page 149: Message Definitions
(maximum lines stored). The register will require the sale to be finalized with the option of printing a bill if required P Mode Programming 149 SPS-2000 Program Manual v1.30... - Page 150 Table number entry is required to open a guest check, or begin sale. ENTRY REQUIRED The function selected requires a numeric entry, i.e. a percentage for an open percent discount. ERROR General error message. ERROR JAM Receipt / journal printer jammed message. 150 P Mode Programming SPS-2000 Program Manual v1.30...
- Page 151 NO MANUAL ENTRY Manual entry is not allowed (scale function). NO PAPER Slip printer is out of paper, appears when printing to a loose-leaf printer. P Mode Programming 151 SPS-2000 Program Manual v1.30...
- Page 152 This item requires a weight this may be entered either manually or automatically. SEQUENCE ERROR! The preceding key sequence is not allowed. SINGLE ITEM! This PLU has been programmed as a single item PLU and cannot be used within a sale. 152 P Mode Programming SPS-2000 Program Manual v1.30...
- Page 153 Also appears when attempting to sign on a new employee without first signing the current employee off, if overlap employee is not programmed. ZERO AMOUNT The register has been programmed to not allow negative sales, and to consider a zero amount as a negative sale. P Mode Programming 153 SPS-2000 Program Manual v1.30...
-
Page 154: Printer & Kv Routing
Printer & KV Routing The printing system of an SPS-2000 register or system of registers is completely flexible. Up to 40 printers can be defined and connected to any available serial port on any register within a system. Multiple printer functions can be assigned to the same printer, giving added flexibility. -
Page 155: Promotion Table
If the discountable item is not registered, a “NO ITEM FOR SELECT DISCOUNT” error will display and the discount will not be applied. Beginning at version 2.03j, the FIXED QTY field will determine how many times the discount is applied. P Mode Programming 155 SPS-2000 Program Manual v1.30... -
Page 156: File Management
PLU Status Groups Copies the “GROUPS BY EMPLOYEE” settings from one COPY GROUPS BY EMPLOYEE employee to another. Allows downloading of all or selected programs to all or selected PROGRAM DOWNLOAD registers. 156 P Mode Programming SPS-2000 Program Manual v1.30... -
Page 157: P-Mode Pgm Scan
PLU MINIMUM STOCK BY RANGE NON-PLU CODE TARE WEIGHTS MACRO GROUPS BY EMPLOYEE BY RANGE DELIVERY INFO Key Relocation The program provides the same key relocation options also provided available S mode. P Mode Programming 157 SPS-2000 Program Manual v1.30... -
Page 159: Program Guides
1. Designate an employee file to be used for training. Set the P Mode Employee Option for that employee to “Training Mode” = YES. 2. Refer to P Mode System Options/Training Mode Options select printing, drawer and other training related options. Program Guides 159 SPS-2000 Program Manual v1.30... -
Page 160: Table Management Program Guide
Delete a Table Delete All Tables Change Table Shape Set Screen Background Color Set Names for each Floor Select one of Add a new Add a group five floors table of tables 160 Program Guides SPS-2000 Program Manual v1.30... - Page 161 Note: If you add more than one new table at a time, each new table will be located on top of the previous table in the center of the screen. You must move each table as it is added. Program Guides 161 SPS-2000 Program Manual v1.30...
- Page 162 Enter the number of table rows (1-6) in the Height field. Select the tracking file (1-4) that is being used and touch OK. The grid of new tables displays. 3. Move or change shapes of tables as necessary. 162 Program Guides SPS-2000 Program Manual v1.30...
- Page 163 Deleting a Table or Tables 1. Touch a table to select it. 2. Touch Del Table. The table is removed from the screen. Touch Delete All to remove all tables from the screen. Program Guides 163 SPS-2000 Program Manual v1.30...
- Page 164 Adding Floors 1. Touch Floor Info. 2. Enter names for each floor as necessary. 3. Touch OK. Open the Floor list box to select and display the appropriate floor. 164 Program Guides SPS-2000 Program Manual v1.30...
-
Page 165: Alternative Table Shapes/Backgrounds
Microsoft Paint. Table images must be in the correct size and have the correct file name. Custom images are loaded into the SPS-2000 using an SD card and the Image Copy function from the Key Relocation program. Refer to the table below for image names and sizes. - Page 166 Tableshape1_3.gif Shape1 Table Tableshape2_1.gif Tableshape2_2.gif Tableshape2_3.gif Shape2 Table Tableshape3_1.gif Tableshape3_2.gif Tableshape3_3.gif Shape3 Table Tableshape4_1.gif Tableshape4_2.gif Tableshape4_3.gif Shape4 Table Tableshape5_1.gif Tableshape5_2.gif Tableshape5_3.gif Shape5 Table Tableshape6_1.gif Tableshape6_2.gif Tableshape6_3.gif Shape6 Table Tableshape7_1.gif Tableshape7_2.gif Tableshape7_3.gif Shape7 166 Program Guides SPS-2000 Program Manual v1.30...
-
Page 167: Guest Check Tracking Program Guide (Soft Check)
Starting Check Numbers Options to reset check numbers on Z of Financial or Open Check Reports Option to print Barcodes on checks Option to use Alpha Check Numbers Program Guides 167 SPS-2000 Program Manual v1.30... -
Page 168: Employee Time Keeping With Mcr - Program Guide
Employee Time Keeping With MCR – Program Guide 1. Set the CARD READER ENABLE option to YES. (GENERAL FUNCTION OPTIONS) 2. Set EMPLOYEE TIME-IN/OUT option to CLOCK IN CODE. (TIME KEEPING OPTIONS) 168 Program Guides SPS-2000 Program Manual v1.30... - Page 169 Enter the number of digits to be read for the Card ID. COLUMN OF Enter the number of the column that the Card number starts. NUMBER CARD NUMBER Enter the number of digits to be read for the Card number. DIGITS Program Guides 169 SPS-2000 Program Manual v1.30...
- Page 170 4. Enter Employee CLOCK IN CODE. (EMPLOYEE PROGRAMMING) 5. ** You can swipe employee card at this screen. 6. Program JOB CODE and PAY RATE for the employee. 170 Program Guides SPS-2000 Program Manual v1.30...
- Page 171 7. Set CLOCK IN/OUT USING MCR option to YES. (AUTHORITY LEVEL PROGRAMMING) 8. On REG screen, press CLK IN/OUT button to time in/out the clerk. Program Guides 171 SPS-2000 Program Manual v1.30...
- Page 172 9. Slide the clerk card. 10. Select job code and touch OK. 172 Program Guides SPS-2000 Program Manual v1.30...
-
Page 173: Employee Sign On With Mcr - Program Guide
Employee Sign On with MCR – Program Guide 1. Set the EMPLOYEE SIGN-ON option to OPERATING CODE. (GENERAL FUNCTION OPTIONS) 2. Set the CARD READER ENABLE option to YES. (GENERAL FUNCTION OPTIONS) Program Guides 173 SPS-2000 Program Manual v1.30... - Page 174 CARD ID DIGITS Enter the number of the column that the Card number starts. COLUMN OF NUMBER Enter the number of digits to be read for the Card number. CARD NUMBER DIGITS 174 Program Guides SPS-2000 Program Manual v1.30...
- Page 175 5. ** You can swipe employee card at this screen. 6. Set SIGN IN/OUT USING MCR option to YES. (AUTHORITY LEVEL PROGRAMMING) 7. On REG screen, you can sign on/off using the card. Program Guides 175 SPS-2000 Program Manual v1.30...
-
Page 176: Open Check By Mcr - Program Guide
The magnetic track that will be read: track 1 or track 2 Enter the number of the column that the Card number starts Enter the number of digits to be read for the Card number. 176 Program Guides SPS-2000 Program Manual v1.30... - Page 177 Determining MCR Settings 1. Read data from a sample card using the SPS-2000 Self Test program. (From the S Mode menu, choose SELF TEST and then MSR. Slide the card through the card reader.) Track 2 Data Track 1 Data 2.
- Page 178 178 Program Guides SPS-2000 Program Manual v1.30...
-
Page 179: Appendix
INDIVIDUAL & IRC All PLU’s X1 & Z1 also X5 to Z5 INDIVIDUAL & IRC Not use this by REPORT key function. PLU’s by Group X1 & Z1 also X5 to Z5 INDIVIDUAL & IRC Appendix 179 SPS-2000 Program Manual v1.30... - Page 180 IRC from REG holding data Checks for Track 1,2,3,4 X1 & Z1 IRC from REG holding data Product Mix X1 & Z1 also X2 & Z2 INDIVIDUAL & IRC Product Projections X1 read only INDIVIDUAL & IRC 180 Appendix SPS-2000 Program Manual v1.30...
-
Page 181: Report Option Table
If from group number is 1 and to group number is 2, option data is 0102. Selective Groups Group number (1~2 digit) Product Projections Week data (1 digit) Shift Reporting Shift number (1 digit) Stock by Individual Group Group number (1~2 digit) Appendix 181 SPS-2000 Program Manual v1.30... -
Page 182: Special Report Commands
Print Super Macro and Reset (available at version 3.00y or later) 98000 Save PGM/Reports to SD card (available at version 3.00g29 or later) 98100 Save PGM/Reports to USB Memory (available at version 3.00g29 or later) 182 Appendix SPS-2000 Program Manual v1.30... -
Page 183: Glossary Of Terms
Registrations of PLUs with auto scale status will automatically multiply by the weight placed upon a scale connected to the register. Use for items such as produce that are always sold by weight. Glossary of Terms 183 SPS-2000 Program Manual v1.30... - Page 184 The bitmap file is an image, i.e. a logo that can be printed on a receipt or guest check. The bitmap file is downloaded to the SPS-2000 from a PC, and then downloaded to the memory of the appropriate printer.
-
Page 185: Electronic Journal
An error condition signals that an incorrect operation has occurred. It is identified by an audible tone and an error descriptor appearing on the display. Error Correct An error correct operation voids the last item entered, it must be used within a sale. Glossary of Terms 185 SPS-2000 Program Manual v1.30... - Page 186 In the United States, Food Stamps may be used to purchase eligible food items at food stores that participate in the program. The SPS-2000 can assist a retailer in handling food stamp transactions by sorting food stamp and non-food stamp eligible items within each sale and tracking food stamp payments for eligible items.
- Page 187 The SPS-2000 has five keyboard levels. Link PLU If you wish the registration a PLU to automatically cause the registration of another PLU, enter the number of the PLU you wish to register automatically in the LINK PLU field of the appropriate PLU Status Group.
- Page 188 Z1, Z2 etc. reports. A system password can be set to allow service access to all of the functions of the SPS-2000. For example, use the system password if you are servicing a users system and you do not know an employee code that allows you to access necessary functions, or if authority level programming prohibits you from accessing functions you need to access in order to complete your tasks.
- Page 189 (as required by law in some areas) the weight of the container is subtracted and only the true weight of the product is measured on the scale. Tax Except Tax except is used to exclude the tax from an entire sale. Glossary of Terms 189 SPS-2000 Program Manual v1.30...
-
Page 190: Tax Shift
A void operation will erase a previous item entry. It must be used inside of a sale only. Waste The Waste function is used to start and end entries of items that are wasted. A waste count is maintained for each item and inventory is adjusted. 190 Glossary of Terms SPS-2000 Program Manual v1.30... -
Page 191: Index
General Printing Options 119 CLEAR/ESC 56, 98 GUEST # 57, 99 Clerk See Employee:programming CONTINUE 56, 98 CURR. CONV. 1-5 56, 98 currency symbol 119 HOLD 57, 99 destination Ingredient enforce 106 edit 137 Index 191 SPS-2000 Program Manual v1.30... - Page 192 PRICE LVL 1-20 58, 100 Training Mode Options 113 PRINT (function key) 58, 100 Validation/Subtotal Print Options 118 PRINT CHECK (function key) 59, 100 PRINT HOLD 59, 100 Printer Driver Selections 66 Priority printing 116 192 Index SPS-2000 Program Manual v1.30...
- Page 193 Time Activated Functions VAT subtracted fm indiv PLU ttls 111 programming 135 VOID ITEM 60, 101 TIME IN/OUT 60, 101 Time Keeping Options 124 TIP (1-3) 60, 101 TIP DECLARE 56 WASTE 60, 101 Index 193 SPS-2000 Program Manual v1.30...
-
Page 194: Manual Revision Record
Add features associated with software V3.00c V1.18 11/10/2008 Add Features associated with software V3.00w. Fixed Keys: DONE, PLU, PREV. X/TIME/SUBTOTAL/ CLEAR, CASH and VOID ITEM are now macros, and may be reassigned through macro programming. 194 Manual Revision Record SPS-2000 Program Manual v1.30... - Page 195 V1.29 9/16/2011 Updated Application Upgrade/Backup Operation V1.30 9/22/2011 Updated KV Routing Download note on page 156. Updated PLU inactive status definition. Time activated String Report to FTP information added. Manual Revision Record 195 SPS-2000 Program Manual v1.30...
Need help?
Do you have a question about the SPS-2000 and is the answer not in the manual?
Questions and answers