Chamberlain Merlin Professional MR1000 Installation And Operating Instructions Manual
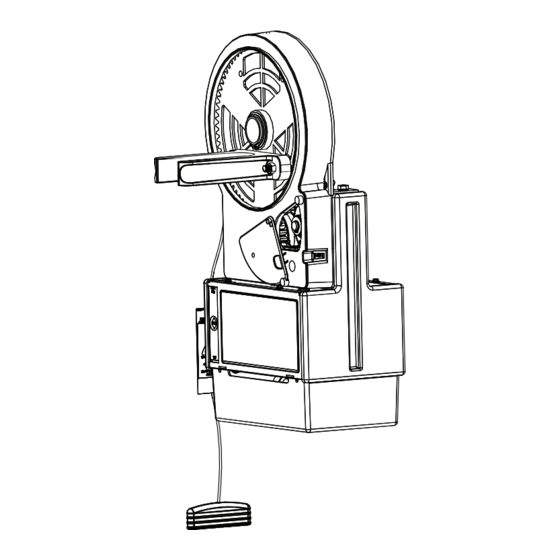
Rolling garage door opener
Hide thumbs
Also See for Merlin Professional MR1000:
Table of Contents
Advertisement
Advertisement
Table of Contents

Subscribe to Our Youtube Channel
Related Manuals for Chamberlain Merlin Professional MR1000


Summary of Contents for Chamberlain Merlin Professional MR1000
- Page 1 MR1000 Rolling Garage Door Opener Installation and Operating Instructions Owners Copy: Please keep these instructions for future reference This manual contains IMPORTANT SAFETY information. DO NOT PROCEED WITH THE INSTALLATION BEFORE READING THOROUGHLY.
-
Page 2: Table Of Contents
START BY READING THESE IMPORTANT SAFETY INSTRUCTIONS WARNING • Failure to comply with the following instructions may result in serious personal injury or property damage. • Read and follow all instructions carefully. • The garage door opener is designed and tested to offer safe service provided it is installed and operated in strict accordance with the instructions in this manual. -
Page 3: Carton Inventory
CARTON INVENTORY TOOLS REQUIRED 1. Instruction manual (this document) 1. Ladder 2. Stop collar 2. Adjustable wrench for U-bolts already installed 3. Drive forks on the door 4. Release handle and cord 3. 8mm socket, 10mm socket and 13mm extended 5. -
Page 4: Prepare & Test The Door
TESTING THE DOOR Disable all locks and remove any ropes connected to the garage door. Complete the following test to ensure your door is well balanced, and not sticking or binding: • Lift the door to about halfway and then release it. The door should remain spring balanced. -
Page 5: Release Cord
ATTACHING THE RELEASE HANDLE AND CORD • Thread one end of the rope through the hole in the top of the red handle so “NOTICE” reads right side up as shown. • Secure with an overhand knot at least 25mm from the end of the rope to prevent slipping. - Page 6 PINNING THE DOOR NOTE: A ballooning door may delay the safety reversal response and can compromise garage door security. Free curtain Ballooning Add fasteners here • To remedy any ballooning, place self tapping metal screws or rivets where the curtain leaves the roll. Secure these through the curtain into the drum wheel at each end of the roll.
- Page 7 LEFT / RIGHT HAND INSTALLATION roller:L roller:L roller:L roller:L LEFT RIGHT Inside garage looking out Setting left / right operation fig 1 The opener must be set to either left or right hand roller:L roller:L operation via the dip switch located under the green activation button.
-
Page 8: Connect Electric Power
INSTALLATION PROCEDURE Do not allow people to walk under or around the door during the installation process. Serious injury can occur. NOTE: The opener can be installed on either side of the door. The following instructions are for RIGHT HAND INSTALLATIONS (as illustrated i.e. Rope inside the garage looking out). -
Page 9: Adjustment
SETTING THE LIMITS FOR RIGHT OR LEFT OPERATION The travel limits regulate the points at which the door will stop when moving UP or DOWN. The procedure for setting these limits differs depending on which side of the garage door the opener has been fitted. - Page 10 SETTING THE FORCE Setting the force The force, as measured on the closing edge of the door, should not exceed 400N (40kgf). If the closing force is operate measured to more than 400N, the Protector System Press learn learn must be installed (refer section 17). The force setting button twice regulates the amount of power required to open and close the door.
-
Page 11: Install The Protector System
INSTALL THE PROTECTOR SYSTEM™ (IR BEAMS) SAFETY FIRST! Whilst Chamberlain have engineered safety features into your garage door opener, we urge you to consider fitting IR Beams to your new garage door opener. In many countries these devices are compulsory to prevent serious injury or property damage. -
Page 12: Setting Auto-Close
SETTING AUTO CLOSE (OPTIONAL) NOTE: The Protector System MUST be installed to enable this feature. The auto close feature will automatically close the garage door after the preset time. The time can be adjusted up to 180 seconds using the trim pot located Terminals Located under flap. -
Page 13: Wireless Programming
INSTALLING YOUR CM128 WIRELESS WALL BUTTON Disconnect power to the opener whilst installing this accessory to prevent accidental activation. Locate minimum 1.5m above the floor. To install: • Carefully pry open the CM128 and locate the two screws for mounting. •... - Page 14 KEYLESS DEVICE PROGRAMMING (OPTIONAL ACCESSORY) Programming C840 using the “learn” button: Activate the opener only when door is in full view, free of operate obstruction and properly adjusted. No one should enter Press and release learn or leave garage while the door is in motion. Do not allow the red learn button children to operate push button(s) or transmitter(s).
-
Page 15: Special Features
SPECIAL FEATURES (OPTIONAL ACCESSORIES) 1. Power output for external devices (12Vdc 100mA). 2. The Protector System (C77 IR Beams). 3. Multi-function wall control (C98). manual control white 12Vdc External Device 100ma (max) 12vdc white white/ black Keyswitch or push button white white/ black ACCESSORIES... -
Page 16: Spare Parts
SPARE PARTS Drive forks ADR2 0164 Motor assy PDR5 0098 Main drive gear Capacitor / limit assy 203D1720 Drive gear cover PDR4 0881 093A0533 Surge arrest PCB loom 001A7089 001A7086 RPM Sensor Clutch assy 001B 7089 PDR5 9000 Side cover Lamp Holder CDR1 0695 Chassis assy... -
Page 17: Diagnostic Chart
Possible RPM sensor • If it is still flashing 5 times and opener moves 150-200mm (6-8"), the RPM sensor failure. Unplug to reset. may need to be replaced, for details contact your Chamberlain Merlin Professional Dealer. 6 FLASHES Symptom: Door will not open or close •... -
Page 18: Troubleshooting
• Door and opener requires service. Contact your local • Replace transmitter batteries. Chamberlain Merlin dealer. 5. The garage door opens and closes by itself: • Be sure that all transmitter push buttons are off. -
Page 19: Operation Of Your Opener
• Ensure that mounting bolts are adequately tightened Allow a 15 minute cooling period after 4 minutes of (i.e. 25-28Nm) to the door axle. continuous operation of the opener. SPECIFICATIONS MR1000 Opening the door manually: (refer section 8) Input Voltage: 230-240VAC, 50Hz, 460W Door should be fully closed if possible. -
Page 20: Warranty
Unit. and/or workmanship for a period of 2 YEARS from the date of first purchase from the Seller. The MR1000 motor Under Division 2 Part V of the Trade Practices Act, 1974, (only) has a 5 year warranty from date of first purchase certain warranties and conditions (Implied Terms) are implied from the seller when installed on a domestic door.
Need help?
Do you have a question about the Merlin Professional MR1000 and is the answer not in the manual?
Questions and answers