Table of Contents
Advertisement
Quick Links
Download this manual
See also:
User Manual
Advertisement
Table of Contents

Related Manuals for Opticon H21


Summary of Contents for Opticon H21
- Page 2 PLEASE READ this manual CAREFULLY before installing or using the product. Serial Number A serial number appears on all Opticon products. This official registration number is directly related to the device purchased. Do not remove the serial number from your Opticon device. Removing the serial number voids the warranty. Warranty Unless otherwise agreed in a written contract, all Opticon products are warranted against defects in materials and workmanship for two years after purchase.
-
Page 3: Fcc Rf Radiation Exposure Statement
Federal Communications Commission (FCC) Statement This equipment has been tested and found to comply with the limits for a Class B digital device, pursuant to part 15 of the FCC rules. Rule 15.21: You are cautioned that changes or modifications not expressly approved by the part responsible for compliance could void the user’s authority to operate the equipment. -
Page 4: Safety Information
Safety Information General Please read the following information carefully before you start using this device to avoid any damages caused by improper usage: • The device is not charged when you take it out of the box. Charge the battery for at least 8 hours before first use. - Page 5 Specific Absorption Rate Specific Absorption Rate (SAR) is a measurement of the amount of radio waves absorbed by the body during mobile phone use. This phone meets government and regulatory standards. Maximum SAR Values CE: 0.578 W/kg(10g) Head FCC: 1.27W/Kg(1g) Head, 1.17 W/Kg(1g) Body Safety of Audio Equipment The Headphones and Earphones used with this device comply with maximum sound pressure level measurement methodology and limit considerations as outlined in EN 50332-1:2000.
-
Page 6: Table Of Contents
Table of Contents Introduction ..................9 1.1. Front view ........................9 1.2. Keypad and Function Keys ..................11 1.3. Right and Left View ....................12 1.4. Top and Bottom View ....................13 1.5. Rear View ........................14 1.6. Unpacking the H-21 ....................14 1.7. - Page 7 Phone Operations ................53 3.1. Making a Phone Call ....................53 3.2. Using Speed Dial ....................... 55 3.3. Accepting/Rejecting a Call ..................55 3.4. Retrieving a Voicemail Message ................55 3.5. Configuring Phone Settings ..................56 3.5.1. Activating PIN Security ......................56 3.5.2.
- Page 8 Bluetooth ................... 91 8.1. Bluetooth Modes ......................91 8.2. Enabling Bluetooth ..................... 91 8.3. Making Your Device Visible ..................91 8.4. Pairing With Devices in Range ................... 92 8.5. Beaming Information ....................93 Barcode Scanner ................94 9.1. Setting Up Barcode Reader ..................94 9.2.
-
Page 9: Introduction
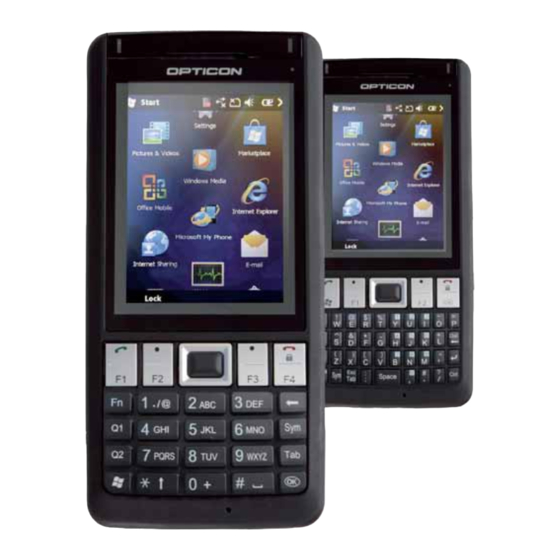
1. Introduction This chapter provides an overview of the H-21. The menu buttons, external views and features are also described. H-21 Views and Descriptions 1.1. Front view H-21 QWERTY H-21 Numeric... - Page 10 Front View Description Item Description Telephone Listen to a phone call here. speaker Wi-Fi/Bluetooth Color Bluetooth Wi-Fi on When both Bluetooth indicator and Wi-Fi are on, the indicator will blink green Green Blink and blue alternately. Blue Blink Color Missed GSM on GSM on Chargin...
-
Page 11: Keypad And Function Keys
1.2. Keypad and Function Keys Item Description NUMERIC & QWERTY 5-Way Navigation Key Press the multi directional control up, down, left, or right to move through menus; carry out the selection by pressing the center button. End Key Press to end a call or close an application. Fn Key Press the function key in order to enter the character on the upper part of the next key that is pressed. -
Page 12: Right And Left View
1.3. Right and Left View Item Description Volume Up Press the Volume Up button to turn up the volume. Volume Down Press the Volume Down button to turn down the volume. Scan Key (left) Press to scan and decode a barcode. Reset button Press the Reset button with the stylus to soft-reset your device. -
Page 13: Top And Bottom View
1.4. Top and Bottom View Item Description Eyelet for Stylus Strap Fix the stylus strap here. Power Button Power the device on or off. Scanner Point the reading window of the scanner in the direction of a barcode. Earphone jack Connect a 2.5 mm Earphone. -
Page 14: Rear View
1.5. Rear View Item Description Stylus Navigate or interact – writes, draws or make selections – on the touch screen. Mirror Allows you to see yourself while taking pictures. Camera 3.2 mega pixel camera with LED light takes high resolution pictures. Camera indicator Indicates when the camera is on/off. - Page 15 Package Contents H-21 QWERTY H-21 Numeric Stylus Battery AC Adapter with USB Cable international plug adapters User Manual and Headphones Wrist Strap...
-
Page 16: Accessories List
1.7. Accessories List The following accessories are optional. Contact your Opticon H-21 dealer for more information about acquiring optional accessories. Optional Accessories Cradle Car Kit... -
Page 17: Sim Card Installation
1.8. SIM Card Installation You must install a SIM card to use the phone functions of your H-21. Perform the following procedures to install the SIM card. Note: Power off the device and remove the battery before inserting a SIM card. Make sure the SIM card snaps correctly into the SIM socket. - Page 18 CAUTION!: To avoid injury during the following step, hold the device in front of you and direct the force away from your body. Step2: Hold the stylus in your hand and the device in your opposite hand. Insert the stylus into the groove closest to you (A). Push the stylus in an upward motion to separate the battery cover from the device (B)
-
Page 19: Installing The Sim Card
1.8.3. Installing the SIM Card Once the battery cover and battery has been removed, you can install the SIM card. Perform the following procedures to complete the installation of the SIM card. Step 1: Step 2: Step 3: Slide the SIM card bracket in Align the SIM card in the Rotate the SIM card bracket the direction of the arrow to... - Page 20 Installing the SIM card (continued) Step 4: Press the bracket and SIM card down and slide in the direction of the arrow to lock. Step 5: Install the battery. See “Installing the Battery” for details on how to do this. Step 6: Replace the battery cover.
-
Page 21: Battery Installation
1.9. Battery Installation The H-21 is not charged when you take it out of the box. Charge the battery for at least 8 hours before the first use. Perform the following procedures to install the battery. Note: The battery can also be charged in the optional cradle. Please check the cradle quick start guide for details on how to do that. -
Page 22: Replacing The Battery Cover
1.9.2. Replacing the Battery Cover Step 1: Align the battery cover with the top of the battery bay and insert (A). Lower the cover in place (B). 1.9.3. Removing the Battery To exchange the battery at any time, perform the following procedure to remove the battery: Step 1: Remove the battery cover. -
Page 23: Locking The Battery Cover
1.9.4. Locking the Battery Cover Before you can power the device on, you must lock the battery cover. Perform the following procedures to lock the battery cover. Step 1: Use the tip of the stylus to perform the following procedures. Do not use excessive force. ·... -
Page 24: Power And Battery Settings
1.10. Power and Battery Settings The life and performance of your battery depend on many factors including signal strength, temperature of the environment in which you use your phone, features and settings, and more. The H-21 is equipped with a high capacity battery that should allow you to work continuously for at least one full day, with all the peripherals switched on. -
Page 25: Micro Sd Cards
1.11. Micro SD Cards The H-21 contains a micro SD card slot for expanding the device’s memory. It has support for both standard and high-capacity SD cards (SDHC) 1.11.1. Inserting a Micro SD Card CAUTION!: Inserting the micro SD card in the wrong direction can cause damage to the card and the device. - Page 26 Step 4: Push down until the card clicks into place and close the SD card cover. Step 5: Slide the SD card lock downwards Step 6: Replace the battery and replace the battery cover. See "Installing the Battery" and "Replacing the Battery Cover"...
-
Page 27: Removing A Micro-Sd Card
1.11.2. Removing a Micro-SD Card Step 1: Remove the battery cover and remove the battery. See "Removing the Battery Cover" and "Removing the Battery" for details. Step 2: Slide the SD card lock upwards Step 3: Press the micro SD card inward to eject the card. - Page 28 Step 4: Remove the micro SD card from the card slot. Step 5: Slide the SD card lock downwards Step 6: Replace the battery and replace the battery cover. See "Replacing the Battery Cover" and "Installing the Battery" for details.
-
Page 29: Connecting A Headset
1.12. Connecting a Headset Step 1: Locate the headphones port on the bottom of the phone. (Item 1 on the drawing below) Step 2: Peel back the rubber door. Step 3: Insert the provided headphones into the headphones port. Headphones Port Headset... -
Page 30: Getting Started
2. Getting Started This chapter will instruct you on how to perform general operations such as powering the H-21 on and off, using the Today Screen and Start Menu, and setting up various organizational tools. 2.1. Powering on and off Powering On 1. -
Page 31: Calibrating The Touchscreen
2.3. Calibrating the Touchscreen Calibration ensures that the correct screen items are activated when tapped. The first time you power on the H-21, the system will ask you to calibrate the touchscreen. Tap the center of the cross using the stylus until the calibration is complete. To recalibrate the screen at any time: >... -
Page 32: Locking/Unlocking The H-21
2.4. Locking/Unlocking the H-21 Locking protects the screen from accidental key presses. To lock/unlock the keyboard and touchscreen: > Lock. The keyboard and touchscreen are now locked. To unlock the screen simply slide the Lock button to either the right or left. -
Page 33: Programming Buttons
2.5. Programming Buttons To assign a function to the F1, F2, F3* and F4* buttons: NOTE: F3 and F4 are only available on the Numeric version 1. Tap > Settings > Personal > Buttons > Program Buttons. 2. Select a button (F1, F2, F3*, or F4*) and assign a program from the drop down menu. 3. -
Page 34: To Edit The Up/Down Control And Repeat Rate
2.6. To edit the Up/Down control and Repeat Rate: 1. Tap > Settings > Personal > Buttons > Up/Down Control. 2. Drag the slider next to the appropriate option to change the setting. 3. Tap OK to save. 2.7. Backlight Settings 1. -
Page 35: Today Screen
2.8. Today Screen The Today Screen is usually the first screen that displays when you turn on the H-21. It displays a list of shortcuts to phone functions, programs, and favorites. The Today screen looks like this: The description of the various items is as follows Name Description Start Button... - Page 36 Accessing the Today Screen > Today Changing Today Screen Items 1. Tap > Settings > Today > Items. 2. Select the check box next to the items you want included on the Today screen. Deselect the check box next to the items you don’t want included. 3.
-
Page 37: Start Menu
2.9. Start menu The Start menu displays icons to all the basic functions and applications. The various items on the start menu screen are listed below: Name Description Start Button Tap to access the Start Menu Highlighted Item Tap to access a function or application Lock Locks the keyboard and touchscreen from accidental key presses Status Bar... -
Page 38: Entering Information
Uppercase mode. See the chapter on the numeric keyboard for more details. The QWERTY keyboard works regardless of the mode, so it does not need special input modes. 2.11. Using the hardware Keyboard Depending on the model, the H21 is either equipped with a QWERTY keyboard or a numeric keyboard. 2.11.1. - Page 39 Symbols To enter the symbols, printed in blue on the keys, press the FN key, followed by the key with the desired marking. E.g. when you want to enter !, press FN, followed by W. Special characters. To enter special characters, accented letters, punctuation marks, currency signs etc, (e.g. à, Ç, ®) you can use the Sym key (located next to the shift key on the bottom row) To do that, first press the key that has a marking that looks most close to the character that you want.
-
Page 40: Using The Numeric Keyboard
2.11.2. Using the Numeric Keyboard The numeric keyboard has 20 keys and is optimized to enter numbers, but it can also be used to enter text and symbols. There are 4 different input modes that can be selected with the use of the FN key. - Page 41 Special characters. To enter special characters, accented letters, punctuation marks, currency signs etc, (e.g. à, Ç, ®) you can use the Sym key. To do that, first press the key that has a marking that looks most close to the character that you want. Then press the Sym key one or more times until the desired character is shown of the screen.
-
Page 42: Selecting An Input Mode
2.12. Selecting an Input Mode There two ways to select a specific input method: · Via the keyboard (numeric keyboard only) Press FN followed by 1 to select Keyboard mode. Press FN followed by 2 to select Initial Capital mode. Press FN followed by 3 to select Lowercase mode. - Page 43 The three input modes that are especially meant for the numeric hardware keyboard do not have options that can be changed, but you can see the description of the function of the selected mode. Since they do not have options that you can change, the ‘Options’ button will only show you a screen like the one below.
-
Page 44: Using The Touch Screen Keyboard
2.13. Using the Touch Screen Keyboard The touch screen keyboard allows you to enter text by tapping keys with your stylus. 1. Select the touch screen keyboard as your input method. See "Selecting an Input Mode" for details on how to do that. 2. -
Page 45: Using Block Recognizer
2.15. Using Block Recognizer Block recognizer interprets letters written in one stroke. 1. Select the block recognizer as your input method. See "Selecting an Input Mode" for details on how to do that. 2. Tap the input icon located along the bottom center of the screen. The block recognizer displays as shown below left. -
Page 46: Setting Up The Calendar
2.16. Setting up the Calendar The Calendar can be used to schedule appointments, such as meetings or events. Appointments of the day can be displayed on the Today screen. There are five different appointment views: Day, Week, Month, Year, and Agenda. Creating Appointments >... - Page 47 Changing the Reminder Time > Calendar. Tap Menu > Tools > Options > Appointment. Select the reminder time from the drop down menus. Tap OK to save and exit. Changing the Calendar View 1. Tap > Calendar. 2. Tap Menu > Tools > Options > General. 3.
-
Page 48: Writing Notes
2.17. Writing Notes Notes allows you to quickly compose reminders, to-do lists, meeting notes, and more. You can write using the stylus, keypad, or touchscreen keypad. Setting the Default Input Method 1. Tap > Notes. 2. Tap Menu > Options. 3. - Page 49 Editing a Handwritten Note To edit a handwritten note, do one of the following options (See picture below left): · Tap Menu > Undo Ink to reverse an action. · Tap Menu > Redo Ink to re-execute an undone action. ·...
- Page 50 Recording Voice Notes 1. Tap > Notes. 2. If the recording toolbar is not displayed, tap Menu > View Recording Toolbar. 3. Tap the Record button on the toolbar as indicated below left and speak into the microphone. 4. Tap the Stop button on the toolbar when finished. 5.
-
Page 51: Tasks
2.18. Tasks Tasks help you keep track of things you need to do. You can program tasks to be one time or recurring, set reminders, and organize them by category. If you use Outlook on your PC, you can synchronize tasks between your H-21 and PC. Creating a task 1. - Page 52 Sorting/Filtering Tasks 1. Tap > Tasks. 2. Do one of the following options to get the screen as shown below left: · Sort: Tap Menu > Sort by and select the sorting option (Priority, Subject, Start Date, Due Date). · Filter: Tap Menu >...
-
Page 53: Phone Operations
3. Phone Operations This chapter instructs you on how to use various phone operations of the H-21. You can make, receive, and keep track of calls, and send text messages (SMS) and multimedia messages (MMS). 3.1. Making a Phone Call Accessing the Phone Screen From the Phone screen, you can make calls and manage contacts. - Page 54 Making a Call from Call History Call History displays calls you have made, received, and missed. 1. Tap > Phone. 2. Tap Keypad to view the keypad buttons. 3. Tap Call History to open the screen as shown below left.. 4.
-
Page 55: Using Speed Dial
3.2. Using Speed Dial Create speed dial entries for frequently used numbers so you can call a contact by pressing a single key. A speed dial entry can only be created for numbers stored in contacts. To create a speed dial entry for a contact: 1. -
Page 56: Configuring Phone Settings
3.5. Configuring Phone Settings 3.5.1. Activating PIN Security Most SIM cards are preset with a personal identification number (PIN) provided by your wireless service provider. When PIN Security is enabled, you will be prompted to enter your PIN whenever you use your device. 1. -
Page 57: Setting The Phone Profile
3.5.3. Setting the Phone Profile 1. Tap > Settings > Personal > Phone mode to open the screen as shown below left. 2. Select the radio button next to one of the following phone profiles: · Normal: Current Sounds & Notifications setting applies. ·... -
Page 58: Blocking Incoming And Outgoing Calls
3.5.5. Blocking Incoming and Outgoing Calls You will not be able to receive or make calls according to the options you choose. 1. Tap > Settings > Personal > Phone . 2. Press the Services tab. 3. Tap Call Barring > Get Settings to open the screen as shown below left. 4. -
Page 59: Call Waiting
3.5.8. Call Waiting Call waiting notifies you of an incoming call when you’re on the phone with another party. 1. Tap > Settings > Personal > Phone. 2. Press the Services tab. 3. Tap Call Waiting > Get Settings to open the screen as shown below left. 4. -
Page 60: In-Call Options
3.5.11. In-Call Options If you receive another incoming call while on the phone, the H-21 provides options for managing multiple calls at the same time. When you are notified of the incoming call, you can ignore, accept, switch, or set up a conference call between all three parties. Answering another call Tap Answer to accept the second call and put the first call on hold. -
Page 61: Using Multimedia Functions
4. Using Multimedia functions 4.1. Playing Music Use your phone’s media player to listen to music or watch videos. To launch the Windows Media player: From the Home screen, tap > Windows Media to open the screen as shown below left. Browse for the desired files and select it. - Page 62 Basic camera functions. Camera main screen. Start the camera application to get the screen as shown below. Via this screen and the touch panel, several more advanced features of the camera can be accessed. The icons and there description can be found in the table following this description. Most of the icons are merely a status indication, while others can be touched to change settings.
- Page 63 The icons on the camera screen are described in this table. Icon Description Cancel button: click to exit the camera/video application and return to Windows. Flash icon: click to turn on/off the flash. If the flash is off, a red cross is drawn through this icon.
-
Page 64: Video Recorder
4.3. Video recorder. 4.3.1. To launch the video recorder: First launch the camera, as shown under "Camera" 1. Tap > Pictures and Video. 2. Tab Camera on the bottom of the screen. 3. Press the camera icon on the left of the screen. When the video recorder is activated the camera icon the icon will then change to indicate that the video recorder is started. - Page 65 The icons on the video screen are described in this table: Icon Description Cancel button: click to exit the camera/video application and return to Windows. Flash icon: click to turn on/off the flash. If the flash is off, a red cross is drawn through this icon.
-
Page 66: Camera And Video Settings
4.4. Camera and Video settings From the camera or the video screen, click the Settings icon to get the configuration menu. In this menu, all the settings for both the camera and the video recorder can be made. There are four tabs, from left to right: ·... - Page 67 Category Settings Effect button Full color, the normal mode for camera and video. Black and white mode. General Enhance Blue color. Settings Enhance Sepia color. Enhance Red color. Enhance Green color. Negative effect. Inverses the colors for pictures/video’s White Balance Auto White Balance.
- Page 68 Category Settings General Shot Mode settings Single shot. A picture is taken when the capture key is continued pressed and stored immediately. Multiple mode. A picture is taken when the capture key is pressed, but after that, the user gets an option to either store the picuture (Press the button for this) or delete it.
- Page 69 Category Settings Image Format: Cannot be changed Resolution 320x240 (default), 640x480 800x600 Camera 1027x768 Settings 1600x1200 2048x1536 File Type Text: The picture is stored without date/time information in the filename DateTime: The picture is stored with date/time information in the filename Filename SNo Select reset to have the next picture stored as picture Picture Quality...
- Page 70 Category Settings Video Format Resolution 320x240 640x480 File Type Text: The picture is stored without date/time Video information in the filename. Settings DateTime: The picture is stored with date/time information in the filename. Filename Select reset to have the next video stored as video 1. Flicker Auto (default) Adjustment.
-
Page 71: Contacts And Messaging
5. Contacts and Messaging This chapter instructs you on using Contacts to manage addresses and phone numbers, and Messaging to send and receive SMS, MMS, and e-mail messages. 5.1. Using Contacts Contacts allows you to store phone numbers, e-mail addresses, birthdays, and other information that relates to a contact. -
Page 72: Using Text Messaging
5.2. Using Text Messaging Writing a New Text Message 1. Tap > Text . 2. Tap Menu > New to open the screen as shown below left.. 3. Do one of the following options: · In the To field, enter the recipient’s number. NOTE: Insert a semicolon (;) between numbers to send to multiple contacts. -
Page 73: Requesting Text Message Delivery Notification
5.2.1. Requesting Text Message Delivery Notification 1. Tap > Text. 2. Tap Menu > New. 3. Tap Menu > Message Options to open the screen as shown below left. 4. Select the check box next to Request message delivery notification. 5. -
Page 74: Sending E-Mail
5.3. Sending e-mail Before you set up your e-mail account, please prepare the following information: Item Description User name The username for the new email account. This is usually the first part of your email address, which appears before the “at” sign (@). Password The password for the new email account. - Page 75 5. Enter the name you want to appear when you send email and tap Next. (See picture below left) 6. In the Automatic Send/Receive drop down menu, select a frequency for sending/receiving email, or select manual. (See picture below right) 7.
-
Page 76: Composing An E-Mail Message
5.3.2. Composing an E-mail Message 1. Tap > Email and select an email account. 2. Tap Menu > New to open a new email message as shown below left. 3. Enter recipient in the To, Cc, or Bcc field. NOTE: Insert a semicolon (;) between multiple addresses. NOTE: Scroll up for the CC and Bcc fields. -
Page 77: Email Message Options
5.3.4. Email Message Options 1. Tap > Email and select an email account. 2. Tap Menu > New. 3. Tap Menu > Message Options to open the screen as shown below left. 4. Select the options to change (Priority, Security, Permission, Language). 5. -
Page 78: Internet Access
6. Internet Access 6.1. Connecting to the Internet This chapter instructs you on how to access the Internet using the H-21. You can establish a connection via GPRS or Proxy for browsing the Web, downloading emails and more. To manually set up a connection, obtain the following information from your Internet Service Provider (ISP): ·... - Page 79 5. In the User name field, enter your user name for the GPRS network, if required. See picture below left. · In the Password field, enter your password, if required. · In the Domain field, enter your domain name, if provided by your ISP. 6.
-
Page 80: Creating A Proxy Connection
6.1.2. Creating a Proxy Connection Every network connection is different. You should gather all of the relevant information or network settings you need before starting this process. 1. Tap > Settings > Connections > Connections > Tasks. 2. Tap Set up my proxy server as shown below left. 3. -
Page 81: Using Internet Explorer
6.2. Using Internet Explorer Internet Explorer Mobile is a web browser optimized for use on your mobile phone. You can use Internet Explorer Mobile to browse the Internet after setting up a valid Internet connection. See "Connecting to the Internet" for details. Browsing the Internet NOTE: A valid connection must be established before you can browse the Internet. - Page 82 Adding a Web Page to the Favorite List 1. Tap > Internet Explorer. 2. Navigate to the page you want to add as a favorite. 3. Tap the Favorites icon as shown in the picture below left. 4. Tap the Add icon as shown in the picture in the middle. 5.
- Page 83 Changing the Size of Text on Web Pages 1. Tap > Internet Explorer. 2. Tap Menu > View > Text size and select the size you want (Largest, Larger, Medium, Smaller, Smallest) Showing or Hiding Pictures on Web Pages 1. Tap >...
- Page 84 Copying Text from a Web Page 1. In Internet Explorer Mobile, tap and hold the page, and tap Select All Text. 2. Tap and hold the page. 3. Tap Make Selection on the pop-up menu as shown below left. 4. Highlight the text to copy using the stylus. 5.
-
Page 85: Using Wireless Manager
6.3. Using Wireless Manager Wireless Manager is a program that lets you to turn on or off your cellular phone, Bluetooth, and Wi-Fi connections. Opening Wireless Manager To open the Wireless Manager, do one of the following: 1. Tap > Settings > Connections > Wireless Manager. 2. -
Page 86: Connecting To A Wi-Fi Network
6.3.1. Connecting to a Wi-Fi Network Wi-Fi allows you to access the internet by connecting to a wireless network, or hotspot. 6.3.2. Connecting to a Wi-Fi Network 1. Tap > Settings > Connections > Wireless Manager. 2. Tap Menu > Wi-Fi Settings as shown on the screen below left. 3. -
Page 87: Editing A Wireless Network
6.3.4. Editing a Wireless Network 1. Tap > Settings > Connections > Wireless Manager. 2. Tap Menu > Wi-Fi Settings. 3. Tap and hold the network you want to edit. 4. Tap Edit on the pop-up menu. 5. Make all the necessary changes to the wireless network settings. 6. -
Page 88: Synchronization
7. Synchronization This chapter instructs you on how to synchronize your H-21 phone with your Windows PC. Use ActiveSync or Windows Mobile Device Center to: · Synchronize Outlook e-mail, contacts, calendar, tasks, pictures, video, and music. · Get up to date e-mail, contacts, calendar appointments, and tasks even when your PC is turned off. -
Page 89: Starting And Stopping Synchronization Manually
7.2. Starting and Stopping Synchronization Manually 1. Turn on the device. 2. Connect the device to your PC using a USB cable. 3. Tap > ActiveSync. 4. To start synchronizing, tap Sync. 5. To stop synchronizing, tap Stop. 7.3. Changing ActiveSync Settings Changing which Information is synchronized 1. -
Page 90: Synchronization Using Bluetooth
7.4. Synchronization using Bluetooth Before you synchronize using Bluetooth, make sure there is a valid Bluetooth partnership set up on your H-21. See “Pairing With Devices in Range”. 1. Tap > ActiveSync. 2. Tap Menu > Connect via Bluetooth. NOTE: Ensure that the device and PC are within close range. 3. -
Page 91: Bluetooth
8. Bluetooth This chapter instructs you how to set up a Bluetooth connection for sending information over a WPAN or Wireless Personal Area Network. 8.1. Bluetooth Modes There are three Bluetooth operational modes: Bluetooth is enabled and your device can send and receive information with other Bluetooth devices in range. -
Page 92: Pairing With Devices In Range
8.4. Pairing With Devices in Range Pairing with another Bluetooth device allows you to exchange information in a secure manner. Make sure the two devices are within a range of 10 meters, and Bluetooth is turned on and in visible mode. 1. -
Page 93: Beaming Information
8.5. Beaming Information To use Bluetooth to receive beams, ensure Bluetooth is turned on and that your device is visible and within close range. To enable incoming beams: 1. Tap > Settings > Connections > Beam. 2. Select the check box next to Receive all incoming beams. 3. -
Page 94: Barcode Scanner
9. Barcode Scanner The H-21 comes equipped with a barcode scanner for reading barcodes. Either with a 1D laser scanner or with a 2D camera module. In this chapter, learn how to enable the barcode scanner and adjust the various settings. 9.1. -
Page 95: Scanning And Reading Barcode Labels
Selecting Recognized Barcode Types The H-21 is capable of scanning and decoding various barcode types. To select or deselect the barcode types to scan for, perform the following steps: 1. Tap > Settings > System > Scanner Setting > Code Options. 2. -
Page 96: Applications
10. Applications 10.1. Data Backup This chapter instructs you on how to backup and recover data. Back up your data regularly to avoid lost or damaged data. Backing up Data 1. Tap > Backup Manager. 2. Select one of the following options: ·... -
Page 97: Managing Memory
10.2. Managing Memory Checking Available Storage > Settings > System > Memory. · In the Main tab, you can see how much storage is available on the main memory of your device. · In the Storage Card tab, you can see how much storage is available on your storage cards. 10.2.1. -
Page 98: Office Mobile
10.4. Office Mobile 10.4.1. Excel Mobile Excel Mobile allows you to create, view, and edit spreadsheets on your device. Creating a New Spreadsheet 1. Tap > Office Mobile > Excel Mobile. 2. Compose your spreadsheet. 3. Tap Menu > File > Save As. (See picture below left) 4. -
Page 99: Word Mobile
10.4.3. Word Mobile Word Mobile allows you to create and edit Microsoft Word documents, templates, plain text files, and/or rich text format files. It is also great for testing the barcode scanner. Creating a Word Mobile Document 1. Tap > Office Mobile > Word Mobile. 2. -
Page 100: Gps
10.5. GPS The H-21 has a built-in GPS signal receiver that can be used to get the current location of the H-21. To do anything useful with the location information, a navigating program is required, which is not part of the standard software of the H-21. This should be purchased separately. 10.5.1. -
Page 101: Appendix
11. Appendix 11.1. Specifications Item Description ID Shape Bar Type Dimension/Weight 136x66.5x22.07mm Windows Mobile 6.5 Professional Band WCDMA: 800 (band VI), 850 (band V), 1900 (band II) and 2100 MHz (band I) GSM: 850, 900, 1800 and 1900 MHz Network GPRS/EDGE/UMTS/HSDPA/HSUPA CPU chipset Qualcomm MSM 7225 (ARM11 528MHz)
Need help?
Do you have a question about the H21 and is the answer not in the manual?
Questions and answers