Table of Contents
Advertisement
Quick Links
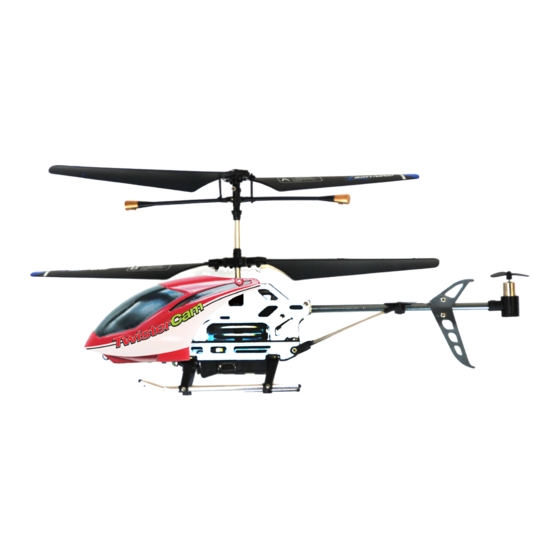
Mini R/C Helicopter with built in Video Camera
INSTRUCTION MANUAL
„ Super bright front LED
„ Lightweight plastic flybar
„ Super strong wide track undercarriage
„ High strength, resilient main rotor blades
„ Indoor Infra Red R/C transmitter
„ 4 Channel transmitter (3-channel control plus button for the Video)
„ Super smooth and stable hovering
„ Around 60 minute charge time from USB cable
„ Approximately 7 minutes flying time per charge
„ 1Gb Micro SD Card included
Please read the instructions carefully before use and retain for future reference.
V1.0
Advertisement
Table of Contents

Related Manuals for J. Perkins Mini Twister Cam


Summary of Contents for J. Perkins Mini Twister Cam
-
Page 1: Instruction Manual
Mini R/C Helicopter with built in Video Camera INSTRUCTION MANUAL „ Super bright front LED „ Lightweight plastic flybar „ Super strong wide track undercarriage „ High strength, resilient main rotor blades „ Indoor Infra Red R/C transmitter „ 4 Channel transmitter (3-channel control plus button for the Video) „... -
Page 2: Table Of Contents
Please note that, whilst every effort is made to ensure the accuracy of instructions and material included with this product, mistakes can occur neither J. Perkins Distribution Ltd nor it’s distributors will be held liable for any loss or damage arising from the use of this model or for any loss or damage arising from omissions or inaccuracies in the associated instructions or materials included with this product. -
Page 3: Introduction
A hard, flat surface clear of all radio and excellent stability. Mini Twister obstacles is recommended for take offs. Because of its size, the Mini Twister Cam can Cam is an ideal choice for the beginner be flown in virtually any size room. However,... -
Page 4: Specifications
A. KIT CONTENTS Main blades (upper) Flybar assembly Main shaft Transmitter Front LED Spare main blades Screw driver USB charge lead Spare tail blades USB Micro SD card adapter Mini Twister Cam Instruction Manual... -
Page 5: Transmitter Part Names
B. TRANSMITTER PART NAMES Infra Red sender ON/OFF switch Frequency selection Swithc A,B,C Charging Indicator Yaw Trim Dial Power Indicator Fore / Aft cyclic & Yaw stick (Mode 1) Throttle stick (Mode 1) Throttle (Mode 2) Fore / Aft Cyclic stick & Yaw stick(Mode 2) Video On/Off Button (Mode 1) -
Page 6: Flight Controls
If there is too much artificial light or there is direct sunlight on the model, the link will also be lost and the model will stop and fall to the ground. Maximum range in ideal conditions is approximately 15 meters. Mini Twister Cam Instruction Manual... -
Page 7: Helicopter Charging Instructions
heliCopter CharGinG instruCtions Note: Charge the helicopter battery before using the Mini TwisterCam for the first time. Charging from your computer Turn on your computer power switch Plug the USB charge lead into a spare USB slot on your computer. The light in the lead will glow red. -
Page 8: Trimming The Helicopter (Mode 1 & Mode 2)
LANDING Once you have trimmed your model, slowly reduce throttle to land, disconnect the battery and read through the next section on how to use the other controls on the helicopter. Yaw Trim Dial Mini Twister Cam Instruction Manual... -
Page 9: Flight Controls
fliGht Controls TAKING OFF If you have never flown an R/C helicopter before, we recommend learning to fly in the beginner mode before progressing to advanced mode. See page 7 for information on how to switch between beginner and advanced the modes. Gently move the throttle stick up. -
Page 10: Fore/Aft Cyclic Control
The possibilities are endless. ENJOY! WHEN YOU HAVE FINISHED FLYING THE HELICOPTER, TURN IT OFF, THEN TURN OFF THE TRANSMITTER. Mini Twister Cam Instruction Manual... -
Page 11: Video Recording
Video reCordinG Turn on the helicopter, the power switch is under the helicopter (pic. 1) Wait for the red and yellow light at the rear of the helicpter to light up (pic. 2) Insert the Micro SD card into the Micro SD Card slot (pic. 3) When the card is inserted correctly, the yellow light will turn off (pic. -
Page 12: Exploded Diagram
Horizontal Stabiliser Rear Landing Skid Support Vertical Stabiliser Tail Rotor Blade Tail Motor and Mount Tail Boom Vertical Stabiliser Mount Video Camera Unit Horizontal Stabiliser and Tail Boom Support Mount Main Motors Tail Boom Support Mini Twister Cam Instruction Manual... - Page 13 Diagram Part Description quantity ME Parts Code Number 6605825 Flybar Assembly 6605810 Upper Rotor Blade 6605810 Upper Rotor Blade 6605825 Upper Blade Grips 6605810 Lower Rotor Blade 6605810 Lower Rotor Blade 6605850 Top Bearing and Mount 6605850 Upper Spacer for Outer Shaft 6605850 Outer Shaft, Upper Main Gear and Lower Spacer 6605850...
-
Page 14: Parts List
Not Shown 6605865 Micro SD card 1Mb Please order spare parts using the JP Codes above from your local model shop. There is a Shop Locator on the J Perkins (Dist) Ltd home page. www.jperkinsdistribution.co.uk Mini Twister Cam Instruction Manual... -
Page 15: Lithium Polymer Battery Safety
lithium polymer battery safety Before Charging Li-po’s Before charging your battery check for any damage e.g. check if the battery has „ expanded or swollen in size or if the battery cells have been punctured. If any of the above is true: DO NOT CHARGE THE BATTERY! Charging Li-po’s Only use the USB lead supplied with this product to charge the Lithium polymer „... - Page 16 European agents: J Perkins Distribution, Lenham, England www.jperkinsdistribution.co.uk...
Need help?
Do you have a question about the Mini Twister Cam and is the answer not in the manual?
Questions and answers