
Subscribe to Our Youtube Channel
Related Manuals for J. Perkins Panic


Summary of Contents for J. Perkins Panic
- Page 1 J. Perkins Distribution Ltd. & Model Engines (Aust) Pty Ltd Presents A.R.T.F. To celebrate the 25th Anniversary Join in the fun...
- Page 2 “Another world first”. The Panic is the only model that can land on demand in a full power-on flat spin! You need to see this to believe it!! The Panic Team have always tried to find new ways to mass land when performing at shows and with the flexibility of the Panic and inventiveness of the team, mass landings...
-
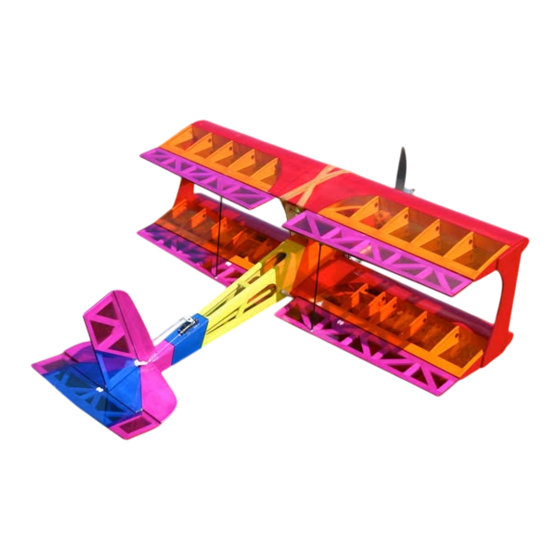
Page 3: Specifications
Electric Power Version (optional) Alternatively a brushless electric motor may be used to power your Panic. Anything that will turn a propeller of 11inches or larger at over 10+ thousand rpm will be suitable and a speed controller that handles 60 amps or more. -
Page 4: Assembly Instruction
Assembly Instruction This aircraft is intended for people who have some experience building ARF models. If there are any building processes that you do not fully understand when assembling this model, please contact your local model shop for advice. Some pictures may not match the components in your kit due to improvement in production or hardware and accessory pack improvements. -
Page 5: Parts List
Parts List Bag No. Description Qty. Upper wing panel Lower wing panel with servo holes Fuselage Wood wing dowels Servo tray for throttle and elevator Rubber strips for wing seating Horizontal tailplane & elevator Vertical fin and rudder Wing tip struts Engine mount (L &... -
Page 6: Assembly And Installation
Assembly and Installation Step 1 Assemble and install the main landing gear and wheels Figure 2. Assemble and install the main landing gear and wheels 1. Locate the undercarriage so the thicker wire is facing the rear of the model. ▼... - Page 7 Step 3 Install rudder horn (L&R) and hinge rudder to the fin Figure 4. Install rudder horn and then hinge the rudder to the fin 1. Install control horn (L&R) onto the rudder. A small amount of the rudder horn may need to be cut ▼...
- Page 8 Figure 6. Using the metal link connect the push-rod to the elevator horn Step 5. Glue the complete tail surfaces in place IMPORTANT Make sure the tail plane and rudder both dry fit in position before gluing in place and the rudderpost is 90 degrees to the tail plane, otherwise you will not get the 80 degrees rudder movement needed in both directions.
- Page 9 Figure 8. The rudder pull-pull control system 1. Rudder servo installation ▼ 2. Maximum rudder movement recommended for advanced pilots ▼ Step 6 Install engine and fuel tank 1. You can use either a pair of L&R engine mounts or a solid round engine mount as shown in Figure ▼...
- Page 10 Step 7 Installation of radio 1. Glue the factory ready-made servo tray in position. ▼ 2. Fit the throttle and elevator servo as shown. ▼ 3. Connect one end of the throttle control cable to the engine throttle arm, the other end to the ▼...
- Page 11 Step 8 Aileron assembly and installation 1. Use epoxy to glue the ball cups (aileron top and bottom connecting points) in the trailing edge of ▼ the ailerons. Note that the ball cup holes should be facing upwards on the lower aileron (i.e. the red side of lower ailerons) and downwards on the upper wing aileron (i.e.
- Page 12 Figure 13. Glue wood dowels and stick rubber strips 3. Use the wing tip struts to connect the upper and lower wing panels. (Figure 14) ▼ Figure 14. Fix the upper and lower wing panels in place Step 10 Setting up the aileron upper and lower joiner rods 1.
- Page 13 Optional Anti-Vibration Engine Mount System (TEAM ISSUE) This engine mount system is used by the Panic Team and helps stop the fuel from foaming in the tank and vibration through the airframe. It can also help reduce the overall noise of the aircraft! See our web site for more details www.jperkinsdistribution.co.uk...
- Page 14 Important - First Flight It is recommended that you use rate switches set to 50% (half the suggested travel throw movements) on the first flight. Once you are happy with the flying characteristics then experiment with rates off (100%) . Fine tune to your desired settings.
Need help?
Do you have a question about the Panic and is the answer not in the manual?
Questions and answers