
Related Manuals for Gemini Saw Company Taurus Ring Saw

Summary of Contents for Gemini Saw Company Taurus Ring Saw
- Page 1 Gemini Saw Company, Inc. 3300 Kashiwa Street, Torrance, CA 90505 Phone (310) 891-0288 Fax (310) 891-0265 www.geminisaw.com Rev. 1/10...
- Page 2 1. Blue Pulley Assembly #1067 6. Orange Grove Grommet Assembly #1070 2. Blue Pulley Assembly #1067 7. Orange Grove Grommet Assembly #1070 3. Blue Pulley Assembly #1067 8. Drive Pulley #0035 4. Blue Pulley Assembly #1036 9. Drive Belt #0070 5.
-
Page 3: Table Of Contents
To All Ring Saw Customers Forward Unpacking Your Machine page 1-2 page 3 Installing Machine page 4 Installing Work surface page 5 Installing Faceshield page 6 Install/Remove Upper Door page 7 Water: Level, Conditions and Care page 8-10 Blade In/Out page 10 Using The Separating Blade page 11-12... - Page 4 M I S S I O N S T A T E M E N T To provide machines to the industry which are efficient, dependable, long lasting, attractive and innovative beyond the state of the art. To listen to our customers and provide the best possible customer service and to treat all persons with whom we come in contact with dignity, integrity and respect.
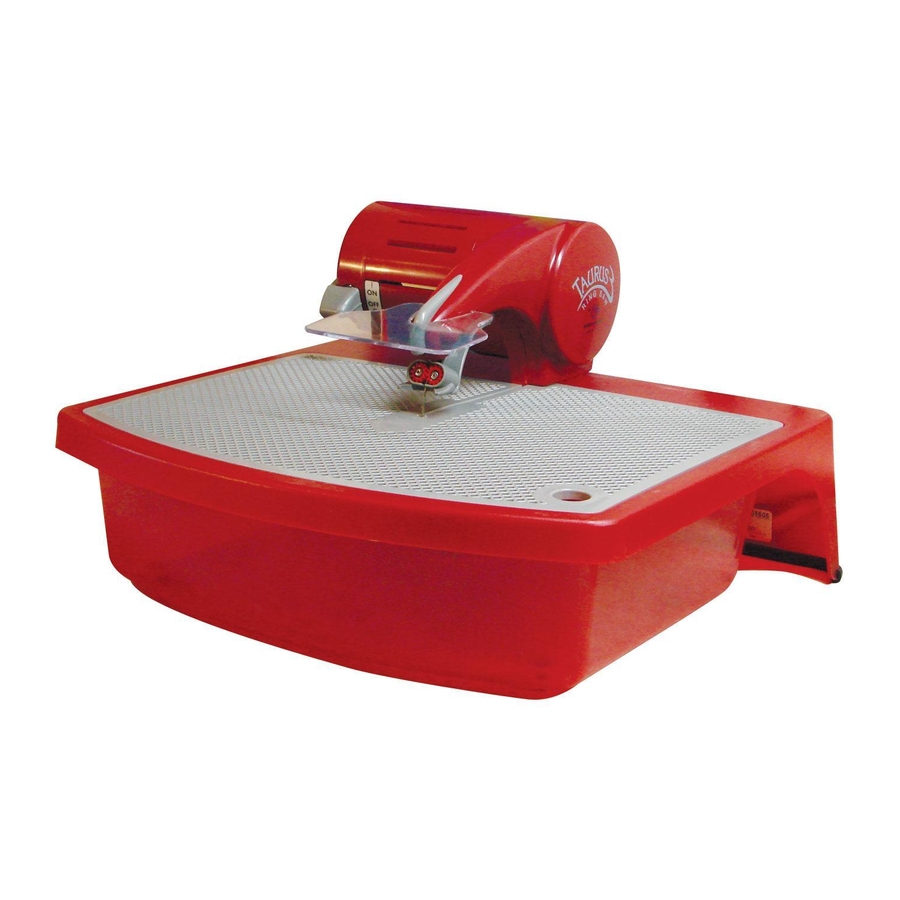
- Page 5 WORK SURFACE Lay box down with logo facing up. Lift off work surface, resting on top Pull the saw out by the tub, the unit of the foam. will come out as one piece. This view shows your saw with all Remove top piece.
- Page 6 FACE FOOT SHIELD This is the “foot” that also is used This is your face shield (covered on with the saw when it’s used out of page 5). the tub (covered on page 12). Remove saw body from bottom Remove bottom piece. foam piece.
- Page 7 BOTTOM MOUNT Remove lower door and thumb Be sure that the saw sits flush with screw and slide the saw into the the bottom mount. groove of the water tub. CLIP Push down and back on the saw Clip engaged. until clip engages the water tub.
- Page 8 Slide work surface onto water tub. PINS (BOTTOM SIDE WORK SURFACE) The work surface has two pins on the bottom side that hold the saw in position. Push down on work surface to make sure that it is seated on the water tub. Page 4...
- Page 9 Insert the tabs on the face shield into the indentions on the upper door and the body. INDENTION Face shield should look like this. It will flip up out of the way when not needed. Note: the shield needs to come off to remove door.
- Page 10 The rear side of the upper door has Pull the tab toward you to pop the upper door off. a finger tab. To put the door on, snap the front Snap the back portion of the upper part of the upper door on and hold door into position.
- Page 11 Fill the water up to the watermark The water should come half way up located on the front of the water tub. the bottom blue pulley #4. Conditions: Water conditions vary from region to region. Areas with “hard water” will have an adverse affect on the saws moving parts, especially the bearings.
- Page 12 Loosen Groove Grommet #7 and Lift up on tension arm #10 and slide slide it back. When replacing the drive belt off of blue pulley #4. blade, slide it forward until it makes contact with Groove Grommet #6. Gently unwrap drive belt from blue Unwrap drive belt from blue pulley pulley #5.
- Page 13 Gently pull drive belt #9 off of the Lift blade out of saw. saw. TIP: The following steps will make starting the process of replacing the blade much easier. Wrap the drive belt tightly around While still pinching, Slip the drive the blade and pinch with your belt and blade into position.
- Page 14 Slip drive belt and blade past blue The GOLDEN RULE when replacing pulley #5, then wrap the drive belt any parts in the saw is to rotate the around it. From this point just drive gear counter-clockwise by hand follow the previous steps in reverse several times to make sure everything order.
- Page 15 Because of the MEGA blades more sturdy construction you may find it more difficult to install. The following will help making the installation much easier. Remove blue pulley #5. Remove blue pulley #1. Slide belt and blade into machine using the same method described on page 10.
- Page 16 Wrap drive belt #9 around blue Wrap drive belt #9 around blue pulley #1 and slip them into pulley #5 and slip them into position. Insert screw and tighten. position. Insert screw and tighten. Slide groove grommet #7 until it makes contact with the blade.
- Page 17 The inside has a die cut sponge This is the bottom cover that is used inside to hold water inside. Soak it on the handheld unit. prior to assembly. The bottom cover comes with a Snap the back of the cover in place. thumbscrew that will hold it on and keep the water from leaking out prematurely.
- Page 18 Slide the foot onto the tab on the The foot comes with a phillips head underside of the nose of the saw. screw and nut. Put them on loosely. Slide the foot down until the space Snug the screw down to secure it in between it and the base of the saw is place.
- Page 19 1. To apply patterns onto your work piece a copying machine is helpful. The print can be sprayed with Scotchguard fabric protector, covered with a film of rubber cement, or simply copied onto Mylar which makes the print waterproof. The print can then be affixed to the material with the use of rubber cement.
- Page 20 The Taurus will cut all kinds of materials. These materials will not load the blade, they include but are not limited to tile, gold (which can be refined out of the water bath), silver, brass, bronze, aluminum, stainless steel, copper and plastics such as lucite, plexiglass, composites and all types of stone.
- Page 21 The ring saw is a completely unique machine and its operation is very different than any other machine. For this reason persons who have been using band saws tend to lead the material into the front of the saw blade and rotate the material to make a curved cut.
- Page 22 Gemini Saw Company continues to add value to the Taurus 3 Ring Saw with yet another improvement to the best saw for cutting all types of material.
- Page 23 Push Stabilizer Foot against the Rotate the Stabilizer foot up into blade and roll it down at an angle the mount on the saw. into position. Insert screw through Stabilizer To replace red grommets, remove Foot, position as needed and mounting screws.
- Page 24 The new Taurus hole reducers come on a sheet and are useful on both the underside of the saw where the blade exits for water reduction and on the work surface for inhibiting debris from entering moving parts. Before applying the hole reducer, clean the areas around the blade thoroughly and dry completely.
- Page 25 The Magnificent 7 Blades of the Taurus 3 What Are They All About? There are 7 blades available for the Taurus 3 ring saws and there are often questions arising as to what they are for, how long they last, and how to use them. So we are writing this article to ive a summary of all of them and their many uses.
- Page 26 Cutting action is Omni-directional in thin material like stained glass but more forward and backward cutting for thicker harder materials. Leaves a smooth edge. Blade Shape: Tear Drop .072 Diameter (front) x .150 (front to back), inside is pointed. Grit is aggressive. Material Thickness Capacity: 3/4", normal use is fused glass, stained glass, ceramic tile, or stone.
- Page 27 *Note: Always be sure to order genuine Gemini Saw parts as this assures your warranty and that you will get maximum life out of the parts you purchase. Thank you for choosing Gemini Saw Company, Inc. and allowing us the pleasure of helping to unleash your imaginations.
Need help?
Do you have a question about the Taurus Ring Saw and is the answer not in the manual?
Questions and answers
what is the grit on the standard diamond blade
The grit of the standard diamond blade for the Gemini Saw Company Taurus Ring Saw is 80 grit.
This answer is automatically generated
There is no water line on my taurus ring saw tub. How much water do I put in?
Add 1-1/2" to 2" of clean water, or enough to reach halfway up the bottom blue pulley, approximately 1 gallon.
This answer is automatically generated