
Subscribe to Our Youtube Channel
Related Manuals for Power Acoustik PCD-42B


Summary of Contents for Power Acoustik PCD-42B
- Page 1 PCD-42B Owner’s Manual Take the time to read through this owner’s manual. Familiarity with installation and operation procedures will help you obtain the best Performance from your new CD-receiver. Page -...
-
Page 2: Table Of Contents
CONTENTS CONTENTS ----------------------------------------------------------------------------------------------01 PRECAUTION ------------------------------------------------------------------------------- ACCESSORY ---------------------------------------------------------------------------------- INSTALLATION (UN-INSTALLATION) --------------------------------------------------- WIRING DIAGRAM ----------------------------------------------------------------------- CONTROL PANEL ------------------------------------------------------------------------- BASIC OPERATION ------------------------------------------------------------------------------------07 POWER ------------------------------------------------------------------------------------07 IR SENSOR ----------------------------------------------------------------------------------------------07 D I S C S L O T - - - - - - - - - - - - - - - - - - - - - - - - - - - - - - - - - - - - - - - - - - - - - - - - - - - - - - - - - - - - - - - - - - - - - - - - 0 7 LCD DISPLAY -----------------------------------------------------------------------------07 T-DN/T-UP----------------------------------------------------------------------------------------------------07 --------------------------------------------------------------------------------------------------07... -
Page 3: Precaution
PRECAUTION This unit is designed and manufactured with consideration of user’s safety, however any improper use or operation may result in a certain hazard or misuse. So it is highly recommended to read this manual thoroughly and adhere to the following precaution. SAFETY PRECAUTION ... -
Page 4: Accessory
ACCESSORY Package will include in the following accessories for installation and operation the unit. Installation Accessory Release Key Screw Bolt Screw Nut Mount Strap Remote Control Cable Page -... -
Page 5: Installation/Un-Installation
Installation/Un-Installation First complete the electrical connections, and then check them for correctness. Installation/ Un-installation Page -... -
Page 6: Wiring Diagram
WIRING DIAGRAM 1、Purple:Right Rear + 2、Gray:Right Front + 3、White:Left Front + 4、Green:Left Rear + 5、Blue:Auto Antenna(Fuse 0.5A) 6、Yellow:ACC B+(Fuse 15A) 7、Purple/Black:Right Rear - 8、Gray/Black:Right Front - 9、White/Black:Left Front - 10、Green/Black:Left Rear - 11、Red:Connect to Ignition Key switch 12V DC(Fuse 1A) 12、Black:ACC B- 13、Red RCA:Line out-Right Front 14、Red RCA:Line out-Right Rear... -
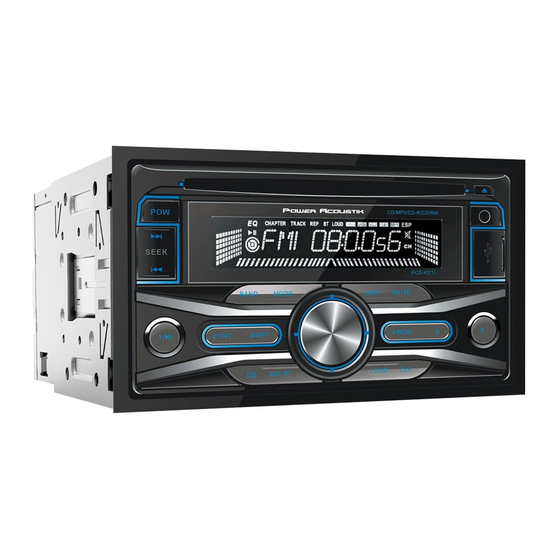
Page 7: Control Panel
CONTROL PANEL 1 POWER 2 IR SENSOR 3 DISC SLOT 4 LCD DISPLAY 5 EJECT 6 T-UP 7 T-DN 10 1/PAUSE \ PLAY 11 2/INTCLK 12 EQ 13 3/RPT 14 MO/ST 15 SELECT 16 VOL 17 LOUD 18 CLK 19 4/RDM 20 5 21 6 22 AMS... -
Page 8: Basic Operation
BASIC OPERATION 1.POWER Press [POWER] button to turn on the unit.Press again to turn off the unit. 2.IR SENSOR 3.DISC SLOT Insert a disc with MP3 and/ or WMA files into the CD slot with label side up. The first file in the first folder will start to play. -
Page 9: Int
10\11\13\19\20\21 PRESET STATION No. 1 ~ 6 / Pause, INT, RPT, RDM, +10, -10 - Preset Button (In Radio mode) Press [1-6] button to select the radio station memorized in each buttons. Press for more than 2 seconds to memorize the current station to teach preset buttons (Manual Station Store). - In CD, USB, SD Slot mode, each button performs below function. -
Page 10: Mute
23.MUTE Short press to mute on, short press again to mute off. 24. USB SOCKET Insert a USB Flash Storage Device and music starts to play automatically. LCD display. Support Music File Format: MP3, WMA Files 25. AUX IN AUX IN socket Page -... -
Page 11: Bluetooth Section
BLUETOOTH SECTION Warning: Driving and having a Telephone conversation at the same time is dangerous, please park your car before having a telephone conversation. The supplier waves any and all liability when this warning is not followed. 1.Power on 2.Open the Bluetooth of mobile phone→Search for Bluetooth devices→Choose a name for the “SOUNDSTREAM”... -
Page 12: Remote Control
REMOTE CONTROL 1 POWER 8 MO/ST 9 EQ 3 MUTE 10 1,2/INT,3/RPT,4/RDM,5,6 4 AMS 11 LOC 5 VOL+/VOL- 6 T-DN/ T-UP 13 SEL 7 CLK 14 PAUSE \ PLAY (Place the Battery install battery, open battery compartment, insert the CR2025 3V cell battery and observe that the correct “+”... -
Page 13: Specification & Feature
SPECIFICATION FM TUNER Frequency Range ----------------------------------------------------------------. 87.5 ~ 107.9MHZ Usable Sensitivity ---------------------------------------------------------------- 18 dBuV Stereo Separation ------------------------------------------------------------------------------ 30 dB AM (MW) TUNER Frequency Range -------------------------------------------------------------- 530 ~ 1710KHz U s a b l e S e n s i t i v i t y - - - - - - - - - - - - - - - - - - - - - - - - - - - - - - - - - - - - - - - - - - - - - - - - - - - - - - - - - - 3 5 d B u V ELECTRIC Power Supply ------------------------------------------------------------------------... -
Page 14: Troubleshooting
TROUBLSHOOTING Symptom Cause Remedy Replace with a fuse of the same rating Power does Fuse is blown amperage. If the fuse blows again, not turn on. consult your local retailer. (No sound is produced.) Incorrect wiring Consult your local retailer. Wiring for amplifier Refer to the unit wiring diagram to General...
Need help?
Do you have a question about the PCD-42B and is the answer not in the manual?
Questions and answers