
Related Manuals for Broadcast Pix Slate 100


Summary of Contents for Broadcast Pix Slate 100
- Page 1 Slate 100 / 1000 / 2100 / 3000 1 ME HD & SD Video Switchers Operators Manual Software Version 7.0 Broadcast Pix V7.0 install - concepts - PixMaster - switcher - CG - clips - controls - team - appendix...
- Page 2 Broadcast Pix in the USA for repair. The costs of any visit to the customer's site are not included in the warranty. The cost of returning Product to Broadcast Pix is the responsibility of the end user or the Dealer.
-
Page 3: Table Of Contents
Section 1 Installation and Getting Started Video I/O Configurations 1.1.1 Analog Video I/O 1.1.2 HD I/O 1.1.3 Optional DVI-I I/O Broadcast Pix Slate 100 1.2.1 System Contents 1.2.2 Wiring Diagram Broadcast Pix Slate 1000 1.3.1 System Contents 1.3.2 Wiring Diagram 1.3.3... - Page 4 1.13.2 Selecting between NTSC/525 and PAL/625 1.13.3 Selecting between Aspect Ratio 16:9 and 4:3 1.14 DualAspect 1.15 Control Panel Installation Broadcast Pix V7.0 install - concepts - PixMaster - switcher - CG - clips - controls - team - appendix...
- Page 5 Table of Contents Section 2 Broadcast Pix Concepts Broadcast Pix Switcher Features 2.1.1 Video Flow Diagram PixButtons for Executing with Confidence Devices Device Controls 2.4.1 Assigning the Device Controls 2.4.2 PixPad Navigation 2.4.3 Multi-View PixPad 2.4.4 PixPad Order Controls 2.4.5...
- Page 6 Auto Fail-Safe Setting 3.7.3 Adding Wildcard Devices 3.7.4 Show Memories 3.7.5 Global Naming of Memories 3.7.6 Custom Images on Memory PixButtons Broadcast Pix V7.0 install - concepts - PixMaster - switcher - CG - clips - controls - team - appendix...
- Page 7 4.5.4 Accessing Keys 4-6 Source Controls Chromakey 4.7.1 Activating the Chromakey 4.7.2 Settings for the Chromakey 4.7.3 Adjusting the Chromakey Broadcast Pix V7.0 install - concepts - PixMaster - switcher - CG - clips - controls - team - appendix...
- Page 8 4.8.5 To Turn On & Set Up iBoB DSK 4.8.6 To Operate & Modify iBoB DSK Auxiliary Output Control 4.9.1 Aux Out on Slate 100 & 1000 4.9.2 Aux Out on Slate 2100 4.9.3 Aux Out on Slate 3016 4.9.4 Aux Out on Slate 3032 4.9.5...
- Page 9 CG Installation 5.1.1 TitleMotion Pro Canvas Creating Still CG Graphics 5.2.1 Exporting a Still Graphic from Inscriber to Broadcast Pix 5.2.2 Exporting Graphics from Photoshop to Broadcast Pix CG Rolls and Crawls 5.3.1 To Create CG Graphics that Roll or Crawl 5.3.2...
- Page 10 Selecting Clips to Access 6.8.4 Adding DDR Control to a Show 6.8.5 Controlling External DDR 6.8.6 Looping 6.8.7 Accessing More Channels Broadcast Pix V7.0 install - concepts - PixMaster - switcher - CG - clips - controls - team - appendix...
- Page 11 7.12 Optional Audio-Follow-Video Control 7.12.1 Enabling Audio Follow 7.12.2 Activating Audio Follow 7.12.3 Audio Follow Setup 7.12.4 Audio Follow Operation Broadcast Pix V7.0 install - concepts - PixMaster - switcher - CG - clips - controls - team - appendix...
- Page 12 Updating the Control Panel or iBoB Firmware Installing System Options Classic Show Editor Control Panel Internal Operation Broadcast Pix Slate Analog Video Connector Pin-Outs Broadcast Pix Slate Analog Audio Breakout Cable RS-232 Serial Pin-Out for Slate 2100 & Slate 3000 Fail-Safe Control Custom Shortcuts Keyboard Layout A.10...
-
Page 13: Installation And Getting Started
Section 1: Installation and Getting Started Thank you for purchasing a Broadcast Pix Slate video switcher, soon you will be experiencing how we have redefined the switcher. There are a total of 25 Slate switcher models, as shown below, all of which use the same BPSwitcher software, each with unique hardware to control the software. -
Page 14: Video I/O Configurations
(325 feet) for HD, as signal quality will be degraded. For longer runs, it is necessary to install video amplifiers/reclockers to boost the signal, although external components may increase overall system delay. Broadcast Pix V7.0 install - concepts - PixMaster - switcher - CG - clips - controls - team - appendix... - Page 15 NOTE: On HD I/O cards with the optional DVI I/O card, output D/E can not output both a HD-SDI and a DVI/VGA signal at the same time, either one or the other as selected in the Slate I/O Assignments window. Broadcast Pix V7.0 install - concepts - PixMaster - switcher - CG - clips - controls - team - appendix...
-
Page 16: Analog Video I/O
BNC breakout cables provided by Broadcast Pix. Composite cables are included with all Slate switcher models for each analog input and output. Three component/composite break out cables are included with the Slate 100 and Slate 1000 models, and one component cable with the Slate 2100 and Slate 3000 models. -
Page 17: Hd I/O
DVI ports are needed, then two HD I/O cards are necessary. You can not output through the DVI card and the HD card simultaneously. Broadcast Pix V7.0 install - concepts - PixMaster - switcher - CG - clips - controls - team - appendix... -
Page 18: Broadcast Pix Slate
1.2 Broadcast Pix Slate 100 This section covers the typical installation of a Broadcast Pix Slate system and some options. Other options that require installation are covered in their sections. 1.2.1 Slate 100 System Contents The Broadcast Pix Slate 100 is comprised of the following components:... - Page 19 Broadcast Pix Slate 100 System Includes: Hardware Workstation, with Slate board and I/O board 25-Pin to 6-XLR Audio Breakout cable (for analog audio I/O) Inscriber USB Dongle, installed internally in the workstation at the factory USB Custom keyboard, for using shortcuts...
-
Page 20: Wiring Diagram
1.2.2 Wiring Diagram for Slate 100 The Slate 100 and Slate 1000 are identical systems except the 1000 has a physical control panel connected, while the 100 uses the custom keyboard and a SoftPanel. The keyboard can be enabled by pressing Shift and Panel On/ Video Outputs Off on the keyboard. -
Page 21: Broadcast Pix Slate 1000
1.3 Broadcast Pix Slate 1000 1.3.1 Slate 1000 System Contents The Broadcast Pix Slate 1000 is comprised of the following components: Broadcast Pix Software, Software: Showing the Multi-View BPSwitcher V7 Inscriber TitleMotion Pro Character Generator Microsoft Windows XP (VGA monitor... - Page 22 Broadcast Pix Slate 1000 System Includes: Hardware Broadcast Pix Control Panel Workstation, with Slate board and I/O board Network Crossover Cable (to connect panel to workstation) 25-Pin to 6-XLR Audio Breakout cable (for analog audio I/O) Inscriber USB Dongle, installed internally in the workstation at the factory...
-
Page 23: Wiring Diagram
Fail-Safe video to work properly. other. Both need be be either Video Composite, Y/C or YUV. Wires Ethernet Video Connectors Network Serial Broadcast Pix V7.0 install - concepts - PixMaster - switcher - CG - clips - controls - team - appendix 1.3.2... - Page 24 1.3.3 Optional Tally Box on the Slate 100 and 1000 The tally box option is a stand-alone Sense & Switch 8 tally and GPIO box that plugs into the workstation via a USB connection. It provides 8 relays for tally output to your camera control units and 8 isolated inputs for General Purpose Inputs/Outputs contact points.
- Page 25 Camera Control Units or other source. The Tally Box only opens and closes the tally circuit. Check your Camera Control Unit’s user manual for more information. Broadcast Pix V7.0 install - concepts - PixMaster - switcher - CG - clips - controls - team - appendix...
-
Page 26: Installing Tally Box Drivers
If not, check your connections to the tally box and to the workstation. Close all the windows to InstaCal, you are now ready to use the tally box. Broadcast Pix V7.0 install - concepts - PixMaster - switcher - CG - clips - controls - team - appendix 1.3.4... -
Page 27: Audio I/O
For automated control of external audio mixers, see section 7.12. One clip store is included on the Slate 100 and Slate 1000. On a Slate 2100 and Slate 3000 two clip store channels are included. The clip store can be used with or without audio,... -
Page 28: Slate I/O Assignments
To Assign the Slate I/O: Start the Broadcast Pix application by clicking on it's switcher icon on the desktop, which will bring up the large Broadcast Pix switcher window, which contains a blank Multi-View, and various drop down menus at the top. - Page 29 Cam1, for Camera 1. To create your own custom name, select Custom from the drop down menu. Broadcast Pix V7.0 install - concepts - PixMaster - switcher - CG - clips - controls - team - appendix...
- Page 30 Note: you can not output embedded audio on a HD I/O card. Click on Save in the lower right corner of the Slate IO Assignments window to save and exit. Broadcast Pix V7.0 install - concepts - PixMaster - switcher - CG - clips - controls - team - appendix...
-
Page 31: Autoaspect For Inputs
None (Stretch) To set the aspect treatment of a source: In the Broadcast Pix Switcher, launch a show from the Multi-View. (File, Load show) On the Setup drop down window, shown in the illustration at the right, click on Slate IO assignments…, and the Slate IO... - Page 32 NOTE: When a source is treated, it will appear with that treatment on all video outputs, and on the program and preview windows of the Multi-View. Broadcast Pix V7.0 install - concepts - PixMaster - switcher - CG - clips - controls - team - appendix...
-
Page 33: Broadcast Pix Slate 2100
1.6 Broadcast Pix Slate 2100 1.6.1 Slate 2100 System Contents The Broadcast Pix Slate 2100 is comprised of the following components: Broadcast Pix Software, Showing the Multi-View Software: BPSwitcher V7 Inscriber TitleMotion Pro Character Generator Microsoft Windows XP (VGA monitor... - Page 34 Broadcast Pix 2100 System Includes: Hardware Broadcast Pix physical control panel (Control panel) Broadcast Pix Break-out-Box (iBoB) Workstation, with Slate board and I/O board Ethernet 10/100 switch (for private control network) (3) Straight Network Cables (for private control network) 9-Pin Male to Female Straight Serial Cable (for fail-safe control)
- Page 35 Program to a program monitor and other program destinations Attach three network cables (Cat 5) from the private Ethernet 10/100 switch to the Broadcast Pix components, as follows: From Hub Any port To workstation NIC 2, next to the USB ports...
-
Page 36: Wiring Diagram
Broadcast Pix Network control Fail-Safe Network for moving Serial Cable content Control Panel Video Ethernet Wires Serial Connectors Network Serial Broadcast Pix V7.0 install - concepts - PixMaster - switcher - CG - clips - controls - team - appendix 1.6.2... - Page 37 There are similar status Leds for program and preview to indicate whether analog component or Y/C has been selected. Broadcast Pix V7.0 install - concepts - PixMaster - switcher - CG - clips - controls - team - appendix 1.6.2...
-
Page 38: Ibob Audio I/O Wiring
AES/EBU AES/EBU For Recording Output Output to the Clip Store For Playing For Playing Clip Store 1 Clip Store 2 Broadcast Pix V7.0 install - concepts - PixMaster - switcher - CG - clips - controls - team - appendix... -
Page 39: Ibob Tally Wiring
If you have an optional input card and would like to tally sources 9-12, you may use the optional tally box used on a Slate 100/1000. Inputs 9-12 correspond to terminals 4-7 on the tally box. See section 1.3.3 for more information. -
Page 40: Ibob Assignments
Control panel as described in section 1.3.6. To Assign the iBoB I/O: Start the Broadcast Pix application by clicking on the switcher icon on the desktop, which will bring up the large Broadcast Pix switcher window, which contains a blank Multi-View and various drop down menus at the top. - Page 41 1.5 You may also treat the sources with the Source Controls from the control panel, see section 4.6 Broadcast Pix V7.0 install - concepts - PixMaster - switcher - CG - clips - controls - team - appendix 1.6.5...
- Page 42 For example, in the illustration below YUV is being selected for Program and Preview. Broadcast Pix V7.0 install - concepts - PixMaster - switcher - CG - clips - controls - team - appendix...
- Page 43 Slate IO Assignments window from the Setup drop down menu, as shown here. NOTE: If you wish to set up iBoB DSK, see sections 4.8. Broadcast Pix V7.0 install - concepts - PixMaster - switcher - CG - clips - controls - team - appendix 1.6.5...
-
Page 44: Setting Up The Ibob From The Control Panel
Either Y/C or YUV. NOTE: In this same setup you may also assign the Key Cut/Fill for the iBoB DSK. Broadcast Pix V7.0 install - concepts - PixMaster - switcher - CG - clips - controls - team - appendix... -
Page 45: Broadcast Pix Slate 3000
1.7 Broadcast Pix Slate 3000 1.7.1 Slate 3000 System Contents The Broadcast Pix Slate 3000 is comprised of the following components. Broadcast Pix Software, Showing the Multi-View Software: BPSwitcher V7 Inscriber TitleMotion Pro Character Generator Microsoft Windows XP (VGA monitor... - Page 46 Broadcast Pix 3000 System Includes: Hardware Broadcast Pix physical control panel (Control Panel) Broadcast Pix Router, made by Harris, either 16x16 or 32x32 (HD or SD) Workstation, with Slate board and I/O board Ethernet 10/100 Switch (for private control network)
- Page 47 Auxes, Output 3-8 to auxiliary outputs Attach three network cables (Cat 5) from the private Ethernet 10/100 switch to th Broadcast Pix components, as follows: From Hub Any port To workstation NIC 2, next to the USB ports...
- Page 48 I/O cable NIC 2 Out C: 10/100MB Separate Analog Output for Clean Network for moving content Feed, Program or Preview. See section 1.5 Network Switch for Broadcast Pix control Control Panel Video Ethernet Wires Serial Fail-Safe Serial Cable Connectors Network Serial Broadcast Pix V7.0...
- Page 49 Auxes, Output 3-24 to auxiliary outputs Attach three network cables (Cat 5) from the private Ethernet 10/100 switch to th Broadcast Pix components, as follows: From Hub Any port To workstation NIC 1, next to the USB ports...
- Page 50 I/O cable NIC 2 Out C: 10/100MB Separate Analog Output for Clean Network for moving content Feed, Program or Preview. Network Switch See section 1.5 for Broadcast Pix control Control Panel Video Ethernet Wires Serial Fail-Safe Serial Cable Connectors Network Serial Broadcast Pix V7.0...
- Page 51 1.7.4 Multiple Slate Wiring A unique option with the Broadcast Pix Slate 3016 or 3032 is the capability to hook two or more Slate systems to one centralized router to share inputs and outputs. Great for larger facilities where multiple studios/control points are needed, it greatly simplifies wiring by having one access point for all your connections and lowers your overall cost.
-
Page 52: Example Slate 3032 & Slate 1000 Wiring
In 28 (>.'"$)$%&'$3;$ In 29 Slate 2 Workstation (>.'"$)$%&'$3<$ In 30 (>.'"$)%&'$6=$ In 31 (>.'"$)$%&'$6)$ In 32 (>.'"$)$%&'$63$ 32x32 Router Broadcast Pix V7.0 install - concepts - PixMaster - switcher - CG - clips - controls - team - appendix 1.7.5... -
Page 53: Optional Tally Box Wiring
USB ports, and needs to be plugged into an electrical socket with the supplied power supply. This tally box does not have GPIOs, if needed, then the tally box from a Slate 100/1000 needs to be used for this purpose and can be used in conjunction with a Slate 3000 tally box. -
Page 54: Optional Remote Aux Panel Wiring
1 on (up). All the other dip switches should be set to the off (down) position. NOTE: For operation of the Remote Aux Panel, see section 4.9.6. Broadcast Pix V7.0 install - concepts - PixMaster - switcher - CG - clips - controls - team - appendix... -
Page 55: Router Assignments
To Assign the Router I/O: Start the Broadcast Pix application by clicking on the switcher icon on the desktop, which will bring up the large Broadcast Pix switcher window, which contains a blank Multi-View and various drop down menus at the top. - Page 56 Note: The last 4 inputs will always be grayed out and not configurable, since they are connected to the Slate Output cards. Broadcast Pix V7.0 install - concepts - PixMaster - switcher - CG - clips - controls - team - appendix 1.7.8...
- Page 57 None, Box, 14x9, or Crop. For more information about AutoAspect see section 1.5.1. Broadcast Pix V7.0 install - concepts - PixMaster - switcher - CG - clips - controls - team - appendix 1.7.8...
- Page 58 When all the Router Assignments are configured, select the OK button to save and exit the Router Assignments window. Broadcast Pix V7.0 install - concepts - PixMaster - switcher - CG - clips - controls - team - appendix 1.7.8...
-
Page 59: Running A Show
Multi-View is filled with content, as shown below. To run a Show (when the Sample Show is set to auto-load): Double-click on the Broadcast Pix Switcher application on the desktop, and it will open and display the Multi-View for the sample show, and then the control panel will fill in its PixButtons for the sample show. -
Page 60: The Sample Show
Whatever is attached to input 8* Stills channel 2 Internal Black * Input number is on Slate boards for Slate 100 and 1000, and on iBoB for Slate 2100 and router on Slate 3000 Broadcast Pix V7.0 install - concepts - PixMaster - switcher - CG - clips - controls - team - appendix... -
Page 61: Internal Content For Sample Show Ntsc
Logo (ch 1) BPix Bug.TGA Box Left.TGA Box Right.TGA Slate 100.TGA Slate 1000.TGA Slate 2100.TGA Rough Box R.TGA Royal Box R.TGA Viva Box R.TGA Broadcast Pix V7.0 install - concepts - PixMaster - switcher - CG - clips - controls - team - appendix... -
Page 62: Testing The System
Key 2 is full screen with a basic DVE move. You can customize any of these, or add your own, see section 4.10 Broadcast Pix V7.0 install - concepts - PixMaster - switcher - CG - clips - controls - team - appendix... -
Page 63: Troubleshooting
The Multi-View always displays a status light in the top left corner. If it is green all is OK, if not (Red) select the Status Tab in the lower left corner of the Multi-View and the following detailed status window will appear. Lights during normal operation Status on Slate 100 and Slate 1000 Status of Light Indicates... - Page 64 Computer message on what is currently happening Reset Video Will reset the sources/video on iBoB Caution: will cause all video to flash on program/air Broadcast Pix V7.0 install - concepts - PixMaster - switcher - CG - clips - controls - team - appendix 1.10...
- Page 65 Ethernet communication to Router is OK - (Grey) It is not Status message Computer message on what is currently happening Broadcast Pix V7.0 install - concepts - PixMaster - switcher - CG - clips - controls - team - appendix 1.10...
-
Page 66: Input Timing & Asynchronous Sources
1.11 Input Timing & Asynchronous Sources Reference The Broadcast Pix Switcher requires a reference input from an analog black burst sync generator. Format Internally, the Broadcast Pix uses the SDI format (SMPTE 259M), and all systems provide SD-SDI digital video I/O with embedded audio (SMPTE 272M ). -
Page 67: System Delay
** Presentation Mode is using only 720p genlocked cameras coming in and going out 720p to a progressive projector. Broadcast Pix V7.0 install - concepts - PixMaster - switcher - CG - clips - controls - team - appendix 1.11.1... -
Page 68: Changing What Show Is Running
If you turn off auto-loading, then Broadcast Pix Switcher will still open, but you need to then Load Show as described above. -
Page 69: Selecting Between Ntsc/525 And Pal/625
Restart the BPswitcher application. 1.13.3 Selecting 4:3 or 16:9 Aspect Ratios The Broadcast Pix Slate system can switch between 4:3 and 16:9 shows easily, without the need of a restart. All outputs are a pixel for pixel (or 1:1) output and rely on the output device (like a monitor, projector or VTR) to apply any letterboxing. -
Page 70: Dualaspect
4:3 or 16:9 video aspect ratios. On HD Slate systems with 2 HD cards, Broadcast Pix can output both 4:3 and 16:9 video aspects simultaneously. This is ideal when you need to simulcast to two different mediums, i.e. TV broadcast and Internet or Image Magnification (IMAG) and TV broadcast. -
Page 71: Control Panel Installation
1.15 Control Panel Installation Most Broadcast Pix control panels are used on a tabletop, which provides a better viewing angle in most light conditions, especially to view the PixButtons. The panel may also be recessed into a hole cut out of a table top or console. If a cut out installation is desired, then the following dimensions should be used to cut the hole in the console top. -
Page 72: Broadcast Pix Concepts
Section 2: Broadcast Pix Concepts 2.1 Broadcast Pix Features Integrated Broadcast Studio Contains an entire control room of devices including: switcher, clip stores, character generator still stores, logos, DVEs, monitoring, optional audio, camera and external DDR control. Pristine SDI Video... -
Page 73: Video Flow Diagram
2.1.1 Video Flow Diagram Every Broadcast Pix Slate system has an integrated Windows XP computer, which enables the switching matrix to be extended into the computer, so it can access disk space for clips, graphics and animations. As shown in the above diagram, sources may come in from a wide range of creation points. -
Page 74: Pixbuttons For Executing With Confidence
2.2 PixButtons for Executing with Confidence Much of the versatility of the Broadcast Pix system is due to its unique picture buttons, called PixButtons. Each has a small computer VGA display built into the button, which has a resolution of 36x24 pixels. - Page 75 Effects DVE boxes Five Kinds of PixButtons A total of 28 PixButtons are used in 5 different areas of the Broadcast Pix control panel: 1. 12 in the PixPad To select content within a device, and for modifiers 2. 9 Sources To see what is on each source, and selection without preview 3.
-
Page 76: Devices
PixPad of 12 PixButtons. The list of supported devices will grow over time, check for new devices at www.broadcastpix.com. Each device has a unique icon that appears on the top of the PixButtons. Broadcast Pix Software Version 6 supports the following devices, and use the following icons:... - Page 77 VDCP Protocol, having its clip name appear in the PixPad. Currently 360 Systems and Harris Nexio are supported. Broadcast Pix V7.0 install - concepts - PixMaster - switcher - CG - clips - controls - team - appendix...
-
Page 78: Device Controls
Device Controls portion of Panel Display Device Select 3 Axis 3 Knobs Motion Joystick Buttons PixPad with 12 PixButtons Broadcast Pix V7.0 install - concepts - PixMaster - switcher - CG - clips - controls - team - appendix... -
Page 79: Assigning The Device Controls
At all times you can tell what device is assigned to the Device Controls, by looking at the upper left corner of the display, in this illustration it is the first channel of CG. Broadcast Pix V7.0 install - concepts - PixMaster - switcher - CG - clips - controls - team - appendix... -
Page 80: Pixpad Navigation
There is also an up button, to move up from control PixPads, to a previous PixPad. Broadcast Pix V7.0 install - concepts - PixMaster - switcher - CG - clips - controls - team - appendix... -
Page 81: Multi-View Pixpad
NOTE: The Panel PixPad will always update with the control panel PixPad, no matter if Panels are locked or unlocked. Broadcast Pix V7.0 install - concepts - PixMaster - switcher - CG - clips - controls - team - appendix... -
Page 82: Pixpad Order Controls
Click OK. Now the order will appear as you prepared it. Broadcast Pix V7.0 install - concepts - PixMaster - switcher - CG - clips - controls - team - appendix 2.4.4... -
Page 83: Floating Pixpads
Click on the Size drop down menu on the floating PixPad, and select the size you want. The illustration below shows three sizes: 150%, 100% and 75% Broadcast Pix V7.0 install - concepts - PixMaster - switcher - CG - clips - controls - team - appendix 2.4.5... -
Page 84: Multi-View
Traditional Aspect Ratio Monitor 1280x1024: for traditional 4:3 monitors, and almost all touch screen monitors. Widescreen Monitors 1680x1050: for widescreen 16:9 monitors Broadcast Pix V7.0 install - concepts - PixMaster - switcher - CG - clips - controls - team - appendix 2.5.1... -
Page 85: Overview Of The Multi-View
2.5.2 Overview of the Multi-View Panels Connected Preview Monitor Program Monitor Panel Status PixPad Indicator Clock Clip Counters Sources Tab Window Keyer Window Broadcast Pix V7.0 install - concepts - PixMaster - switcher - CG - clips - controls - team - appendix 2.5.2... -
Page 86: Sources On Multi-View
Tally Program To view sources above the first 8 shown, click the sources tab on the Multi-View, as shown below: Broadcast Pix V7.0 install - concepts - PixMaster - switcher - CG - clips - controls - team - appendix 2.5.3... -
Page 87: Keyer On The Multi-View
(or orange if its key transition button is on). Broadcast Pix V7.0 install - concepts - PixMaster - switcher - CG - clips - controls - team - appendix 2.5.4... - Page 88 DVE or if a reposition applied to it, the indicator light to the left of the device name turns to red from grey. Key transition rate Lit when DVE or Reposition is on Broadcast Pix V7.0 install - concepts - PixMaster - switcher - CG - clips - controls - team - appendix 2.5.4...
-
Page 89: Clip Store Counters
NOTE: The Clip Counters bar will turn red at 10 seconds remaining only if the Clips Controls Settings are set to not Loop, see section 6.5.4 Broadcast Pix V7.0 install - concepts - PixMaster - switcher - CG - clips - controls - team - appendix... -
Page 90: Basic Switching On The Multi-View
To change this in BPswitcher go to the Setup drop down window and select Clicking Sources Switches, then select the desired style. Broadcast Pix V7.0 install - concepts - PixMaster - switcher - CG - clips - controls - team - appendix... -
Page 91: Advanced Switching On The Multi-View
Broadcast Pix V7.0 install - concepts - PixMaster - switcher - CG - clips - controls - team - appendix 2.5.7... -
Page 92: About Tab
The About tab in the lower left corner of the Multi-View reveals information about the installation, including the: Current software version installed of Broadcast Pix Switcher Settings for NTSC/PAL and 4:3/16:9 If the iBoB is installed and the current iBoB firmware installed... -
Page 93: Floating Monitors
Source monitors are 180x120. When resizing monitors be cautious of how large you make each monitor, as the resolution may get distorted. Broadcast Pix V7.0 install - concepts - PixMaster - switcher - CG - clips - controls - team - appendix... - Page 94 NOTE: To close or modify one floating monitor, right click on the window and select Show/hide frame to activate the window frame for that one monitor or select Close window to close that monitor. Broadcast Pix V7.0 install - concepts - PixMaster - switcher - CG - clips - controls - team - appendix...
- Page 95 You can also remove a saved layout by selecting Remove Layout… in the above list. Broadcast Pix V7.0 install - concepts - PixMaster - switcher - CG - clips - controls - team - appendix 2.5.9...
-
Page 96: Clocks On The Multi-View
2.5.10 Clocks on the Multi-View There are 3 types of clocks on the Broadcast Pix Multi-View: an Analog Clock, a Digital Clock and a Timer. All three options are floatable, as described in the previous section and all three can be floated at the same time. The analog clock provides a graphical analog clock with a seconds hand and a small digital clock in both 12-hour and 24-hour formats, this type of clock is not resizable. - Page 97 To stop and reset the stopwatch zero, left-click on the red stop/square button in the lower left hand corner of the timer window. Broadcast Pix V7.0 install - concepts - PixMaster - switcher - CG - clips - controls - team - appendix 2.5.10...
-
Page 98: List Of Screen Resolutions
2560"1600 2048"1536 It is important to set your Windows desktop settings prior to starting the Broadcast Pix Switcher application. It is not advised to change the desktop resolutions while the application is running. Be advised that some large LCD/Plasma monitors do not accept high resolutions on the VGA input, but do on a HDMI input. -
Page 99: Optional Quad Monitor Card
NOTE: The maximum resolution of either monitor card depends on the resolution capabilities of the monitor you are connecting. Broadcast Pix V7.0 install - concepts - PixMaster - switcher - CG - clips - controls - team - appendix 2.6.2... -
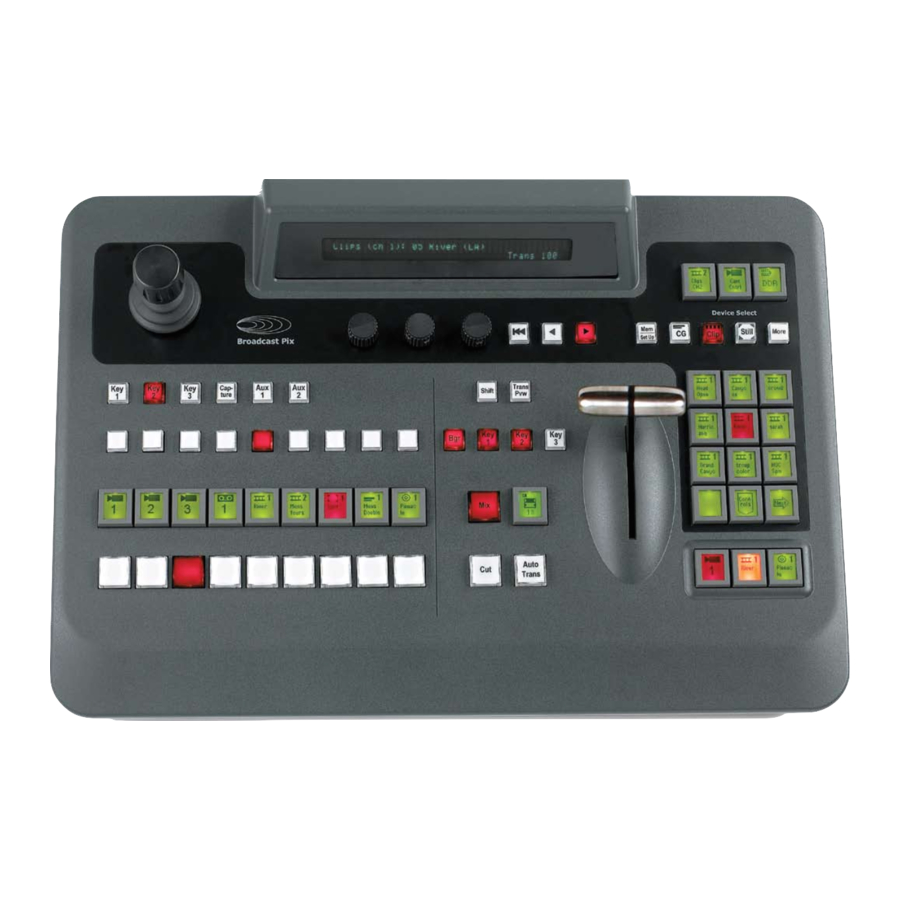
Page 100: Keyboard Shortcuts
Keyboard Shortcuts Every Slate 100 system (optional on other Slate systems) comes with a custom color- coded Broadcast Pix keyboard, as shown below. The keyboard acts as a control panel to give you greater control than what the software can provide. Although not every button which is on the control panel is on the custom keyboard, the essentials are at your fingertips. - Page 101 Simply repeat the same steps which were used to enable shortcuts. When disabled, the on screen message on the Multi-View will disappear. Broadcast Pix V7.0 install - concepts - PixMaster - switcher - CG - clips - controls - team - appendix...
-
Page 102: Using Keyboard Shortcuts
2.7.2 Using Keyboard Shortcuts The Broadcast Pix Shortcuts Keyboard is color-coded for ease of use, and is separated by 5 different colors: Red: Auto Trans & Direct Keys Blue: Device Selectors Purple: PixPad, Motion Controls & Transition Controls Off-White: Preview, Program & Source Rows Black: Knobs &... - Page 103 Section 3: PixMaster Show Editor The Broadcast Pix System is designed for the real-time production of live shows to a live audience, or recorded live for viewing later on DVD or other medium. In both scenarios, the PixMaster show editor delivers comprehensive pre-production capabilities, enabling you to stage all of your assets for a smooth production experience.
- Page 104 This will open the PixMaster: Start Window as shown below. The main Broadcast Pix Switcher application needs to be closed in order to launch PixMaster. Click on Create new show. This opens the Create a new show window, as shown below.
- Page 105 NOTE: when giving a new show a name, standard Microsoft Windows conventions apply. For example, you cannot use a colon (:) in a name. Broadcast Pix V7.0 install - concepts - PixMaster - switcher - CG - clips - controls - team - appendix...
- Page 106 NOTE: If you do not have a show open, you can not access the PixMaster Show Editor from the Multi- View, as it will be grayed out. Broadcast Pix V7.0 install - concepts - PixMaster - switcher - CG - clips - controls - team - appendix...
-
Page 107: Editing A Show
10-18 wildcard buttons. content. NOTE: It is recommended to restart the Broadcast Pix Switcher application when adding, removing or arranging a lot of content to prevent stability issues, if you are using the PixMaster Show Editor function. Broadcast Pix V7.0... -
Page 108: Editing A Show's Content
NOTE: the location of the clip library for the show is indicated at the bottom – in this case D:\clips\ Broadcast Pix V7.0 install - concepts - PixMaster - switcher - CG - clips - controls - team - appendix... - Page 109 NOTE: If you’re doing a lot of editing, you do not have to press OK until you are done with everything. Broadcast Pix V7.0 install - concepts - PixMaster - switcher - CG - clips - controls - team - appendix...
- Page 110 In this case, four adjacent clips were moved down to the bottom of the list. Broadcast Pix V7.0 install - concepts - PixMaster - switcher - CG - clips - controls - team - appendix 3.5.2...
-
Page 111: Adding Content From The Central Library
NOTE: the Refresh List button is used if you edit a library using Microsoft Windows, then changes made can be seen by clicking on refresh list (or reopening PixMaster). Broadcast Pix V7.0 install - concepts - PixMaster - switcher - CG - clips - controls - team - appendix... - Page 112 NOTE: The newly added content is now grayed out on the library list to indicate that it is now in the show. Broadcast Pix V7.0 install - concepts - PixMaster - switcher - CG - clips - controls - team - appendix...
-
Page 113: Adding A Group Of Content From The Central Library
This is a standard Windows convention, and works in all other areas of the system. Broadcast Pix V7.0 install - concepts - PixMaster - switcher - CG - clips - controls - team - appendix... -
Page 114: Importing Content
“Importing files”. Wait unit this message disappears before continuing. Broadcast Pix V7.0 install - concepts - PixMaster - switcher - CG - clips - controls - team - appendix 3.5.5... - Page 115 In this example we created a subfolder called “Sample.” Consequently the word “Sample” was added in the folder column when the clip was imported. Broadcast Pix V7.0 install - concepts - PixMaster - switcher - CG - clips - controls - team - appendix 3.5.6...
- Page 116 3.5.8 Importing PowerPoint Slides into a Still Store In PowerPoint use “Save As” to save your presentation as a series of .bmp or .jpg files. When importing them into Broadcast Pix be sure to choose Resize and soften images. Broadcast Pix V7.0 install - concepts - PixMaster - switcher - CG - clips - controls - team - appendix 3.5.7...
-
Page 117: Previewing Content
To close the still being previewed, click on the red X in its upper right corner. NOTE: If no Preview is shown, then a thumbnail needs to created for that clip, see section 6.1.1 Broadcast Pix V7.0 install - concepts - PixMaster - switcher - CG - clips - controls - team - appendix... -
Page 118: Renaming Content
NOTE: It is important to leave the file extension at the end of the file name for PixMaster to recognize the file. Broadcast Pix V7.0 install - concepts - PixMaster - switcher - CG - clips - controls - team - appendix... -
Page 119: Removing Content From A Show
If you want to delete content from the hard drive, see section 3.5.12. Broadcast Pix V7.0 install - concepts - PixMaster - switcher - CG - clips - controls - team - appendix... - Page 120 This act is not undoable. Click Yes. It’s gone. Broadcast Pix V7.0 install - concepts - PixMaster - switcher - CG - clips - controls - team - appendix 3.5.12...
- Page 121 Content Summary If you have a printer installed on your system, you can print the list by clicking on Print. Broadcast Pix V7.0 install - concepts - PixMaster - switcher - CG - clips - controls - team - appendix...
- Page 122 More devices for assigning devices to the three wildcard PixButtons. Memories for adding, removing and naming presets. Broadcast Pix V7.0 install - concepts - PixMaster - switcher - CG - clips - controls - team - appendix...
-
Page 123: Switcher Source Assignments
Click on the device you want – Cam5 in this example. Your choice is now reflected in the source assignments window. Click on OK. Broadcast Pix V7.0 install - concepts - PixMaster - switcher - CG - clips - controls - team - appendix 3.7.1... -
Page 124: Auto Fail-Safe Setting
3.7.2 Auto Fail-Safe Setting The Broadcast Pix Slate 2100, 3016 & 3032 Switchers have extensive fail-safe capabilities that enable you to continue a broadcast uninterrupted even if your computer workstation goes offline (see section 4.11). If the workstation or its network is ever lost, unplugged or locks up in the middle of a show, the system’s fail safe mechanism takes over and brings to program whatever Fail... - Page 125 3.7.3 Adding Wildcard Devices The Broadcast Pix system has four standard content devices: Clip1, Still1, CG1 and Logo1, and there are dedicated buttons on the source panel for each. There are an additional 3 wildcard device buttons in the top right corner of the panel which can be assigned to the second channel of a Clip, Still or CG, external control of cameras and servers, or iBoB DSK if enabled from the Setup Menu.
-
Page 126: Show Memories
3.7.4 Show Memories The StudioMemory on the Broadcast Pix enables panel setups to be saved that contain all the classic switcher settings, like key settings, DVEs, sources, etc. as well as the exact content in clip and graphic stores, complete with attributes, like mark points, auto-start, crawl speed, etc. - Page 127 PixButton in the upper right corner. Broadcast Pix V7.0 install - concepts - PixMaster - switcher - CG - clips - controls - team - appendix 3.7.4...
-
Page 128: Global Naming Of Memories
Press OK. The Memory will now appear with it’s name in Memory list for the show. Broadcast Pix V7.0 install - concepts - PixMaster - switcher - CG - clips - controls - team - appendix 3.7.5... - Page 129 C Drive. NOTE: Some examples of custom memory PixButtons are shown in the sample show, see section 1.6.1 Broadcast Pix V7.0 install - concepts - PixMaster - switcher - CG - clips - controls - team - appendix...
-
Page 130: Switcher Controls
SoftPanel. Many switching functions can also be run from the Multi-View, see section 2.5.6. 4.0 Switcher Controls When you launch Broadcast Pix Switcher and a show is loaded (see section 1.12), the switcher controls fill in on the panel as shown below. Transition Controls... -
Page 131: Tally
Broadcast Pix uses tally to identify at a glance what has been selected. Tally is displayed simultaneously on the panel and on the Multi-View. On the Slate 2100 tally signals are sent out of the iBoB to light the tally lights on cameras. The Slate 100, 1000 and 3000 have an optional tally box. -
Page 132: Video Sources
Source Program Preview Broadcast Pix V7.0 install - concepts - PixMaster - switcher - CG - clips - controls - team - appendix... -
Page 133: Program Row Source Selection
Press the [Program PixButton] on the program row and it will Illuminate red, and the selected source will appear on air. Broadcast Pix V7.0 install - concepts - PixMaster - switcher - CG - clips - controls - team - appendix... -
Page 134: Accessing Inputs 9-18 With Shift
4.1.2 Accessing Inputs 9-18 with Shift The shift button is used to access sources 10-18. This enables the Broadcast Pix panel to control twice as many sources as there are buttons for. These “shifted sources” are typically used for sources that are used less frequently than the first 9 sources, such as black or a rarely used extra tape deck. -
Page 135: Transitions
To Set Auto Transition Style Select Mix or Effect Effect PixButton Auto To Execute a Transition Use Cut, Auto or Fader Arm Broadcast Pix V7.0 install - concepts - PixMaster - switcher - CG - clips - controls - team - appendix... -
Page 136: Transition Preview
[Fader Arm], the Transition Preview button will remain on. To turn off this function you can press the [Trans Pvw] and the orange light will go off. Broadcast Pix V7.0 install - concepts - PixMaster - switcher - CG - clips - controls - team - appendix... -
Page 137: Background Cut Transition
The illuminated buttons will also “flip-flop” in the program and preview rows, as shown: Broadcast Pix V7.0 install - concepts - PixMaster - switcher - CG - clips - controls - team - appendix 4.2.2... -
Page 138: Background Mix Transition
If you wish to execute a manual mix, then instead of pressing the [Auto Trans] button, use the Fader Arm. Broadcast Pix V7.0 install - concepts - PixMaster - switcher - CG - clips - controls - team - appendix... -
Page 139: Background Effects Transition
If you wish to execute a manual effect, then instead of pressing the [Auto Trans] button, use the Fader Arm. Broadcast Pix V7.0 install - concepts - PixMaster - switcher - CG - clips - controls - team - appendix... -
Page 140: Transition Effects
This will also change the selected effect shown in the display and on the [Effects PixButton]. Broadcast Pix V7.0 install - concepts - PixMaster - switcher - CG - clips - controls - team - appendix... -
Page 141: Effects Styles And Pixbuttons
4.3.1 Effects Styles and PixButtons The Broadcast Pix Switcher has over 150 effects. Each effect has a unique number, name and PixButton icon image. The PixButton icons are intended to show the effect style at a glance. The conventions used for these PixButtons are: Black shows the foreground, while the background video is blank. - Page 142 Broadcast Pix V7.0 install - concepts - PixMaster - switcher - CG - clips - controls - team - appendix...
-
Page 143: Selecting A New Effect By Number
Effects: Fx 122 Dual Clock Top Rate Trate: 30 Effects PixButton Broadcast Pix V7.0 install - concepts - PixMaster - switcher - CG - clips - controls - team - appendix 4.3.2... -
Page 144: Viewing More Effects In The Library
To back up and look at the previous PixPad, press the [Back] PixButton NOTE: You can always return to the first page of effects, by pressing the [Effects PixButton] again. Broadcast Pix V7.0 install - concepts - PixMaster - switcher - CG - clips - controls - team - appendix... -
Page 145: Changing Effect Transition Rates
Effects: Fx 05 Push Rate Trate:30 Multi-View Rate Displays The Multi-View always shows you the rates set for Transitions : Broadcast Pix V7.0 install - concepts - PixMaster - switcher - CG - clips - controls - team - appendix 4.3.4... - Page 146 NOTE: You can also change the Auto Transition Rate by pressing the [Mix] button, which will bring up a numeric PixPad. Broadcast Pix V7.0 install - concepts - PixMaster - switcher - CG - clips - controls - team - appendix...
-
Page 147: Modifying An Effect
It may be advised to modify an effect in pre-production and then save the modifications using a memory. Broadcast Pix V7.0 install - concepts - PixMaster - switcher - CG - clips - controls - team - appendix... - Page 148 To remove reverse and return to the normal state, press the [Reverse] PixButton again, and the (R) in the display will be removed. Broadcast Pix V7.0 install - concepts - PixMaster - switcher - CG - clips - controls - team - appendix...
-
Page 149: Keys
4.4 Keys The Broadcast Pix switcher combines multi-layer pictures that can include a background video image (such as a camera), clip or full page graphic and up to six overlays (3 standard and 6 as an option), each of which is known as a key, plus a seventh key downstream in the iBoB. -
Page 150: Key Controls
4.4.1 Key Controls The Broadcast Pix panel provides three groups of buttons for controlling the first 3 keys: Key Select Buttons, Key Transition Buttons and Direct Key Buttons. The Source Row is also used with the Key Select Buttons. Each of the 3 Keyers is treated as a device, so pressing any one of the three Key Select buttons assigns all of the device controls to that Key, including: Joystick, 3 knobs, PixPad and the Display. -
Page 151: Assigning A Source To Keys
Key 2 from CG to Logo, press Logo in the source row (the last button). Broadcast Pix V7.0 install - concepts - PixMaster - switcher - CG - clips - controls - team - appendix... -
Page 152: Direct Keys Control
NOTE: If the rate for a Key on the control panel display is set to 1, the Key will cut on/off program. To change the Key rate see section 4.4.7 Broadcast Pix V7.0 install - concepts - PixMaster - switcher - CG - clips - controls - team - appendix... -
Page 153: Transitioning Keys With Other Keys Or With The Background
Key 1 is already on, and you wish to bring it off with a background transition, while bringing on Key 2, the illumination of the [Key Transition] buttons would Broadcast Pix V7.0 install - concepts - PixMaster - switcher - CG - clips - controls - team - appendix... - Page 154 Trans For more on Transition Preview, see section 4.2.1 Broadcast Pix V7.0 install - concepts - PixMaster - switcher - CG - clips - controls - team - appendix 4.4.5...
-
Page 155: Modifiers For Keyers
You can reset the cropping to none/000 by pressing the [Crop Reset] button in the Keyer Modifier PixPad Broadcast Pix V7.0 install - concepts - PixMaster - switcher - CG - clips - controls - team - appendix 4.4.6... -
Page 156: To Change The Key Fade Rate
[numeric keypad], as done for a transition rate, and press [Enter] to apply the rate. Broadcast Pix V7.0 install - concepts - PixMaster - switcher - CG - clips - controls - team - appendix... -
Page 157: Dve Boxes (Picture In Picture)
(DVE) to appear in the display to let you know the DVE is applied, as shown below: Key1 (Ra1, DVE) Rate Broadcast Pix V7.0 install - concepts - PixMaster - switcher - CG - clips - controls - team - appendix... - Page 158 Box to air by pressing its [Direct Key Button] To remove/reset the DVE box and return the Keyer to full screen mode, press the [DVE OnOff] PixButton. Broadcast Pix V7.0 install - concepts - PixMaster - switcher - CG - clips - controls - team - appendix 4.5.1...
-
Page 159: Modifying A Dve Box
The numbers refer to pixels (full screen 4x3 NTSC is 720x486 pixels, and PAL is 720x576 ). Key1 (Ra1, DVE) Size W:270 H:360 Broadcast Pix V7.0 install - concepts - PixMaster - switcher - CG - clips - controls - team - appendix 4.5.2... - Page 160 NOTE: In the above illustration, the two DVE boxes are placed on an animated background that is playing out from the system’s clip store with a crawl placed on the bottom. Broadcast Pix V7.0 install - concepts - PixMaster - switcher - CG - clips - controls - team - appendix...
-
Page 161: Accessing Keys
4.5.4 Accessing Keys 4-6 Most Broadcast Pix Slate switchers come standard with 3 Keyers, as an option every model can be upgraded to a total of 6 Keyers allowing for 6 picture-in- pictures. Even though Keys 4-6 have the same capabilities as Keys 1-3, as described in section 4.5, they can not be tied to a transition with the transition... -
Page 162: Source Controls
4.6 Source Controls All Broadcast Pix sources, both external live and internal graphics and clips, have various parameters which can be modified known as Source Controls. For external live sources you can set the AutoAspect treatment, as described in section 1.5.1, as well as chromakey levels. -
Page 163: Chromakey
One Chromakey comes standard with the Broadcast Pix switcher, and as an option 8 sources may have a Chromakey assigned to it, ideal for creating virtual sets. - Page 164 Blue] or [Key Green] in the above PixPad. This will activate the factory settings for either Chromakey, additional adjustments may be needed. Broadcast Pix V7.0 install - concepts - PixMaster - switcher - CG - clips - controls - team - appendix...
- Page 165 (0 to 180) ! Suppression Clip [SCl]: Same as Clip, but for a hard edge mask. (-100 to -5) Broadcast Pix V7.0 install - concepts - PixMaster - switcher - CG - clips - controls - team - appendix...
-
Page 166: Adjusting The Chromakey
Broadcast Pix V7.0 install - concepts - PixMaster - switcher - CG - clips - controls - team - appendix... -
Page 167: External Key
4.8 External Key The Broadcast Pix Slate systems supports 1 external keyer, useful when connecting an external graphics system to use in conjunction with the Broadcast Pix. Although this feature uses 2 keyers (Key 3 and Key 4) it supports clip and gain adjustments, shaped and unshaped signals, key inversion as well as horizontal and vertical offset. - Page 168 [Key 4 OnOff Prog] PixButton in the PixPad. Adjust the Clip by using the [Clip Knob] and adjust the Gain by using the [Gain Knob]. Broadcast Pix V7.0 install - concepts - PixMaster - switcher - CG - clips - controls - team - appendix 4.8.2...
- Page 169 In the Key 4 PixPad, select the [X Key Shape] PixButton. The display will read out Shp. The default state for the external keyer is unshaped. Broadcast Pix V7.0 install - concepts - PixMaster - switcher - CG - clips - controls - team - appendix...
- Page 170 Key 4 is applied to. Click on OK, to save and close the External key cut offset window. Broadcast Pix V7.0 install - concepts - PixMaster - switcher - CG - clips - controls - team - appendix 4.8.2...
- Page 171 If you have a show where you would rather use this wildcard button for another device, then you can disable iBoB DSK by going to the Broadcast Pix Switcher application and clicking on the Setup menu, select iBoB, and then uncheck Use iBoB DSK.
-
Page 172: To Turn On & Set Up Ibob Dsk
If needed, turn the Gain and Clip knobs to the appropriate levels for the key source by turning the [1st knob] and [2nd knob]. Broadcast Pix V7.0 install - concepts - PixMaster - switcher - CG - clips - controls - team - appendix 4.8.5... - Page 173 To save and exit the iBoB Assignments window, click on Save. Broadcast Pix V7.0 install - concepts - PixMaster - switcher - CG - clips - controls - team - appendix 4.8.5...
- Page 174 NOTE: iBoB DSK can only cut on/off, you can not add any mix/effects or tie it to a transition. iBoB DSK also is downstream of all the keys, meaning that it will appear on top of all key layers. Broadcast Pix V7.0 install - concepts - PixMaster - switcher - CG - clips - controls - team - appendix...
-
Page 175: Auxiliary Output Control
4.9.1 Aux Output on Slate 100 and Slate 1000 Slate 100 and 1000 switchers have only one Aux output, which is assignable on the Slate switcher card called out A, B, C, D or E if a second I/O card is installed. - Page 176 Multi-View and the display will read out the newly selected source. In the illustration shown below Aux 2 has been assigned to Cam 2. Broadcast Pix V7.0 install - concepts - PixMaster - switcher - CG - clips - controls - team - appendix...
- Page 177 Aux at a time can output internal content. Aux 1 and Aux 2 can not output internal content Broadcast Pix V7.0 install - concepts - PixMaster - switcher - CG - clips - controls - team - appendix...
- Page 178 NOTE: Since Aux bus selection is a vertical interval cut, there may be a glitch on the Aux output if switching between different formats (SD to HD) and if switching between genlocked and non-genlocked sources. Broadcast Pix V7.0 install - concepts - PixMaster - switcher - CG - clips - controls - team - appendix 4.9.3...
- Page 179 NOTE: Since Aux bus selection is a vertical interval cut, there may be a glitch on the Aux output if switching between different formats (SD to HD) and if switching between genlocked and non-genlocked sources. Broadcast Pix V7.0 install - concepts - PixMaster - switcher - CG - clips - controls - team - appendix 4.9.4...
-
Page 180: Assigning Output Sources
The 16x1 panel is fully customizable, as a default the aux panel is setup to switch output 7 (the first non Broadcast Pix controllable output) of the router, although you may change this at any time. To change which output the panel is effecting you will need to install the Harris Router Mapper software that came with the router, see the next page to configure a different output. -
Page 181: Programming The Remote Aux Panel
Open the Router Mapper application by navigating to Start menu, Leitch Routing Switching, Router Mapper. The Router Mapper application window will open, as shown below. Broadcast Pix V7.0 install - concepts - PixMaster - switcher - CG - clips - controls - team - appendix 4.9.7... - Page 182 Place a check next to Panel 0. Click on the Add Newly Discovered button at the bottom of the screen. Broadcast Pix V7.0 install - concepts - PixMaster - switcher - CG - clips - controls - team - appendix...
- Page 183 On the main Router Mapper window, click on the red X or File, Quit to exit the Router Mapper application. It is not necessary to save the configuration settings. Broadcast Pix V7.0 install - concepts - PixMaster - switcher - CG - clips - controls - team - appendix...
-
Page 184: Poweraux Control
For the most part, traditional switchers offer only one layer to be sent to an Auxiliary Output. As an option, all Broadcast Pix Slate switchers have the ability to overlay any/all of Keys 1-6 onto one Aux output, this is known as PowerAux. This feature is ideal for producing two simultaneous shows from the same system for two different audiences, without the cost and complexity of a 2ME switcher. -
Page 185: Studiomemory
4.10 StudioMemory The Broadcast Pix system has a powerful memory system that can combine all devices in the system. It enables the saving and instant recall of a panel’s set-ups, or the set-ups plus the sources assigned, or even the individual content element in a device, such as a specific lower third graphic in the CG. - Page 186 If you press it a third time no key 1 information will be saved, and the display will reflect that. Broadcast Pix V7.0 install - concepts - PixMaster - switcher - CG - clips - controls - team - appendix...
- Page 187 6 is something else, then care should be taken, as this mem will still recall whatever is in source 6. The same applies for internal content CGs, Clips, Stills and Logos. Broadcast Pix V7.0 install - concepts - PixMaster - switcher - CG - clips - controls - team - appendix...
- Page 188 Direct Keys 1 to 6. Press again and it clears all 6 Direct Keys from the display. (D123456 or blank) Broadcast Pix V7.0 install - concepts - PixMaster - switcher - CG - clips - controls - team - appendix...
- Page 189 “Mem X failed to fully load”. In BPswitcher go to Logging, Error Log to view what element failed to load. Broadcast Pix V7.0 install - concepts - PixMaster - switcher - CG - clips - controls - team - appendix...
-
Page 190: Scripts
You may have as many script windows running as you like, although you need to have enough licenses to run them, just like a SoftPanel. You may purchase more licenses from Broadcast Pix. To view how many Panels are licensed, in BPswitcher select the About Tab. - Page 191 Save the script by clicking on Save As. In the save window, enter the name of the script, and click on save. All scripts are saved in the C:\\broadcastpix\Scripts folder. Broadcast Pix V7.0 install - concepts - PixMaster - switcher - CG - clips - controls - team - appendix...
- Page 192 NOTE: You can not use the Key Select 1, 2 & 3 buttons for double-punch if you have 6 keyers enabled, since they are reserved for Keys 4-6. Broadcast Pix V7.0 install - concepts - PixMaster - switcher - CG - clips - controls - team - appendix...
-
Page 193: Playing A Script
The smaller the number the faster you need to double-punch. Broadcast Pix V7.0 install - concepts - PixMaster - switcher - CG - clips - controls - team - appendix 4.11.2... -
Page 194: Alpha Wipes
They are created in any graphics applications, exported as a 32 bit image sequence and converted into a Broadcast Pix file (as described in section 5.4.2) onto the clipstore. When designing alpha wipes, as in the example “02 Light Swipe”... -
Page 195: Fail-Safe On-Air Production
On the Slate 100 and Slate 1000, one camera is sent to program output. On the Slate 2100, the iBoB enables all sources attached to the iBoB to still be switched even if the workstation is unplugged. -
Page 196: Fail-Safe On Slate 2100 & 3000
The Fail-Safe Device is show specific so that different shows may specify different fail safe sources. To set the Fail-Safe Device, see section 3.7.2 Broadcast Pix V7.0 install - concepts - PixMaster - switcher - CG - clips - controls - team - appendix... -
Page 197: Fail-Safe Operation On Slate 2100
Panel Join Fail Set-up Safe &Test Show Broadcast Pix V7.0 install - concepts - PixMaster - switcher - CG - clips - controls - team - appendix 4.12.3... -
Page 198: Fail-Safe Operation On Slate 3000
Panel Join Fail Set-up Safe &Test Show Broadcast Pix V7.0 install - concepts - PixMaster - switcher - CG - clips - controls - team - appendix 4.12.4... -
Page 199: Capture Of Stills
4.13 Capture of Stills The Broadcast Pix system can capture a still image of program output or preview output. The still image can then be loaded into a still store and used in a show. 4.13.1 To Capture a Still Image In BPswitcher select the Capture drop down menu, as shown below. - Page 200 When you choose the folder you want click on Select. The default folder is C:\BroadcastPix\Captures. Broadcast Pix V7.0 install - concepts - PixMaster - switcher - CG - clips - controls - team - appendix...
-
Page 201: Cg Installation
Instead, this section 5 of the Broadcast Pix manual provides a quick overview of how to create CG graphics, and then focuses on how to import them into the Broadcast Pix system, and how to control them on-air from the Broadcast Pix control panel. -
Page 202: Titlemotion Pro Canvas
Inscriber canvas. This will act as a guide when creating graphics so your text does not get cut off on the edges of TV screens. Broadcast Pix V7.0 install - concepts - PixMaster - switcher - CG - clips - controls - team - appendix... -
Page 203: Creating Still Cg Graphics
Double-Click on the TitleMotion Icon on the desktop to start the Inscriber application and the application will launch a blank canvas, as illustrated below. Broadcast Pix V7.0 install - concepts - PixMaster - switcher - CG - clips - controls - team - appendix... - Page 204 Scroll down through the many templates until you find one you like. As you scroll down a preview of each template is shown as illustrated below: Broadcast Pix V7.0 install - concepts - PixMaster - switcher - CG - clips - controls - team - appendix...
- Page 205 You may now Click + drag to position text or ALT + Arrow Keys to nudge text by small amounts. Broadcast Pix V7.0 install - concepts - PixMaster - switcher - CG - clips - controls - team - appendix...
-
Page 206: Exporting A Still Graphic From Inscriber To Broadcast Pix
5.2.1 Exporting a Still graphic from Inscriber to Broadcast Pix Once you have created a CG, you then need to export it for the Broadcast Pix system to access it. You can save it to many common files types, such as Bitmaps, JPEGs, Targas, as well as editable Inscriber .ICG files. -
Page 207: Exporting Graphics From Photoshop To Broadcast Pix
5.2.2 Exporting Graphics from Photoshop to Broadcast Pix When exporting from Adobe Photoshop, you may export to many popular file formats, like .JPEG and .BMP, to import into the Broadcast Pix system. Although neither file format supports an alpha channel or transparency layer, a Targa/Truevision, .TGA, file does support a 32 bit alpha channel. - Page 208 Targa. Select 32 bits/pixel under the Options Window (so the transparency layer gets saved). Name your file, Choose your directory where the rest of your Broadcast Pix graphics are saved (C:graphics\) and click on Save. Import/Add your file to your show using PixMaster, as described in section 3.
-
Page 209: Cg Rolls And Crawls
5.3 CG Rolls and Crawls CG graphics can also be created to roll vertically or crawl horizontally, and then later controlled by Broadcast Pix to a custom speed setting. Ideal for making a credit roll or a ticker at the bottom of the screen. -
Page 210: Motion Controls For Rolls And Crawls
CG for the crawls. (Similar issue if you have a crawl on air and attempt to switch to a roll.) Broadcast Pix V7.0 install - concepts - PixMaster - switcher - CG - clips - controls - team - appendix... -
Page 211: Modifiers For Rolls And Crawls
Press the [Controls] PixButton, which will bring up the following PixPad of Modifiers: CG Controls PixPad Broadcast Pix V7.0 install - concepts - PixMaster - switcher - CG - clips - controls - team - appendix 5.3.4... - Page 212 You can add blank pages to both the beginning and end if desired. Broadcast Pix V7.0 install - concepts - PixMaster - switcher - CG - clips - controls - team - appendix 5.3.4...
- Page 213 0:00:00 NOTE: When playing a Roll or a Crawl, Broadcast Pix does not auto-detect if the CG is a Roll or Crawl, it will always default to C for Crawl. It will be necessary to manually change your files accordingly.
-
Page 214: Creating An Animated Cg Graphic
The Inscriber operators manual contains much more detail on animations. The basics are covered here in this Broadcast Pix system manual. 5.4.1 To Create an Animated Graphic In Inscriber, as you would for any CG graphic, select the default template or another template you wish to use, type in your text and perform any modifications to it. - Page 215 Save the animation by clicking on File, and then a drop down menu appears and click on Import/Export, and then Export All Frames, as shown below: Broadcast Pix V7.0 install - concepts - PixMaster - switcher - CG - clips - controls - team - appendix 5.4.1...
- Page 216 After the animated title is exported from the Inscriber CG, it must then be converted into a clip for play out, as described on the next page. Broadcast Pix V7.0 install - concepts - PixMaster - switcher - CG - clips - controls - team - appendix...
-
Page 217: Importing An Animated Cg Graphic Into Broadcast Pix
After an animated title is created and exported, it then must be converted into a clip for play out by the Broadcast Pix Clip Store. The animation is exported by Inscriber as a sequence of individual Targa files, one for each frame in the animation. -
Page 218: On-Air Operations For Cg Animations
Import. This will covert all the individual Targa files into one file, which can be played through the clip store of Broadcast Pix. If the status bar does not start within 30 seconds, then the animation file was not exported correctly. -
Page 219: Creating Animations In 3Rd Party Applications
3.! Set the file type to be Targa*, with the right number of frames per second (depending on whether you are in NTSC/525 or PAL/625.) 4.! Run Digital Juice to create the animation sequence. 5.! Import the animation into Broadcast Pix just as if it were coming from Inscriber, see section 5.4.2. •! Other formats can also be used. -
Page 220: Basic Cg On-Air Operation
5.5 Basic CG On-Air Operations The unified control architecture of the Broadcast Pix system manages all content devices the same way. For example, once you learn how to control CGs, you have also learned the basic elements of how to control Stills, Clips and Logos. CG and Clips have more modifiers/controls since they involve motion, where as Stills and Logos only have aspect ratio controls. -
Page 221: Updating Cg Graphics On-The-Fly
In BPswitcher, go to Setup, Engineering Settings, Allow Fast ICG Editing. As shown below. NOTE: The Broadcast Pix Switcher has two editing speeds, fast and normal. Fast leaves the Inscriber open so it comes up quicker. Normal leaves it off. Select the desired speed on Setup, and select Enable Fast ICG Editing if desired. -
Page 222: Overwriting A File
Another way to update a file that is currently in your show is to simply overwrite the file using standard Microsoft Windows. This may be desired if you have the Broadcast Pix workstation plugged into a separate local network, where files can be shared and saved. -
Page 223: Dual Cg
5.7 Dual CG The Broadcast Pix Switcher software enables a second channel of CG to be used in a show. This enables two CG graphics to be displayed on-air at once, one in its own keyers, taking up 2 Keyers. -
Page 224: Still Store And Logo Operation
5.8 Still Store and Logo Operation The unified control architecture of the Broadcast Pix system manages all content devices the same way. Once you learn how to control the Clips Store, you have also learned how to control the Still Store, CG Store and Logo Store. -
Page 225: Optional Cg Connect Software
RTX Tags. When you’re in Off-Air Mode the Display button is deactivated, so no changes will go to Broadcast Pix until you enter the On-Air (red) Mode. The Preview Button is active for your to preview how the CG Layout will look before going On-Air. - Page 226 View/CG operators monitor during your production. Now both the Preview and Program buttons are active and any changes made will go onto your Broadcast Pix program. When in On-Air Mode, you may not make changes to the setup of your CG layout, i.e.
-
Page 227: Adding The Rtx Tags
Export your CG layout as an .ICG file, saving it in the cg folder in your C drive with the rest of your CG graphics for Broadcast Pix, and add the file to your show through PixMaster, as described in section 3. -
Page 228: Loading Cg Connect With A Layout
The directory for the most part will be C:\\graphics\cg, once selected click OK. Broadcast Pix V7.0 install - concepts - PixMaster - switcher - CG - clips - controls - team - appendix... -
Page 229: Updating The Cg Layout
The tag Type determines how the content of the assigned RTX Tag can be updated. Broadcast Pix V7.0 install - concepts - PixMaster - switcher - CG - clips - controls - team - appendix... -
Page 230: Adding A Data Source With Xml Files
The XML file will be loaded and tables found in the XML file are listed in the Tables list. Broadcast Pix V7.0 install - concepts - PixMaster - switcher - CG - clips - controls - team - appendix... - Page 231 The Value field will now consist of a dropdown list containing all the record data for the selected table and field, all of these values are being reference to your original data source/XML file. Broadcast Pix V7.0 install - concepts - PixMaster - switcher - CG - clips - controls - team - appendix 5.9.4...
- Page 232 Apply button. Now, anytime that data source file changes, like from a scoreboard, those changes will reflect on-air in Broadcast Pix without having the need to select Program. NOTE: When choosing automatic update, only the first table in the XML file can be updated. Therefore, you would generally only enter a single data record in this XML file and have your external source update this record with the new data you want to display on the screen.
-
Page 233: Creating Your Own Xml File
All your fields will be listed below your table. To delete a Table click on the Table and select Delete. Broadcast Pix V7.0 install - concepts - PixMaster - switcher - CG - clips - controls - team - appendix... -
Page 234: Using Images With Cg Connect
Unlike your CG Layouts, the directory will not be the cg folder. It is recommended to make a CG Connect Images folder on your C drive, to keep your files separated from your Broadcast Pix files. Broadcast Pix V7.0 install - concepts - PixMaster - switcher - CG - clips - controls - team - appendix... - Page 235 NOTE: If you are using images in your Data Source/XML file, it is important to include the exact file name and extension of the file inside the XML file for CG Connect to properly recognize the file. Broadcast Pix V7.0 install - concepts - PixMaster - switcher - CG - clips - controls - team - appendix...
-
Page 236: Using Clocks With Cg Connect
In the Layout Tags Grid, select the Clocks Type for your source. Now when you go On-Air the clock is ready to use. Broadcast Pix V7.0 install - concepts - PixMaster - switcher - CG - clips - controls - team - appendix... -
Page 237: Displaying The Cg Layout
The Preview Tab will appear showing you the image. To commit the changes to the layout and send the CG to the Broadcast Pix Switcher, click on the Program button (or F7 on the keyboard) and the changes will reflect automatically on the switcher. -
Page 238: Using International Characters With Inscriber
In the Installed Services section select the Add button, which will bring the the window below. In the drop down menu select Farsi. Broadcast Pix V7.0 install - concepts - PixMaster - switcher - CG - clips - controls - team - appendix... - Page 239 To change the Language Bar, Left-Click on the EN and choose Farsi. You must first select the appropriate language prior to launching TitleMotion Pro. Broadcast Pix V7.0 install - concepts - PixMaster - switcher - CG - clips - controls - team - appendix...
-
Page 240: Clip Store
To enable embedded audio see section 1.4 Playing Embedded Audio On a Slate 100, 1000 and 3000 all Slate SD-SDI video outputs can be assigned to playback embedded audio on clip 1 or clip 2, this is configured in the Slate I/O Assignments window, see section 1.5 for more information. - Page 241 Recording Embedded Audio On a Slate 100, 1000 & 3000 all the SD-SDI video inputs, can accept embedded audio from a SDI stream. The HD I/O card can not record embedded audio. On a Slate 2100 only the SDI inputs, 1-8, can accept embedded audio from a SDI stream.
- Page 242 Inputs 7 & 8 can not be forced to A-Sync, those inputs can not be used to record embedded audio. Broadcast Pix V7.0 install - concepts - PixMaster - switcher - CG - clips - controls - team - appendix...
-
Page 243: Audio Flow With Digital Aes/Ebu Audio
In addition to embedded audio, a Slate 2100 can also play and record Digital AES/EBU audio, on a Slate 100, 1000 & 3000 you need to go through a 3rd party audio de-embedder for digital audio. Digital audio is connected via the XLR connectors on the iBoB, labeled ‘Digital’, at a line level. -
Page 244: Audio Flow With Analog Stereo Audio
Lastly, the Slate 100, 1000, 2100 and 3000 can all play and record Analog Stereo audio. On a Slate 100, 1000 and 3000 you need to connect your audio source with the provided break-out-cable, which plugs into the back of the workstation, see section 1.2.7 for more information. - Page 245 Recording Analog Stereo Audio When recording analog audio on a Slate 100, 1000 or 3000 you need to disable the embedded audio function. In BPswitcher go to Setup, Engineering Settings and deselect Embedded audio enabled, for more information see section 1.4.
-
Page 246: Recording A Clip
1 2 3 4 5 6 7 8 *If you have a Slate 100 or 1000, you can select which input you wish to record from in the top right corner of the Clip Ingest window, as shown on the next page. - Page 247 Double-click on the Clip Ingest icon on the desktop and the Clip Ingest Window will appear, as shown below. Slate 2100/3000 Slate 100/1000 Audio Monitoring, if desired, on Slate 2100 The audio that is to be recorded can be monitored from any of the analog or digital XLR audio outputs, on the iBoB.
- Page 248 When you’ve completed all your ingesting, be sure to close the Clip Ingest window prior to starting Broadcast Pix Switcher by pressing the Close button. Broadcast Pix V7.0 install - concepts - PixMaster - switcher - CG - clips - controls - team - appendix...
-
Page 249: Creating Clip Thumbnails
As an alternative, you may specify the frame number of the clip you wish to capture, as shown above. Broadcast Pix V7.0 install - concepts - PixMaster - switcher - CG - clips - controls - team - appendix 6.1.1... -
Page 250: Clip Store Playout
PixPad on the Multi-View on the Control Panel Panel Display Clip1: 02 box notext (LAXR) Scrub 0:00:00 Knobs Motion Controls Broadcast Pix V7.0 install - concepts - PixMaster - switcher - CG - clips - controls - team - appendix... -
Page 251: To Select A Clip By Name
NOTE: To select a clip by number, the clip file name must have digits in front of the name, i.e. “02 Open”. Broadcast Pix V7.0 install - concepts - PixMaster - switcher - CG - clips - controls - team - appendix... -
Page 252: Selecting A Clip With The Multi-View
To select a clip not currently shown on the Multi-View, use the navigation buttons at the bottom of the PixPad, the left and right arrows. Navigation buttons Broadcast Pix V7.0 install - concepts - PixMaster - switcher - CG - clips - controls - team - appendix 6.3.2... -
Page 253: Viewing More Clips In The Library
2. Press the [Back] PixButton, to go back to the previous page. NOTE: You can always return to the first page of clips, by pressing the [Clips] PixButton again. Broadcast Pix V7.0 install - concepts - PixMaster - switcher - CG - clips - controls - team - appendix... - Page 254 6.3.4 Compressed Clips The internal clip store of the Broadcast Pix can support playback of standard definition compressed clips, either QuickTime movies or MPEG movies. This is ideal if you are exporting video files from a non-linear editing system like Avid or Final Cut Pro or even an animated background from Adobe After Effects or Apple Motion.
-
Page 255: Exporting Compressed Clips From Final Cut Pro
The Prepare for Internet Streaming section may be uncheck, although this setting has no effect for playout in Broadcast Pix. Broadcast Pix V7.0 install - concepts - PixMaster - switcher - CG - clips - controls - team - appendix... - Page 256 Select either: DV-PAL, DV/DVCPRO-NTSC, DVCPRO-PAL DVCPRO50-NTSC, DVCPRO50-PAL, H.264 or MPEG-4 Video. Choosing any other setting will not create a file recognizable in Broadcast Pix. Under the Motion section, select a Frame Rate drop down menu and select 29.97 for NTSC or 25 for PAL Under the Compressor section, select Best with the Quality slider.
- Page 257 Where: drop down menu. 21.! Click on Save to export and save your QuickTime move. Broadcast Pix V7.0 install - concepts - PixMaster - switcher - CG - clips - controls - team - appendix 6.3.5...
-
Page 258: Clip Motion Controls
The clip’s runtime is also shown on the Multi-View, and clips can be set to count up or count down, see section 2.5.5 Broadcast Pix V7.0 install - concepts - PixMaster - switcher - CG - clips - controls - team - appendix... -
Page 259: Mark In And Out Points
[Mark-In] PixButton. When the clip reaches the point you wish for a mark-out point, press the [Mark-Out] PixButton. Broadcast Pix V7.0 install - concepts - PixMaster - switcher - CG - clips - controls - team - appendix 6.5.1... - Page 260 (If other modifiers are turned on they will also appear) Clip: 01 Head Open (A) Scrub 0:00:00 Broadcast Pix V7.0 install - concepts - PixMaster - switcher - CG - clips - controls - team - appendix 6.5.2...
-
Page 261: Auto Stop Clips
NOTE: If a clip has audio associated with it, the audio will cut off ounce the clip is taken off of program, if it is desired to be able to keep playing the audio once transitioned off, deselect Auto-Stop. Broadcast Pix V7.0 install - concepts - PixMaster - switcher - CG - clips - controls - team - appendix... -
Page 262: Loop Clips
Now select the desired treatment to be applied to the clip. Either None, Box, 14:9 or Crop. For more information on AutoAspect, see section 1.4.1. Broadcast Pix V7.0 install - concepts - PixMaster - switcher - CG - clips - controls - team - appendix 6.5.5... -
Page 263: Scrubbing A Clip
To scrub faster through a clip use the x10 or x100 knobs to quickly advance through the clip. Clip: 01 Head Open Scrub x100 0:00:00 Broadcast Pix V7.0 install - concepts - PixMaster - switcher - CG - clips - controls - team - appendix 6.5.7... -
Page 264: Setting The Clip Audio Advance
Broadcast Pix system. To advance the audio: In BPswitcher, make sure a show is not running. Click on Setup option. -
Page 265: Optional Dual Clip Store
NOTE: Even though you may have one clip in both channels of the clip store, any control changes (Mark In/Out, Loop, etc) made on one channel with automatically occur on the other clip channel. Broadcast Pix V7.0 install - concepts - PixMaster - switcher - CG - clips - controls - team - appendix... - Page 266 Transmit B (TX+) Receive A (RX-) Attach the included Edge Port 422 Hub to a USB port on the Broadcast Pix workstation. Then attach the 422 cables from the Edge Port to each channel of the DDR that you wish to control, as shown below, ensuring that you align Channel 1 with Port 1, Channel 2 with Port 2 and Channel 3 with Port 3.
- Page 267 6.8.2 Verifying Installation of External DDR Software On the Broadcast Pix Switcher window, select the Help menu, then About Devices, then DDR Control as shown below…. … and the following window will appear if the external DDR option is present: It may also be necessary to ensure that the Edge Port RS-422 hub is installed/ configured properly.
- Page 268 Under Industrial Settings, ensure that each COM port is set to RS422: Non Terminating Resistor. Select the Update button to save changes, then close the Edgeport Properties window. Broadcast Pix V7.0 install - concepts - PixMaster - switcher - CG - clips - controls - team - appendix 6.8.2...
- Page 269 You can select all or just a subset of clips on the DDR, to make the collection of clips that you want to have access to from the Broadcast Pix panel. In BPswitcher, select the Setup menu, Engineering settings, Device settings and then the DDR Control menu, as shown below…...
- Page 270 NOTE: When naming your clips on an external server, it is important not to have a name longer than 8 characters long. The VDCP protocol only supports file names with 8 or less characters. Broadcast Pix V7.0 install - concepts - PixMaster - switcher - CG - clips - controls - team - appendix...
-
Page 271: Adding Ddr Control To A Show
Then select DDR Control from the drop down window, as shown below. Click on OK and then Save Show. Broadcast Pix V7.0 install - concepts - PixMaster - switcher - CG - clips - controls - team - appendix 6.8.4... -
Page 272: Controlling External Ddr
[Next] PixButton or by using the numeric keypad, see sections 6.3.1 and 6.3.3. Broadcast Pix V7.0 install - concepts - PixMaster - switcher - CG - clips - controls - team - appendix 6.8.5... - Page 273 Any fast button-pushes may break the communication to your external DDR. Broadcast Pix V7.0 install - concepts - PixMaster - switcher - CG - clips - controls - team - appendix...
-
Page 274: Looping
To turn off looping, press the above [Loop Clip OnOff] PixButton again, and the L will be removed from the display. Broadcast Pix V7.0 install - concepts - PixMaster - switcher - CG - clips - controls - team - appendix... -
Page 275: Accessing More Channels
Broadcast Pix V7.0 install - concepts - PixMaster - switcher - CG - clips - controls - team - appendix... -
Page 276: Camera Control Option
Section 7: Optional Device Controls The Broadcast Pix system may control a number of external devices, one of which is DDR control which was described in the previous section. As an option the switcher can also control robotic cameras and external audio mixers, for a true one-man production. -
Page 277: Installation Of Sony Cameras
‘Auto’ or ‘0’, as the Broadcast Pix software with automatically detect the correct settings. On an EVI-70 there is no such setting, as it is internally set to ‘Auto’, on a BRC-300 the camera address is changed on the button of each camera via dip-switches. - Page 278 RS-232 Daisy Chain Set-Up: Broadcast Pix RS 232 to VISCA Cable Workstation Sony VISCA Sony VISCA Cable Cable RS-422 Star Configuration: USB Cable Workstation Edgeport (3) RS-422 Custom Serial Cables RS-422 Star with Daisy Chain Configuration: USB Cable Workstation Edgeport...
-
Page 279: Installation Of Hitachi Cameras
Most of the instructions for how to install this camera control system come from Display Devices, the makers of the pan/tilt head that is being used by Broadcast Pix. So refer to the Display Devices manual for more information. The following instructions provide an overview, and the Broadcast Pix specifics. -
Page 280: One Camera Installation
7.3.1 One Camera Installations Run two video cables to the pan/tilt head: one for video to the Broadcast Pix, and one for genlock/reference. Run a serial cable from the serial port of the Broadcast Pix workstation to the B&B Electronics RS-232 to RS-485 converter, as shown below. It is also possible to plug the converter directly into on the workstation’s COM port, if... -
Page 281: Multi-Camera Installation
The multi-camera set-up is illustrated below: Pan-Tilt head Pan-Tilt head Pan-Tilt head RS- 485 Multiplexer Power Supply Workstation COM 1 or COM 2 Broadcast Pix V7.0 install - concepts - PixMaster - switcher - CG - clips - controls - team - appendix 7.3.2... -
Page 282: Setting The Com Port
This is set at the factory to COM1 as a default, if the serial cable is installed in a different port, you will need to change it to the appropriate one. Broadcast Pix V7.0 install - concepts - PixMaster - switcher - CG - clips - controls - team - appendix... -
Page 283: Sony Camera Control Settings
Click the drop down menu to change the Comm Port and Daisy Chain Position for each attached camera. Click on Close to save the settings, and to close the window. Broadcast Pix V7.0 install - concepts - PixMaster - switcher - CG - clips - controls - team - appendix... -
Page 284: Hitachi Camera Control Settings
Device settings and Camera Control as shown at the right. The settings window will appear as shown on the right. Broadcast Pix V7.0 install - concepts - PixMaster - switcher - CG - clips - controls - team - appendix 7.5.2... - Page 285 For Knob Settings, click on Knob Settings and the following will appear. Select the knob settings and threshold values desired and press accept. Broadcast Pix V7.0 install - concepts - PixMaster - switcher - CG - clips - controls - team - appendix...
- Page 286 To assign numbers to each camera: Create a Broadcast Pix show, as described in section 2. Add camera control to that show, as described in section 7.6 Decide what address each Pan/Tilt Head is going to be. In order to set the address of the head, the panel sends out a command to all connected heads.
- Page 287 Broadcast Pix V7.0 install - concepts - PixMaster - switcher - CG - clips - controls - team - appendix 7.5.3...
-
Page 288: Adding Camera Control To A Show
Click on camera control, and it will appear on the PixButton, as shown below. Click on OK and then Save Show. Broadcast Pix V7.0 install - concepts - PixMaster - switcher - CG - clips - controls - team - appendix... -
Page 289: Selecting Camera Control In A Production
Focus and Isis aren’t always present), while the third knob changes to one of many camera control settings (on Hitachi camera only). Broadcast Pix V7.0 install - concepts - PixMaster - switcher - CG - clips - controls - team - appendix... -
Page 290: Controlling A Camera Manually
Pan and Tilt Left/Right Up/Down Diagonally For Slow movement, move the joystick a little For Rapid movement, move the joystick a lot Broadcast Pix V7.0 install - concepts - PixMaster - switcher - CG - clips - controls - team - appendix... - Page 291 To adjust the focus of the active camera, twist the left knob To adjust the Iris of the active camera, twist the center knob Broadcast Pix V7.0 install - concepts - PixMaster - switcher - CG - clips - controls - team - appendix...
- Page 292 NOTE: All three of the above speed setting may me adjusted, as described in section 7.5 Broadcast Pix V7.0 install - concepts - PixMaster - switcher - CG - clips - controls - team - appendix...
-
Page 293: Setting Camera Preset Positions
7’s are related to each other. Device Icon Camera Number indicates Camera Control Preset Position Number Broadcast Pix V7.0 install - concepts - PixMaster - switcher - CG - clips - controls - team - appendix... - Page 294 Recall speed will be captured at whatever speed is set to the camera, see section 7.9.2. Broadcast Pix V7.0 install - concepts - PixMaster - switcher - CG - clips - controls - team - appendix...
- Page 295 NOTE: If Preset 1 already had a saved preset position, this will now be overwritten with the position you just saved. Broadcast Pix V7.0 install - concepts - PixMaster - switcher - CG - clips - controls - team - appendix...
- Page 296 PixButton and that preset will be loaded, the camera will move to it, and the large display will show that preset position number as shown below. Broadcast Pix V7.0 install - concepts - PixMaster - switcher - CG - clips - controls - team - appendix 7.9.1...
- Page 297 The camera will move to it, at the recall speed saved with this preset, and the large display will show this preset position number. Broadcast Pix V7.0 install - concepts - PixMaster - switcher - CG - clips - controls - team - appendix...
-
Page 298: Recall Speed For Preset Positions
Fast, Medium or Slow Turn the right knob to the desired speed and it is set. Broadcast Pix V7.0 install - concepts - PixMaster - switcher - CG - clips - controls - team - appendix... -
Page 299: Hitachi Camera Control Settings
Press the [Settings] PixButton and the Settings PixPad will appear, as shown below right. Presets PixPad Camera Settings PixPad Broadcast Pix V7.0 install - concepts - PixMaster - switcher - CG - clips - controls - team - appendix 7.10... - Page 300 On the above PixPad, press the [Clear Limits] PixButton, and all four limits will be removed for this camera. Broadcast Pix V7.0 install - concepts - PixMaster - switcher - CG - clips - controls - team - appendix 7.10.1...
-
Page 301: Adjusting Ccu Functions
Turn the right knob to white balance the camera. The setting will be saved in either in Memory 1 or Memory 2 of the above White Balance function. Broadcast Pix V7.0 install - concepts - PixMaster - switcher - CG - clips - controls - team - appendix... - Page 302 Then, Press the [Lens Type] PixButton and the display will show what is illustrated below. Turn the right knob to adjust. Broadcast Pix V7.0 install - concepts - PixMaster - switcher - CG - clips - controls - team - appendix...
- Page 303 Auto – for the camera to automatically set the Iris Remote – for the middle knob on the Broadcast Pix panel to control Iris Manual – for manual control of the Iris by the iris ring on the camera 10. To Invert Tilt In some installations that Pan/Tilt head is installed upside down.
- Page 304 (as the camera is upside down). On Sony cameras, you may need to go in to the Sony Menu using the remote control supplied by Sony to invert the camera. Broadcast Pix V7.0 install - concepts - PixMaster - switcher - CG - clips - controls - team - appendix...
-
Page 305: Sony Camera Control Settings
Auto Focus On, as shown below. To turn off Auto Focus and to manually focus, simply turn the Focus knob. Broadcast Pix V7.0 install - concepts - PixMaster - switcher - CG - clips - controls - team - appendix... - Page 306 [One Push W Bal] PixButton in the PixPad. When the camera has successfully white balanced, the display will show White Balance Set, as shown below. Broadcast Pix V7.0 install - concepts - PixMaster - switcher - CG - clips - controls - team - appendix 7.11.1...
-
Page 307: Optional Audio-Follow-Video Control
7.12 Optional Audio-Follow-Video Control As an option the Broadcast Pix switcher can provide control of virtually any external audio mixer, digital or analog, through a Musical Instrument Digital Interface (MIDI). Controls can be as simple as turning on a source when it transitions to program, or as complex as calling up scene changes to modify effect parameters like reverb, panning and equalization controls. - Page 308 Float, Audio Follow. In that window select Setup, View Setup. The window expands to reveal the programming interface, as shown below. Broadcast Pix V7.0 install - concepts - PixMaster - switcher - CG - clips - controls - team - appendix 7.12.2...
-
Page 309: Audio Follow Setup
Program the On-Air and Off-Air commands in the table provided. Sources 1-18 refer to the inputs on the Broadcast Pix Switcher. The first 9 sources are shown, scroll down to reach the shifted sources (10 through 18). Each show can have its own set of Audio-Follow commands. - Page 310 To tie a video source to another video source, simply type: t and the number of the other source. (i.e. t2) Broadcast Pix V7.0 install - concepts - PixMaster - switcher - CG - clips - controls - team - appendix...
- Page 311 To close the programming section, either click the Save and Close button or uncheck the Setup, View Setup menu option. Broadcast Pix V7.0 install - concepts - PixMaster - switcher - CG - clips - controls - team - appendix...
-
Page 312: Audio Follow Operation
Operation can be disabled and re-enabled using the Setup, Disable audio follow menu option in the Audio Follow window. Broadcast Pix V7.0 install - concepts - PixMaster - switcher - CG - clips - controls - team - appendix 7.12.4... -
Page 313: Types Of Multi-User Operation
Large Teams with many panels 8.2 Optional Multi-Panel Support Standard equipment for a Broadcast Pix Switcher includes both a control panel and a SoftPanel. Either can be used to control the show. For example, if the control panel is the one primarily used, and should fail and lose its network connection, then the SoftPanel can be used (or visa versa). -
Page 314: Adding A Separate Graphics Operator
Graphics Creator Show Creator NOTE: Only one keyboard and one mouse can be connected to the workstation at any given time. Broadcast Pix V7.0 install - concepts - PixMaster - switcher - CG - clips - controls - team - appendix... -
Page 315: Two Operators With Separate Graphics Operator And 2 Panels
8.5 Dual VGA Graphics Creator with CG PixPad and Show Creator Keyer control Broadcast Pix V7.0 install - concepts - PixMaster - switcher - CG - clips - controls - team - appendix 8.3.2... -
Page 316: Locking Panels Together
NOTE: On the above menu, if you select Force Disconnect, a window will appear which shows each of the panels’ IP address that are currently connected. You can then select one and force it to disconnect. Broadcast Pix V7.0 install - concepts - PixMaster - switcher - CG - clips - controls - team - appendix... -
Page 317: Viewing Just A Portion Of The Softpanel
The resulting portion of the SoftPanel can then be sized and positioned like any other window. (To return to the full panel, right-click and click-on Show All) Broadcast Pix V7.0 install - concepts - PixMaster - switcher - CG - clips - controls - team - appendix... -
Page 318: Two Operators With Two Computers
Control Panel, Network Connections to change the IP address of the network card. NIC 2 is for the Control Network for Broadcast Pix (this is located next to the USB ports) and NIC 1 is used for your local private network (this is located next to the graphics card). -
Page 319: Remote Operator In The Back Room
Monitor VGA monitor cable can easily run to. (or a back- room PC) Show Creator Broadcast Pix V7.0 install - concepts - PixMaster - switcher - CG - clips - controls - team - appendix... -
Page 320: Dual Panels For Back-Up Redundancy
Physical and SoftPanels This capability is standard with every Broadcast Pix Switcher system. If the control panel should fail, then press Reconnect on the SoftPanel’s web browser to connect it. If you wish it to be always available, you need an optional additional panel license, see section 8.2... - Page 321 (if any) To remotely control a system: 1.! Attach the remote panel to NIC1 on the Broadcast Pix workstation, which is the 1 GB Ethernet port, via an appropriate Internet connection (DSL is fine). 2.! In BPSwitcher, select Setup, then...
- Page 322 5.! Enter the new BPSwitcher server port number. 6.! Press OK. NOTE: It is important to consult Broadcast Pix Technical Support prior to changing the Sever Port. Improper setup will cause BPswitcher to not operate correctly. Broadcast Pix V7.0...
-
Page 323: Appendix
Broadcast Pix. It is recommended to download the appropriate software on another workstation and copy the zip file via a CD or USB drive, and not connect the Broadcast Pix system to the internet. To Download New Software: Register your unit by going to http://www.broadcastpix.com/support.html,... - Page 324 It will ask if you are sure. Click Yes. It will display a series of growing bars to show Broadcast Pix Software being removed. Broadcast Pix V7.0 install - concepts - PixMaster - switcher - CG - clips - controls - team - appendix...
- Page 325 Broadcast Pix Software: Open the zip file that you downloaded by double-clicking on it. Double-click on Setup.exe file. This will open the Broadcast Pix Software Installation Wizard. Click on Next. To add Broadcast Pix to your startup, click on the checkbox, and click on Next.
- Page 326 When done, this window will appear. Click on Close. Shutdown the computer, and then reboot to the computer to refresh the memory. Broadcast Pix V7.0 install - concepts - PixMaster - switcher - CG - clips - controls - team - appendix...
-
Page 327: Installing System Options
A.2 Updating the Control Panel and Break-out-Box Firmware While most upgrades are accomplished with the Broadcast Pix software as described in the previous section, it is sometimes desired to upgrade the firmware that lives inside the control panel or iBoB. - Page 328 A.4 Building a Show in Classic Mode Classic mode is the show editor that shipped with Version 1 and 2 of the Broadcast Pix system software, which was replaced by PixMaster in Version 3. It is in this manual for those users that use it as a supplement to PixMaster to set up different data storage libraries than the standard libraries.
- Page 329 A.4.1 Create a Show With the Classic Show Editor To Create a Show: 1. Start the Broadcast Pix application by clicking on its icon on the desktop GUI, which will bring up the Multi-View window, which contains a blank Multi-View, and various drop down menus at the top.
- Page 330 4. In the content column of the Show Editor window, for each desired device, select it from the drop-down menu, as shown below: Broadcast Pix V7.0 install - concepts - PixMaster - switcher - CG - clips - controls - team - appendix...
- Page 331 Then press the Select button at the bottom of the Select Folder window. 6. Save the show 7. Switch the Show Editor back to PixMaster for editing, as shown on A.4. Broadcast Pix V7.0 install - concepts - PixMaster - switcher - CG - clips - controls - team - appendix A.4.1...
-
Page 332: Control Panel Internal Operation
192.168.53.250. If it fails to find either a workstation with that address or a Broadcast Pix Switcher application open to a show, then it asks the operator what it should do. It does the same thing if a problem develops during normal operation. - Page 333 1 through 8. Inputs 17 and 18 are labeled Show Prog. and Show Prev., indicating their use as the connections from the Broadcast Pix workstation running the current show. On a Slate 3000 inputs inputs 9 through 14 are labeled 9 thought 14 indicating input channels on the router and inputs 15 and 16 are labeled Show Prog.
- Page 334 Targa mode, iBoB mode, 16x Router mode or 32x Router mode. Select the Select Panel Mode PixButton when the correct mode has been selected. Broadcast Pix V7.0 install - concepts - PixMaster - switcher - CG - clips - controls - team - appendix...
-
Page 335: Broadcast Pix Slate Analog Video Connector Pin-Outs
A.6 Broadcast Pix Slate Analog Video Connector Pin-outs Composite Video (single BNC connection): Pin 6 - Center Pin on BNC , Pin 3 - Shield/Ground Component Video (triple BNC connections): (Y) Pin 6 - Center Pin , Pin 3 - Shield/Ground (Green) -
Page 336: Broadcast Pix Slate Analog Audio Breakout Cable
A.7 Broadcast Pix Slate Analog audio breakout cable Revision A DB25 Male to 4 male and 2 female XLR. 8 foot length shielded audio cable. All inputs and outputs are balanced line level signals. XLR label XLR pin DB25 Pin #... -
Page 337: Serial Pin-Out For Slate 2100 & Slate 3000 Fail-Safe Control
NOTE: The maximum length for RS-232 communication is 15 meters (50 ft), if a longer distance is required you may need to convert to RS-422 back to RS-232 with a 3rd party converter. Broadcast Pix V7.0 install - concepts - PixMaster - switcher - CG - clips - controls - team - appendix... -
Page 338: Broadcast Pix Slate Technical Specifications
I/O, balanced line level •! 2100 adds: AES/EBU digital I/O, balanced line level Workstation •! Software: Broadcast Pix Switcher Version 6, Inscriber TitleMotion Pro CG, Windows XP Pro •! Hardware: Pentium D Dual-Core, dual disks, dual monitor support, R/W DVD/CD, keyboard, mouse •! Requires a VGA/DVI Monitor, can accept two: 1280x1024,1680x1050 and many other... - Page 339 Broadcast Pix V7.0 install - concepts - PixMaster - switcher - CG - clips - controls - team - appendix A.10...
-
Page 340: Glossary
A.10 Glossary AutoAspect A Broadcast Pix feature which allows you to mix 4:3 and 16:9 content in the same show, while maintaining the native aspect ratio of each element. See section 1.5.1. Auxiliary output, which can be assigned to any internal or external source for a separate monitor or record deck. - Page 341 The group of 12 PixButtons in the device control portion of the control panel. See section 2.4.2. PowerAux A Broadcast Pix feature which enables Keys to be overlaid onto an Aux output. See section 4.9.5. Preview Video shown on a preset monitor used by the operator before content is taken to air, to avoid mistakes.
- Page 342 See sections 1.3.3, 1.6.4 or 1.7.6. VGA Monitor A computer monitor. It is used to show the Broadcast Pix Multi-View, show editor, Inscriber and other software. (Resolution of at least 1280 x 1024 is needed).
-
Page 343: Broadcast Pix Contact Information
Broadcast Pix welcomes suggestions to this manual, please send to manual@broadcastpix.com © 2008 Copyright Broadcast Pix, Inc. Broadcast Pix, Slate, iBoB, PixButtons, PixMaster, PixPad, AutoAspect, and SoftPanel are trademarks of Broadcast Pix, Inc. Other trademarks are owned by their respective companies. - Page 344 Notes Broadcast Pix V7.0 install - concepts - PixMaster - switcher - CG - clips - controls - team - appendix...
Need help?
Do you have a question about the Slate 100 and is the answer not in the manual?
Questions and answers