
Subscribe to Our Youtube Channel
Related Manuals for Broadcast Pix Granite 2000


Summary of Contents for Broadcast Pix Granite 2000
- Page 1 Granite 2000 / 2000+ 1ME HD Video Switchers Operators Manual Granite Software Version 5 switchers / graphics / slow motion Broadcast Pix V5 install - concepts - PixMaster - switcher - CG - clips - controls - team - appendix...
- Page 2 Made in the United States of America © 2016 Copyright Broadcast Pix, Inc. January 2016 Broadcast Pix, Granite, PixButtons, PixMaster, PixPad, iPixPad, iPixPanel, AutoAspect and SoftPanel are trademarks of Broadcast Pix, Inc. Other trademarks are owned by their respective companies.
-
Page 3: Table Of Contents
Installation and Getting Started Granite Switcher 1.1.1 Granite Switcher Installation Granite Server 1.2.1 Granite Server Installation Broadcast Pix Granite 2000 / 2000+ 1.3.1 System Contents 1.3.2 Wiring Diagram for a Granite 2000 1.3.3 Wiring Diagram for a Granite 2000+ Tally on the Granite Switcher 1.4.1... - Page 4 Table of Contents Section 2 Broadcast Pix Concepts Broadcast Pix Switcher Features 2.1.1 1 M/E Control Panel Overview PixButtons for Executing with Confidence Devices Device Controls 2.4.1 Assigning the Device Controls 2.4.2 PixPad Navigation 2.4.3 Multi-View PixPad 2.4.4 PixPad Order Controls 2.4.5...
- Page 5 3.10.1 Restoring System Settings 3.11 Exporting a Show 3.11.1 Importing a Show 3.11.2 Exporting System Files 3.11.3 Importing System Files Broadcast Pix V5 install - concepts - PixMaster - switcher - CG - clips - controls - team - appendix...
- Page 6 4.7.3 Adjusting ClearKey Luma Key 4.8.1 Activating & Adjusting the Luma key Fluent Controls 4.9.1 Virtual Studios 4.9.2 Image Editor Broadcast Pix V5 install - concepts - PixMaster - switcher - CG - clips - controls - team - appendix...
- Page 7 4.10 External Key 4.10.1 To Setup External Key 4.10.2 External Key Operation 4.11 Auxiliary Output Control 4.11.1 Aux Out on Granite 2000 4.11.2 Aux Out on Granite 2000+ 4.11.3 Assigning Output Sources 4.11.4 PowerAux Control 4.11.5 Optional Remote Panels 4.11.6 Remote Panel Wiring 4.11.7...
- Page 8 CG and Graphics CG Installation 5.1.1 TitleMotion GS Canvas Creating Still CG Graphics 5.2.1 Exporting a Still Graphic from Inscriber to Broadcast Pix 5.2.2 Exporting Graphics from Photoshop to Broadcast Pix CG Rolls and Crawls 5.3.1 To Create Rolls/Crawls 5.3.2 To Play a Roll or Crawl 5.3.3...
- Page 9 7.2.1 Sony Wiring Configurations 7.2.2 Vaddio Wiring Configurations 7.2.3 IP Configuration of Sony Cameras 7.2.4 IP Configuration of Vaddio Cameras Broadcast Pix V5 install - concepts - PixMaster - switcher - CG - clips - controls - team - appendix...
- Page 10 Adjusting CCU Functions 7.14 Panasonic Camera Control Settings 7.14.1 Adjusting CCU Functions 7.15 Telemetrics Camera Control Settings 7.15.1 Adjusting CCU Functions Broadcast Pix V5 install - concepts - PixMaster - switcher - CG - clips - controls - team - appendix...
- Page 11 Router Control 7.20.1 Installing Router Control 7.20.2 Router Control Setup 7.20.3 Router Control Panel Operation 7.20.4 Router Control Mulit-View Operation Broadcast Pix V5 install - concepts - PixMaster - switcher - CG - clips - controls - team - appendix...
- Page 12 Updating the Software to Future Versions Installing System Options Control Panel Internal Operation RS-232 Serial Pin-Out for Fail-Safe Control Broadcast Pix Granite Technical Specifications Custom Shortcuts Keyboard Layout Broadcast Pix Contact Information Broadcast Pix V5 install - concepts - PixMaster - switcher - CG - clips - controls - team - appendix...
-
Page 13: Installation And Getting Started
Switcher. The Granite Server stores the Fluent Workflow software and is connected to the Granite Switcher, which processes all the video I/O. There are a total of 3 Granite 2000 switcher models, as shown below, all of which use the same BP Switcher software, each with unique hardware to control the software. -
Page 14: Granite Switcher
(325 feet) for HD, as signal quality will be degraded. For longer runs, it is necessary to install video amplifiers/reclockers to boost the signal, although external components may increase overall system delay. Broadcast Pix V5 install - concepts - PixMaster - switcher - CG - clips - controls - team - appendix... -
Page 15: Granite Switcher Installation
In addition, a rear support bracket is provided for proper support when attached with multiple/heavy cables. The rear support bracket can accept rack depths from 24 inches to 36 inches. Broadcast Pix V5 install - concepts - PixMaster - switcher - CG - clips - controls - team - appendix 1.1.1... - Page 16 24 inches – No holes showing, with space 32 inches – 4 holes showing 36 inches – 5 holes showing Broadcast Pix V5 install - concepts - PixMaster - switcher - CG - clips - controls - team - appendix 1.1.1...
-
Page 17: Granite Server
NOTE: The maximum distance for the PCI Express cable between the Granite Server and Granite Switcher is 7 meters (22.9ft). The hard drives are removable, but are not hot-swappable. Broadcast Pix V5 install - concepts - PixMaster - switcher - CG - clips - controls - team - appendix... -
Page 18: Granite Server Installation
Once the door opening is aligned with the pin, release the pin to lock the door in position. Broadcast Pix V5 install - concepts - PixMaster - switcher - CG - clips - controls - team - appendix 1.2.1... - Page 19 1.3 Broadcast Pix Granite 2000 / 2000+ / 2000X 1.3.1 Granite 2000 / 2000+ / 2000X System Contents The Broadcast Pix Granite 2000 is comprised of the following standard components: Broadcast Pix Software, Software: Showing the Multi-View BPswitcher Inscriber TitleMotion GS...
-
Page 20: Broadcast Pix Granite 2000 / 2000
Broadcast Pix Granite 2000 / 2000+ / 2000X System Includes: Hardware 1 M/E Control Panel Granite Server, with 6 removable media drives Granite Switcher with I/O boards Inscriber USB Dongle, installed internally in the Server at the factory USB Keyboard USB Mouse ½... - Page 21 1.3.2 Wiring Diagram for Granite 2000 Top Slot In 1 Out 1 In 2 HD/SD-SDI Out 2 In 3 Assignable in Out 3 Granite Output In 4 Out 4 Live Inputs Assignments In 5 Out 5 Auto-Detect HD/SD-SDI In 6 Out 6 (Cameras, tape decks, etc.)
- Page 22 1.3.3 Wiring Diagram for Granite 2000+ / 2000X Slot In 1 Out 1 In 2 HD/SD-SDI Out 2 In 3 Assignable in Out 3 Granite Output In 4 Out 4 Live Inputs Assignments In 5 Out 5 Auto-Detect HD/SD-SDI In 6 Out 6 (Cameras, tape decks, etc.)
-
Page 23: Tally On The Granite Switcher
GPO 22 GPO 10 Input 11 GPO 23 GPO 11 Input 12 GPO 24 GPO 12 Pin 1 Pin 25 Broadcast Pix V5 install - concepts - PixMaster - switcher - CG - clips - controls - team - appendix... -
Page 24: Gpis On The Granite Switcher
GPI 1 GPI 2 GPI 3 GPI 4 GPI 5 GPI 6 GPI 7 GPI 8 Pin 1 Pin 9 Broadcast Pix V5 install - concepts - PixMaster - switcher - CG - clips - controls - team - appendix 1.4.1... - Page 25 1.4.2 Optional Tally Box on the Granite 2000 / 2000+ / 2000X There are 2 tally box options for Granite Switchers to provide a contact closure/relay connection in addition to the standard open collector tally on the Granite Switcher. The tally boxes are stand-alone: Sense &...
-
Page 26: Installing Optional 8 Port Tally Box
Camera Control Units or other source. The Tally Box only opens and closes the tally circuit. Check your Camera Control Unit’s user manual for more information. Broadcast Pix V5 install - concepts - PixMaster - switcher - CG - clips - controls - team - appendix... - Page 27 Camera Control Units or other source. The Tally Box only opens and closes the tally circuit. Check your Camera Control Unit’s user manual for more information. Broadcast Pix V5 install - concepts - PixMaster - switcher - CG - clips - controls - team - appendix...
-
Page 28: Installing Tally Box Drivers
If not, check your connections to the tally box and to the workstation. 9. Close all the windows in InstaCal, you are now ready to use the tally box. Broadcast Pix V5 install - concepts - PixMaster - switcher - CG - clips - controls - team - appendix... -
Page 29: Installing Multiple Tally Boxes
A standard system usually uses one tally box, however multiple tally boxes may be installed on a Broadcast Pix system. Multiple tally boxes expands the number tally outputs as well the number of General Purpose Inputs and Outputs (GPIOs), which can be used with Fluent Macros. -
Page 30: Audio I/O
Left In Right In Animation Animation Left Out Right Out Clip / Clip / Animation Animation Left Out Right Out Function Broadcast Pix V5 install - concepts - PixMaster - switcher - CG - clips - controls - team - appendix... -
Page 31: Audio Output Control
-8dB, -6dBFS for -14dB and 0 dBFS for -20dB. Click on the OK button. This will close the System Settings window. Broadcast Pix V5 install - concepts - PixMaster - switcher - CG - clips - controls - team - appendix 1.5.1... - Page 32 To allow for higher frequencies, for a larger range of audio deselect this option. Broadcast Pix V5 install - concepts - PixMaster - switcher - CG - clips - controls - team - appendix 1.5.1...
- Page 33 SDI output. Click on the OK button. This will close the System Settings window. Broadcast Pix V5 install - concepts - PixMaster - switcher - CG - clips - controls - team - appendix 1.5.1...
-
Page 34: Running A Show
Multi-View. To run the Broadcast Pix system and to use a control panel a show must be loaded. A show is running when the Multi-View is filled with content/video. -
Page 35: Granite I/O Assignments
Quick Start Guide, and the BPswitcher application must be loaded with a show file opened. To Assign the Granite Input Assignments: Start the Broadcast Pix application and load a show, as described in section 1.6. Click on the Broadcast Pix menu button icon, as shown on the right. - Page 36 Remove Label or Remove Name button. Click on the OK button to save and apply the custom Names and Labels to their drop down list. Broadcast Pix V5 install - concepts - PixMaster - switcher - CG - clips - controls - team - appendix...
- Page 37 11 inputs. Repeat the above steps to configure the inputs. Click on the OK button to save and close the Input Assignments window. Broadcast Pix V5 install - concepts - PixMaster - switcher - CG - clips - controls - team - appendix...
- Page 38 16:9, 486i/576 - 16:9, 486i/576 - 4:3, None, 486i/576 - 4:3, Box or 486i/576 - 4:3, Crop for Preview and ME 1 Preview. Broadcast Pix V5 install - concepts - PixMaster - switcher - CG - clips - controls - team - appendix...
- Page 39 Click on the OK button to save and close the Output Assignments window. In the Granite IO Assignments window, click on the OK button to close the window. Broadcast Pix V5 install - concepts - PixMaster - switcher - CG - clips - controls - team - appendix...
- Page 40 Click on the OK button to save and close the Output Assignments window. In the Granite IO Assignments window, click on the OK button to close the window. Broadcast Pix V5 install - concepts - PixMaster - switcher - CG - clips - controls - team - appendix...
-
Page 41: Autoaspect Inputs
NOTE: When a source is treated, it will appear with that treatment on all video outputs, and on the program and preview windows of the Multi-View, the source monitors will show only the native aspect ratio. Broadcast Pix V5 install - concepts - PixMaster - switcher - CG - clips - controls - team - appendix 1.7.1... -
Page 42: Troubleshooting
If it is green all is OK, if not (Red) click on the status light, which will bring up the Status Tab on the Multi-View and the following detailed status window will appear. Lights during fail-safe operation Lights during normal operation Status on Granite 2000 / 2000+ Status of Light Indicates... -
Page 43: Input Timing
1.9 Input Timing Reference The Broadcast Pix Switcher can auto-detect external reference, either analog blackburst or Tri-Level sync in these formats: 480i29.97 (NTSC), 720p59.94, 1080i59.94, 1080p29.97, 1080PsF29.97, 576i25 (PAL), 720p50, 1080i50, 1080p25, 1080PsF25. If no reference is connected, the Granite Switcher will generate internal sync. In this mode the 3 Ref outputs on the Granite switcher can output blackburst to external equipment. - Page 44 40 mS 1080i/720p Synchronous/Timed Sources 67 mS 80 mS 1080i/720p Asynchronous/Untimed Sources SD Outputs + 33 mS + 40 mS Broadcast Pix V5 install - concepts - PixMaster - switcher - CG - clips - controls - team - appendix...
-
Page 45: System Settings
If you turn off auto-loading, then Broadcast Pix Switcher will still open, but you need to then Load a Show as described above. -
Page 46: Selecting Between 60 And 50 Hz
This will close the System Settings window. Close the BPswitcher application by selecting the File menu then Quit. Restart the application by double-clicking the Broadcast Pix Switcher on the desktop. To switch back the video standard, repeat steps 1-6. Broadcast Pix V5 install - concepts - PixMaster - switcher - CG - clips - controls - team - appendix 1.10.2... -
Page 47: Changing The Output Settings
Place a check mark next to the SD filtering option. Click on the OK button. This will close the System Settings window. Broadcast Pix V5 install - concepts - PixMaster - switcher - CG - clips - controls - team - appendix 1.10.3... -
Page 48: Control Panel Installation
1.11 Control Panel Installation Most Broadcast Pix control panels are used on a tabletop, which provides a better viewing angle in most light conditions, especially to view the PixButtons. The panel may also be recessed into a cut out of a table top or console. If a cut out installation is desired, then the following dimensions should be used to cut the hole in the console top. -
Page 49: Hard Drive Configuration
In addition, if a hard drive should fail, the removable drive trays makes it easy to swap out the failed hard drive. If a hard drive should fail, contact Broadcast Pix Technical Support. To remove hard drives:... -
Page 50: Creating A Raid 5 Array
Efficient data hosting and protection (RAID 5) radio button, as shown on the right. Click on the Next button. Broadcast Pix V5 install - concepts - PixMaster - switcher - CG - clips - controls - team - appendix 1.12.2... - Page 51 Now the array must be imported in Windows Disk Management in order for the Video D Drive to be assigned to Windows. Broadcast Pix V5 install - concepts - PixMaster - switcher - CG - clips - controls - team - appendix 1.12.2...
-
Page 52: Importing Existing Media Drives
NOTE: When importing foreign disks, any shared networking that had been previously done to the drive will no longer be visible. You will need to reset any network settings on the Video D drive. Broadcast Pix V5 install - concepts - PixMaster - switcher - CG - clips - controls - team - appendix... - Page 53 Disk Management should now report 1 large Video D drive around 1.3 TB in size, as shown on the right. Broadcast Pix V5 install - concepts - PixMaster - switcher - CG - clips - controls - team - appendix 1.12.3...
-
Page 54: Back-Up Software
Clips can not be backed up with this option. New systems from Broadcast Pix will have both a factory restore point and a restore CD to recover from. It is recommended to create a restore point after your system has been installed and configured. - Page 55 It is advised not to use the system while the back up is occurring. Broadcast Pix V5 install - concepts - PixMaster - switcher - CG - clips - controls - team - appendix 1.12.4...
- Page 56 Paragon by clicking the Red X at the top right corner. To restore a backup in Paragon: Quit all applications, including Broadcast Pix Switcher. Double-click the green Paragon icon on the desktop. If the icon is not on the desktop...
- Page 57 Any files that are on the current System drive and not on the backup will be deleted. Broadcast Pix V5 install - concepts - PixMaster - switcher - CG - clips - controls - team - appendix 1.12.4...
- Page 58 Next button. The following screens will be similar to the ones described above when restoring from inside the Paragon software. Broadcast Pix V5 install - concepts - PixMaster - switcher - CG - clips - controls - team - appendix 1.12.4...
- Page 59 CD, close the Wizard windows and reboot the workstation. The restore point should load and you are now ready to use the system. Broadcast Pix V5 install - concepts - PixMaster - switcher - CG - clips - controls - team - appendix 1.12.4...
- Page 60 Using the Desktop Shortcuts: On new systems from Broadcast Pix, 4 desktop icons are available as shortcuts for both creating and resorting a backup. There are 2 shortcuts to create a backup, Backup 1 and Backup 2. These backups automate the above steps without the need of entering the Paragon application.
-
Page 61: Broadcast Pix Concepts
Section 2: Broadcast Pix Concepts 2.1 Broadcast Pix Features Integrated Broadcast Studio Contains an entire control room of devices w/ Fluent Workflow Software including: switcher, clip store, character generator still stores, logos, animations, DVEs, Multi-View monitoring, Macros, optional audio, camera and external DDR control. -
Page 62: E Control Panel Overview
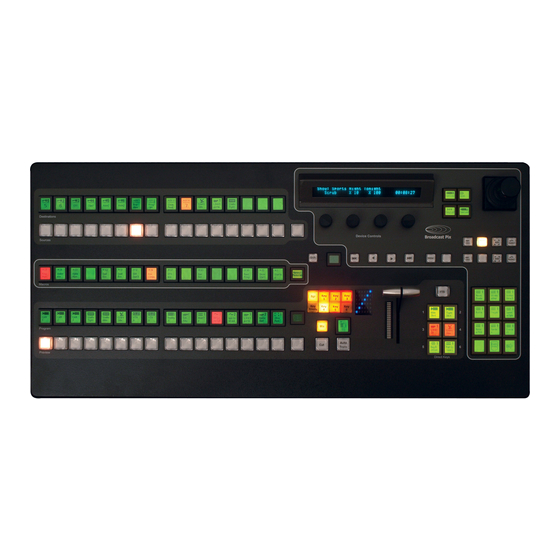
The Broadcast Pix 1 M/E Control Panel has a wide layout, resembling more of a traditional 2 M/E panel on the left side, plus direct access to Broadcast Pix devices on the right side of the panel. There are 16 direct input source buttons, plus access to 16 more inputs with a shift, for a total of 32 inputs. - Page 63 Display Devices 3-axis Joystick 4 Knobs 8 Content Devices 2 Switcher 4 Motion 2 Switcher Controls Controls Controls PixPad Broadcast Pix V5 install - concepts - PixMaster - switcher - CG - clips - controls - team - appendix 2.1.1...
-
Page 64: Pixbuttons For Executing With Confidence
2.2 PixButtons for Executing with Confidence Much of the versatility of the Broadcast Pix system is due to its unique picture buttons, called PixButtons. Each has a small computer VGA display built into the button, which has a resolution of 36x24 pixels. - Page 65 Effects DVE boxes Seven Kinds of PixButtons A total of 74 PixButtons are used in 7 different areas of the Broadcast Pix control panel: 1. 12 in a PixPad To select content within a device and for modifiers. 2. 32 Source Displays To see what device is on each source, and to modify controls.
-
Page 66: Devices
In a traditional live television studio, many of these devices are in a separate box with its own operator. The Broadcast Pix panel provides flexible control over a wide range of devices, by using the device controls. When a device is selected the entire bank of device controls are assigned to that device, including a Joystick, 4 knobs, motion buttons, and a PixPad of 12 PixButtons. - Page 67 Fluent Macros (MEM): Is a device that enables SnapShot recalls of panel setups & Macro recalls of multiple buttons pushes and sequences. Broadcast Pix V5 install - concepts - PixMaster - switcher - CG - clips - controls - team - appendix...
- Page 68 TCP/IP and allows for sources from router to be switched from the control panel and/or Macros. Source names from router can also be viewed on the Multi-View. Broadcast Pix V5 install - concepts - PixMaster - switcher - CG - clips - controls - team - appendix...
-
Page 69: Device Controls
12 PixButtons called the PixPad, and a display, as shown below. When any device is selected, all of these the controls are dedicated to it. Device Controls portion of Panel Broadcast Pix V5 install - concepts - PixMaster - switcher - CG - clips - controls - team - appendix... -
Page 70: Assigning The Device Controls
Device Controls section, in this illustration it is the first channel of CG. Broadcast Pix V5 install - concepts - PixMaster - switcher - CG - clips - controls - team - appendix... -
Page 71: Pixpad Navigation
- There is also an up button, to move up from control PixPads, to a previous PixPad. Broadcast Pix V5 install - concepts - PixMaster - switcher - CG - clips - controls - team - appendix... -
Page 72: Multi-View Pixpad
Now any button selected on any control panel will update any Multi-View PixPad that is following. Broadcast Pix V5 install - concepts - PixMaster - switcher - CG - clips - controls - team - appendix 2.4.3... - Page 73 Button 10 on control panel Button 12 on control panel To move down to the Controls PixPad Button 11 on control panel Broadcast Pix V5 install - concepts - PixMaster - switcher - CG - clips - controls - team - appendix 2.4.3...
- Page 74 Control for the device of PixMaster to edit show contents or settings for (not available for all devices) devices Broadcast Pix V5 install - concepts - PixMaster - switcher - CG - clips - controls - team - appendix 2.4.3...
- Page 75 Clicking on the 4 arrows or magnifying glass will ‘nudge’ the joystick, providing a finer control. Broadcast Pix V5 install - concepts - PixMaster - switcher - CG - clips - controls - team - appendix...
-
Page 76: Pixpad Order Controls
The top of each PixPad share the same group of 5 devices. Use the forward and back error buttons to switch the next group of 5 devices. Broadcast Pix V5 install - concepts - PixMaster - switcher - CG - clips - controls - team - appendix... -
Page 77: Floating Pixpads
NOTE: To have Floating PixPads not follow the control Panel PixPad, deselect the Follow panel option in the right-click menu or from the gear icon. Broadcast Pix V5 install - concepts - PixMaster - switcher - CG - clips - controls - team - appendix... -
Page 78: Multi-View
To load the default layout at application startup, hold the Shift button on the keyboard when the application is being launched. Broadcast Pix V5 install - concepts - PixMaster - switcher - CG - clips - controls - team - appendix... -
Page 79: Overview Of The Multi-View
Timer/Countdown Digital Clock Status Bar/Indicator Menu Button Multi-View PixPad Preview Monitor Program Monitor Clip/Animation Counters Keyer Windows Input Sources Broadcast Pix V5 install - concepts - PixMaster - switcher - CG - clips - controls - team - appendix 2.5.1... -
Page 80: Sources On Multi-View
32 inputs. See section 2.5.9. NOTE: The ME tally will only be active on systems with the 2ME SoftPanel option installed Broadcast Pix V5 install - concepts - PixMaster - switcher - CG - clips - controls - team - appendix... -
Page 81: Keyer Windows On The Multi-View
(or orange if its key transition button is on). NOTE: The ME 1 tally will only be active on systems with the 2ME SoftPanel option installed Broadcast Pix V5 install - concepts - PixMaster - switcher - CG - clips - controls - team - appendix... -
Page 82: Program/Preview Overlays On The Multi-View
The active/selected overlays will now show a check mark, as shown on the right. To deselect any overlays on Program/Preview, repeat steps 1-2. Broadcast Pix V5 install - concepts - PixMaster - switcher - CG - clips - controls - team - appendix 2.5.4... -
Page 83: Counters
NOTE: The counters bar will turn red at 10 seconds remaining only if the Clips Controls Settings are set to not Loop, see section 6.5.5. Broadcast Pix V5 install - concepts - PixMaster - switcher - CG - clips - controls - team - appendix... - Page 84 Click on the Direct Key Click on the Trans button(s). preview. thumbnail. Will perform a Mix or Cut at the assigned keyer rate. Broadcast Pix V5 install - concepts - PixMaster - switcher - CG - clips - controls - team - appendix 2.5.6...
- Page 85 When in black and the FTB button is illuminated red and want to fade up, click on the Program monitor. See section 4.3.6 for more information. Broadcast Pix V5 install - concepts - PixMaster - switcher - CG - clips - controls - team - appendix 2.5.6...
- Page 86 Click Assign button on the PowerAux monitor, then click on the thumbnail of the source you wish to assign. The output monitor will now cut to the selected source. For more information about PowerAux, see section 4.11. Broadcast Pix V5 install - concepts - PixMaster - switcher - CG - clips - controls - team - appendix 2.5.6...
- Page 87 And, enable/disable the clicking on the Preview and/or Program windows to perform a transition. Click on the OK button to apply the changes. Broadcast Pix V5 install - concepts - PixMaster - switcher - CG - clips - controls - team - appendix 2.5.7...
- Page 88 Now all the source monitors will hide the aspect and source control indicators of 9N, DVE and Cr, as shown on the right. Broadcast Pix V5 install - concepts - PixMaster - switcher - CG - clips - controls - team - appendix 2.5.7...
-
Page 89: Floating Monitors
480x320. When resizing monitors be cautious of how large you make each monitor, as the resolution may get distorted. Broadcast Pix V5 install - concepts - PixMaster - switcher - CG - clips - controls - team - appendix... - Page 90 Windows desktop to your liking in the Display Properties of the workstation and deselect Use Colored Background. Broadcast Pix V5 install - concepts - PixMaster - switcher - CG - clips - controls - team - appendix 2.5.8...
- Page 91 NOTE: To close one floating monitor, right click on the window and select Close window to close that monitor. Broadcast Pix V5 install - concepts - PixMaster - switcher - CG - clips - controls - team - appendix 2.5.8...
- Page 92 You can also remove/delete a saved layout by selecting Remove Layout… in the above list. Broadcast Pix V5 install - concepts - PixMaster - switcher - CG - clips - controls - team - appendix 2.5.8...
-
Page 93: Labeling The Multi-View
Press the [Enter] key on the keyboard. All the labels on each copy of the selected output window will update. Broadcast Pix V5 install - concepts - PixMaster - switcher - CG - clips - controls - team - appendix 2.5.9... -
Page 94: Multi-Lingual Multi-View
Assistant program, any text and language (including Unicode text) may be used. Currently the following components are available for Multi-Lingual use: - Top level menus under the Broadcast Pix logo - All labels on the Multi-View (i.e. Key and Device Names) - Page 95 To create a custom translation: Navigate to the Start Menu, All Programs, Broadcast Pix, and select Translation Assistant, as shown on the right. Click on the New button. To modify an existing translation, click on the Load… button and select the desired translation file.
- Page 96 To use a custom translation: In BPswitcher, click on the Broadcast Pix Logo menu and select the Setup drop down menu. Click on the Language menu item, as shown on the right. The list of default language names will now include any of the created custom translations.
-
Page 97: Clocks On The Multi-View
2.5.11 Clocks on the Multi-View There are 3 types of clocks on the Broadcast Pix Multi-View: an Analog Clock, a Digital Clock and a Timer. All three options are floatable and resizable, as described in the previous section and all three can be floated at the same time. The analog clock provides a graphical analog clock with a seconds hand in both 12-hour and 24- hour formats and allows for time-shifting and color settings. - Page 98 To stop and reset the stopwatch zero, left-click on the red stop/square button in the lower left hand corner of the timer window. Broadcast Pix V5 install - concepts - PixMaster - switcher - CG - clips - controls - team - appendix 2.5.11...
- Page 99 Click on OK to save the clock and its settings. All saved clocks will now be accessed under the Window-Float-Clock menu under the Remove clock setting. Broadcast Pix V5 install - concepts - PixMaster - switcher - CG - clips - controls - team - appendix 2.5.11...
-
Page 100: Controlling Timer On The Multi-View
Timer Control, as shown on the right. Click on the OK button, then Close and then Save Show to close PixMaster. Broadcast Pix V5 install - concepts - PixMaster - switcher - CG - clips - controls - team - appendix 2.5.12... - Page 101 (zero), either stopping at zero or counting back up to show the elapsed time, in this case it will stop at zero. Broadcast Pix V5 install - concepts - PixMaster - switcher - CG - clips - controls - team - appendix...
- Page 102 For example to enter 1 min and 30 seconds push [1], [3], [0] or [9], [0] for 90 seconds. Broadcast Pix V5 install - concepts - PixMaster - switcher - CG - clips - controls - team - appendix 2.5.12...
- Page 103 [Go Up at Zero] PixButton, the display will now read Count reverses at zero, as shown on the right. Broadcast Pix V5 install - concepts - PixMaster - switcher - CG - clips - controls - team - appendix 2.5.12...
- Page 104 When the timer is set to count up the stop at zero and start counting PixButtons do not function. Broadcast Pix V5 install - concepts - PixMaster - switcher - CG - clips - controls - team - appendix 2.5.12...
-
Page 105: List Of Screen Resolutions
2048 1152 2560 1600 It is important to set your Windows desktop settings prior to starting the Broadcast Pix Switcher application. It is not advised to change the desktop resolutions while the application is running. Be advised that some large LCD/Plasma monitors do not accept high resolutions on the VGA input, but do on a HDMI input. -
Page 106: Optional Quad Monitor Card
NOTE: The maximum resolution of either monitor card depends on the resolution capabilities of the monitor you are connecting. Broadcast Pix V5 install - concepts - PixMaster - switcher - CG - clips - controls - team - appendix 2.6.2... -
Page 107: Pixmaster Show Editor
Section 3: PixMaster Show Editor The Broadcast Pix System is designed for the real-time production of live shows to a live audience, or recorded live for viewing later on DVD or other medium. In both scenarios, the PixMaster show editor delivers comprehensive pre-production capabilities, enabling you to stage all of your assets for a smooth production experience. -
Page 108: Creating A New Show
This will open the PixMaster: Start Window as shown below. The main Broadcast Pix Switcher application needs to be closed in order to launch PixMaster. Click on Create new show. This opens the Create a new show window, as shown below. - Page 109 NOTE: when giving a new show a name, standard Microsoft Windows conventions apply. For example, you cannot use a colon (:) in a name. Broadcast Pix V5 install - concepts - PixMaster - switcher - CG - clips - controls - team - appendix...
-
Page 110: Selecting An Existing Show To Edit
NOTE: If you do not have a show open, you can not access the PixMaster Show Editor from the Multi- View, as it will be grayed out. Broadcast Pix V5 install - concepts - PixMaster - switcher - CG - clips - controls - team - appendix... -
Page 111: Editing A Show
PixButton to edit content. NOTE: It is recommended to restart the Broadcast Pix Switcher application when adding, removing or arranging a lot of content to prevent stability issues, if you are using the PixMaster Show Editor function. Broadcast Pix V5... -
Page 112: Editing A Show's Content
NOTE: the location of the clip library for the show is indicated at the bottom – in this case D:\clips\ Broadcast Pix V5 install - concepts - PixMaster - switcher - CG - clips - controls - team - appendix... -
Page 113: Editing A Show's Content From The Multi-View
NOTE: For external device control, like camera control, the Edit button will be named Settings. Clicking on the Settings button will bring up the Device Settings menu for the specified device. Broadcast Pix V5 install - concepts - PixMaster - switcher - CG - clips - controls - team - appendix... -
Page 114: Reordering, Adding Or Removing Content
NOTE: If you’re doing a lot of editing, you do not have to press OK until you are done with everything. Broadcast Pix V5 install - concepts - PixMaster - switcher - CG - clips - controls - team - appendix... -
Page 115: To Reorder A Group Of Content
In this case, four adjacent clips were moved down to the bottom of the list. Broadcast Pix V5 install - concepts - PixMaster - switcher - CG - clips - controls - team - appendix 3.5.2... -
Page 116: Adding Content From The Central Library
NOTE: the Refresh List button is used if you edit a library using Microsoft Windows, then changes made can be seen by clicking on refresh list (or reopening PixMaster). Broadcast Pix V5 install - concepts - PixMaster - switcher - CG - clips - controls - team - appendix... - Page 117 NOTE: The newly added content is now grayed out on the library list to indicate that it is now in the show. Broadcast Pix V5 install - concepts - PixMaster - switcher - CG - clips - controls - team - appendix...
-
Page 118: Adding A Group Of Content From The Central Library
This is a standard Windows convention, and works in all other areas of the system. Broadcast Pix V5 install - concepts - PixMaster - switcher - CG - clips - controls - team - appendix... -
Page 119: Manually Importing Content
“Importing files”. Wait unit this message disappears before continuing. Broadcast Pix V5 install - concepts - PixMaster - switcher - CG - clips - controls - team - appendix 3.5.5... -
Page 120: Importing Content Into A Subfolder
In this example we created a subfolder called “Sample.” Consequently the word “Sample” was added in the folder column when the clip was imported. Broadcast Pix V5 install - concepts - PixMaster - switcher - CG - clips - controls - team - appendix 3.5.6... -
Page 121: Fluent Watch Folders
To not use a subfolder, and to have content added to the central library, leave the pull down menu blank, as shown on the right. Broadcast Pix V5 install - concepts - PixMaster - switcher - CG - clips - controls - team - appendix 3.5.7... - Page 122 Broadcast Pix system effortlessly. Please note that a maximum of 10 network clients may be connected to the Broadcast Pix Server at any given time.
- Page 123 Once all the watch folders have been enabled in PixMaster, the C and D hard drives will show the enabled Broadcast Pix shows in a series of folders. Inside of each show folder will be the active folders, as shown below in the 6pm News show example:...
-
Page 124: Cloud-Based Watch Folders
Broadcast Pix watch folder, ready to be accessed by any show. A Dropbox, Google Drive or Microsoft OneDrive account and access to an Internet connection is necessary to use this feature, contact their support for more information. - Page 125 NOTE: For the Dropbox, Skydrive of Google Drive folder to appear, you must have at least one of these services installed on the Broadcast Pix Server and registered with an account to one of those service providers. It may also be convenient to create a subfolder on your storage account (i.e.
- Page 126 NOTE: Depending on the connection speed of the Internet on both the transmit and receive ends of the file may take extra time to arrive in the Broadcast Pix Show. Broadcast Pix V5 install - concepts - PixMaster - switcher - CG - clips - controls - team - appendix...
-
Page 127: Resizing And Softening Images
NOTE: When the Resize and Soften function is selected, the file(s) will automatically be copied to the folder, there is no need to select Copy or Move. Broadcast Pix V5 install - concepts - PixMaster - switcher - CG - clips - controls - team - appendix... -
Page 128: Previewing Content
To close the still being previewed, click on the red X in its upper right corner. NOTE: If no Preview is shown, then a thumbnail needs to created for that clip, see section 6.1.1 Broadcast Pix V5 install - concepts - PixMaster - switcher - CG - clips - controls - team - appendix... - Page 129 NOTE: If no Preview is shown, then a thumbnail needs to created for that clip, see section 6.1.1 Broadcast Pix V5 install - concepts - PixMaster - switcher - CG - clips - controls - team - appendix...
-
Page 130: Renaming Content
NOTE: It is important to leave the file extension at the end of the file name for PixMaster to recognize the file. Broadcast Pix V5 install - concepts - PixMaster - switcher - CG - clips - controls - team - appendix... -
Page 131: Removing Content From A Show
If you want to delete content from the hard drive, see section 3.5.12. Broadcast Pix V5 install - concepts - PixMaster - switcher - CG - clips - controls - team - appendix 3.5.12... -
Page 132: Permanently Deleting Content From The Library
This act is not undoable. Click Yes. It’s gone. Broadcast Pix V5 install - concepts - PixMaster - switcher - CG - clips - controls - team - appendix 3.5.13... -
Page 133: Searching For Content In The Library
Size, Date, Height, Width, Frame Rate, Length, and Compression (or codec). Broadcast Pix V5 install - concepts - PixMaster - switcher - CG - clips - controls - team - appendix 3.5.14... -
Page 134: Modifying Attributes
Click on the OK button. Now when when content is added to a show those attributes will automatically be selected. Broadcast Pix V5 install - concepts - PixMaster - switcher - CG - clips - controls - team - appendix 3.5.15... -
Page 135: Show Content Summary
Content Summary If you have a printer installed on your system, you can print the list by clicking on Print. Broadcast Pix V5 install - concepts - PixMaster - switcher - CG - clips - controls - team - appendix... - Page 136 Device Control, i.e. Camera Control. Memories for adding, removing, sorting and naming SnapShot Memories or Macros for the MEM device. Broadcast Pix V5 install - concepts - PixMaster - switcher - CG - clips - controls - team - appendix...
-
Page 137: Switcher Source Assignments
Click on OK when complete. NOTE: These settings do not take effect until you Save the show in PixMaster, as shown in section 3.3. Broadcast Pix V5 install - concepts - PixMaster - switcher - CG - clips - controls - team - appendix... -
Page 138: Auto Fail-Safe Setting
3.7.2 Auto Fail-Safe Setting All Broadcast Pix Granite Switchers have extensive fail-safe capabilities that enable you to continue a broadcast uninterrupted even if the Server goes offline, see section 4.13. If the Server or its network is ever lost, unplugged or locks up in the middle of a show, the system’s fail safe mechanism takes over and brings to program and preview... -
Page 139: Adding Wildcard Devices
3.7.3 Adding Wildcard Devices The Broadcast Pix system has 8 standard content devices: Clips (ch 1), Clips (ch 2), Anim (ch 1), Anim (ch 2), Stills (ch 1), Stills (ch 2), CG (ch 1) and CG (ch 2), which have their own dedicated button in Device Control-A. There are an additional 4 wildcard device buttons in the top right corner of the panel which can be assigned to external camera control and server control. -
Page 140: Show Memories
3.7.4 Show Memories The Integrated Memories on the Broadcast Pix enables panel setups to be saved that contain all the classic switcher settings, like key settings, DVEs, sources, etc. as well as the exact content in clip and graphic stores, complete with attributes, like mark points, auto-start, crawl speed, etc. - Page 141 PixButton in the upper right corner. Broadcast Pix V5 install - concepts - PixMaster - switcher - CG - clips - controls - team - appendix 3.7.4...
-
Page 142: Global Naming Of Memories
Press OK. The Memory will now appear with it’s name in Memory list for the show. Broadcast Pix V5 install - concepts - PixMaster - switcher - CG - clips - controls - team - appendix 3.7.5... -
Page 143: Custom Images On Memory Pixbuttons
C Drive. NOTE: Some examples of custom memory PixButtons are shown in the sample show, see section 1.6.1 Broadcast Pix V5 install - concepts - PixMaster - switcher - CG - clips - controls - team - appendix... -
Page 144: Memory Row Assignments
The Assign memory to button window will appear, as shown below, showing a list of created SnapShot and Macro Memories. Click on the desired memory to select it. Broadcast Pix V5 install - concepts - PixMaster - switcher - CG - clips - controls - team - appendix 3.7.7... - Page 145 In the Assign memory button window, click on Unassign memory. Click on OK in the Memory row organizer to apply the changes. Broadcast Pix V5 install - concepts - PixMaster - switcher - CG - clips - controls - team - appendix...
-
Page 146: Tally Remapping
Broadcast Pix Switcher, the tally outputs may need to be reassigned to accommodated other equipment upstream/downstream of the Broadcast Pix system. For example, a large ‘house’ router may feed not only the Broadcast Pix system but as well as other studio equipment, where source locations can easily be varied. The remapping of tally outputs allows for each source to be appropriately paired with its tally signal from Broadcast Pix. -
Page 147: Show Linking
To have no layout load at show load, uncheck the Load layout with show option. Broadcast Pix V5 install - concepts - PixMaster - switcher - CG - clips - controls - team - appendix... - Page 148 On the next show load the selected memory/macro will run. To have no memory load at show load, uncheck the Load memory with show option. Broadcast Pix V5 install - concepts - PixMaster - switcher - CG - clips - controls - team - appendix...
-
Page 149: Restoring A Show
Section 3. In BPswitcher, click on Broadcast Pix menu icon, select the File menu and select Restore Show…, as shown on the right. -
Page 150: Restoring System Settings
Support or when these settings are clearly unusable. Since these are system-wide settings every show will be impacted. In BPswitcher, click on Broadcast Pix menu icon, select the Setup menu and select Restore System Settings…, as shown on the right. -
Page 151: Exporting A Show
As shows are crafted and multiple shows are created, it may become necessary to backup shows for protection, to free up hard drive space or export shows to another Broadcast Pix system. The Show Export Utility allows for shows, their settings and any associated content to be exported to one zip file for easy backup and transfer. -
Page 152: Importing A Show
Ensure that no show is running, click on Broadcast Pix menu icon, select the File menu and select Close Show Click on Broadcast Pix menu icon, select the File menu, and select Import Show…, as shown on the right An open window will appear to select the source of the exported files. -
Page 153: Exporting System Files
Since show files constantly can change, having a fresh versions and multiple versions to restore or import from is more useful for shows. In BPswitcher, click on Broadcast Pix menu icon, select the File menu and select Export System Files…, as shown on the right. -
Page 154: Importing System Files
Once a system files export has occurred, as described in section 3.11.1, they can be imported onto the same Broadcast Pix unit or to another unit. Click on Broadcast Pix menu icon, select the File menu, and select Import System Files…, as shown on the right An open window will appear to select the source of the exported files. - Page 155 Operation works the same way from either a physical control panel or a SoftPanel. 4.0 Switcher Controls When you launch Broadcast Pix Switcher and a show is loaded, see section 1.7, the switcher controls fill in on the panel as shown below. Source...
- Page 156 4.0.1 Tally Broadcast Pix uses tally to identify at a glance what has been selected. Tally is displayed simultaneously on the panel, Multi-View and Granite Switcher tally output. If the optional tally box is installed, the program tally is also sent out.
- Page 157 Sources Row Source Controls/Macros Row Program Row Preview Row Broadcast Pix V5 install - concepts - PixMaster - switcher - CG - clips - controls - team - appendix...
- Page 158 This row can also be used for other switcher functions like source controls and triggering memories and Macros, see section 4.6. Broadcast Pix V5 install - concepts - PixMaster - switcher - CG - clips - controls - team - appendix...
- Page 159 For shows that consist of more than 16 inputs, the [Shift] button is used to access sources 17-32. This enables the Broadcast Pix panel to control twice as many sources as there are buttons. These “shifted sources” are typically used for sources that are used less frequently than the first 16 sources, such as a rarely used extra tape deck, video feed and black.
- Page 160 To turn off Lock Shift: Repeat step 1-3 above or double-punch the [Shift] button. Broadcast Pix V5 install - concepts - PixMaster - switcher - CG - clips - controls - team - appendix 4.1.2...
- Page 161 To Set Auto Transition Style Select Mix or Effect To Execute a Transition Use Cut, Auto or Fader Arm Broadcast Pix V5 install - concepts - PixMaster - switcher - CG - clips - controls - team - appendix...
- Page 162 Under the Options section, place a check mark next to Use transition preview, as shown on the right. Every Granite 2000 system comes with Transition Preview enabled (checked). Click on the OK button to save and exit the System Settings window.
- Page 163 The illuminated buttons will also “flip-flop” in the program and preview rows, as shown: Broadcast Pix V5 install - concepts - PixMaster - switcher - CG - clips - controls - team - appendix 4.2.2...
- Page 164 4.3.3. To execute a manual mix, move the Fader Arm up or down. Broadcast Pix V5 install - concepts - PixMaster - switcher - CG - clips - controls - team - appendix 4.2.3...
- Page 165 4.3.3. To execute a manual effect, move the Fader Arm up or down. Broadcast Pix V5 install - concepts - PixMaster - switcher - CG - clips - controls - team - appendix...
- Page 166 PixButton, and it will illuminate red and the previously selected effect will turn to green. This will also change the selected effect shown in the display and on the [Effects] PixButton. Broadcast Pix V5 install - concepts - PixMaster - switcher - CG - clips - controls - team - appendix...
- Page 167 [Back] PixButton To return the the home or first page of the Effect PixPad, press the [Effects] PixButton. Broadcast Pix V5 install - concepts - PixMaster - switcher - CG - clips - controls - team - appendix...
- Page 168 4.3.1 Effects Styles and PixButtons The Broadcast Pix Switcher has over 150 effects. Each effect has a unique number, name and PixButton icon image. The PixButton icons are show the effect style at a glance. The conventions used for these PixButtons are: Black shows the foreground, while the background video is blank.
- Page 169 Broadcast Pix V5 install - concepts - PixMaster - switcher - CG - clips - controls - team - appendix...
- Page 170 Effects: Fx 122 Dual Clock Top Rate Trate: 30 Effects PixButton Broadcast Pix V5 install - concepts - PixMaster - switcher - CG - clips - controls - team - appendix 4.3.2...
- Page 171 TRate: 30. This rate will be now be used for all transitions until changed. Broadcast Pix V5 install - concepts - PixMaster - switcher - CG - clips - controls - team - appendix...
- Page 172 Press the [Enter] PixButton and the rate will appear in the display, and the PixPad will revert to PixPad containing the selected effect. Broadcast Pix V5 install - concepts - PixMaster - switcher - CG - clips - controls - team - appendix...
- Page 173 To remove reverse and return to the normal state, press the [Reverse] PixButton again, and the (R) in the display will be removed. Broadcast Pix V5 install - concepts - PixMaster - switcher - CG - clips - controls - team - appendix...
- Page 174 To change the Aspect ratio of a gradient wipe, turn the [2 Knob]. Effects: Fx 103 Circle SFT:50 ASP:1.0 Trate:30 Broadcast Pix V5 install - concepts - PixMaster - switcher - CG - clips - controls - team - appendix 4.3.5...
- Page 175 Multi-View source monitors will remain tallied showing what sources are under black for reference. Broadcast Pix V5 install - concepts - PixMaster - switcher - CG - clips - controls - team - appendix 4.3.6...
- Page 176 [Numbers] PixButtons. As you enter each number it will appear in the display. Press the [Enter] PixButton. Broadcast Pix V5 install - concepts - PixMaster - switcher - CG - clips - controls - team - appendix 4.3.6...
- Page 177 4.4 Keys The Broadcast Pix Granite system combines multiple layers that can include a background video image and up to six overlays, each of which is known as a key. 6 keyers are standard. All 6 keys can hold a graphic, such as a CG, Still or Animation, or a DVE box (Picture-in-Picture) which can hold a camera, still, clip or any other source.
- Page 178 4.4.1 Key Controls The Broadcast Pix panel provides three groups of buttons for controlling the 6 keys: Key Select Buttons, Direct Key Buttons and Key Transition Buttons. The Source Row and Display Row are also used with the Key Select Buttons.
- Page 179 Only one button in the source row may be illuminated at a time. The new source, and its current contents, will also appear in the appropriate [Direct Key] PixButton. Broadcast Pix V5 install - concepts - PixMaster - switcher - CG - clips - controls - team - appendix...
- Page 180 Transition Controls, by clicking in the keyer window on the Multi-View or by using the Direct Key buttons. Broadcast Pix V5 install - concepts - PixMaster - switcher - CG - clips - controls - team - appendix...
- Page 181 Key 1 is already on, and you wish to bring it off with a background transition, while bringing on Key 2, the illumination of the [Key Transition] buttons would be: Broadcast Pix V5 install - concepts - PixMaster - switcher - CG - clips - controls - team - appendix...
- Page 182 Now, any transition layer that is selected will automatically turn off any previously select layers. To disable Pro transition mode, repeat the steps above. Broadcast Pix V5 install - concepts - PixMaster - switcher - CG - clips - controls - team - appendix 4.4.5...
- Page 183 View will read out Cr next to the key rate, signifying cropping has been applied. You can reset the cropping to none/000 by pressing the [Crop Reset] button in the Keyer Modifier PixPad. Broadcast Pix V5 install - concepts - PixMaster - switcher - CG - clips - controls - team - appendix 4.4.6...
- Page 184 [Posit Reset] button in the Keyer Modifier PixPad. Or when no DVE is applied, twist the Joystick to reset the position to 0,0. Broadcast Pix V5 install - concepts - PixMaster - switcher - CG - clips - controls - team - appendix 4.4.6...
- Page 185 [numeric keypad], as done for a transition rate, and press [Enter] to apply the rate. The display will change to the newly selected rate. Broadcast Pix V5 install - concepts - PixMaster - switcher - CG - clips - controls - team - appendix 4.4.7...
- Page 186 To move the same keyer up more layers, continue to select the Key Transition button. To move a different keyer up one layer, repeat step 2. Broadcast Pix V5 install - concepts - PixMaster - switcher - CG - clips - controls - team - appendix 4.4.8...
- Page 187 To move the same keyer down more layers, continue to select the Key Transition button. To move a different keyer down one layer, repeat step 2. Broadcast Pix V5 install - concepts - PixMaster - switcher - CG - clips - controls - team - appendix 4.4.8...
- Page 188 (DVE) to appear in the display to let you know the DVE is applied, as shown below: Key1 (Ra1, DVE) Rate Broadcast Pix V5 install - concepts - PixMaster - switcher - CG - clips - controls - team - appendix...
- Page 189 [DVE OnOff] PixButton. To return to the main page of the PixPad either select the [Up] PixButton or select the [Key Select] button in the Destinations Row. Broadcast Pix V5 install - concepts - PixMaster - switcher - CG - clips - controls - team - appendix 4.5.1...
- Page 190 Knob] to individually control width and height respectively. The numbers refer to HD pixels (full screen 16:9, 1920x1080). Key1 (Ra1, DVE) Size W:270 H:360 Broadcast Pix V5 install - concepts - PixMaster - switcher - CG - clips - controls - team - appendix 4.5.2...
- Page 191 NOTE: In the above illustration, the two DVE boxes are placed on an animated background that is playing out from the system’s clip store with a crawl placed on the bottom. Broadcast Pix V5 install - concepts - PixMaster - switcher - CG - clips - controls - team - appendix...
- Page 192 4.6 Source Controls All Broadcast Pix sources, both external live and internal graphics and clips, have various parameters which can be modified known as Source Controls. For external live sources you can set the aspect treatment as well size, crop and position sources prior to using a keyer.
- Page 193 Program monitors will also show the applied treatment. NOTE: The Animation store does not have any Aspect Controls, since all content must be 1920x1080 – 16:9 Broadcast Pix V5 install - concepts - PixMaster - switcher - CG - clips - controls - team - appendix...
- Page 194 DVE once the [Src DVE] PixButton has been selected. To reset the DVE parameters, select the [Reset DVE] PixButton. Broadcast Pix V5 install - concepts - PixMaster - switcher - CG - clips - controls - team - appendix...
- Page 195 The source monitor will have a Cr label applied to its source control indicators, as shown on the right. To reset the cropping, select the [Reset Crop] PixButton. Broadcast Pix V5 install - concepts - PixMaster - switcher - CG - clips - controls - team - appendix...
- Page 196 4.7 ClearKey™ ClearKey is Broadcast Pix’s precise, highly adjustable chromakeyer. Chromakey is a method of removing a solid background color and replacing it with a different image. The most common application for chromakey (also called green/blue screen) is in news/weather...
- Page 197 Please see the next section for adjusting the ClearKey settings. Broadcast Pix V5 install - concepts - PixMaster - switcher - CG - clips - controls - team - appendix 4.7.1...
- Page 198 Grey areas will be slightly transparent, allowing you to see through the image, i.e. for smoke, glass or shadows. Broadcast Pix V5 install - concepts - PixMaster - switcher - CG - clips - controls - team - appendix...
- Page 199 To change the background, simply change the source assigned to the Preview bus. Broadcast Pix V5 install - concepts - PixMaster - switcher - CG - clips - controls - team - appendix 4.7.3...
- Page 200 Turn the knob to the right to remove from either side, to the left to reveal more. To reset the cropping press the [Crop Reset] PIxButton. Broadcast Pix V5 install - concepts - PixMaster - switcher - CG - clips - controls - team - appendix 4.7.3...
- Page 201 One Luma key comes standard with the Broadcast Pix switcher, and as an option multiple sources may have a Luma key assigned to it.
- Page 202 Inverting the key reverses the values used in the luminance key. Inverting the key can assist in fine-tuning the key. Broadcast Pix V5 install - concepts - PixMaster - switcher - CG - clips - controls - team - appendix 4.8.1...
- Page 203 Fluent Controls window. Activating ClearKey on the Multi-View Open the Fluent Controls window by selecting the Panel, Fluent Controls menu from the Broadcast Pix menu button, as shown on the right. The Fluent Controls window will appear. Select the ClearKey tab, as shown on the right.
- Page 204 To revert to normal video, reselect the Invert button and it will turn black. Broadcast Pix V5 install - concepts - PixMaster - switcher - CG - clips - controls - team - appendix...
- Page 205 To reset the the Source DVE and/or Source Crop select the Reset DVE and/or Reset Crop buttons. Broadcast Pix V5 install - concepts - PixMaster - switcher - CG - clips - controls - team - appendix...
- Page 206 Virtual Studios is a global attribute which applies to all shows, but can be turned on or off. All assignments and moves are saved in the show for unlimited presets. To enable Virtual Studios: Click on the Broadcast Pix menu button. Select the Setup, System Settings…...
- Page 207 Anim 1, Anim 2 or Black can be routed to Keys 3 & 2 and no DVE is available. Keyer 1 is a full function keyer with DVE. Broadcast Pix V5 install - concepts - PixMaster - switcher - CG - clips - controls - team - appendix...
- Page 208 To activate angles: Open the Fluent Controls window by selecting the Panel, Fluent Controls menu from the Broadcast Pix menu button, as shown on the right. Along the left edge of the Fluent Control window, select the Virtual Studios button, it will illuminate blue as shown of the right.
- Page 209 Virtual Sets directory must be refreshed. Click on the Images: menu bar and click on the Re-scan Virtual Sets option. Broadcast Pix V5 install - concepts - PixMaster - switcher - CG - clips - controls - team - appendix 4.9.1...
- Page 210 VS icon will open Fluent Controls and navigate to the selected angle to the Move Editor tab. Broadcast Pix V5 install - concepts - PixMaster - switcher - CG - clips - controls - team - appendix 4.9.1...
- Page 211 As the example on the right shows, you can easily move your talent to make the background monitor visible. Broadcast Pix V5 install - concepts - PixMaster - switcher - CG - clips - controls - team - appendix 4.9.1...
- Page 212 NOTE: There is no undo, when a move is saved it will overwrite the previously saved move. Broadcast Pix V5 install - concepts - PixMaster - switcher - CG - clips - controls - team - appendix 4.9.1...
- Page 213 [VS Moves] PixButton, as shown on the right. The PixPad will update showing the Virtual Studio controls. Broadcast Pix V5 install - concepts - PixMaster - switcher - CG - clips - controls - team - appendix 4.9.1...
- Page 214 Move A, Move, B, Move C and Move D, select the desired Move and the Move will be updated. Broadcast Pix V5 install - concepts - PixMaster - switcher - CG - clips - controls - team - appendix 4.9.1...
- Page 215 4.9.2 AutoFlags As described in previous sections all Broadcast Pix systems can mix and match 4:3 sources with 16:9 sources each with their own unique and custom aspect ratios, without any additional delay. Traditionally a 4:3 source in a 16:9 production will show black pillar boxes on the left and right of the screen.
- Page 216 Original Image section and the final cropped and processed output will appear in the Output section. Broadcast Pix V5 install - concepts - PixMaster - switcher - CG - clips - controls - team - appendix 4.9.3...
- Page 217 Ratio checkbox. To restore the image back to the original with no effect, click on the Reset All button. Broadcast Pix V5 install - concepts - PixMaster - switcher - CG - clips - controls - team - appendix 4.9.3...
- Page 218 After applying the desired effects, the image may be temporally sent to the selected Angle so it may be previewed in the Broadcast Pix Switcher, without the need of saving and importing the file. Select the desired Angle, then click and hold down on the Live Preview (Hold down) button, as shown on the right.
- Page 219 The Broadcast Pix Granite systems supports 1 external keyer, useful when connecting an external graphics system to use in conjunction with the Broadcast Pix. It supports clip and gain adjustments, unshaped signals and key inversion and may be used on any key layer.
- Page 220 Knob]. To invert the key to adjust the clip/gain settings, select the [X Key Invert] PixButton. The display will read out Inv. To turn off the invert, reselect the [X Key Invert] PixButton. Broadcast Pix V5 install - concepts - PixMaster - switcher - CG - clips - controls - team - appendix 4.10.2...
- Page 221 1 & 2) to convert and allow internal sources, see section 4.11.4. 4.11.1 Aux Output on a Granite 2000 Granite 2000 switchers have up to 6 Aux outputs, only the SDI outputs may be used as Aux outputs, and Auxes 1-6 may be controlled from the Control Panel.
- Page 222 4.11.2 Aux Output on Granite 2000+, 2000X On + and X models up to 12 Auxiliary outputs are available, however only 10 are controllable from the 2000 control panel, as described in section 4.11.1. As described in section 1.8, you may assign Default Aux Sources to the Granite Output Assignments.
- Page 223 NOTE: The ME1 Prog and ME1 Prev buttons are not selectable, since they dedicated for Granite 2ME switchers or when the 2ME SoftPanel is enabled. Broadcast Pix V5 install - concepts - PixMaster - switcher - CG - clips - controls - team - appendix...
- Page 224 For the most part, traditional switchers offer only one layer to be sent to an Auxiliary Output. All Broadcast Pix Granite switchers have the ability to overlay any/all of Keys 1-6 onto one Aux output, this is known as PowerAux. This feature is ideal for producing simultaneous program from the same system for two or three different audiences, without the cost and complexity of a 2ME switcher.
- Page 225 Close the Broadcast Pix Switcher application by selecting File, Quit. Restart the application by double-clicking the Broadcast Pix Switcher icon on the desktop. Broadcast Pix V5 install - concepts - PixMaster - switcher - CG - clips - controls - team - appendix...
- Page 226 Preview or Program, you can not remove the keyer from only the PowerAux. You can, however, keep the keyer on PowerAux, if you remove it from Preview or Program. Broadcast Pix V5 install - concepts - PixMaster - switcher - CG - clips - controls - team - appendix...
- Page 227 Wire the Remote Panel(s) as described below: Connect the Remote Panel(s) to a Network Switch using the To Switcher connector. (Note the Network Switch is not provided by Broadcast Pix) Connect the Granite Switcher to the same Network Switch using the Service connector.
- Page 228 While the panel connects, the Status LED will blink blue, once connected with a valid IP address the LED will turn to solid blue. Broadcast Pix V5 install - concepts - PixMaster - switcher - CG - clips - controls - team - appendix...
- Page 229 Press the [Macro] button to decrease the contrast. Press the [Output] PixButton labeled Set Black to apply the changes and to return to the setup menu. Broadcast Pix V5 install - concepts - PixMaster - switcher - CG - clips - controls - team - appendix 4.11.7...
- Page 230 To Setup the Remote Panels: Launch BPswitcher and load a show, as described in section 1.6. Click on the Broadcast Pix Menu and select File, Edit Show…, as shown on the right. In the PixMaster window, select the Remote Panels button, as shown on the right.
- Page 231 To access buttons C and D click on the Shift button and repeat this step. Broadcast Pix V5 install - concepts - PixMaster - switcher - CG - clips - controls - team - appendix 4.11.8...
- Page 232 Assign memory window click on the Unassign Memory button. The PixButton will now be blank. Broadcast Pix V5 install - concepts - PixMaster - switcher - CG - clips - controls - team - appendix 4.11.8...
- Page 233 Save Show button. 4.11.9 Remote Panel Operation As each Remote Panel connects to a running Broadcast Pix show, the last selected mode for each panel is recalled. Any panel may have access to all 22 modes. To Set a Mode on the Remote Panel: On the Remote Panel, select and hold down the [Shift] button, it will illuminate yellow.
- Page 234 To unlock the panel, select the [Lock] button, and it will turn off. The Remote Panel is now back in it’s normal operational mode. Broadcast Pix V5 install - concepts - PixMaster - switcher - CG - clips - controls - team - appendix 4.11.9...
- Page 235 NOTE: Only one Macro at a time may be played out. Selecting a Macro while one is playing will stop the Macro. Broadcast Pix V5 install - concepts - PixMaster - switcher - CG - clips - controls - team - appendix...
- Page 236 4.12 SnapShot Memories The Broadcast Pix system has a powerful memory system that can combine all devices in the system. It enables the saving and instant recall of a panel’s set-ups, or the set-ups plus the sources assigned, or even the individual content element in a device, such as a specific lower third graphic in the CG.
- Page 237 If you press it a third time no key 1 information will be saved, and the display will reflect that. Broadcast Pix V5 install - concepts - PixMaster - switcher - CG - clips - controls - team - appendix...
- Page 238 PixPad that lets you select the each option. When finished press the [Up Arrow] to return to the main element selection PixPad. (see next page) Broadcast Pix V5 install - concepts - PixMaster - switcher - CG - clips - controls - team - appendix 4.12.1...
- Page 239 PixPad that lets you select the each option. When finished press the [Up Arrow] to return to this PixPad. (see next page) Broadcast Pix V5 install - concepts - PixMaster - switcher - CG - clips - controls - team - appendix 4.12.1...
- Page 240 On + models, click on the [Mem Sav Mor] PixButton to save Auxes 7 - 12. (see next page) [MEM Save Aux] PixPad Broadcast Pix V5 install - concepts - PixMaster - switcher - CG - clips - controls - team - appendix 4.12.1...
- Page 241 [UP] PixButton until visible. Once select the display will read out that your memory is saved, similar to as shown below. Broadcast Pix V5 install - concepts - PixMaster - switcher - CG - clips - controls - team - appendix 4.12.1...
- Page 242 At times the display may read “Mem X failed to fully load”. In BPswitcher go to Logging, Error Log to view what element failed to load. Broadcast Pix V5 install - concepts - PixMaster - switcher - CG - clips - controls - team - appendix...
- Page 243 Contains the available tools to record and playback a macro. Details Panel Displays the available editing options for a specific command selected in the Action List. Broadcast Pix V5 install - concepts - PixMaster - switcher - CG - clips - controls - team - appendix 4.13...
- Page 244 To open the Macros window: In BPswitcher select the Panel drop down menu. Select Macros, as shown on the right. Broadcast Pix V5 install - concepts - PixMaster - switcher - CG - clips - controls - team - appendix 4.13.1...
- Page 245 When the macro is finished being recorded, select the Stop Record button in the Macros Control Bar. Broadcast Pix V5 install - concepts - PixMaster - switcher - CG - clips - controls - team - appendix 4.13.2...
- Page 246 4.12.1. NOTE: All Macros must live in the C:\BroadcastPix\memories folder to be accessed by the system. Broadcast Pix V5 install - concepts - PixMaster - switcher - CG - clips - controls - team - appendix 4.13.2...
- Page 247 All the editing is done in the Macro Editor with the keyboard and mouse. Broadcast Pix V5 install - concepts - PixMaster - switcher - CG - clips - controls - team - appendix...
- Page 248 SnapShot memory. Broadcast Pix V5 install - concepts - PixMaster - switcher - CG - clips - controls - team - appendix 4.13.3...
- Page 249 List will show a red highlight, as shown on the right, to signify that the source/content is not available in your show or system. Broadcast Pix V5 install - concepts - PixMaster - switcher - CG - clips - controls - team - appendix 4.13.3...
- Page 250 Save As… button in the Menu Bar. This will bring up a Save As window, name the file as described in section 4.13.2, step 7. Broadcast Pix V5 install - concepts - PixMaster - switcher - CG - clips - controls - team - appendix 4.13.3...
- Page 251 To insert a macro seeing all the actions, use the Append… function in the Toolbar. Broadcast Pix V5 install - concepts - PixMaster - switcher - CG - clips - controls - team - appendix 4.13.4...
- Page 252 Load Layout: Allows a Macro to load a layout. Note this is intended for advanced users. Load Default Layout: Allows a Macro to load the default system layout. Broadcast Pix V5 install - concepts - PixMaster - switcher - CG - clips - controls - team - appendix 4.13.4...
- Page 253 The DVEs / Keys command group allows keyer control including DVE state, key assignment and keyer rate, as shown on the right. Broadcast Pix V5 install - concepts - PixMaster - switcher - CG - clips - controls - team - appendix 4.13.4...
- Page 254 The Audio Mixer command group allows control of the internal Audio Mixer in Flint, as shown on the right. Broadcast Pix V5 install - concepts - PixMaster - switcher - CG - clips - controls - team - appendix 4.13.4...
- Page 255 Select By Alias Name: Select a piece of content in the Content Panel of Rapid CG by the provided alias name. Broadcast Pix V5 install - concepts - PixMaster - switcher - CG - clips - controls - team - appendix...
- Page 256 Click on - Minus button, to the right to the Action List. This will permanently delete the row, there is no undo. Broadcast Pix V5 install - concepts - PixMaster - switcher - CG - clips - controls - team - appendix 4.13.4...
- Page 257 In addition, a progress bar will appear behind the counter representing the progress to the end of the macro. Broadcast Pix V5 install - concepts - PixMaster - switcher - CG - clips - controls - team - appendix 4.13.5...
- Page 258 The Macros window will open. With the mouse, select the Macro Player button, it will illuminate blue, as shown on the right. Broadcast Pix V5 install - concepts - PixMaster - switcher - CG - clips - controls - team - appendix 4.13.6...
- Page 259 To un-assign the macro button, click on Remove Button. Once finished assigning the button, click on the OK button. Broadcast Pix V5 install - concepts - PixMaster - switcher - CG - clips - controls - team - appendix 4.13.6...
- Page 260 Large as shown on the right. Now the entire bank of buttons will change to the selected button size. Broadcast Pix V5 install - concepts - PixMaster - switcher - CG - clips - controls - team - appendix 4.13.6...
- Page 261 To assign a custom image, use the Assign Buttons window, as described in the previous section. Broadcast Pix V5 install - concepts - PixMaster - switcher - CG - clips - controls - team - appendix 4.13.6...
- Page 262 Click on the OK button to close and save the GPIO settings. Assign a macro to a button, as described in the previous section. Broadcast Pix V5 install - concepts - PixMaster - switcher - CG - clips - controls - team - appendix 4.13.6...
- Page 263 Auto button and it will illuminate blue. The control panel has a similar function for triggering SnapShots and Macros from the panel. Broadcast Pix V5 install - concepts - PixMaster - switcher - CG - clips - controls - team - appendix 4.13.7...
- Page 264 NOTE: Only one Macro at a time may be played out. Selecting a Macro while one is playing will stop the Macro. Broadcast Pix V5 install - concepts - PixMaster - switcher - CG - clips - controls - team - appendix...
- Page 265 The Macro Row display will update showing the select memory with name and timing information, as is done in the MEM device control. Broadcast Pix V5 install - concepts - PixMaster - switcher - CG - clips - controls - team - appendix 4.13.8...
- Page 266 The control panel source PixButtons and display will look similar to the example below: Broadcast Pix V5 install - concepts - PixMaster - switcher - CG - clips - controls - team - appendix...
- Page 267 This ensures that the correct file/effect will play out every time. Below is a sample alpha wipe macro. Broadcast Pix V5 install - concepts - PixMaster - switcher - CG - clips - controls - team - appendix 4.13.9...
- Page 268 To set the Fail-Safe Device, see section 3.7.2 Fail-Safe switching When the Granite Switcher is in fail-safe, the front Broadcast Pix logo will be glowing slowly, this signifies that the system is in fail-safe. When the system is in fail-safe no format, aspect or timing conversion is done.
- Page 269 4.14.1 Fail-Safe Operation on Granite 2000 If during production the Server should lock-up or the network connection should fail: The control panel will automatically detect the problem and the Fail-Safe device will appear on the program and preview SDI outputs. At the same time the control panel will drop into Fail-Safe mode, and it’s PixButtons will appear in...
- Page 270 Failsafe operation Program= 1, Preview= 2, Aux 1= 2 Shift 1 2 3 4 5 6 7 8 9 Broadcast Pix V5 install - concepts - PixMaster - switcher - CG - clips - controls - team - appendix 4.14.1...
- Page 271 4.14.2 Fail-Safe Operation on Granite 2000+ If during production the Server should lock-up or the network connection should fail: The control panel will automatically detect the problem and the Fail-Safe device will appear on the program and preview SDI outputs. At the same time the control panel will drop into Fail-Safe mode, and it’s PixButtons will appear in...
- Page 272 Program= 3, Preview= 2, Aux 1= 2 Shift 1 2 3 4 5 6 7 8 9 11 12 13 14 15 16 Broadcast Pix V5 install - concepts - PixMaster - switcher - CG - clips - controls - team - appendix 4.14.2...
- Page 273 [Join the Show] PixButton in the upper right corner in Device Control – A. The Control Panel and Switcher now are in normal mode, and the Broadcast Pix logo on the Granite Switcher will be solid white.
- Page 274 Still capture is a feature enabled in a future free software upgrade. The Broadcast Pix system can capture a still image of the program output or preview output. The still image can then be loaded into a still store and used in a production.
- Page 275 Watch Folders can automatically add them to a Still store. Simply point the destination of the capture folder to C:\watch\(show name)\Still 1. See section 3.5.7 for more information on Watch Folders. Broadcast Pix V5 install - concepts - PixMaster - switcher - CG - clips - controls - team - appendix 4.15.2...
- Page 276 Instead, this section 5 of the Broadcast Pix manual provides a quick overview of how to create CG graphics, and then focuses on how to import them into the Broadcast Pix system, and how to control them on-air from the Broadcast Pix control panel.
- Page 277 (monitor icon with a checkmark). This will act as a guide when creating graphics so your text does not get cut off on the edges of TV screens. Broadcast Pix V5 install - concepts - PixMaster - switcher - CG - clips - controls - team - appendix...
- Page 278 CG templates provided by Inscriber. The canvas size of Inscriber is automatically set by Broadcast Pix and is always 1920x1080. When the Broadcast Pix Switcher application is opened, it will automatically open TitleMotion and minimize it, ready for use. It is recommended not to close TitleMotion and use the minimize button to hide the application, when not in use.
- Page 279 Use the various tabs on the bottom of the canvas to change these attributes. See the Inscriber Manual or help menus for more information. Broadcast Pix V5 install - concepts - PixMaster - switcher - CG - clips - controls - team - appendix...
- Page 280 5.2.1 Exporting a Still Graphic from Inscriber to Broadcast Pix Once you have created a CG, you then need to export it for the Broadcast Pix system to access it. You can save it to many common files types, such as Bitmaps, JPEGs, Targas, as well as editable Inscriber .Scribe files.
- Page 281 C:\\graphics\animations\ respectively). Click On Save. You may now add the created graphics to your Broadcast Pix show, as described in Section 3 with PixMaster. Broadcast Pix V5 install - concepts - PixMaster - switcher - CG - clips - controls - team - appendix...
- Page 282 5.2.2 Exporting Graphics from Photoshop to Broadcast Pix When exporting from Adobe Photoshop, you may export to many popular file formats, like .JPEG and .BMP, to import into the Broadcast Pix system. Although neither file format supports an alpha channel or transparency layer, a Targa/Truevision, .TGA, file does support a 32 bit alpha channel.
- Page 283 Targa. Select 32 bits/pixel under the Options Window (so the transparency layer gets saved). Name your file, Choose your directory where the rest of your Broadcast Pix graphics are saved (C:graphics\) and click on Save. Import/Add your file to your show using PixMaster, as described in section 3.
- Page 284 5.3 CG Rolls and Crawls CG graphics can also be created to roll vertically or crawl horizontally, and then later controlled by Broadcast Pix to a custom speed setting. Ideal for making a credit roll or a ticker at the bottom of the screen.
- Page 285 CG for the crawls. (Similar issue if you have a crawl on air and attempt to switch to a roll.) Broadcast Pix V5 install - concepts - PixMaster - switcher - CG - clips - controls - team - appendix...
- Page 286 Press the [Controls] PixButton, which will bring up the following PixPad of Modifiers: CG Controls PixPad Broadcast Pix V5 install - concepts - PixMaster - switcher - CG - clips - controls - team - appendix 5.3.4...
- Page 287 You can add blank pages to both the beginning and end if desired. Broadcast Pix V5 install - concepts - PixMaster - switcher - CG - clips - controls - team - appendix 5.3.4...
- Page 288 0:00:00 NOTE: When playing a Roll or a Crawl, Broadcast Pix does not auto-detect if the CG is a Roll or Crawl, it will always default to C for Crawl. It will be necessary to manually change your files accordingly.
- Page 289 To perform more edits repeat steps 2-4. To minimize the TitleMotion application click on the – (minimize button) on the menu bar. Broadcast Pix V5 install - concepts - PixMaster - switcher - CG - clips - controls - team - appendix...
- Page 290 Another way to update a file that is currently in your show is to simply overwrite the file using standard Microsoft Windows. This may be desired if you have the Broadcast Pix Server plugged into a separate local network, where files can be shared and saved.
- Page 291 5.5 Animation Store The Broadcast Pix Animation Store plays out native image sequences without the need of conversion. There are up to 2 animation stores that can play uncompressed files in a TGA, BMP, GIF, JPG or PNG image sequence, in addition to the Apple Animation Codec in a .mov file.
- Page 292 The TitleMotion operators manual contains much more detail on animations. The basics are covered here in this Broadcast Pix system manual. To Create an Animation in TitleMotion:...
- Page 293 After the animation is exported from the Inscriber CG, it can added to the Animation Store, as described in section 3. Broadcast Pix V5 install - concepts - PixMaster - switcher - CG - clips - controls - team - appendix 5.5.1...
- Page 294 Broadcast Pix Animation store. All files loaded into the Anim store must have a frame size of 1920x1080 with square pixels and a 16:9 aspect ratio. No AutoAspect correction may occur in the Animation Store.
- Page 295 (for example alphawipe_00001.tga and alphawipe.wav). The .wav file needs to be PCM Data 16 bit at 48 kHz. Broadcast Pix V5 install - concepts - PixMaster - switcher - CG - clips - controls - team - appendix...
- Page 296 See section 6.3 for more information on clip/animation controls. Broadcast Pix V5 install - concepts - PixMaster - switcher - CG - clips - controls - team - appendix 5.5.4...
- Page 297 5.6 Basic CG & Stills Operation The unified control architecture of the Broadcast Pix system manages all content devices the same way. For example, once you learn how to control CGs, you have also learned the basic elements of how to control Stills, Clips and Animations.
- Page 298 PixMaster section (Section 3). Broadcast Pix V5 install - concepts - PixMaster - switcher - CG - clips - controls - team - appendix...
- Page 299 Click on OK to close the window. Broadcast Pix V5 install - concepts - PixMaster - switcher - CG - clips - controls - team - appendix...
- Page 300 TitleMotion GS, under the Attributes tab for a text field place a checkmark next to Text direction is right-to-left, as shown on the right. Broadcast Pix V5 install - concepts - PixMaster - switcher - CG - clips - controls - team - appendix...
- Page 301 It inserts text and images into .SCRIBE template files and then updates and displays them on the Broadcast Pix Switcher. Text and images can be updated manually or automatically from XML (locally stored or on the web), Microsoft Access database (.MDB, .ACCDB), Excel (.XLS, .XLSX, .XLSM, .XLSB) or Comma-separated Values (.CSV) files.
- Page 302 Rapid CG must be opened, one instance will run channel A and the other B. Both output files can be added to the CG, Stills or Logo device of a Broadcast Pix show using PixMaster Show Editor. This method replicates a ‘traditional’ CG where only one or two outputs from a ‘CG’...
- Page 303 The Status Bar will display Live buffer output: OFF. This is useful when the selected file in Rapid CG is on air with Broadcast Pix, but modifications need to be made to other files in Rapid CG. 5.9.3 Adding the RTX Tags Rapid CG updates text fields and logo objects in the CG layout, these text fields and logo objects must be assigned a RTX tag within TitleMotion GS.
- Page 304 Rapid CG will change are the RTX Tag values. No color, font or sizing attributes will be affected. Broadcast Pix V5 install - concepts - PixMaster - switcher - CG - clips - controls - team - appendix...
- Page 305 TitleMotion GS Canvas Window RTX Tags on Text/Logo Fields News Edit Display Options Broadcast Pix V5 install - concepts - PixMaster - switcher - CG - clips - controls - team - appendix 5.9.3...
- Page 306 Editor: A preview window to view the selected Scribe file from the Content panel and where tag fields are linked to data sources. Also the output of Rapid CG to Broadcast Pix Switcher. Data: Where all custom data sources are viewed, as well as where Clocks, Timers, Dates, RSS Feeds, Twitter Feeds and Scoreboard data are configured.
- Page 307 Search All Text to search by all the text in the tag field or Search Text Start to search by the first word of a tag field. Broadcast Pix V5 install - concepts - PixMaster - switcher - CG - clips - controls - team - appendix 5.9.5...
- Page 308 Select either Small, Medium or Large. A checkmark will appear on the selected size, and The thumbnails will resize within the Content Panel. Broadcast Pix V5 install - concepts - PixMaster - switcher - CG - clips - controls - team - appendix 5.9.5...
- Page 309 Click on the OK button, and the new alias name will appear on the bottom of the thumbnail. Broadcast Pix V5 install - concepts - PixMaster - switcher - CG - clips - controls - team - appendix 5.9.5...
- Page 310 Content panel. This process may take several minutes depending on how many files are in the Content panel. Broadcast Pix V5 install - concepts - PixMaster - switcher - CG - clips - controls - team - appendix 5.9.5...
- Page 311 The Editor Panel is the output of Rapid CG, and is what the RapidCG_A and RapidCG_B files are outputting to Broadcast Pix Switcher. It displays a larger image of the selected file from the Content panel and is an edit window to link the RTX tags assigned from TitleMotion with data sources.
- Page 312 This feature is handy when new graphics of the same template is needed quickly, for example lower third names for a talk show. Broadcast Pix V5 install - concepts - PixMaster - switcher - CG - clips - controls - team - appendix 5.9.6...
- Page 313 To start running the clocks, click on the Run Clocks button on the bottom of the Rapid CG window, it will illuminate blue, as shown on the right. Broadcast Pix V5 install - concepts - PixMaster - switcher - CG - clips - controls - team - appendix 5.9.7...
- Page 314 If a stopwatch is set to Ignore as an end action, the end time field will be disabled. To configure other Timers, repeat steps 3 - 7. Broadcast Pix V5 install - concepts - PixMaster - switcher - CG - clips - controls - team - appendix 5.9.7...
- Page 315 (1st, 2nd, etc.), as shown on the right. To configure Date2 and/or Date3 repeat steps 3 - 6. Broadcast Pix V5 install - concepts - PixMaster - switcher - CG - clips - controls - team - appendix 5.9.7...
- Page 316 The information in the RSS Feed will update using a cut transition. Broadcast Pix V5 install - concepts - PixMaster - switcher - CG - clips - controls - team - appendix 5.9.7...
- Page 317 Input Section going to the Output & other status info Section, appear with Edit is selected Broadcast Pix V5 install - concepts - PixMaster - switcher - CG - clips - controls - team - appendix 5.9.7...
- Page 318 Click on the Edit button and the Editor pane will appear on the button of the window. Broadcast Pix V5 install - concepts - PixMaster - switcher - CG - clips - controls - team - appendix 5.9.7...
- Page 319 To hide a user’s image, deselect the Image checkbox, as shown on the right. In this example the Broadcast Pix logo is replaced with the Twitter logo. Once a Tweet is to your liking, with or with out editing it, click on the Move to Output button in the Edit pane or click &...
- Page 320 Once a Tweet is selected to be edited in the Edit pane, click on the Block User button, as shown on the right. Broadcast Pix V5 install - concepts - PixMaster - switcher - CG - clips - controls - team - appendix...
- Page 321 . To allow selection, place a check mark next to Allow Url Selection, as shown on the right. Broadcast Pix V5 install - concepts - PixMaster - switcher - CG - clips - controls - team - appendix 5.9.7...
- Page 322 The order in which is displayed is the order in which the Tweets will cycle through, if Auto Advance is activated. Broadcast Pix V5 install - concepts - PixMaster - switcher - CG - clips - controls - team - appendix 5.9.7...
- Page 323 To allow Tweets from all blocked users, click on the Clear button and OK on the pop up message. Broadcast Pix V5 install - concepts - PixMaster - switcher - CG - clips - controls - team - appendix 5.9.7...
- Page 324 To switch accounts repeat the steps above, ensuring that you log into the new Twitter account in the web browser in step # 3. Broadcast Pix V5 install - concepts - PixMaster - switcher - CG - clips - controls - team - appendix 5.9.7...
- Page 325 Remove button at the bottom of the Data Panel. To remove all the listed files, select the Clear All button. Broadcast Pix V5 install - concepts - PixMaster - switcher - CG - clips - controls - team - appendix 5.9.7...
- Page 326 Field names/headers and each row below them is for the actual Value set. This will create a proper table for Rapid CG to use. Broadcast Pix V5 install - concepts - PixMaster - switcher - CG - clips - controls - team - appendix...
- Page 327 Daktronics All Sport CG - Rear Daktronics Controller - Rear ¼ TRS Male to DB-9 Pin Female (use any J-Port Scoreboard Output) Broadcast Pix Server - Rear Straight RS-232 DB-9 Pin Femal e -Male (use any port on the Edgeport) ¼ TRS...
- Page 328 Data panel, as shown on the right. To stop updating the feed, click on the Close Port button. Broadcast Pix V5 install - concepts - PixMaster - switcher - CG - clips - controls - team - appendix 5.9.7...
- Page 329 The OES feed is connected using a RS-232 serial connection from the Game Out 2 port on the controller to the Broadcast Pix Server with a DP-9 pin Female to Female cable. You may either use a straight RS-232 to RS-232 Female to Female cable into the Flint system or use an external Edgeport Serial extender, ensure that the Port Flags are set to RS-232C, as described in section 6.5.2.
- Page 330 Data panel, as shown on the right. To stop updating the feed, click on the Close Port button. Broadcast Pix V5 install - concepts - PixMaster - switcher - CG - clips - controls - team - appendix 5.9.7...
- Page 331 Numbers. Now any basic number will be changed to show st, nd, rd, etc after each number (i.e. 1 to 1st). Broadcast Pix V5 install - concepts - PixMaster - switcher - CG - clips - controls - team - appendix 5.9.7...
- Page 332 To save the condition and allow it to be linked to a taglink, click on the Save button, as shown on the right. Broadcast Pix V5 install - concepts - PixMaster - switcher - CG - clips - controls - team - appendix 5.9.7...
- Page 333 To save the condition and allow it to be linked to a taglink, click on the Save button, as shown on the right. Broadcast Pix V5 install - concepts - PixMaster - switcher - CG - clips - controls - team - appendix 5.9.7...
- Page 334 In this example we will use text and leave the value blank, to not display any text. Broadcast Pix V5 install - concepts - PixMaster - switcher - CG - clips - controls - team - appendix 5.9.7...
- Page 335 NOTE: Conditions can not be edited while the Com Port is opened/running, and the name & description can not be edited once created. Broadcast Pix V5 install - concepts - PixMaster - switcher - CG - clips - controls - team - appendix...
- Page 336 Set to Text: Sets the TagName with the current text from a data table, without marinating a link. Broadcast Pix V5 install - concepts - PixMaster - switcher - CG - clips - controls - team - appendix 5.9.7...
- Page 337 Now that all the Tags have been linked with data sources all the files in the Content Panel will update. Broadcast Pix V5 install - concepts - PixMaster - switcher - CG - clips - controls - team - appendix 5.9.7...
- Page 338 If a TagLink is set to LOCK, hold down the ATL button on the keyboard while double- clicking. Broadcast Pix V5 install - concepts - PixMaster - switcher - CG - clips - controls - team - appendix 5.9.7...
- Page 339 The Alias name must match the desired value for page linking to function properly. Note that this is a case sensitive field. Broadcast Pix V5 install - concepts - PixMaster - switcher - CG - clips - controls - team - appendix 5.9.7...
- Page 340 To simply deactivate the automatic selection and keep the link, deselect the Page Link button to turn it off, as shown on the right. Broadcast Pix V5 install - concepts - PixMaster - switcher - CG - clips - controls - team - appendix 5.9.7...
- Page 341 Only a number value may be entered when Minus is selected as an action. Broadcast Pix V5 install - concepts - PixMaster - switcher - CG - clips - controls - team - appendix 5.9.8...
- Page 342 You may update both text and logo tags with one single push. Repeat step 3 above, to have a different Action for the different tag names. Broadcast Pix V5 install - concepts - PixMaster - switcher - CG - clips - controls - team - appendix 5.9.8...
- Page 343 Action Button will appear at the end of the the Action Button Panel. Color TagName or ‘Multi-Tags’ if using this features Assigned to All TagNames Caption/Value/I mage Broadcast Pix V5 install - concepts - PixMaster - switcher - CG - clips - controls - team - appendix 5.9.8...
- Page 344 Button button, as shown on the right, and the Action Button will appear at the end of the the Action Button Panel. Broadcast Pix V5 install - concepts - PixMaster - switcher - CG - clips - controls - team - appendix 5.9.8...
- Page 345 To remove all Action Buttons to clear the panel, click on the Action Buttons menu and select Clear User Action Buttons, as shown on the right. Broadcast Pix V5 install - concepts - PixMaster - switcher - CG - clips - controls - team - appendix 5.9.8...
- Page 346 To modify the running Timer, you may access the Data Panel by right-clicking on the Action Button to automatically open the properties in the Data Panel. Broadcast Pix V5 install - concepts - PixMaster - switcher - CG - clips - controls - team - appendix 5.9.8...
- Page 347 To load the project file, click on Open… in the above menu and select a file in the Explorer window. Broadcast Pix V5 install - concepts - PixMaster - switcher - CG - clips - controls - team - appendix 5.9.9...
- Page 348 Click on the OK button to apply the changes. On the Instruction Format 1 screen, click the Inst button to create a Static Instruction. Broadcast Pix V5 install - concepts - PixMaster - switcher - CG - clips - controls - team - appendix 5.9.10...
- Page 349 .SCRIBE Layout/template file that will match this instruction, in this example NameSuper. The exact name of the Scribe file saved on the Broadcast Pix system must be used. NameSuper NO SPACES, PUNCTUATION, OR SPECIAL CHARACTERS ARE ALLOWED IN THIS FIELD.
- Page 350 Click on the OK button to close the Metafile Options window. Broadcast Pix V5 install - concepts - PixMaster - switcher - CG - clips - controls - team - appendix 5.9.10...
- Page 351 Click on the OK button. For creating an EZNews script and exporting an .EZN file, please refer to the EZNews documentation. Broadcast Pix V5 install - concepts - PixMaster - switcher - CG - clips - controls - team - appendix 5.9.10...
- Page 352 In the Windows Open window, navigate to where the EZN file lives. This files can live on the Broadcast Pix system or on any remote/networked system. Click on the OK button, as shown on the right. Rapid CG will now link the date from the EZN file to the Scribe template files in the EZN Templates folder.
- Page 353 .SCRIBE template, without the .SCRIBE file extension. For example, if your template's filename is 2line- seg.SCRIBE, enter 2line-seg. <cg id="" template="2line-seg"> Broadcast Pix V5 install - concepts - PixMaster - switcher - CG - clips - controls - team - appendix 5.9.11...
- Page 354 Click the go button to save the new script template. NOTE: You must repeat these steps for all of your title and graphic templates. Broadcast Pix V5 install - concepts - PixMaster - switcher - CG - clips - controls - team - appendix 5.9.11...
- Page 355 Click on the save button to save your script. Repeat these steps for each script in your rundown. Broadcast Pix V5 install - concepts - PixMaster - switcher - CG - clips - controls - team - appendix 5.9.11...
- Page 356 Playlist option, as shown on the right. In the Directory field, enter the path of the directory where you saved your .SCRIBE templates earlier. This could be a subfolder on the Broadcast Pix system, for example c:\Graphics\Rundown Templates NOTE: If you have administrator privileges, you...
- Page 357 Section 6: Clip Store The Broadcast Pix system contains a multi-definition two channel clip store. Clips are imported into the Server and then selected like a still image for playout. All clips must be compressed as a QuickTime movie file encoded with one of the codecs below and wrapped in a .mov or .mp4 extension.
- Page 358 Clips Device Controls Multi-View PixPad on control panel PixPad Display Clips1: 02 Light Swipe (AXR) Scrub 0:00:00 Knobs Motion Controls Broadcast Pix V5 install - concepts - PixMaster - switcher - CG - clips - controls - team - appendix...
- Page 359 NOTE: To select a clip by number, the clip file name must have digits in front of the name, i.e. “02 Open”. Broadcast Pix V5 install - concepts - PixMaster - switcher - CG - clips - controls - team - appendix...
- Page 360 NOTE: You can always return to the first page of clips, by pressing the [Clips] device once, and you can jump to the last page by double-punching the [Clips] device button. Broadcast Pix V5 install - concepts - PixMaster - switcher - CG - clips - controls - team - appendix...
- Page 361 Broadcast Pix V5 install - concepts - PixMaster - switcher - CG - clips - controls - team - appendix 6.1.5...
- Page 362 Multi-View PixPad. The image will be saved in the same folder with the clip on the Servers C drive. Broadcast Pix V5 install - concepts - PixMaster - switcher - CG - clips - controls - team - appendix 6.1.5...
- Page 363 The clip’s runtime is also shown on the Multi-View, and clips can be set to count up or count down, see section 2.5.6 Broadcast Pix V5 install - concepts - PixMaster - switcher - CG - clips - controls - team - appendix...
- Page 364 (in this case ‘Scrub’) is selected. In addition the knob/slider has 2 nudge arrows at each end for finer control. Broadcast Pix V5 install - concepts - PixMaster - switcher - CG - clips - controls - team - appendix 6.2.2...
- Page 365 [Mark In] PixButton. When the clip reaches the point you wish for a mark-out point, press the [Mark Out] PixButton. Broadcast Pix V5 install - concepts - PixMaster - switcher - CG - clips - controls - team - appendix 6.3.1...
- Page 366 (If other modifiers are turned on they will also appear) Clip: 01 Head Open (A) Scrub 0:00:00 Broadcast Pix V5 install - concepts - PixMaster - switcher - CG - clips - controls - team - appendix 6.3.2...
- Page 367 NOTE: If a clip has audio associated with it, the audio will cut off once the clip is taken off of program, if it is desired to be able to keep playing the audio once transitioned off, deselect Auto-Stop. Broadcast Pix V5 install - concepts - PixMaster - switcher - CG - clips - controls - team - appendix...
- Page 368 Clip: 01 Head Open (LP) Scrub 0:00:00 To remove the Loop point and to enter a new one, select the [Rem Loop Point]. Broadcast Pix V5 install - concepts - PixMaster - switcher - CG - clips - controls - team - appendix 6.3.5...
- Page 369 [Rem Cut Point]. Only one cut point may be marked at a time per clip. Clip: 01 Head Open (AXRC) Scrub 0:00:00 Broadcast Pix V5 install - concepts - PixMaster - switcher - CG - clips - controls - team - appendix 6.3.6...
- Page 370 To turn off the Auto Trans, select the [Auto Trans] PixButton until the display clears the T and T+. Broadcast Pix V5 install - concepts - PixMaster - switcher - CG - clips - controls - team - appendix 6.3.7...
- Page 371 To turn off the Auto Next, select the [Auto Next] PixButton on the desired clips until the display clears the N. Broadcast Pix V5 install - concepts - PixMaster - switcher - CG - clips - controls - team - appendix 6.3.8...
- Page 372 PixButton and use the knobs to dial in the correct aspect ratio. To reset the custom aspect ratio select the [Cust Asp Reset] PixButton. Broadcast Pix V5 install - concepts - PixMaster - switcher - CG - clips - controls - team - appendix 6.3.9...
- Page 373 To scrub faster through a clip use the x10 or x100 knobs to quickly advance through the clip. x100 Broadcast Pix V5 install - concepts - PixMaster - switcher - CG - clips - controls - team - appendix 6.3.10...
- Page 374 Select Settings under the Video section, to change the video compression settings. The Prepare for Internet Streaming setting has no effect for playout in Broadcast Pix. Broadcast Pix V5 install - concepts - PixMaster - switcher - CG - clips - controls - team - appendix...
- Page 375 LT or ProRes, as shown on the right. Choosing any other setting will not create a file recognizable in Broadcast Pix. Under the Motion section, select the Frame Rate drop down menu and select 29.97 for NTSC/60hz or 25 for PAL/50Hz, as shown on the right.
- Page 376 16 bits under the Sample size drop down menu. Click on the OK button once all these settings have been selected. Broadcast Pix V5 install - concepts - PixMaster - switcher - CG - clips - controls - team - appendix...
- Page 377 Watch Folder or to the D:Clips directory. Click on the Save button to export and save your QuickTime movie. Broadcast Pix V5 install - concepts - PixMaster - switcher - CG - clips - controls - team - appendix...
- Page 378 Transmit B (TX+) Receive A (RX-) Attach the included Edge Port 422 Hub to a USB port on the Broadcast Pix Server. Then attach the 422 cables from the Edge Port to each channel of the DDR that you wish to control, as shown below, ensuring that you align Channel 1 with Port 1, Channel 2 with Port 2 and Channel 3 with Port 3.
- Page 379 Click on the OK button to apply the changes. For each channel window, click on the Serial Control check box, as shown on the right. Broadcast Pix V5 install - concepts - PixMaster - switcher - CG - clips - controls - team - appendix 6.5.1...
- Page 380 Click on the OK button to apply the changes. Click on the Next button, then click on the Finish button. Restart the Nexio Server. Broadcast Pix V5 install - concepts - PixMaster - switcher - CG - clips - controls - team - appendix 6.5.1...
- Page 381 Click on the Apply button and then on the OK button to save the settings. Broadcast Pix V5 install - concepts - PixMaster - switcher - CG - clips - controls - team - appendix 6.5.1...
- Page 382 Deactivate Selected button. Click on the Edit link for the desired Player, as shown on the right. Broadcast Pix V5 install - concepts - PixMaster - switcher - CG - clips - controls - team - appendix 6.5.1...
- Page 383 Active the modified players by playing a check mark next to each player and click on the Active Selected button, as shown on the right. Broadcast Pix V5 install - concepts - PixMaster - switcher - CG - clips - controls - team - appendix 6.5.1...
- Page 384 VDCP radio button. Click on the OK button to apply the changes. Repeat steps 2 – 6 for each channel. Broadcast Pix V5 install - concepts - PixMaster - switcher - CG - clips - controls - team - appendix 6.5.1...
- Page 385 Under Industrial Settings, ensure that each COM port is set to RS422: Non Terminating Resistor. Select the Update button to save changes, then close the Edgeport Properties window. Broadcast Pix V5 install - concepts - PixMaster - switcher - CG - clips - controls - team - appendix 6.5.2...
- Page 386 DDR Control or Omneon Server Control. Click on the OK button, then Close and then Save Show to close PixMaster. Broadcast Pix V5 install - concepts - PixMaster - switcher - CG - clips - controls - team - appendix...
- Page 387 6.5.4 Selecting Clips to Access Similar to the internal clipstore in Broadcast Pix, you can select all or just a subset of clips from the external DDR to be accessed in your show. The clips selected in the following menu are the clips accessible through the Broadcast Pix Control Panel.
- Page 388 UTF-8 or Unicode. The VDCP protocol only supports file names with 8 or less characters in ASCII Broadcast Pix V5 install - concepts - PixMaster - switcher - CG - clips - controls - team - appendix...
- Page 389 [Next] PixButton or by using the now assigned to this device. numeric keypad, see sections 6.1.1 and 6.1.3. Broadcast Pix V5 install - concepts - PixMaster - switcher - CG - clips - controls - team - appendix 6.5.5...
- Page 390 Any fast button-pushes may break the communication to your external DDR. Broadcast Pix V5 install - concepts - PixMaster - switcher - CG - clips - controls - team - appendix...
- Page 391 6.5.6 DDR Controls Similar to the internal Broadcast Pix clip store, each external clip from the DDR/ Server may be set to loop continuously and/or set to Auto-Start when transitioned to Program. In addition, some servers may be configured to record, they may be started and stopped directly from the control panel.
- Page 392 Up to 999 clips may be recorded sequentially, however the clip name may be manually changed locally on the external server, allowing for unlimited clip records. Broadcast Pix V5 install - concepts - PixMaster - switcher - CG - clips - controls - team - appendix 6.5.6...
- Page 393 Click on the OK button to save your clips. The newly recorded clips will now appear in the PixPad. Broadcast Pix V5 install - concepts - PixMaster - switcher - CG - clips - controls - team - appendix 6.5.6...
- Page 394 If a clip is renamed or deleted on the external server while being controlled by Broadcast Pix selecting an offline clip will display: To resolve this issue, select the [Setup] button and reselect your clips.
- Page 395 Section 7: Optional Device Controls The Broadcast Pix system may control a number of external devices, one of which is DDR control which was described in the previous section. As an option the switcher can also control robotic cameras, external audio mixers and streamers, for a true one- man production.
- Page 396 9600 bps, for both a RS-232 and a RS-422 connection, this is also selectable on the bottom of each camera with dip-switches. The COM ports on of the Broadcast Pix Server are RS-232 connections. Depending on which option is purchased, the correct adapter is supplied, either a RS-232 cable or a converter to RS- 422 (B&B 422-PP9TB).
- Page 397 ‘Auto’ or ‘0’, as the Broadcast Pix software will automatically detect the correct settings. On an EVI-70 there is no such setting, as it is internally set to ‘Auto’, on a BRC-300 the camera address is changed on the bottom of each camera via dip-switches.
- Page 398 7.2.1 Sony Wiring Configurations RS-232 Daisy Chain Set-Up: Broadcast Pix RS 232 to VISCA Cable Server Sony VISCA Sony VISCA Cable Cable RS-422 Star Configuration: USB A-B Cable 4/8 port Edgeport Server DB-9 to Screw Terminal RS-422 Custom Serial Cables...
- Page 399 0:low to 7:high Direct 8x 01 04 47 0p 0q 0r 0s FF pqrs=Zoom Position (0h-4000h) Broadcast Pix V5 install - concepts - PixMaster - switcher - CG - clips - controls - team - appendix 7.2.2 CAM_DZoom...
- Page 400 Sony. You may download it here as well: https://www.servicesplus.sel.sony.com/sony-software-model-RMIP10.aspx Once downloaded, it can be run locally on the Broadcast Pix Server or on a remote computer. NOTE: The IP Setup tool can only see one network port at a time, if both the Panel and LAN ports have a cable connected, disconnect the LAN cable prior to performing the following steps.
- Page 401 The default IP address of IP controllable Vaddio cameras is 169.254.1.1. In order to have the Broadcast Pix system control these cameras, the IP address must change to be on the same subnet of the Broadcast Pix Server, either on the panel or LAN networks. The IP settings of the Vaddio cameras are changed through a web browser which can be run locally on the Broadcast Pix Server or on a remote computer.
- Page 402 Navigate to a web browser, Start Menu, Internet Explorer. In the address bar, type in the address 169.254.1.1 and press Enter on the keyboard. Broadcast Pix V5 install - concepts - PixMaster - switcher - CG - clips - controls - team - appendix 7.2.4...
- Page 403 Click on the Save button to apply the new network settings. Repeat these steps for each connected camera, ensuring to use unique IP addresses. Broadcast Pix V5 install - concepts - PixMaster - switcher - CG - clips - controls - team - appendix 7.2.4...
- Page 404 In the Properties window, click on the Obtain an IP address automatically radio button, as shown on the right. If the Broadcast Pix Control Panel port was used, enter the static IP Address of 192.268.53.250. Click on the OK button and close all open Network windows.
- Page 405 Most of the instructions for how to install this camera control system come from Display Devices, the makers of the pan/tilt head that is being used by Broadcast Pix. Please refer to the Display Devices/Eagle manual for more information, there are various dip switches that must be placed in the correct position depending on the camera model, both in the pan/tilt head and camera.
- Page 406 7.3.1 One Camera Installations Run two video cables to the pan/tilt head: one for video to the Broadcast Pix, and one for genlock/reference. Run a serial cable from the serial port of the Broadcast Pix workstation to the B&B Electronics RS-232 to RS-485 converter, as shown below. It is also possible to plug the converter directly into on the workstation’s COM port, if...
- Page 407 The multi-camera set-up is illustrated below: Pan-Tilt head Pan-Tilt head Pan-Tilt head RS-485 Multiplexer Power Supply Server COM 1 or COM 2 Broadcast Pix V5 install - concepts - PixMaster - switcher - CG - clips - controls - team - appendix 7.3.2...
- Page 408 7.4 Installation of Panasonic Cameras The Broadcast Pix system can control a wide-range of Panasonic cameras in the AW series, including the AW-HE100, AW-PH400 and other Panasonic pan-tilt camera control systems. Panasonic controlled cameras are connected using a RS-422 serial connection, with a maximum connection length of 1200 meters (4000 feet).
- Page 409 4/8 port Edgeport Any USB Port DB-9 to RJ-45 Custom RS-422 Serial Cables Panasonic Controller Configuration: Connect up to 5 cameras through the AW-RP655, then connect to the Broadcast Pix with a RS-232 serial cable. Server RS-232 DP-9 Male to Female Cable...
- Page 410 In some installations it is desired to have a Panasonic controller for a dedicated operator and have the Broadcast Pix system used to trigger Macros or to control other cameras. In this type of installation the IP control would be connected to a Panasonic controller, like the AW-RP50, and the serial control using the AW-CA20T6G breakout cable would connect to the Broadcast Pix System.
- Page 411 192.168.0.10. In order to have the Broadcast Pix system control these cameras, the IP address must change to be on the same subnet of the Broadcast Pix Server. The IP settings of the Panasonic cameras are changed through a web browser, this can be done locally on the Broadcast Pix Server or on a remote computer.
- Page 412 View icon to the right of the address bar to view the webpage correctly, as shown on the right. Broadcast Pix V5 install - concepts - PixMaster - switcher - CG - clips - controls - team - appendix 7.4.2...
- Page 413 Note: Any IP address in the 192.168.53.XXX subnet may be used, as long as no other device (including Broadcast Pix Control Panels) has that IP address. Click on the Set button (below the Line speed text box) to save the settings.
- Page 414 Obtain an IP address automatically radio button, as shown on the right. Click on the OK button and close all open Network windows. Broadcast Pix V5 install - concepts - PixMaster - switcher - CG - clips - controls - team - appendix 7.4.2...
- Page 415 There are 2 main ways to configure a Telemetrics systems with Broadcast Pix control: - Direct control from the Broadcast Pix to the Telemetrics camera head. This configuration allows for up to 10 cameras to be controlled by Broadcast Pix. No shading/white balance control is offered when controlled directly, camera/lens manufacturers remote panels may be needed for shading.
- Page 416 The Telemetrics STS-12 Control Transfer Switch is needed. The STS-12 must be ordered with at least (1) RS-232 port if connecting directly to the Broadcast Pix workstation, as shown below. If using a RS-422 connection, then a RS-232 to RS-422 convertor must be used on the Broadcast Pix end.
- Page 417 Options Key Code, which was supplied once you ordered the Camera Control Option. See section A.2 for more information about Installing System Options. Broadcast Pix V5 install - concepts - PixMaster - switcher - CG - clips - controls - team - appendix...
- Page 418 Position 1 to Position 7. If no daisy chain is being used, select Position 1. Broadcast Pix V5 install - concepts - PixMaster - switcher - CG - clips - controls - team - appendix...
- Page 419 Note: This setting only functions when the Sony Camera Control device is selected in the Device Controls section. Broadcast Pix V5 install - concepts - PixMaster - switcher - CG - clips - controls - team - appendix 7.7.1...
- Page 420 To save the settings, select the Close button. In the System Settings window, click on the OK button to close the window. Broadcast Pix V5 install - concepts - PixMaster - switcher - CG - clips - controls - team - appendix 7.7.1...
- Page 421 To change the COM port being used, click on the the Communications tab and select the appropriate comm port under the Comm Port drop down menu. Broadcast Pix V5 install - concepts - PixMaster - switcher - CG - clips - controls - team - appendix 7.7.2...
- Page 422 Defaults button. In the System Settings window, click on the OK button to close the window. Broadcast Pix V5 install - concepts - PixMaster - switcher - CG - clips - controls - team - appendix 7.7.2...
- Page 423 To assign numbers to each camera: Create a Broadcast Pix show, as described in section 3. Add camera control to that show, as described in section 7.8. Decide what address each Pan/Tilt Head is going to be. In order to set the address of the head, the panel sends out a command to all connected heads.
- Page 424 Broadcast Pix V5 install - concepts - PixMaster - switcher - CG - clips - controls - team - appendix 7.7.3...
- Page 425 (if the camera supports tally), as well as which model of camera head being controlling. If desired the Broadcast Pix system may control different models of cameras within the same show. In addition to having Broadcast Pix being the camera controller, the first 5 cameras may also be controlled with a Panasonic controller, like the AW-RP655.
- Page 426 100/300 model camera. You may mix and match model numbers within a show. Only the Panasonic AW series may be controlled from Broadcast Pix. The AW-HE50/60/120 (TCP/IP) will control IP controllable cameras. If selected a TCP/IP address text box will appear, as shown on the right, to enter the dedicated IP address for each camera.
- Page 427 Click on Close to save the settings, and to close the window. In the System Settings window, click on the OK button to close the window. Broadcast Pix V5 install - concepts - PixMaster - switcher - CG - clips - controls - team - appendix 7.7.4...
- Page 428 STS-12 or 38400 when connecting to the Studio Software CPC-ST-S.19200 is reserved for future use. Broadcast Pix V5 install - concepts - PixMaster - switcher - CG - clips - controls - team - appendix 7.7.5...
- Page 429 Click on Close to save the settings, and to close the window. In the System Settings window, click on the OK button to close the window. Broadcast Pix V5 install - concepts - PixMaster - switcher - CG - clips - controls - team - appendix 7.7.5...
- Page 430 Click on OK, to apply the Camera Control the show, then Close in the Edit Show Settings window and Save Show to apply all the settings. Broadcast Pix V5 install - concepts - PixMaster - switcher - CG - clips - controls - team - appendix...
- Page 431 Focus and Iris aren’t always present), while the third knob changes to one of many camera control settings, including gain. Broadcast Pix V5 install - concepts - PixMaster - switcher - CG - clips - controls - team - appendix...
- Page 432 Left/Right Up/Down Diagonally For Slow movement, move the joystick a little For Rapid movement, move the joystick a lot Broadcast Pix V5 install - concepts - PixMaster - switcher - CG - clips - controls - team - appendix 7.10...
- Page 433 To adjust the focus of the active camera, twist the left knob To adjust the Iris of the active camera, twist the center knob Broadcast Pix V5 install - concepts - PixMaster - switcher - CG - clips - controls - team - appendix...
- Page 434 Medium, simply deselect the [<] or [>] motion button and they will go off. NOTE: All three of the above speed setting may me adjusted, as described in section 7.7.2 Broadcast Pix V5 install - concepts - PixMaster - switcher - CG - clips - controls - team - appendix...
- Page 435 [>] motion button and it will turn off. The display will read out “Fast controls”, as shown below. Now when you move the joystick and knobs the motion will be at faster. Broadcast Pix V5 install - concepts - PixMaster - switcher - CG - clips - controls - team - appendix 7.10.2...
- Page 436 Camera Control Settings window. Focus Iris M.Black Broadcast Pix V5 install - concepts - PixMaster - switcher - CG - clips - controls - team - appendix 7.10.3...
- Page 437 Back motion control button is not illuminated. Press the [<] motion control button and the display will read out “Joystick P/T”, as shown below. Focus Iris M.Black Broadcast Pix V5 install - concepts - PixMaster - switcher - CG - clips - controls - team - appendix 7.10.3...
- Page 438 255 presets. These presets can be assigned to the PixPad for rapid recall. With Telemetrics systems, timed sequences may not be stored/saved by Broadcast Pix, this function must be done with the Studio Software CTS-ST-S. Only snapshot presets can be saved from the Broadcast Pix.
- Page 439 Hitachi cameras only, the recall speed will be captured at whatever speed is set to the camera, see section 7.11.2. Broadcast Pix V5 install - concepts - PixMaster - switcher - CG - clips - controls - team - appendix...
- Page 440 NOTE: If Preset 1 already had a saved preset position, this will now be overwritten with the position you just saved. Broadcast Pix V5 install - concepts - PixMaster - switcher - CG - clips - controls - team - appendix...
- Page 441 Preset Positions are designed to be recalled rapidly. When using Telemetrics Studio Software, sequences stored in the CTS-ST-S may be triggered by the Broadcast Pix at the stored recall speed. To recall a preset position: Select the desired camera from the list available on the top level PixPad for camera control as shown on the lower left, such as Camera 1.
- Page 442 When you reach the desired location press its [Preset Position] PixButton. The camera will move to it, and the large display will show this preset position number. Broadcast Pix V5 install - concepts - PixMaster - switcher - CG - clips - controls - team - appendix 7.11.1...
- Page 443 Fast, Medium or Slow Turn the right knob to the desired speed and it is set. Broadcast Pix V5 install - concepts - PixMaster - switcher - CG - clips - controls - team - appendix...
- Page 444 Delete Pset PixButton. The thumbnail on the Fluent-View PixPad will be removed showing the generic Camera X, Preset X label. Broadcast Pix V5 install - concepts - PixMaster - switcher - CG - clips - controls - team - appendix 7.11.3...
- Page 445 Press the [Settings] PixButton and the Settings PixPad will appear, as shown below right. Presets PixPad Camera Settings PixPad Broadcast Pix V5 install - concepts - PixMaster - switcher - CG - clips - controls - team - appendix 7.12...
- Page 446 On the above PixPad, press the [Clear Limits] PixButton, and all four limits will be removed for this camera. Broadcast Pix V5 install - concepts - PixMaster - switcher - CG - clips - controls - team - appendix 7.12.1...
- Page 447 The setting will be saved in either in Memory 1 or Memory 2 of the above White Balance function. Broadcast Pix V5 install - concepts - PixMaster - switcher - CG - clips - controls - team - appendix...
- Page 448 Turn the 3 knob to adjust, select either Rainbow for type 1/C- mount lenses or Fujinon for type 2/Bayonet lenses. Broadcast Pix V5 install - concepts - PixMaster - switcher - CG - clips - controls - team - appendix 7.12.2...
- Page 449 Auto – for the camera to automatically set the Iris Remote – for the middle knob on the Broadcast Pix panel to control Iris Manual – for manual control of the Iris by the iris ring on the camera 10. To Invert Tilt In some installations that Pan/Tilt head is installed upside down.
- Page 450 Sony & Panasonic to invert the camera. Broadcast Pix V5 install - concepts - PixMaster - switcher - CG - clips - controls - team - appendix...
- Page 451 Auto Exposure uses Gain and Iris to adjust the picture. To turn off Auto Exposure and to manually adjust the iris, simply turn the Iris knob. Broadcast Pix V5 install - concepts - PixMaster - switcher - CG - clips - controls - team - appendix...
- Page 452 [One Push W Bal] PixButton in the PixPad. When the camera has successfully white balanced, the display will show White Balance Set, as shown below. Broadcast Pix V5 install - concepts - PixMaster - switcher - CG - clips - controls - team - appendix 7.13.1...
- Page 453 Auto Focus On, as shown below. To turn off Auto Focus and to manually focus, simply turn the Focus knob. Broadcast Pix V5 install - concepts - PixMaster - switcher - CG - clips - controls - team - appendix...
- Page 454 To set the camera to an outdoor 5600K color temperature preset, press the [White Bal Outsid] PixButton in the PixPad. The display will show White Balance Outside, as shown below. Broadcast Pix V5 install - concepts - PixMaster - switcher - CG - clips - controls - team - appendix 7.14.1...
- Page 455 To access the camera’s internal menu, press the [Online Menu] PixButton in the PixPad. This will display the camera menu on the camera’s video output, which is visible on the Broadcast Pix Multi-View. Assign the camera on the preview row to view the on-screen menu items.
- Page 456 Turn the first knob labeled Focus. The display will update showing positive or negative Focus numbers. Focus Iris M.Black Broadcast Pix V5 install - concepts - PixMaster - switcher - CG - clips - controls - team - appendix 7.15...
- Page 457 Studio Software. To control Iris Commands: In the Controls PixPad, press the [Iris PT] PixButton. Now the iris controls can be adjusted by the Broadcast Pix control panel or the Telemetrics controller. To control the iris from a manufactures or 3 party panel, in the Control PixPad, press the [Iris Cam] PixButton.
- Page 458 7.16 Optional Audio-Follow-Video Control As an option the Broadcast Pix switcher can provide control of virtually any external audio mixer, digital or analog, through a Musical Instrument Digital Interface (MIDI). Controls can be as simple as turning on a source when it transitions to program, or as complex as calling up scene changes to modify effect parameters like reverb, panning and equalization controls.
- Page 459 Under the MIDI Tx channel drop down menu, select the transmit channel being used on the Audio Mixer, either 1-16. Broadcast Pix V5 install - concepts - PixMaster - switcher - CG - clips - controls - team - appendix 7.16.2...
- Page 460 NOTE: 32 sources are available for use on 2000 systems only, normally you have up to 18 source buttons that can be assigned, Broadcast Pix V5 install - concepts - PixMaster - switcher - CG - clips - controls - team - appendix...
- Page 461 (i.e. t1), as shown on the right. When one column is set to be tied, the other column will automatically get tied as well. Broadcast Pix V5 install - concepts - PixMaster - switcher - CG - clips - controls - team - appendix 7.16.3...
- Page 462 Audio Follow window. If everything is connected and programmed properly, the commands should be noticed on the audio mixer. Broadcast Pix V5 install - concepts - PixMaster - switcher - CG - clips - controls - team - appendix 7.16.3...
- Page 463 Multi-View to be displayed. This VU Meters can also active some of the programming features of the full Audio Follow menu. To float the VU Meters: Click on the Broadcast Pix menu button and select Multi-View, Float and then VU Meter, as shown on the right.
- Page 464 The VU Meters window will appear. If audio signals are active on the mixer, and if the mixer is supports VU Metering to Broadcast Pix, you will see the levels, as shown on the right. The green speaker icon represents that Audio Follow Video is active and enabled.
- Page 465 Installing a Matrox Monarch The control is through the LAN port on the Broadcast Pix Server, using a network switch to connect to the Monarch device. When the Monarch device first boots up, the video output will display a splash screen with the current IP address, usually set to DHCP (this step may take several minutes).
- Page 466 Monarch manual for more information. Click on the Apply button, to set the settings. Whichever profile or settings have been applied will be used once Broadcast Pix starts the stream/record. Close the web browser, by click on the X on the top right on the page.
- Page 467 To stop streaming, click on the red Stop button. Broadcast Pix V5 install - concepts - PixMaster - switcher - CG - clips - controls - team - appendix 7.17.1...
- Page 468 Click on OK, to apply the Streamer Control the show, then Close in the Edit Show Settings window and Save Show to apply all the settings. Broadcast Pix V5 install - concepts - PixMaster - switcher - CG - clips - controls - team - appendix...
- Page 469 The bottom right side displays a timecode counter for the selected stream. When streaming HH:MM:SS:-- is displayed, when stopped HH:MM:SS:FF is displayed. Broadcast Pix V5 install - concepts - PixMaster - switcher - CG - clips - controls - team - appendix...
- Page 470 In addition, Macros can be used to start and stop the Stream device, once a Profile has been selected. Broadcast Pix V5 install - concepts - PixMaster - switcher - CG - clips - controls - team - appendix 7.17.4...
- Page 471 7.18 Deck Control The Broadcast Pix switcher can also provide control of the full line of AJA KiPro and Blackmagic Hyperdeck recorders, over a TCP/IP connection. Up to 12 decks/units may be controlled by Broadcast Pix, controllable functions include selecting recorded clips by clip name on the PixPad to play/fast forward/reverse and starting and stopping new clip recordings.
- Page 472 Click on OK, to apply the Deck Control the show, then Close in the Edit Show Settings window and Save Show to apply all the settings. Broadcast Pix V5 install - concepts - PixMaster - switcher - CG - clips - controls - team - appendix...
- Page 473 Click on the Save settings and close button to save the changes. Click on the OK button in the System Settings window to close it. Broadcast Pix V5 install - concepts - PixMaster - switcher - CG - clips - controls - team - appendix 7.18.3...
- Page 474 The bottom right side displays a timecode counter for the selected clip. When playing/recording HH:MM:SS is displayed, when stopped/paused HH:MM:SS:FF is displayed. Broadcast Pix V5 install - concepts - PixMaster - switcher - CG - clips - controls - team - appendix 7.18.4...
- Page 475 Once a clip has stopped recording the Multi-View PixPad will display a thumbnail of the first frame of video recorded. Broadcast Pix V5 install - concepts - PixMaster - switcher - CG - clips - controls - team - appendix 7.18.5...
- Page 476 Controls PixPad select the [Prev Clip] or [Next Clip] PixButton, as shown on the right. Broadcast Pix V5 install - concepts - PixMaster - switcher - CG - clips - controls - team - appendix 7.18.5...
- Page 477 When the clip reaches the start of the clip, rewind will stop. To pause the clip from rewinding, select the [>] motion control button. Broadcast Pix V5 install - concepts - PixMaster - switcher - CG - clips - controls - team - appendix 7.18.5...
- Page 478 To pause the clip from fast forwarding, select the [>] motion control button, as shown on the right. Broadcast Pix V5 install - concepts - PixMaster - switcher - CG - clips - controls - team - appendix 7.18.5...
- Page 479 Note that on KiPros, the Use Custom Clip Take option needs to be set to On. Broadcast Pix V5 install - concepts - PixMaster - switcher - CG - clips - controls - team - appendix 7.18.6...
- Page 480 Note that the settings window can remain open while recording, this provides an easy way to name new clip recordings. Broadcast Pix V5 install - concepts - PixMaster - switcher - CG - clips - controls - team - appendix 7.18.6...
- Page 481 PixPlay can either record or playback clips and marks, it can not do both simultaneously. For PixPlay to be enabled, an option code is required to be entered in the Setup-Installed Option menu. Contact Broadcast Pix Sales for more information.
- Page 482 It can also be used after a clip has been stopped and while it’s being played back. Broadcast Pix V5 install - concepts - PixMaster - switcher - CG - clips - controls - team - appendix 7.18.7...
- Page 483 If desired a graphical list of clips and marks can be viewed for easy selection and mark naming. Navigate to the Broadcast Pix menu and select the Multi-View – Float – Device – PixPlay window, as shown on the right.
- Page 484 Select the [Mark Name] PixButton. The deck(s) will jump to that specific mark location. Broadcast Pix V5 install - concepts - PixMaster - switcher - CG - clips - controls - team - appendix 7.18.7...
- Page 485 Play the deck(s) backwards in full motion (-100%), selecting it will illuminate the button orange, as shown on the right. Broadcast Pix V5 install - concepts - PixMaster - switcher - CG - clips - controls - team - appendix 7.18.7...
- Page 486 The VOX unit is a 1 Rack Unit (RU) box with integrated rack ears, for convenient installation in an equipment rack. It is connected to a Broadcast Pix system through a standard straight RS-232 serial connection using the Bpix/Next VOX port on the rear of the VOX Unit.
- Page 487 Broadcast Pix VOX - Front Green LED Red LEDs Yellow LEDs Indicates Power is Supplied Indicate that the Indicate that signal is present on the VOX unit and audio inputs BPSwitcher Application are communicating wi t h each other, will...
- Page 488 A custom overrode button panel may also be made and connected to the same port using the pinout listed below. There are 4 GPI buttons and 4 LEDs, which give status depending if a Marco is defined/running/paused. Broadcast Pix VOX - Rear Override Panel 1 2 3 4...
- Page 489 You may continue to loop through other units in the same manor. The below diagram shows 3 units connected for a total of 24 audio inputs. Broadcast Pix VOX 1 - Rear Straight 9 pin cable Broadcast Pix VOX 2 - Rear...
- Page 490 The VOX software has powerful intelligence to turn a basic production into a compelling production. When using a remote PC to run VOX, the remote PC and the Broadcast Pix system must be networked together in order for the Macros to be triggered.
- Page 491 OK button, as shown on the right. If the connection fails, ensure that both the serial cable is connected and that a show is running on the Broadcast Pix Switcher. Once communication has been established, a series of tabs will appear at the top of the window.
- Page 492 Mic A Title, as shown on the right. To unassign the title macro, click on the clear link. Broadcast Pix V5 install - concepts - PixMaster - switcher - CG - clips - controls - team - appendix 7.19.4...
- Page 493 Under the General macro file(s): section, click on the Pick Macros button, as shown on the right. Broadcast Pix V5 install - concepts - PixMaster - switcher - CG - clips - controls - team - appendix 7.19.4...
- Page 494 Reload macros button at the top of the window, as shown on the right. Broadcast Pix V5 install - concepts - PixMaster - switcher - CG - clips - controls - team - appendix 7.19.4...
- Page 495 Time to run the mic title macro again text box, as shown on the right. Broadcast Pix V5 install - concepts - PixMaster - switcher - CG - clips - controls - team - appendix 7.19.4...
- Page 496 Since the General Macros are usually wide shots, these numbers may be slightly longer than the microphone macros. Broadcast Pix V5 install - concepts - PixMaster - switcher - CG - clips - controls - team - appendix 7.19.4...
- Page 497 These settings can be modified under the Advanced timing settings section. It is recommended to use the default settings. Broadcast Pix V5 install - concepts - PixMaster - switcher - CG - clips - controls - team - appendix 7.19.4...
- Page 498 Start command to re-launch the automata if the VOX has been turned off Stop: Which completely stops the VOX automation Broadcast Pix V5 install - concepts - PixMaster - switcher - CG - clips - controls - team - appendix 7.19.4...
- Page 499 Macro to assign a Macro. Use the drop down menu radio button to select the desired Macro, as shown on the right. Broadcast Pix V5 install - concepts - PixMaster - switcher - CG - clips - controls - team - appendix 7.19.4...
- Page 500 This allows for multiple set ups to be loaded to the VOX system, similar to the Broadcast Pix Show, allowing for custom Macros and timing for each show you produce.
- Page 501 VOX unit being connected and the other for having a connection with the Broadcast Pix software, both need to be in the green state, as shown on the right, for VOX to operate. Broadcast Pix V5 install - concepts - PixMaster - switcher - CG - clips - controls - team - appendix 7.19.5...
- Page 502 If the Pause command from the override panels were trigged, then this button would also turn grey. Broadcast Pix V5 install - concepts - PixMaster - switcher - CG - clips - controls - team - appendix 7.19.5...
- Page 503 If VOX is restarted, then all the timing is reset and VOX starts from the beginning with a General Macro and its Title Macro. Broadcast Pix V5 install - concepts - PixMaster - switcher - CG - clips - controls - team - appendix 7.19.5...
- Page 504 Click on OK, to apply the VOX Control the show, then Close in the Edit Show Settings window and Save Show to apply all the settings. Broadcast Pix V5 install - concepts - PixMaster - switcher - CG - clips - controls - team - appendix...
- Page 505 Pressing the [Pause VOX] PixButton will pause the automation at the current start. Pressing the [Stop VOX] PixButton will stop the automation process. Broadcast Pix V5 install - concepts - PixMaster - switcher - CG - clips - controls - team - appendix...
- Page 506 7.20 Router Control As an option any Broadcast Pix switcher can also provide control of the full line of AJA KUMO SDI video routers, such as the 1604, 1616 and 3232, over a TCP/IP connection. This feature is designed to integrate with house video routers to expand the amount of inputs and outputs the system has access to.
- Page 507 Sample wiring diagram: Not all outputs from the router need to feed into the Broadcast Pix and not all or even any outputs of the Broadcast Pix need to feed back into the router. The installation can be completely customized to fit the production needs. Some sources may feed the Broadcast Pix directly without the need to going into the router, if desired.
- Page 508 Click on the name and type the a custom name on the button and click on the Apply button. These names can be carried over to the Broadcast Pix Multi-View if desired. Repeat this step for all attached inputs. Close the web browser by clicking on the x on the top right of the page.
- Page 509 Click on the OK button to close the Router Setup window. In the Input Assignments window, select the Router Output drop down menu for the specific Broadcast Pix inputs that have a router outputs attached to it. Select the router output number 1-32, as shown on the right.
- Page 510 To select a router source by number, select the [Control] PixButton, then the [Number] PixButton and enter the desired router input number and select the [Enter] PixButton. Broadcast Pix V5 install - concepts - PixMaster - switcher - CG - clips - controls - team - appendix 7.20.4...
- Page 511 Large Teams with many panels 8.1 Optional Multi-Panel Support Standard equipment for a Broadcast Pix Switcher includes both a control panel and a SoftPanel. Either can be used to control the show. For example, if the control panel is the one primarily used, and should fail and lose its network connection, then the SoftPanel can be used (or visa versa).
- Page 512 1 panel license each. NOTE: There is no difference between the Internet Explorer and Flash SoftPanels, either may be used. Broadcast Pix V5 install - concepts - PixMaster - switcher - CG - clips - controls - team - appendix...
- Page 513 IP address that are currently connected. You can then select one and force it to disconnect. Broadcast Pix V5 install - concepts - PixMaster - switcher - CG - clips - controls - team - appendix...
- Page 514 The resulting portion of the SoftPanel can then be sized and positioned like any other window. (To return to the full panel, right-click and click-on Show All) Broadcast Pix V5 install - concepts - PixMaster - switcher - CG - clips - controls - team - appendix...
- Page 515 Graphics Creator Show Creator NOTE: Only one keyboard and one mouse can be connected to the workstation at any given time. Broadcast Pix V5 install - concepts - PixMaster - switcher - CG - clips - controls - team - appendix...
- Page 516 8.4. Dual Monitor Output VGA/DVI Graphics Creator with CG PixPad and Show Creator Keyer control Broadcast Pix V5 install - concepts - PixMaster - switcher - CG - clips - controls - team - appendix 8.5.2...
- Page 517 Control Panel, Network Connections to change the IP address of the network card. NIC 2 is for the Control Network for Broadcast Pix (this is located next to the USB ports) and NIC 1 is used for your local private network (this is located next to the graphics card).
- Page 518 SoftPanel. When the main workstation is back up and connected to a show, clicking on Reconnect will join the show. NOTE: There is a maximum of 10 users that may connect and view the Broadcast Pix system at one given time. Broadcast Pix V5...
- Page 519 Monitor VGA monitor cable can easily run to. (or a back- room PC) Crossover cable Show Creator Broadcast Pix V5 install - concepts - PixMaster - switcher - CG - clips - controls - team - appendix...
- Page 520 Reconnect on the SoftPanel’s web browser to connect it. If you wish it to be always available, you need an optional additional panel license, see section 8.1. All Granite 2000 models come with 4 panel licenses. If one panel should fail, the other one may be used without any interruption.
- Page 521 Redundant Control Panel and SoftPanel 2ME Control Panel & 1ME Control Panel Redundant 1ME Control Panels Broadcast Pix V5 install - concepts - PixMaster - switcher - CG - clips - controls - team - appendix...
- Page 522 8.9 Remote Control from a Distance The Broadcast Pix system may be remotely controlled over the Internet. Remote control is done through the system’s second Ethernet port, NIC 1. NIC 1 Internet Remote NIC 2 SoftPanel or Crossover Cable Control Panel...
- Page 523 Binding window to close the window. Click on the Red X to close the Computer Management window. NOTE: It is important to consult Broadcast Pix Technical Support prior to changing the Server Ports. Improper setup will cause BPswitcher to not operate correctly. Broadcast Pix V5...
- Page 524 8.6. In the address bar, enter the external IP address of the remote Broadcast Pix system. In most causes this is not the assigned IP address on the workstation NIC card. If the external IP address is not known, on the Broadcast Pix workstation go to www.whatsmyip.com.
- Page 525 Clear Workstation URL= Enter the External IP address of the remote Broadcast Pix system, using the numeric PixButtons ensuring that the period . is used. The above example would be Workstation URL= 67.152.12.226 [6] [7] [.] [1] [5][2] [.] [1] [2] [.] [2] [2] [6]...
- Page 526 Using new URL for Workstation If multiple panels are connected ensure that the Panel IP addresses are different, as described in section 8.8. Broadcast Pix V5 install - concepts - PixMaster - switcher - CG - clips - controls - team - appendix...
- Page 527 Refer to your wireless hub/router for proper installation. The iPixPad replicates a Broadcast Pix PixPad with access to Mems, CG 1, Stills 1, and Clips 1 and runs on the iPhone or iPod Touch. The iPixPad is a free download from the Apple Application Store, which can be accessed at http://itunes.apple.com/us/app/ipixpad/id333188743?mt=8...
- Page 528 Broadcast Pix logo on the home screen, as shown on the right. The Broadcast Pix splash screen will appear. Enter the IP address of the Broadcast Pix system In the IP Address text box, in this case 10.0.0.51. Click the Done button on the virtual keyboard.
- Page 529 Apple iPad by clicking the Broadcast Pix logo on the home screen. The Broadcast Pix splash screen will appear. Enter the IP address of the Broadcast Pix system In the IP Address text box, in this case 10.0.0.51. Click the Keyboard key on the virtual keyboard to hide the keyboard, as shown right.
- Page 530 To mute or lower the volume of the clicks, use the volume controls on the side of the iPad. Broadcast Pix V5 install - concepts - PixMaster - switcher - CG - clips - controls - team - appendix 8.10...
- Page 531 A.1 Updating the Broadcast Pix Software Broadcast Pix systems may be easily updated with new enhanced software that may be provided from time to time by Broadcast Pix. It is recommended to download the appropriate software on another workstation and copy the zip file via USB drive, and not connect the Broadcast Pix system to the internet.
- Page 532 Click on the Yes button. It will display a series of progress bars to show Broadcast Pix Software being removed. This process may take 2-5 minutes. Broadcast Pix V5 install - concepts - PixMaster - switcher - CG - clips - controls - team - appendix...
- Page 533 To Load the New Version of Broadcast Pix Software: Once the previous version has been uninstalled and the new version has been downloaded, Open the zip file that you downloaded by double-clicking on it. Double-click on Setup.exe file, as shown on the right.
- Page 534 Granite Switcher, Granite Server, Control Panel and Remote Panels to eliminate this step. Granite Server Broadcast Pix V5 install - concepts - PixMaster - switcher - CG - clips - controls - team - appendix...
- Page 535 Once the progress bar disappeared and the control panel automatically reboots, the Granite System is now upgraded. You may now start to use the new features. Broadcast Pix V5 install - concepts - PixMaster - switcher - CG - clips - controls - team - appendix...
- Page 536 Close the application (File, Quit) and restart BPswitcher. Your options are ready to use. Broadcast Pix V5 install - concepts - PixMaster - switcher - CG - clips - controls - team - appendix...
- Page 537 192.168.53.250. If it fails to find either a workstation with that address or a Broadcast Pix Switcher show open, then it asks the operator what it should do. It does the same thing if a problem develops during normal operation.
- Page 538 Show Prev. are labeled on inputs indicating their use as the connections from the Broadcast Pix workstation running the current show. The Cut button is also illuminated, indicating that it can be used to perform cuts between program and preview.
- Page 539 Select the Granite mode. Select the Select Panel Mode PixButton when the correct mode has been selected. Broadcast Pix V5 install - concepts - PixMaster - switcher - CG - clips - controls - team - appendix...
- Page 540 NOTE: The maximum length for RS-232 communication is 15 meters (50 ft), if a longer distance is required you may need to convert to RS-422 back to RS-232 with a 3rd party converter. Broadcast Pix V5 install - concepts - PixMaster - switcher - CG - clips - controls - team - appendix...
- Page 541 Broadcast Pix V5 install - concepts - PixMaster - switcher - CG - clips - controls - team - appendix...
- Page 542 85 – 265 VAC, 47 – 63Hz, -10 to +70 degrees Celsius Typical: 26VA @240VAC / 90 BTU/hr Power Consumption Max: 60VA @240VAC / 200 BTU/hr Broadcast Pix V5 install - concepts - PixMaster - switcher - CG - clips - controls - team - appendix...
- Page 543 Broadcast Pix welcomes suggestions to this manual, please send to manual@broadcastpix.com © 2016 Copyright Broadcast Pix, Inc. Broadcast Pix, Granite, iBoB, Slate, PixButtons, PixMaster, PixPad, iPixPad, iPixPanel, AutoAspect, and SoftPanel are trademarks of Broadcast Pix, Inc. Other trademarks are owned by their respective companies.
- Page 544 Notes Broadcast Pix V5 install - concepts - PixMaster - switcher - CG - clips - controls - team - appendix...
Need help?
Do you have a question about the Granite 2000 and is the answer not in the manual?
Questions and answers