Roland VS-880EX Application Manual
Digital studio workstation
Hide thumbs
Also See for VS-880EX:
- Owner's manual (192 pages) ,
- Quick start manual (187 pages) ,
- Service notes (20 pages)
Table of Contents
Advertisement
Quick Links
®
®ÂØÒňÎ
EX
APPLICATION GUIDE 1.0
This Application Guide provides step-by-step procedures and important information about day-to-day use of the
VS-880EX in actual applications.
©
2000 Roland Corporation
All rights reserved. No part of this publication may be reproduced in any form without the written permission of ROLAND CORPORATION.
All trademarks are the property of their respective owners.
Advertisement
Table of Contents

Related Manuals for Roland VS-880EX


Summary of Contents for Roland VS-880EX
-
Page 1: Application Guide
This Application Guide provides step-by-step procedures and important information about day-to-day use of the VS-880EX in actual applications. © 2000 Roland Corporation All rights reserved. No part of this publication may be reproduced in any form without the written permission of ROLAND CORPORATION. All trademarks are the property of their respective owners. -
Page 3: Table Of Contents
Table of Contents Purpose of this Guide ........................7 How to use this Guide ........................7 Refer to your VS-880EX Owner’s Manual & Quick Start ..............7 Icons & Symbols ..........................7 Conventions Used In This Manual ....................8 Chapter 1: Laying a Foundation Introduction to Multitrack Recording .................... - Page 4 [YES] / [NO] Buttons ......................31 TIME/VALUE Dial ........................31 VS-880EX Demo Songs ......................... 31 VS-880EX Connections ........................32 Comments On VS-880EX Connections ..................34 Phantom Power ........................34 Creating A New Song ........................34 Naming A Song ........................... 35 Defining Default Settings ......................
-
Page 5: Table Of Contents
Backup Your Song to DAT .........................99 Recover Your Song from DAT ........................100 Automated Mixing Using a MIDI Sequencer ....................101 Automated Mixing Within the VS-880EX (3 methods) ................. 103 Creating A Tempo Map .......................... 104 Using the Sync Track (3 methods) ......................105 Preparing a Song for CD Burning ...................... - Page 6 Sync VS-880EX to ADAT ......................119 Sync VS-880EX to DA-88 ......................120 Sync VS-880EX with Computer Sequencer ..................121 Sync VS-880EX to Drum Machine or MIDI Sequencer ..............122 Sync VS-880EX to Video ......................123 Chapter 8: Appendix Glossary of General Audio and Recording Terms ................125 More About SCSI ........................
-
Page 7: Purpose Of This Guide
Purpose of this Guide This Application Guide details many of the common concepts and procedures associated with recording and editing with the VS-880EX. It has been written for users new to the general world of recording and specifically to digital hard disk recording. -
Page 8: Conventions Used In This Manual
Tracks • The VS-880EX has two banks of 8 Virtual Tracks for each actual primary recording track. When displayed, the LCD indicates the primary recording track as the first number and the virtual track as the second number. This guide will use the same convention. For example, Tr. -
Page 9: Chapter 1: Laying A Foundation
I n t r o d u c t i o n t o M u l t i t r a c k R e c o r d i n g In order to maximize the usefulness of your VS-880EX, a basic understanding of the typical recording process is very helpful. -
Page 10: Mixdown Session
However, the VS-880EX provides random access to all parts of your song. For example, you just instruct the VS-880EX to play the chorus first, then the first verse, etc. If you didn’t like it, you just instruct the VS- 880EX to change the order as many times as you wish. Since it is not physically moving your song or re- recording anything, you can rearrange your song a thousand different ways without ever using any addition memory from the hard disk. -
Page 11: Pointer Based Editing
Pointers take up virtually no disk space, and the VS-880EX can write or change pointers instantly. That allows you to copy all 8 tracks of a song instantly to another location without using additional disk space. The original audio is never changed. -
Page 12: Summary Of Vs-880Ex Terminology
The ability to recall your completed song from an Low frequency equalization boosts or lowers the audio DAT tape and load it into your VS-880EX so it perceived loudness of bass (low) frequencies. The can be played, re-edited, added to, etc. - Page 13 (backwards). display, location makers, etc. Next Now Line An instruction to the VS-880EX to locate to the next The vertical black line in the center of the LCD marker position (forwards). display indicates the current VS-880EX position in your song.
- Page 14 Parameter Restart A Parameter refers to some setting within the VS- After the VS-880EX has been properly shut down, the 880EX that you can modify (e.g., EQ frequency is a Restart command can be used to reload your song Parameter, Aux Send level is a Parameter, etc.).
- Page 15 The primary use of a Vocoder is to analyze a spoken System or sung human voice, then use the information to A section of the VS-880EX that refers to the overall shape the harmonic content and envelope of a second settings related to your song such as sample rate, musical signal (usually an electronic instrument), sync source, etc.
-
Page 16: Vs-880Ex Commonly Asked Questions
“How do I record with effects?” (See Application Guide page 40 for external effects and page 45 for internal effects.) • “I plugged my foot switch into the VS-880EX and it won’t punch into record - what do I do?” (See “Footswitch,” Application Guide page 31.) •... - Page 17 “How can I add more recording time to my VS-880EX?” (See Application Guide page 113.) • “How do I begin a new song in my VS-880EX?” (See Application Guide page 32, Owner’s Manual page 40, or Quick Start Manual pages 12-13.) •...
- Page 18 VS-880EX Application Guide...
-
Page 19: Chapter 2: Understanding Your Vs-880Ex
CONTROLS – Controls make changes to the value of settings. For example, they change volume, amount of EQ, panning position, etc. The only variable controls on the VS-880EX are the channel faders, pan pots, input sensitivity, headphone volume, aux send, and the Time/ Value dial. -
Page 20: Important Concepts To Understand
Understanding The Mixer In order to make best use of your VS-880EX, an understanding of the built-in digital mixer is required. This will save you valuable hours later when you are trying to figure out why you can’t hear the reverb, why there is EQ on the bass drum, and why you cannot hear anything in your headphones. -
Page 21: A Mixer Analogy
Think of your home as the VS-880EX mixer. The cold water coming into your home from the main supply in the street is just like the audio signal from your guitar entering an input of the VS-880EX. As shown in the plumbing diagram, the cold water branches into two directions, the kitchen sink and your water heater. -
Page 22: The Vs-880Ex Mixer
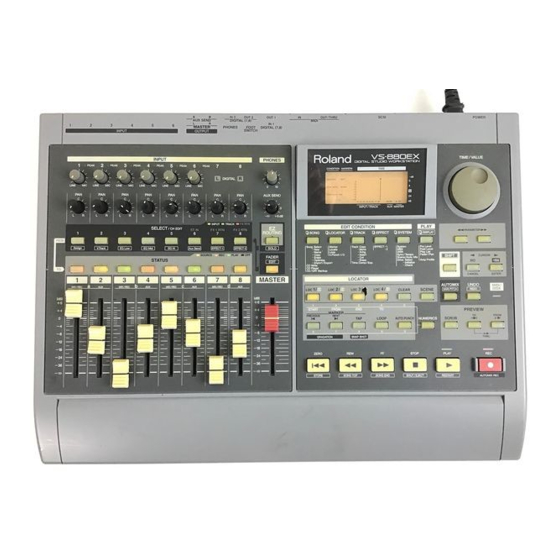
The VS-880EX Mixer As you can see from the front panel, the VS-880EX provides 8 channel mixing faders. However, unlike a conventional analog mixer where every fader is hard-wired to perform a specific function, the VS-880EX digital mixer is virtual (assignable) –... -
Page 23: Input Mode
When the [FADER/EDIT] button is lit orange, the [CH EDIT] and [STATUS] buttons are used to route the Input signal (rear panel of the VS-880EX) to the desired recording Track (1 – 8). Any Input (1 - 8) can be assigned to record to any Track (1 - 8). -
Page 24: Mixer Effect Routing
Now Time Now Time indicates the exact location in your song where the VS-880EX is stopped or playing. It is indicated by the vertical black line in the center of the LCD display. You might think of this “now line” as the playback head of a traditional tape recorder. -
Page 25: Virtual Tracks
Third Guitar Solo, but all the others are now hidden. The VS-880EX Virtual Tracks operate the same way. Whatever Virtual Track you “bring to the top of the stack” is the V. Track that you will hear. All the other 7 are still there, but they are hidden below the top one. -
Page 26: Finding Your Edit Points
Think of each of the eight primary recording tracks in the VS-880EX as a stack of tracks that is eight layers deep. Each Virtual Track (layer) is completely independent from the others. You can record up to 64 tracks total, however, only eight (the layers in the top of each stack) can be played simultaneously. -
Page 27: Editing Resolution
The VS-880EX has the ability to move the Now Line in different size steps. This is very important when you want to edit your song. For example, if you set the VS-880EX step size to one measure, you can only set the Now Line on the beginning of each measure. -
Page 28: Using Waveforms To Edit
Using Waveforms To Edit The VS-880EX Scrub feature makes it very easy to find your edit points because you can see a visual representation of the sound and hear it at its original pitch while editing at a fine resolution of down to 1/3000th of a second (see Owner’s Manual pages 141). - Page 29 Channels Versus Tracks The 8 faders, status buttons, and pan controls on the left side of the VS-880EX represent mixer channels. They may or may not represent actual recorded tracks. However, when a fader is being used for a recorded track, the channel # and the track # will be the same.
-
Page 30: Important Navigational Rules & Skills To Master
Use the [CH EDIT] button to select a specific channel to edit. Press the [CH EDIT] button to instruct the VS-880EX which track you want to work with. For example, if you want to change the virtual track on channel 4, you would first press the [CH EDIT] button above fader # 4 to select channel # 4 for editing. -
Page 31: [Cursor] Buttons
[ Y E S ] / [ N O ] B u t t o n s The [YES] button is also used to answer “YES” whenever the VS-880EX displays a question in the LCD. Alternately, the [NO] button signals a “NO” response. For example, anytime the VS-880EX display asks you a question (i.e. -
Page 32: Vs-880Ex Connections
SCSI is a protocol for high-speed recording and data transfer between computer devices. For our purposes, the VS-880EX is a computer that has all the recording hardware and software built in. You will use this SCSI connector to add external hard disks for additional recordings. (see Owner’s Manual page 99 for detailed information). -
Page 33: Master Out
FOOTSWITCH A momentary switch (e.g., Roland DP-2, DP-6, FS-5U) can be connected to the footswitch jack to activate certain operations. For example, if you set the Footswitch to Record, you could use a DP-2 pedal to activate Punch In/Out, keeping your hands free to play the guitar, keyboard, etc. Other footswitch functions... -
Page 34: Comments On Vs-880Ex Connections
Creating A New Song When you first power on the VS-880EX, the demo song will be loaded. When you want to make your own recordings, you will need to create a new song. Use the following procedure to create a new song: Press [SONG] (under EDIT CONDITION) until “SNG Song New?”... -
Page 35: Naming A Song
Naming A Song When creating a new song it is a good idea to name that song. If you do not name the song, the VS-880EX automatically assigns a name such as “Init Song 001, 002…,” depending on how many new songs have been created during the current recording session. -
Page 36: Save Your Song To Disk Often
Save Your Song to Disk Often Since the VS-880EX creates editing information in RAM (Random Access Memory) before it is saved to disk, it is a good idea to save (store) your song to hard disk often. If the AC power failed, you would loose all the recordings and edits made since the last time your song was stored on the hard disk. -
Page 37: Sample Setup
Sample Setup The VS-880EX can be integrated into a large variety of studio environments. The diagram below depicts one possible system idea. XP-50/80 Music Workstation Audio from MIDI Keyboard, Microphone, MIDI Interface Guitar, or Mixer Computer with Serial Cable connection... - Page 38 VS-880EX Application Guide...
-
Page 39: Chapter 3: Recording Applications
VS-880EX. Our example records a synthesizer as a piano track on the VS-880EX. You will need to connect your synthesizer to the VS-880EX Input # 1, select Tr. 1-1 for recording, correctly adjust the volume, then finally record the instrument to Tr. 1-1. -
Page 40: Play A Piano Track And Add Markers & Locators
You can always adjust the exact location of the marker later if it is not in precisely the correct place. Marker Points The VS-880EX provides up to 1000 potential marker points that can be entered using the [TAP] button and located by two methods outlined below. -
Page 41: Using Locator Banks
(Market Points, Continued) Clearing a Marker Point Locate the VS-880EX to the marker point you wish to clear, hold the [CLEAR] button (in the LOCATOR section) and press the [TAP] button. Clear All Markers Hold down the [SHIFT] and [CLEAR] buttons, then press the [TAP] button. -
Page 42: Record Vocal With Mic And External Compressor
You will need to connect your microphone to the VS-880EX Input # 1, select Tr. 1-1 for recording, correctly adjust the volume, then finally record the instrument to Tr. 1-1. You record on the VS-880EX as outlined on page 37 of this guide, however, you must first make the proper settings on your external compressor/limiter. -
Page 43: Record 5 Guitar Tracks Using Virtual Tracks
Record 5 Guitar Tracks Using Virtual Tracks If you are unfamiliar with virtual tracks in the VS-880EX, refer to page 23 of this guide for more details. It is often desirable to record many takes or recordings of the same musical instrument or vocal so you can pick the best performance to use in you final song. - Page 44 Use the [TIME/VALUE] dial to select between each of the Virtual Tracks you have recorded. You can listen to one, then select another and listen, then select another and listen, etc. You cannot change Virtual tracks while the VS-880EX is in PLAY. You must press [STOP] before changing virtual tracks.
-
Page 45: Listening To A Guitar Using Internal Effects
Maybe you just want to experiment with different reverb effects or change an EQ. This example uses the VS-880EX’s built-in effects. You will setup the VS-880EX as though you are going to record the guitar with effects, however, you will not actually press the record button to begin recording. -
Page 46: Recording A Guitar 'Dry' While Listening With Effects
“dry” (no recorded effects), you will be able to wait until mixdown to make your final effects decisions. The example uses the VS-880EX’s built-in effects. You will connect your guitar to the VS-880EX, select an effect to listen to, select a track to record to, and then record the guitar ‘dry’ to the VS-880EX. -
Page 47: Recording A Guitar 'Wet' With Internal Effects
The example uses the VS-880EX’s built-in effects. You will set up the VS-880EX to record your instrument on Tr. 1-1. You will then select that type and amount of effect that you wish to use. The final step will be to actually record your instrument on Tr. 1-1 with the effect. -
Page 48: Record A Guitar On Tr. 1, Record The Effects On Tr. 2
You will plug your guitar into Input # 1, set the VS-880EX to record it on Tr. 1-1, determine what effect you will use, then set the effect to record on Tr. 2-1, and finally make the actual recording. -
Page 49: Punching In And Out - Manual (With Undo & Redo)
The VS-880EX allows you to manually ‘punch in and out’ on any track, in real time. You will set the punch- in track to record, play the track, then place the VS-880EX into record at the appropriate place. Once you have finished recording over the section of interest, you can take the VS-880EX out or record mode. - Page 50 UNDO LEVEL allows you to choose how many previous actions to “UNDO.” For example, if you made 7 punch in/out recordings and then selected an UNDO LEVEL of 6, the VS-880EX would UNDO the previous 6 recordings leaving only the first one. This UNDO LEVEL also functions the same way during editing.
-
Page 51: Use Auto-Punch For Punch In/Out
The VS-880EX will not actually enter the record mode until the specified location and it will exit the record mode at the specified punch out location. You can then rewind the song, place the record ready track into play mode, and play back the newly recorded solo. -
Page 52: Loop Recording
As long as you do not press the [REC] button, the VS-880EX will not actually enter the record mode. - Page 53 [PLAY]. The [REC] button will flash until you reach the punch in location, then it will light red indicating that you are in record mode. The VS-880EX will automatically to the loop start location after it reaches the loop end location so you can listen to what you just recorded.
-
Page 54: Sync To A Midi Sequencer Using Mtc (Midi Time Code)
MIDI Clock which is based on tempo (musical divisions: measures/beats). If your sequencer can slave to MTC, use the following steps to sync your sequencer as a slave to the VS-880EX: Connect a MIDI cable from the MIDI output of the VS-880EX to the MIDI input of your external sequencer. - Page 55 Set your sequencer to “Transmit MTC.” Make sure that the MTC Type is 30 frame (if you use a different frame rate, make sure that it matches what was set in the VS-880EX). Press [PLAY] on the VS-880EX. The [PLAY] button will flash green indicating that the VS- 880EX is waiting to receive a MTC signal.
-
Page 56: Sync To A Midi Sequencer Using Midi Clock
MIDI Clock is a sync code that uses the tempo settings of your song to lock two devices together. In order to use MIDI Clock with the VS-880EX, you first must make a “Tempo Map” (see page 102 of this guide). -
Page 57: Sync To An External Sequencer Using Mmc
For example, you would use MMC if you are working on your sequencer and would like to start and stop the VS-880EX without ever having to press any transport buttons on the front panel of the VS- 880EX, especially if your sequencer does not transmit MTC (MIDI Time Code). - Page 58 Set the sequencer to “MMC Master” mode. Set it to slave to MTC (MTC slave mode). Press “PLAY” on the external sequencer – OR – press [PLAY] on the VS-880EX. MIDI Clock can also be used as the sync source in this example. Follow the instructions detailed in “Using MIDI Clock”...
-
Page 59: Recording From A Digital Source
VS-880’s sample clock to be locked to the incoming digital signal. Connect your digital source, probably a DAT machine, to Digital In 1 or Digital In 2 on the VS-880EX. You will then need to select the track you wish to record, select the digital input as the source for recording, and finally record the digital audio into the VS-880EX. -
Page 60: Recording Multiple Inputs To A Single Mono Track
You would first connect the three microphones to three inputs of the VS-880EX. We will use inputs 1-3. You will set these inputs to faders 1-3 of the VS-880EX, select each channel to record onto Tr. 1-1, adjust their individual levels, and then record all three vocalists on Tr. 1-1. -
Page 61: Recording Multiple Inputs To 2 Tracks As A Stereo Mix
To add depth and dimension to your background vocal recordings, you might choose to record them as a stereo mix onto two tracks of the VS-880EX. It is very similar to recording multiple inputs to a single track, however, your will use the pan pots to position each microphone in the stereo mix before recording (see the action page - Recording Multiple Inputs to a Single Mono Track). -
Page 62: Record 4 Mics, Using Internal Compressor, To 1 Track
You would first connect the four microphones to the four inputs of the VS-880EX. You will select these inputs to faders 1 through 4 of the VS-880EX, select the compressor, select each channel to record onto Tr. 1-1, adjust their individual levels, and then record all four vocalists on Tr. 1-1. -
Page 63: Using The Serial Insert Path
Using the Serial Insert Path The serial insert FX path routing allow you to send the same mono channel thru both the left and right sides of a stereo effect. This is useful, for example, for using a four band stereo EQ as an eight band mono EQ. -
Page 64: Using The Cosm Microphone Simulator
Using the COSM Microphone Simulator You can record a vocal using an inexpensive dynamic mic such as the Roland DR-20 and then, using the Microphone Simulator in the effects section, emulate the warmth and tone of a much more expensive microphone. This can be done during the recording process or at any later time, even at mix down. -
Page 65: Using The Voice Transformer
Using only the Formant parameter, it can be used to fatten a vocal or bass track. The algorithm allows the user to edit the effect in real time using the first 5 faders of the VS-880EX mixer. ACTION: Use the Voice Transformer to Affect a Vocal Track Connect a microphone to Input 1. - Page 66 You can also use EZ Routing to create User templates that recall your own custom setups at the touch of a button. You can store up to 29 of your own routing setups in the VS-880EX.
-
Page 67: Creating A User Template With Ez Routing
(Creating a Template With EZ Routing - Continued) Press the [PARAMETER>>] button until “Change Routing?” is displayed and press [YES]. After the VS-880EX is finished making the routing changes, “Complete” will be displayed and you will be returned to the main play screen. - Page 68 VS-880EX Application Guide...
-
Page 69: Chapter 4: Overdub Applications
Press the [REC] button. The red led will flash. Press the [PLAY] button to begin recording. After you complete your guitar track, [STOP] the VS-880EX and press the [ZERO] button to return to the beginning of the song. Chapter 4: Overdub Applications... -
Page 70: Bouncing Tracks 1-6 To Tracks 7-8
Press [REC] and then [PLAY] to record (bounce) tracks 1 through 6 to tracks 7 and 8. You can use the faders of channels 1-6 to mix levels in real-time and those changes will be recorded onto tracks 7 and 8. VS-880EX Application Guide... -
Page 71: Using The Internal Effects When Bouncing
Using The Internal Effects When Bouncing When bouncing multiple recorded tracks down to a single mono or stereo track, you may want to add effects during the bouncing process. For example, you might want to take the six background vocal tracks (see Bouncing Tracks 1 through 6 to 7 &... -
Page 72: Using The Aux Bus As A Headphone Monitor
The VS-880EX allows you to use the internal AUX bus as a cue (headphone) bus in order to provide a separate mix for the musician. - Page 73 Combining Lead Vocal Tracks Into One Using [Mute] This function is known in recording studios as “vocal comps” or “comping vocals.” Let’s assume that you have two lead vocal parts recorded on Tr. 1-1 and Tr. 2-1. You decide that the best performance of the first verse, third verse, and ending are the recording on track one.
- Page 74 One approach is to copy your whole song to another location in the VS-880EX time line. You would do this using the Copy function and using the Song Top as the Copy Start and Copy From points, the Song End as the Copy End and some marker that is after the song end as your Copy To location.
-
Page 75: Making A New Version Of Your Song
(Continued) (Making A New Version of Your Song, Continued) Press [YES] to execute the copy function. Now you need to find the destination for the next section you want to copy, which will be the end of the section you just copied. Press the [Song End] Button. -
Page 76: Switching The Virtual Track Bank
Switching the Virtual Track Bank The VS-880EX contains 128 Virtual Tracks that can be used for recording and editing. These tracks are divided into two banks (A and B) of 64. One bank can be selected for the eight playback tracks and you can copy Virtual Tracks from one bank to the other. -
Page 77: Chapter 5: Editing Applications
One of the best parts of the VS-880EX is the ability to cut and paste your audio material, just like you would use a word processor on your computer to cut and paste a written document. One common editing function is the cut command. -
Page 78: Use {Erase} To Eliminate Unwanted Material
Instruct the VS-880EX which track you intend to ERASE, then specify the start and end of the section to be erased, and finally instruct the VS-880EX to execute the erase command. You may think of the ERASE command exactly like your were erasing an analog tape or cassette. -
Page 79: Use {Insert} To Add Space Into An Existing Recording
First choose which track or tracks to insert blank time into. The VS-880EX will let you specify the location to insert the time and also the length of time to insert (for more - see the VS-880EX Owner’s Manual, Chapter 6). - Page 80 By setting the ‘START’ and ‘FROM’ marker to the same location, the start of the section you are moving will be relocated to the designated ‘TO’ destination (for more - see the VS-880EX Owner’s Manual Chapter 6). ACTION: Use {Move} To Place Guitar Part in New Location Clear Locate Points First: Hold the [CLEAR] button and press any [LOC] buttons with lit LED.
-
Page 81: Use {Move} To Place Guitar Part In New Location
(Continued) (Use {Move} To Place Guitar Part in New Location, Continued) Press [LOC 1]. Press the right [PARAMETER>>] button, “TRK Frm=” should be displayed. Press [LOC 1]. Press the right [PARAMETER>>] button, “TRK End=” should be displayed. Press [LOC 2]. Press the right [PARAMETER>>] button, “TRK To=”... -
Page 82: Use {Move} & Sync Point - Align Music With Narration
It is easy to instruct the VS-880EX to {MOVE} the beginning of a verse # 2 to the end of verse # 4. - Page 83 (Use {Move} To Place Guitar Part in New Location, Continued) Press the [STATUS] button that corresponds to the track you want to move this section of the music to (this can be the same as the source track) so it is flashing red. Use the TIME/VALUE dial to select the Virtual Track that you want to move the section to.
-
Page 84: Use {Copy} To Create A Drum Loop
880EX to copy the drum part, end to end, for a defined number of times up to 99. The drum part will now repeat over and over again, end to end, creating a long dance track (for more - see the VS-880EX Owner’s Manual, Chapter 6). - Page 85 (Use {Copy} To Create A Drum LoopContinued) Copying twice to the same Track A" Start Time Copying twice to a different Track B" Start Time Copying using the “Frm” setting Start From Time Chapter 5: Editing Applications...
-
Page 86: Use {Copy} To Re-Use A Vocal In Multiple Verses
Again using the {COPY} command, you can select the first chorus recording on tracks Tr. 6-1 as the ‘START’ and ‘END’ of the section to be copied. You can then instruct the VS-880EX to {COPY} this background vocal section to the second and then to the third chorus. You will first specify the beginning of the second chorus as your COPY TO location and then choose the third chorus as the COPY TO location (for more - see the VS-880EX Owner’s Manual, Chapter 6). - Page 87 (Use {Copy} To Re-Use A Vocal In Multiple Verses, Continued) Press the right [PARAMETER>>] button, “Copy Time =” should be displayed. Use the TIME/VALUE dial to select 1 (number of times to copy the background vocal). Press the right [PARAMETER>>] button, “Track Copy OK?” should be displayed. Press [YES] to complete the copy command.
- Page 88 VS-880EX Application Guide...
-
Page 89: Chapter 6: Mixdown Applications
Press [FADER/EDIT] until it lights green. Press the [TR 1-8 STATUS] buttons until they light green (play mode). Connect the MASTER OUT L and R (VS-880EX rear panel) to the left and right inputs of your mastering tape recorder. Put your mastering deck in record pause mode and press [PLAY] on the VS-880EX. -
Page 90: Mix 8 Tracks To Stereo Dat - Digitally
Mix 8 Tracks To Stereo DAT - Digitally Mixing your 8 VS-880EX tracks to stereo DAT digitally is exactly the same as recording to a stereo analog recorder. With the VS-880EX’s default settings, the master analog outputs and the digital outputs contain exactly the same information. -
Page 91: Mixing 8 Tracks With Internal Effects To Stereo Output
Mixing 8 Tracks With Internal Effects To Stereo Output Using the 2 effects processors built into the VS-880EX you can add additional creativity during the mixdown process. For example, maybe you have a ‘dry’ vocal on Tr. 1-1 (no effects recorded on it). Tr. 2-1 has a piano that was originally recorded using reverb. -
Page 92: Using Mute During Mixdown
Press the [SELECT] button of that track or tracks again to return all tracks to play mode. Hold [SHIFT] and press [SOLO] (EZ ROUTING) again to exit SOLO mode. The SOLO function can be used on more that one channel (track) at a time. VS-880EX Application Guide... -
Page 93: Using Scenes To Help With Mixdown
The VS-880EX allows you to recall mixer settings at the touch of a button using the Scene function. Essentially, the VS-880EX allows you to take a ‘snapshot’ or picture of all the settings in the VS-880EX at a particular point in time. The ‘snapshot’ is stored in one of the 8 available scenes. These scenes or snapshots can be recalled by pressing the correct [SCENE] button. -
Page 94: Mixing 8 Tracks And External Source To 2 Track Dat
Mixing 8 Tracks and External Source To 2 Track DAT There are occasions when you have all 8 tracks recorded and you would like to add just one more instrument or vocal to your song during mixdown. This is a simple process in the VS-880EX using the [FADER/EDIT] button. -
Page 95: Using External Effects During Mixdown
Assign tracks 7 & 8 to use the AUX SEN bus 1 and 2 to pass the audio out the AUX SEND jacks to the external reverb. Then, bring the outputs from the reverb back into the VS-880EX through Inputs # 1 and 2. -
Page 96: Use Virtual Tracks To Re-Use The Internal Effects
Use Virtual Tracks To Re-Use The Internal Effects What do you do if you want to add a different reverb sound to each individual track of the VS-880EX using only the 2 internal effects devices? You re-record two tracks at a time to new virtual tracks, using the internal effects. -
Page 97: Listen To More Than One Virtual Track Simultaneously
# 8. After listening to each Virtual Track, you decide that you would like to listen to Virtual Track # 2, 5, and 6 all at the same time. Since the VS-880EX will only play one Virtual Track at a time for a given recording track, you must move some of your virtual guitar tracks to other recording tracks so that they can be selected for playback. -
Page 98: Process Entire Mix With Internal Eq And Compressor
Process Entire Mix With Internal EQ And Compressor On some occasions you might already have a really good mix set up in your VS-880EX, but you find that you would like to add a little more low frequency boost to the overall mix. In addition, you might want to compress the dynamic range so your song will sound “louder”... -
Page 99: Backup Your Song To Dat
Since hard disk drives are mechanical devices, they are more subject to failure than any other part of your VS-880EX. If your hard disk develops a problem or fails for any reason, you may loose all the songs stored on that disk. It is a good idea backup your songs often by copying them to another disk or backing them up to DAT (for more information see the Owner’s Manual page 129). -
Page 100: Recover Your Song From Dat
(for more information see Owner’s Manual page 131). ACTION: Recover Your Song from DAT Connect the Digital output of your DAT recorder to the Digital input of the VS-880EX (the VS-880EX uses S/P DIF coaxial (RCA phono) and optical connectors). -
Page 101: Automated Mixing Using A Midi Sequencer
MIDI sequencer to your VS-880EX. This automation function (as well as the built-in automation) can be very useful if you have a complicated mix requiring many level changes during the song. -
Page 102: Automated Mixing Within The Vs-880Ex (3 Methods)
Automated Mixing Within the VS-880EX (3 methods) It is also possible to add dynamic automation for actual fader and other control movements within the VS-880EX itself. There are three methods for accomplishing this, and inputs and tracks can be automated independently. -
Page 103: Automated Mixing Within The Vs-880Ex (3 Methods)
(Automated Mixing Within the VS-880EX (3 methods), Continued) ACTION: Automated Mixing using Gradation The VS-880EX provides yet another type of automated mixing that is referred to as gradation. In this type of automation the VS-880EX will interpolate the settings between two marker points (snapshots). -
Page 104: Creating A Tempo Map
Tempo Map 2 will take effect, and a new time signature (if desired). Advance the VS-880EX to the next tempo map change and continue this procedure if you would like any additional changes. The VS-880EX allows up to 50 tempo maps (changes) per song. -
Page 105: Using The Sync Track (3 Methods)
Set your sequencer so that it is slaved to MIDI Clock. Press [ZERO] on the VS-880EX followed by [PLAY]. Your sequencer should start to play in sync with the VS-880EX and the VS-880EX will now send out all of the tempo and meter changes that were contained in your original sequence. - Page 106 Connect the MIDI OUT of the VS-880EX to the MIDI IN of your sequencer/MIDI interface. Set your sequencer to sync to MIDI Clock. Press PLAY on the VS-880EX and your sequencer will play in sync with your song. ACTION: Generating a Sync Track from Start & End...
- Page 107 (Generating a Sync Track from Start & End Times, Continued) Press the right [PARAMETER>>] button until “SYS CV4:Measure=“ is displayed and use the TIME/VALUE dial to select the number of measures in your song. Press PARAMETER>> until “SYS CV4:Beat=“ is displayed and use the TIME/ VALUE dial to select the number of beats in each measure.
-
Page 108: Preparing A Song For Cd Burning
If you have the VS-CDR (optional), you can create an audio CD of your music directly from the VS-880EX. You can then add additional songs to your CD or “finalize” your CD so it can be played on ordinary CD players. -
Page 109: Writing One Song To Cd
CDs. This allows you to keep your audio in the pristine digital domain from the initial recording stage through to the finished CD. The VS-880EX is capable of recording a song to the CD and then adding additional songs to that same CD at a later time. This process is sometimes referred to as the “track-at-once”... -
Page 110: Writing Multiple Songs To The Cd At Once
CD duplicators. You will need to have all the songs for the CD combined within one VS-880EX song. You can do this by recording them that way from the beginning or by mixing your songs to an external device, such as a DAT machine (page 88 of this guide), and then re-recording your mixed down songs back into a single VS-880EX song. -
Page 111: Backing Up Your Hard Drive To Cd-R
Since hard disk drives are mechanical devices, they are more subject to failure than any other part of your VS-880EX. If your hard disk develops a problem or fails for any reason, you may loose all the songs stored on that disk. It is a good idea backup your songs often. -
Page 112: Loading Songs From Cd-R
Loading Songs From CD-R You can load songs stored on a CD-R disc with the CD Backup function back into the VS-880EX’s internal hard drive by using the CD Recover procedure. Your songs can then be played back in their original form. You can also edit and/or record new tracks to your song as well. If you make changes to your song that you would like to keep, you will need to save them and repeat the CD Backup procedure (Application Guide page 109) for your backup to reflect the changes. -
Page 113: Chapter 7: Tips And Advanced Applications
VS-880EX. Using The ‘Narration’ Effect The VS-880EX contains two powerful built-in effects processors, one particular effect is very useful when recording narration or voice dialogue. If you use the NARRATION effect in the Insert mode of your incoming microphone channel, it provides all the following features from a single effect setting: •... -
Page 114: Vari-Speed Functions In Scrub Mode
• When you are using SCRUB or PREVIEW, a blinking horizontal bar at the bottom of the LCD screen on either side of the center “now” line indicates Preview From (right side of the “now” line) or Preview To (left side of the “now” line). VS-880EX Application Guide... -
Page 115: Additional Equalizers In The Built-In Effects
The VS-880EX provides a special Sync Track. A complete tempo map including MIDI clock and Song Position Pointer can be recorded from an external sequencer, into the VS-880EX’s Sync Track. The Sync Track can then be used to synchronize the sequencer and the VS-880EX (see page 103 of this guide). Stereo Grouping / Channel Linking When working with stereo signals, the Channel Link function allows you to link two channels together so that they respond as a stereo pair (see Owner’s Manual - page 149). -
Page 116: Sync Multiple Vs-880Ex's Together
AUDIO: You can connect the Digital Out port from the slave units to the Digital In port of the next VS-880EX in the chain. Set the master Stereo In to Digital, and the master Stereo In Balance to zero for all units with the exception of the final VS-880EX in the chain. -
Page 117: Vs-880Ex With A Digital Sampler
You can use MIDI Time Code, MIDI Machine Control, or MIDI Clock to synchronize your sequencer with the VS-880EX. If possible, set aside a port on your MIDI interface for the VS-880EX and use a different port for your sampler(s). If you are using the VS-880EX as the master device sending MIDI Time Code, make sure that you connect the MIDI OUT connector of the VS-880EX to the MIDI IN connector of the sequencer. -
Page 118: Sync Vs-880Ex To Analog Tape Recorder
You can connect the audio outputs of the tape deck (with the exception of the track striped with SMPTE) to your mixer and then route the mixer outputs to the analog inputs of the VS-880EX. This will allow you to transfer tracks from your analog deck to the VS-880EX (up to 6 at a time) for digital editing or mastering. -
Page 119: Sync Vs-880Ex To Adat
To transfer tracks back and forth between the ADAT and the VS-880EX you can use the analog connections (up to 6 tracks at a time) or the digital connections (up to 2 tracks at a time into the VS-880EX or 4 tracks at a time into the ADAT). -
Page 120: Sync Vs-880Ex To Da-88
To transfer tracks back and forth between the DA-88 and the VS-880EX you can use the analog connections (up to 6 tracks at a time) or the digital connections (up to 2 tracks at a time into the VS-880EX and 4 tracks at a time into the ADAT). -
Page 121: Sync Vs-880Ex With Computer Sequencer
To use the VS-880EX as the master device sending MIDI Time Code, make sure that MIDI Thru is set to Out and that the sync source is set to internal. You will also have to set the VS-880EX to generate MTC and make sure that the frame rate matches that of your sequencer (the VS-880EX defaults to a frame rate of 30). -
Page 122: Sync Vs-880Ex To Drum Machine Or Midi Sequencer
If your sequencer does not support MIDI Time Code or MIDI Machine Control you must use MIDI Clock to synchronize it with the VS-880EX. Connect the MIDI IN and OUT ports of the VS-880EX to your MIDI sequencer (or drum machine) as shown in the diagram below. For this setup, the VS-880EX must be the master. -
Page 123: Sync Vs-880Ex To Video
Video Syncman by MIDIMAN) to generate SMPTE Time Code for the video deck and convert that to MIDI Time Code for the VS-880EX. If your video tape is not already striped with SMPTE Time Code you will need to record (stripe) SMPTE to one of the audio tracks on the tape. Connect the audio output of that track to the SMPTE input on the converter. - Page 124 VS-880EX Application Guide...
-
Page 125: Chapter 8: Appendix
Chapter 8: Appendix Balanced Glossary of General An audio circuit with 3 wires; two wires carry the Audio and Recording signal, high (+) and low (-), and the third is a shield which is connected to a chassis or system ground. Terms The signal leads are both of equal potential difference from the ground, and are hence “balanced”... - Page 126 These models are extremely accurate and allow great control over the sound of any guitar. The built-in effects in the VS-880EX include some of the COSM dBm is an electrical measurement of power. 0 dBm is preamplifier and speaker models, plus new equal to 1 milliwatt, which is the same as 0.775 volts...
- Page 127 Decoder Dynamic Microphone The second part of a 2-part system which also has a A type of microphone which converts acoustical to complementary encoder. Generally, the decoder of a electrical energy by means of a permanent magnet given system is not compatible with the encoder of and a moving coil.
- Page 128 Hence the term “reel usually divided into high, mid, and low flanging.” Today flanging is commonly done with frequency ranges. Also called “3-knob EQ.” electronic signal processing devices that do not require tape and can operate in real time. VS-880EX Application Guide...
- Page 129 Foldback Impedance A term, usually on European mixers, used The total opposition to the flow of alternating current interchangeably with “cue” in recording work or in an electrical circuit. Impedance is measured in “monitor send” in sound reinforcement work. ohms. Gain Input Level The amount an amplifier increases the power of a...
- Page 130 VS-880EX. However, MIDI clock can L i n e L e v e l be used to control other devices. MIDI Clock works...
- Page 131 MTC (MIDI Time Code) Outboard MIDI Time Code is a synchronization signal that is Refers to electronic equipment or signal processors digitally sent through MIDI for synchronization of that are not incorporated in the mixing console. absolute time between audio devices. Similar to External equipment.
- Page 132 Phantom Power Pointer Based Editing A method of remotely powering the preamplifier or When you record sounds into the VS-880EX, they are impedance converter which is built into many stored on the hard drive. Once on the drive, the condenser microphones by sending voltage along the original recording is never changed.
- Page 133 The editing resolution XX, or a punch in after a given word. (Punch out for finding edits on the VS-880EX is 1/3000th of a refers to either stopping the recording or switching second, allowing you to do very precise edits.
- Page 134 EBU consumer standard for the high-speed transfer Another term for a straight-line fader (see “fader”). of two channels of digital audio data. The VS-880EX Also may refer to any straight-line control, as has a coaxial S/PDIF connector that allows you to opposed to a rotary control.
- Page 135 Virtual tracks are additional areas to record you takes or sequencers. The tempo map generates MIDI Clock and ideas. Each track on the VS-880EX has 8 virtual information and Song Position Pointer information tracks. You can play one of these at a time per track,...
-
Page 136: More About Scsi
Incorrect termination will result in extra “ghost reflections” appearing on the SCSI bus, which can also corrupt SCSI communications. One end of the SCSI chain is the VS-880EX. It is internally terminated already. You must provide proper termination on the other end of your SCSI chain. -
Page 137: Scsi Cables
SCSI chain must be terminated as well. i.e. If you add one 1 Gigabyte external drive to the SCSI connector of the VS-880EX, it must also be terminated since it is the last device on the other end of the SCSI chain. -
Page 138: Active" Terminators
External terminators are usually rectangular boxes which can be attached to a separate 50 Pin Amphenol connector on the rear of the drive. Other external terminators have a 50 pin connector on both sides so the terminator can be plugged onto the drive and the cable from the VS-880EX can be plugged into the terminator. -
Page 139: Scsi Summary
SCSI Summary • Keep SCSI cables as short as possible. • Do not allow the total length of the SCSI chain to exceed 6 meters. • Use only high quality SCSI cables of correct impedance and shielding. • Do not connect or disconnect SCSI cables or terminators with power on. •... -
Page 140: Erasing The Demo Songs
Erasing the Demo Songs The VS-880EX contains demo songs for you to listen to and experiment with in order to become familiar with various functions. These songs are recorded on the VS-880EX just like the songs you record and, as such, occupy space on your internal hard drive. -
Page 141: Updating The System Software
Updating the System Software From time to time Roland will issue updates to the operating system for the VS-880EX. These updates are provided for a variety of reasons such as providing compatibility with external SCSI devices, software programs, and/or adding additional features that make your VS-880EX even more valuable and useful than it already is. -
Page 142: Update Procedure
Press [YES]. The update procedure will begin. When it is finished, “Please Reboot OK?” will be displayed. Turn the power for the VS-880EX off and then on again. The new system version will be displayed during as the VS-880EX is booting up. -
Page 143: Blank Track Sheet
Blank Track Sheet V-Tracks Chapter 8: Appendix... - Page 144 VS-880EX Application Guide...
- Page 146 2394US...
Need help?
Do you have a question about the VS-880EX and is the answer not in the manual?
Questions and answers