Table of Contents
Advertisement
Preface
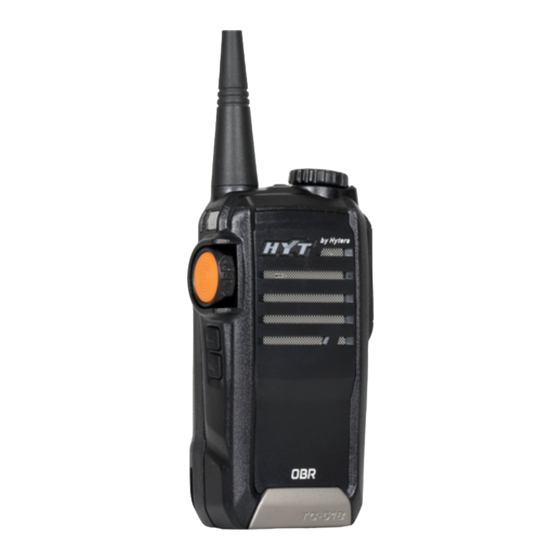
Thank you for purchasing HYT TC-518 portable radio. The main function keys are located
on one side of the radio, so you can have convenient one-hand operation; the orange
anti-skid PTT key is also ergonomically designed; in addition, the knobs are protected
against damage due to accidental drop. All these advantages help TC-518 possess
reliability and durability.
This easy-to-use radio will deliver you secure, instant and reliable communications at
peak efficiency. Please read this manual carefully before use. The information presented
herein will help you to derive maximum performance from your radio.
MODELS COVERED IN THIS MANUAL
TC-518 VHF Two-way Radio
TC-518 UHF Two-way Radio
Advertisement
Table of Contents

Related Manuals for HYT TC-518


Summary of Contents for HYT TC-518
- Page 1 Preface Thank you for purchasing HYT TC-518 portable radio. The main function keys are located on one side of the radio, so you can have convenient one-hand operation; the orange anti-skid PTT key is also ergonomically designed; in addition, the knobs are protected against damage due to accidental drop.
-
Page 2: Table Of Contents
Contents Safety Information ........................ 2 Product Inspection ....................... 3 Radio Overview........................4 Battery Information ......................6 Antenna Information ......................9 Assembly and Disassembly ....................10 Attaching/Removing the Battery ................. 10 Attaching/Removing the Antenna ................11 Attaching/Removing the Belt Clip ................11 Attaching/Removing the Earpiece or Microphone ............ -
Page 3: Safety Information
◇ This equipment shall be serviced by qualified technicians only. ◇ Do not modify the radio for any reason. ◇ Use only HYT supplied or approved batteries and chargers. ◇ To avoid electromagnetic interference and/or compatibility conflicts, turn off your radio in any area where posted notices instruct you to do so. -
Page 4: Product Inspection
Product Inspection Please unpack the package box carefully and check that all items shipped are received; report any missing or damaged items to your dealer. Accessories Item Qty. (PCS) Antenna Belt Clip Strap Battery Rapid-Rate Charger Switching Power Owner’s Manual Rapid-Rate Charger (for Switching Power (different P/N for Li-Ion Battery... -
Page 5: Radio Overview
Radio Overview (1) Power On/Off Key (2) PTT (Push-to-Talk) Key (3) SK1 (Side Key 1) (4) SK2 (Side Key 2) (5) Antenna (6) LED Indicator (7) Channel Selector Knob (8) Channel Indicator (9) Volume Control Knob (10) Microphone (11) Speaker (12) Battery Latch (13) Accessory Jack (14) Accessory Jack Cover... - Page 6 press functions by your dealer. Note: Short Press Key press no longer than 1 second. Long Press Key press longer than 1 second. *LED Indicator LED indications and alert tones are shown in the table below (see Advanced Operations for details): Status LED Indication and Alert Tone 1.
-
Page 7: Battery Information
beep is heard. 3. Green LED solidly glows when signal is received. 4. Scan Stop Tone (programmable by your dealer): one beep is heard. Switch to low power: a low pitched tone is heard. Power Adjust Switch to high power: a high pitched tone is heard VOX/Compandor/Scrambler/ Enable functions: one beep is heard. - Page 8 household waste. Never attempt to disassemble the battery. Battery Tips When charging your battery, keep it at a temperature among 5 ℃ - 40 ℃ . Temperature out of the limit may cause battery leakage or damage. When charging a battery attached to a radio, turn the radio off to ensure a full charge. Do not return fully charged batteries to the charger for an “extra boost”.
- Page 9 Red LED solidly glows. Battery is charging. Green LED solidly glows. Battery is fully charged; Charger is ready to charge. Charging Method 1 Please follow the steps below: 1. Plug the AC connector of the adapter into the AC outlet socket. 2.
-
Page 10: Antenna Information
Figure 1 Assembly Diagram of Multi-unit Charger 图1:排充组装示意图 The assembled multi-unit charger can work with HYT Six-Unit Switching Power, to charge up to six batteries simultaneously, as shown in figure 2. Please refer to Owner’s Manual for Six-Unit Switching Power for detailed operation procedures. -
Page 11: Assembly And Disassembly
makes it ideal for wearing your radio on the belt. Communication range may vary with terrain and your operating conditions. Rainy days or forest locations may narrow your communication range. Please make preparation in advance to avoid potential inconvenience. Assembly and Disassembly Attaching/Removing the Battery Attaching the Battery... -
Page 12: Attaching/Removing The Antenna
Figure 3 Figure 4 Attaching/Removing the Antenna Attaching the Antenna Align the threaded end of the antenna with the radio’s antenna connector. Turn the antenna clockwise until it is screwed down, shown as figure 5. Removing the Antenna Turn the antenna counter-clockwise until it is loosened and screwed out. Figure 5 Attaching/Removing the Belt Clip Attaching the Belt Clip... -
Page 13: Attaching/Removing The Earpiece Or Microphone
clockwise screw down the belt clip. See figure 6 below. Figure 6 Removing the Belt Clip Turn the screwdriver counter-clockwise to loosen the screw. Please refer to the operations for attaching the belt clip. Attaching/Removing the Earpiece or Microphone Attaching the Earpiece/Microphone Open (not remove) the accessory jack cover. -
Page 14: Basic Operations
Figure 7 Removing the Earpiece/Microphone Loosen the screw and then remove the audio accessories. Note: Use of audio accessory may affect the waterproof performance of the radio. Basic Operations Turning the Radio On/Off To turn on the radio, hold down the Power On/Off key for about 1 second, and then the radio sounds power-on alert tone. -
Page 15: Selecting A Channel
Selecting a Channel Turn the Channel Selector Knob to select a channel; the channel No. pointed by the channel indicator is the currently selected channel. Transmitting To transmit, press and hold down the PTT, speak into the microphone. Ensure the radio is 2.5 to 5 centimeters away from your lips. -
Page 16: Advanced Operations
Battery Strength Indicator Channel Lock Advanced Operations The following functions are programmable by your dealer. CTCSS/CDCSS Set up talkgroups with unique CDCSS/CTCSS to prevent unwanted conversations on the same frequency. If CTCSS/CDCSS is set on the current channel, CTCSS/CDCSS match is required for the radio to unmute to an incoming signal. -
Page 17: Time-Out Timer (Tot)
Your dealer may program the alert tone that sounds before the TOT timer nearly expires. Battery Strength Indicator TC-518 allows you to simply press the programmed Battery Strength Indicator key to illuminate the LED battery gauge, which gives different indications representing battery strength levels. -
Page 18: Scan
Press the function key to enter the Squelch Off mode, and press it again to exit. Squelch Off Momentary Causes the radio to forcibly unmute speaker to hear activities on the current channel, whatever the receive condition is. The radio speaker outputs audio when audio signal is present, or background noise will be heard if no audio signal is detected. - Page 19 Figure 1 Priority Channel Scan If you prioritize Channel 2 as Priority 1, the scan operation would proceed in the following sequence, as shown in figure 2. Figure 2 Scan On/Off You can enter scan mode through the following two methods: a.
-
Page 20: Busy Channel Lockout (Bcl)
The radio automatically exits from scan mode when it is switched to another channel. c. Turn the radio off. Talk Back Defines whether the user is able to PTT the radio and talk back on the channel on which the radio currently stops. -
Page 21: Voice Operated Transmit (Vox)
Voice Operated Transmit (VOX) You can transmit hands free with the use of optional accessories. The radio will automatically begin transmitting when you speak, and terminate transmitting when you stop talking. Your dealer can enable/disable the VOX feature, and set the VOX sensitivity. When the feature is enabled, you can follow these steps to transmit hands free: Select the PTT/VOX switch on the earpiece to VOX. -
Page 22: Compandor
Note: To order accessories, please contact your local dealer. Compandor This feature secures high quality communication even in high noise environment. Your dealer may enable the VOX function for certain channels, and users may enable or disable the function through the programmed function key. The radio sounds one beep when the feature is enabled, and two continuous beeps when the feature is disabled. -
Page 23: Troubleshooting
Troubleshooting Symptom Solution The battery has run out. Please recharge the battery or replace it with a new one. Cannot power on the radio. The battery is not properly installed. Please remove the battery and attach it again. ... -
Page 24: Care And Cleaning
Group members are too far away to receive their call. Please go within the Noise always on communication range and re-power on the radio to try. Care and Cleaning Do not hold the radio by its antenna or external earpiece directly. ... - Page 25 Note: Pictures are for reference only and may vary from actual product. Product function shall remain the same. HYT endeavors to achieve the accuracy and completeness of this manual, but no warranty of accuracy or reliability is given. All the above specifications and design are subject to change without prior notice due to continuous development.
Need help?
Do you have a question about the TC-518 and is the answer not in the manual?
Questions and answers